
ARTFUL EXPERIENCES
Hall Of Mirrors
Paint right onto your reflection and see yourself in all the art!
Bookmark
Installations

The Set Up
Cover a wall with sticky backed mirror sheets at different heights, or gather every mirror you can find. Big old frames make it feel dramatic. Second hand ones work beautifully. At Smudge we often hang empty frames so reflections become the portraits inside.
Set out trays of paint with chunky brushes. Choose a bold limited palette or go for a full rainbow. Standing at the wall feels different from sitting at a table. Movements are bigger, marks are looser, and confidence builds quickly.


The Making
Step up and paint what you see. Trace your outline. Add a friend beside you. Fill the frame with patterns and colour. Watch reflections overlap and change as more people join in.
Variations
Try paint sticks or chalk pens if you want something easy to wipe away.
Take the mirrors outside and let the sky or trees join the artwork.
Hand out smaller mirrors with paper for quieter, detailed portraits.
Materials
Sticky backed mirror sheets or loose mirrors
Empty frames (optional but beautiful)
Paint trays
Chunky brushes
Poster or tempera paint
Optional: paint sticks or chalk pens
Drop cloth or sheet for the floor
Back to Top
Hall Of Mirrors
Paint right onto your reflection and see yourself in all the art!
Bookmark
Installations
The Set Up
Cover a wall with sticky backed mirror sheets at different heights, or gather every mirror you can find. Big old frames make it feel dramatic. Second hand ones work beautifully. At Smudge we often hang empty frames so reflections become the portraits inside.
Set out trays of paint with chunky brushes. Choose a bold limited palette or go for a full rainbow. Standing at the wall feels different from sitting at a table. Movements are bigger, marks are looser, and confidence builds quickly.
The Making
Step up and paint what you see. Trace your outline. Add a friend beside you. Fill the frame with patterns and colour. Watch reflections overlap and change as more people join in.
Variations
Try paint sticks or chalk pens if you want something easy to wipe away.
Take the mirrors outside and let the sky or trees join the artwork.
Hand out smaller mirrors with paper for quieter, detailed portraits.
Materials
Sticky backed mirror sheets or loose mirrors
Empty frames (optional but beautiful)
Paint trays
Chunky brushes
Poster or tempera paint
Optional: paint sticks or chalk pens
Drop cloth or sheet for the floor
Back to Top
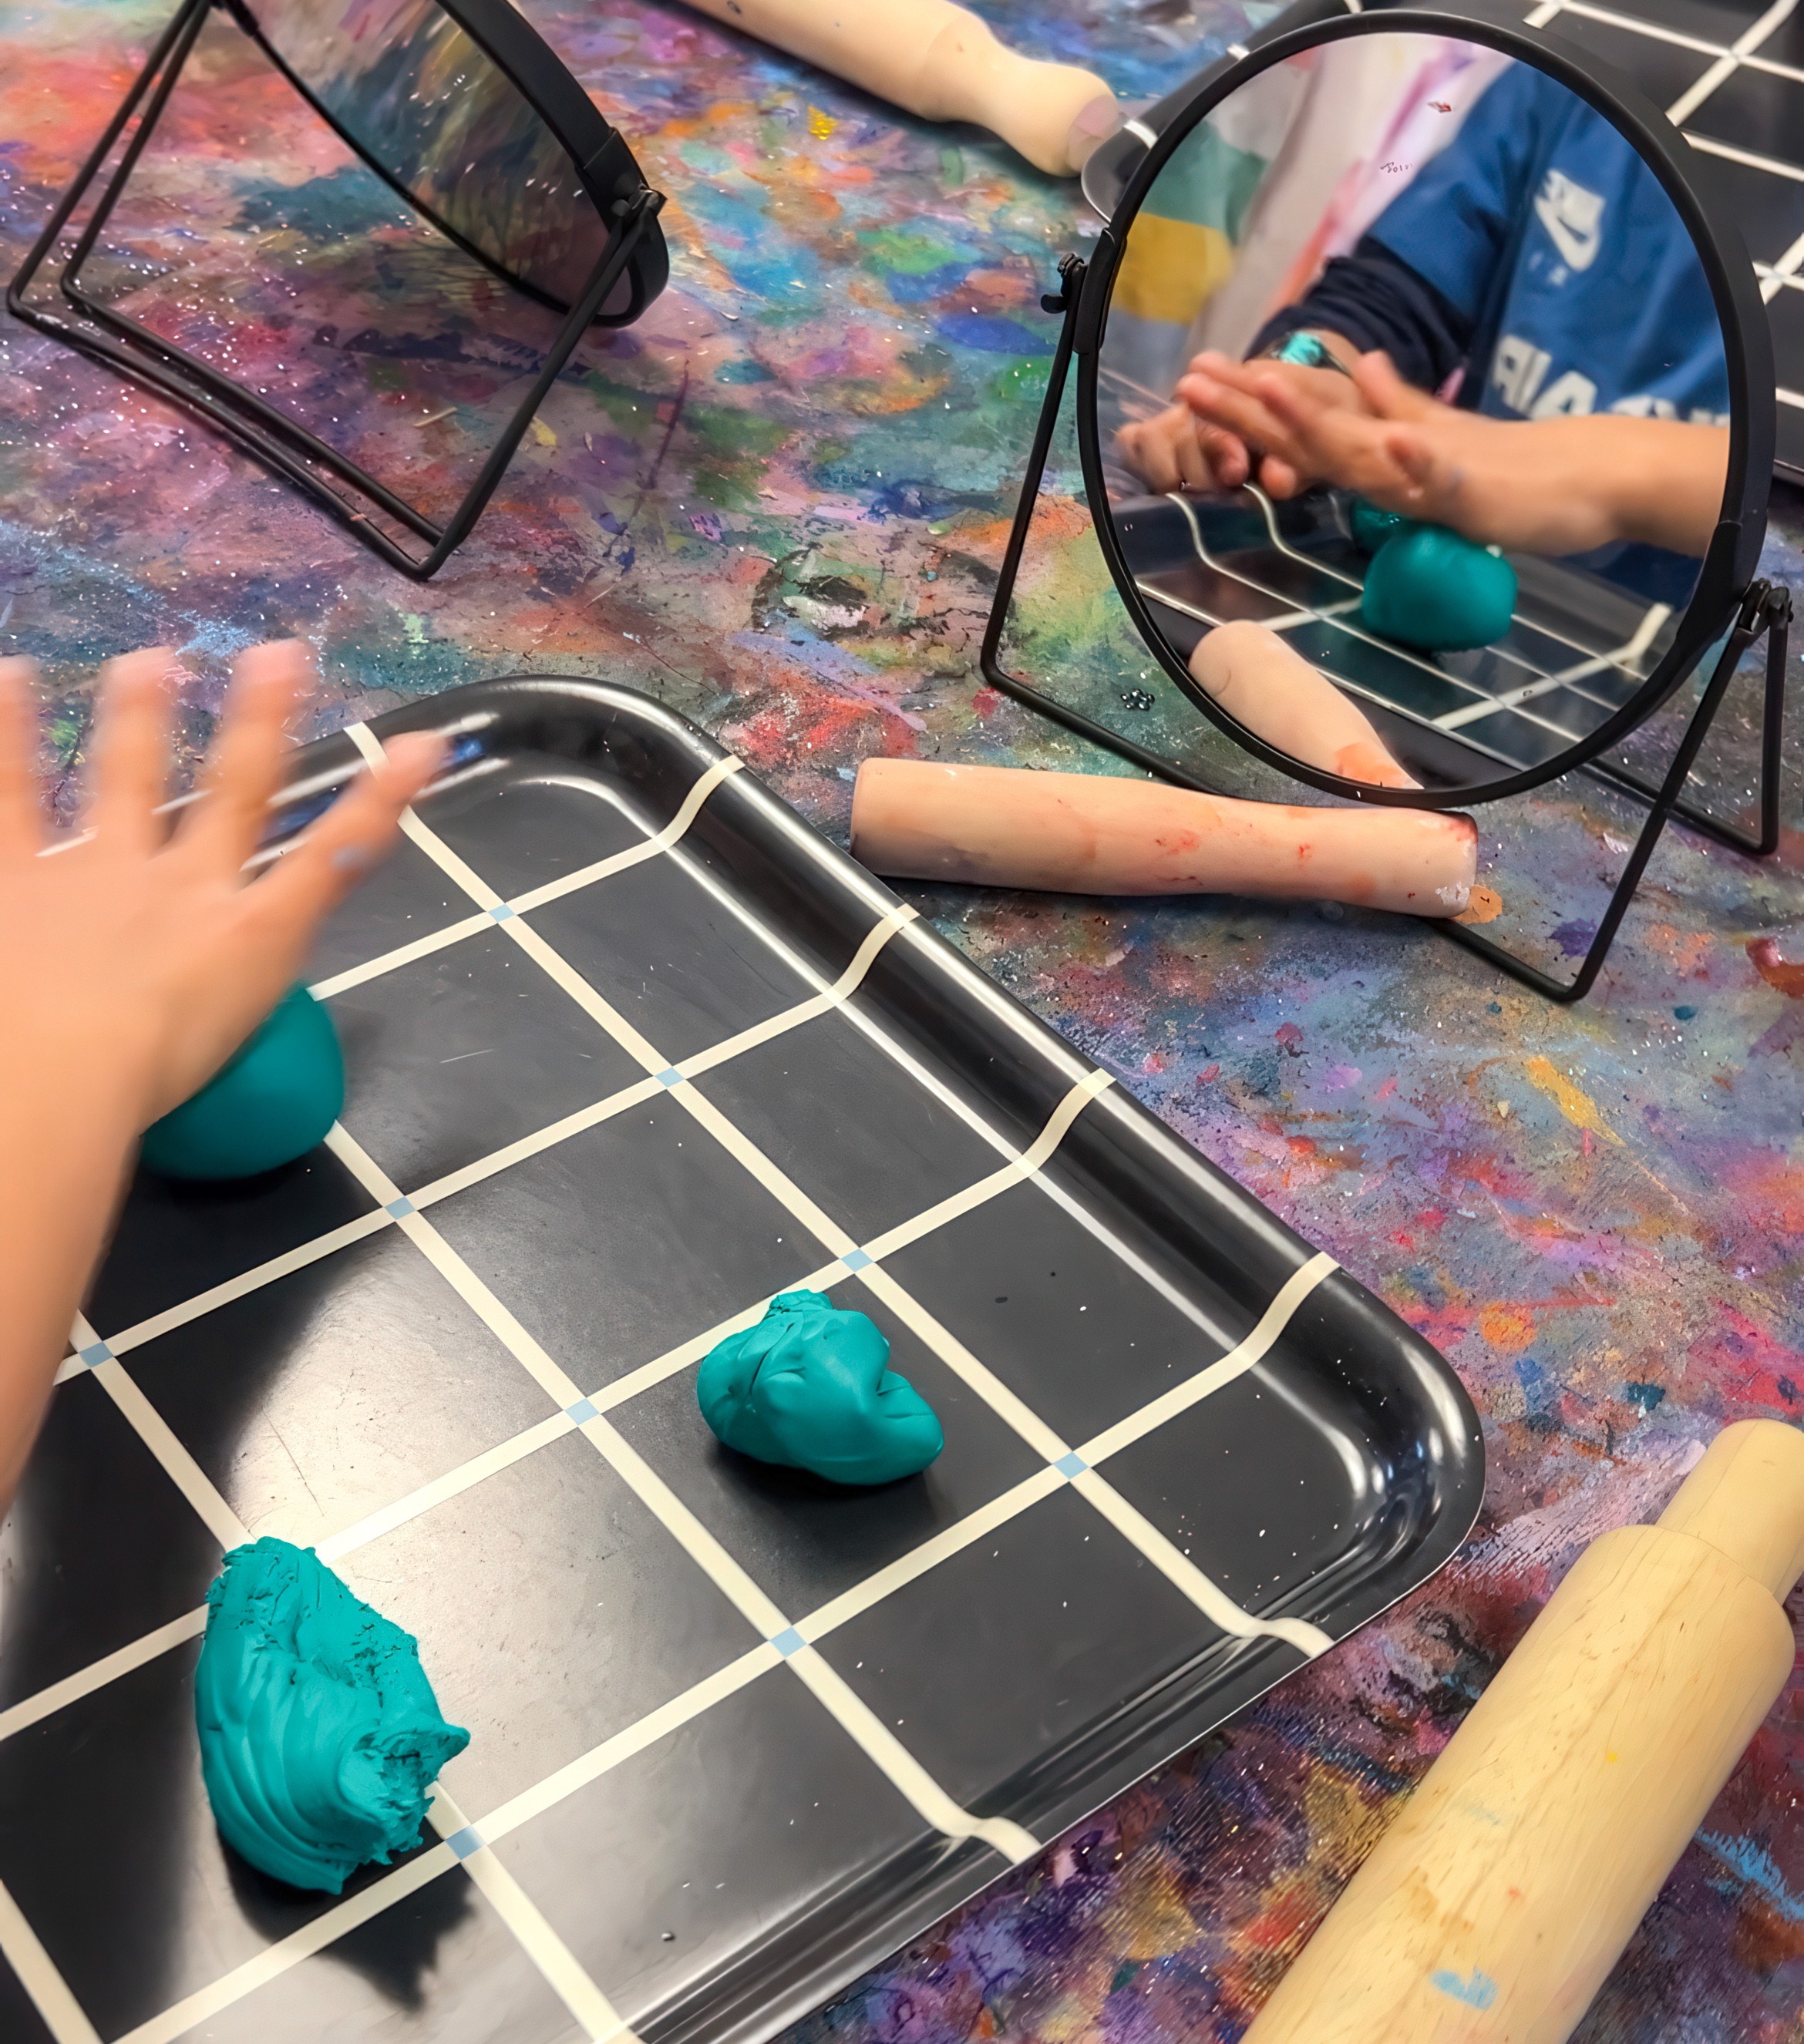
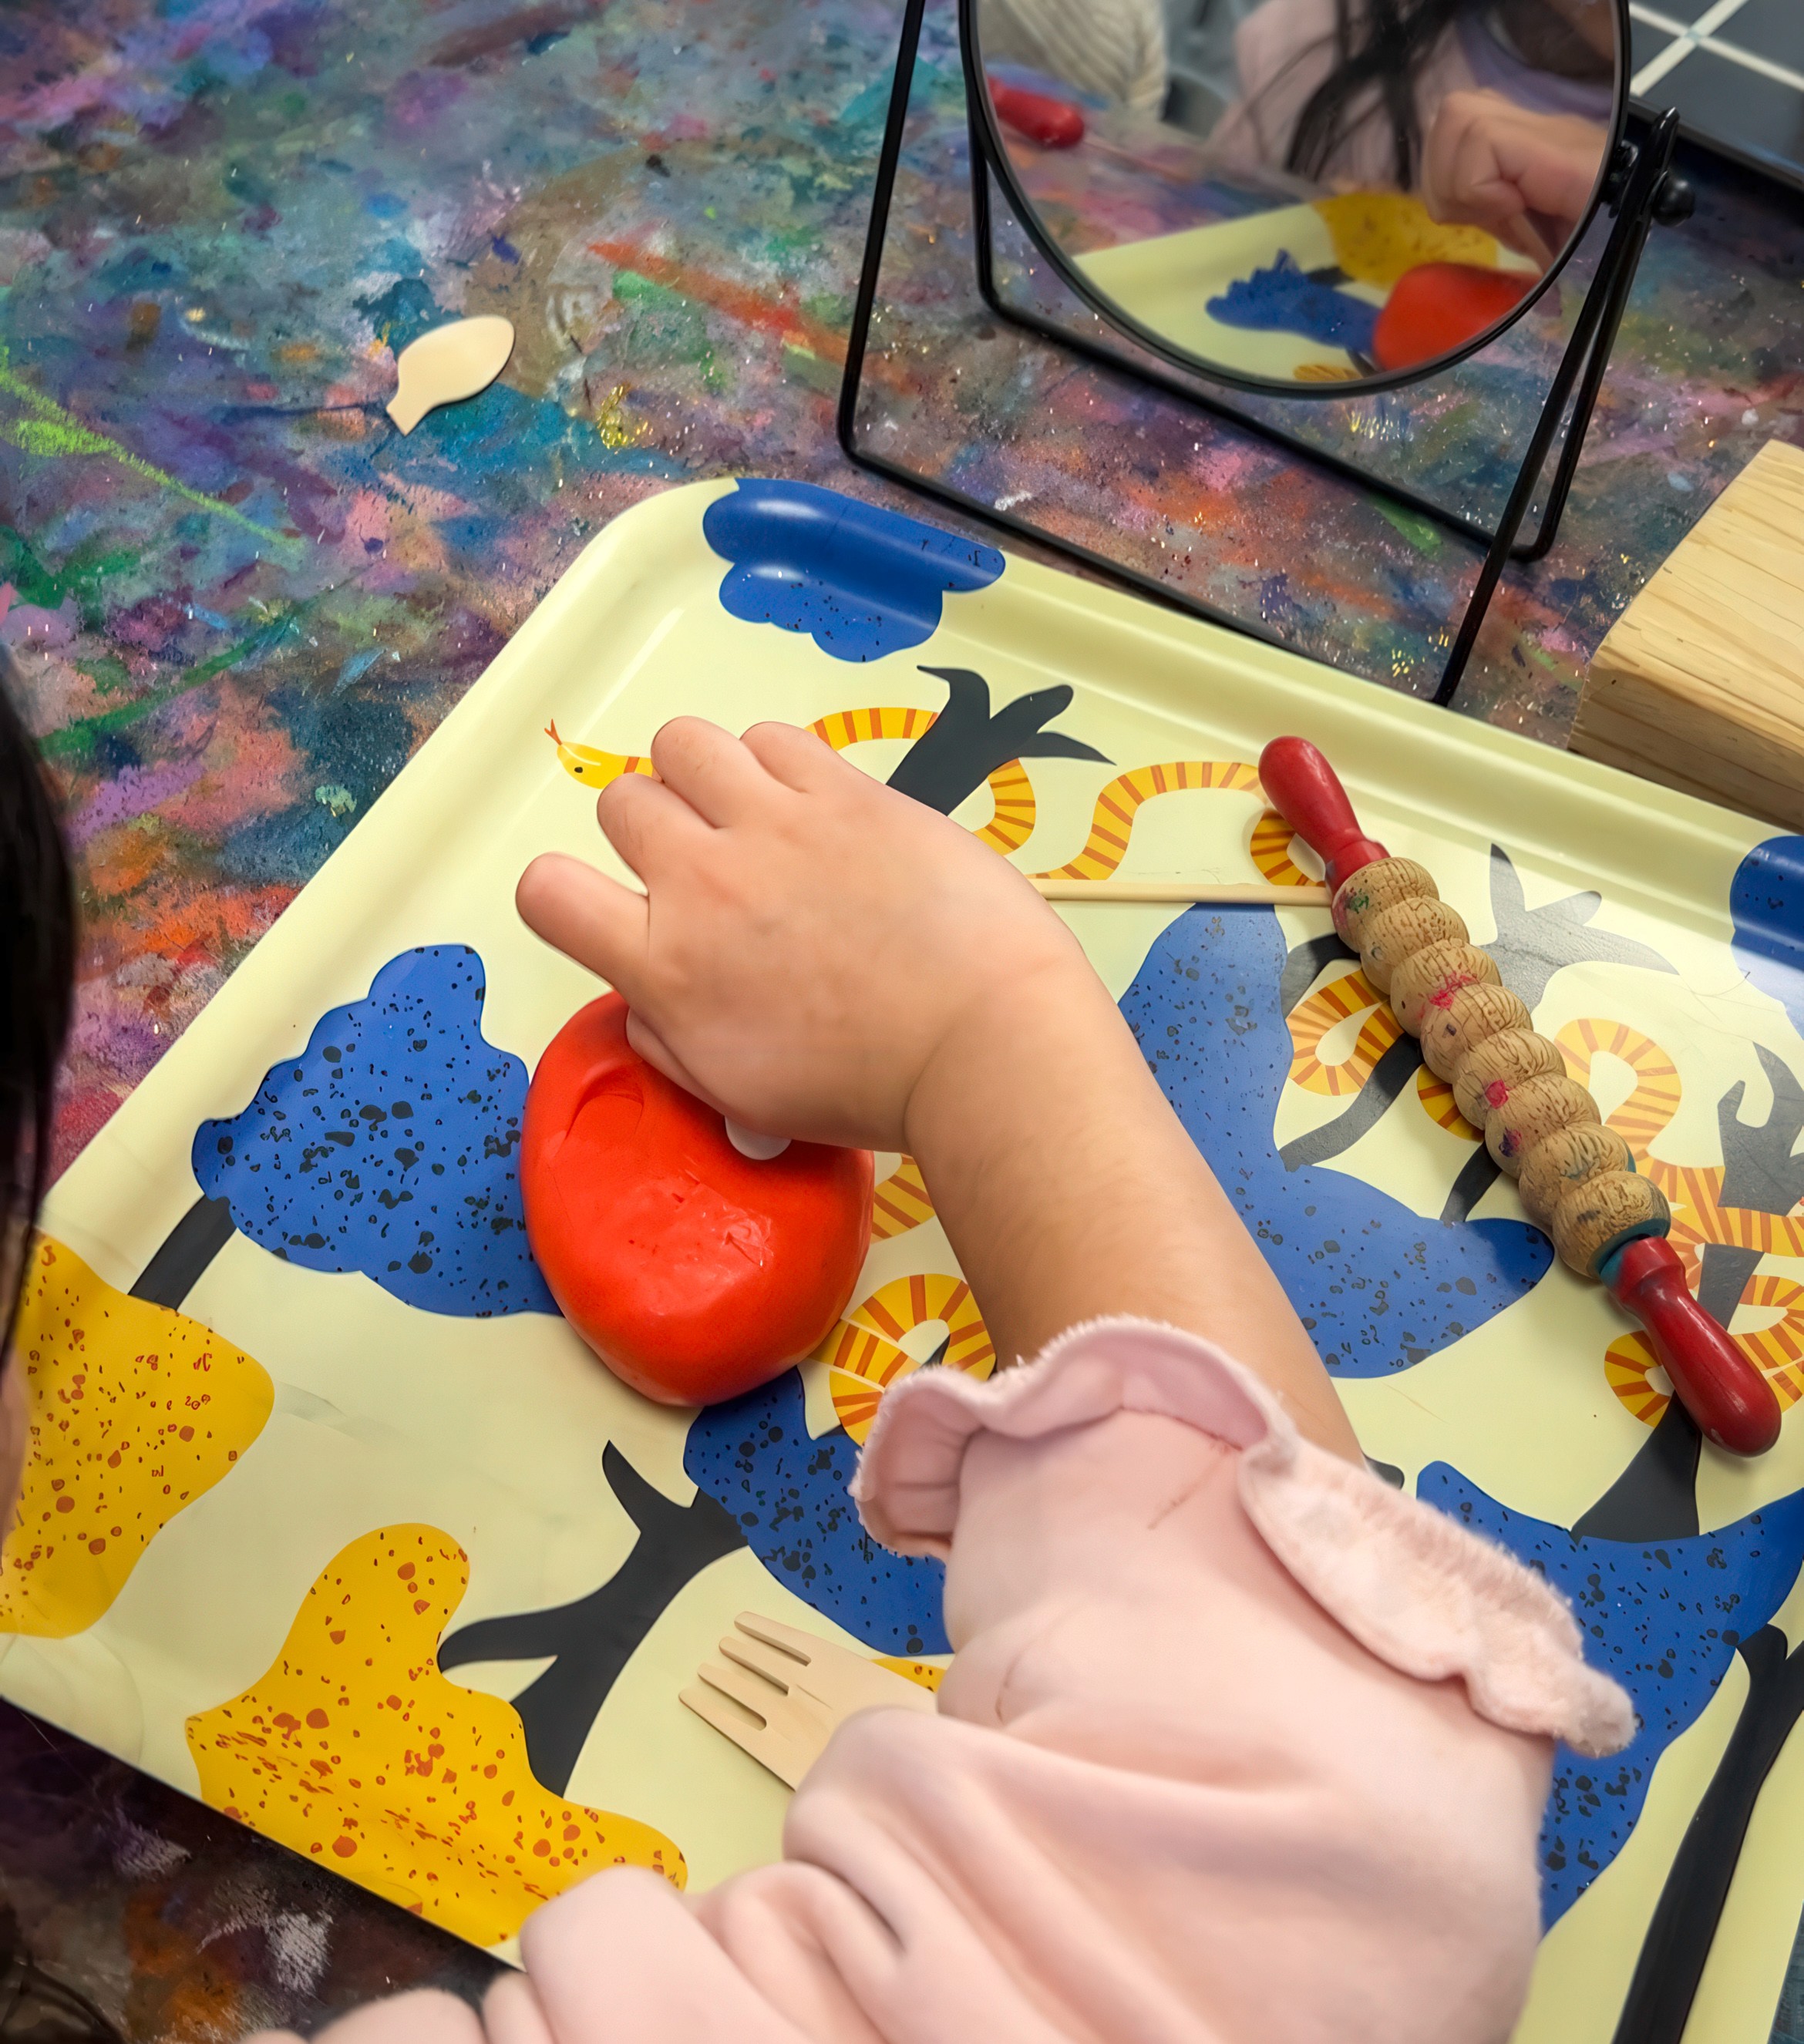
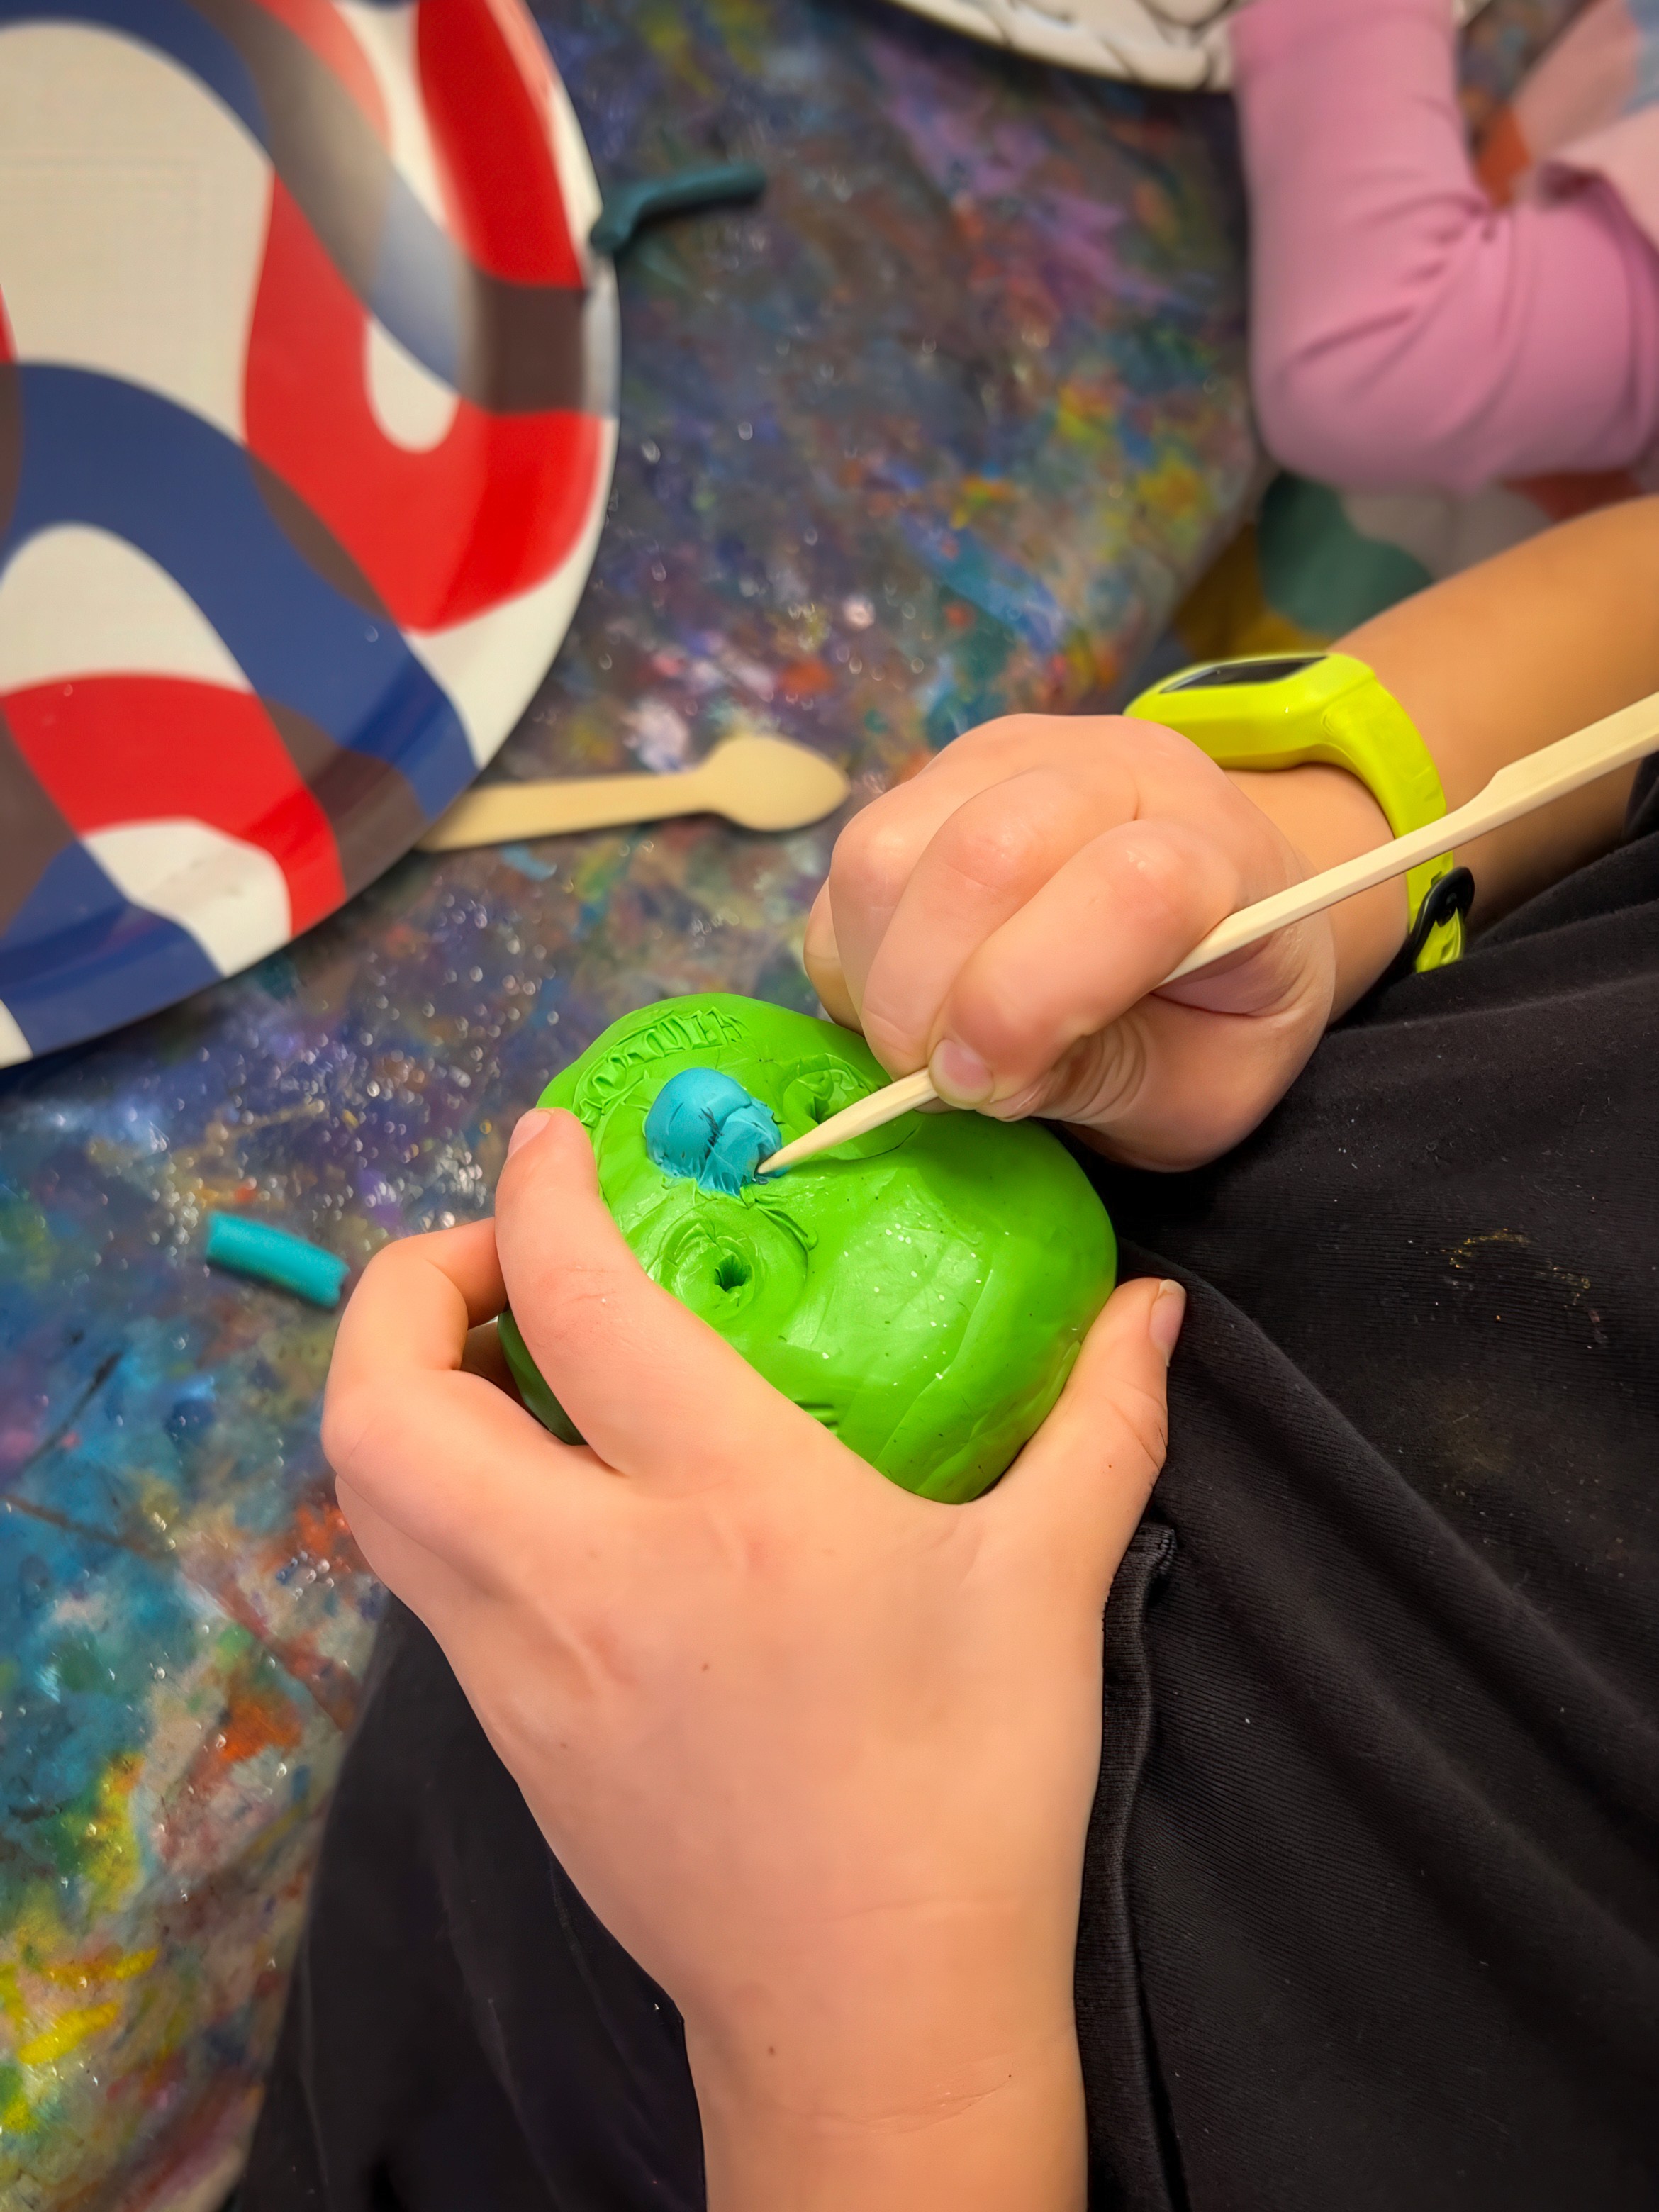
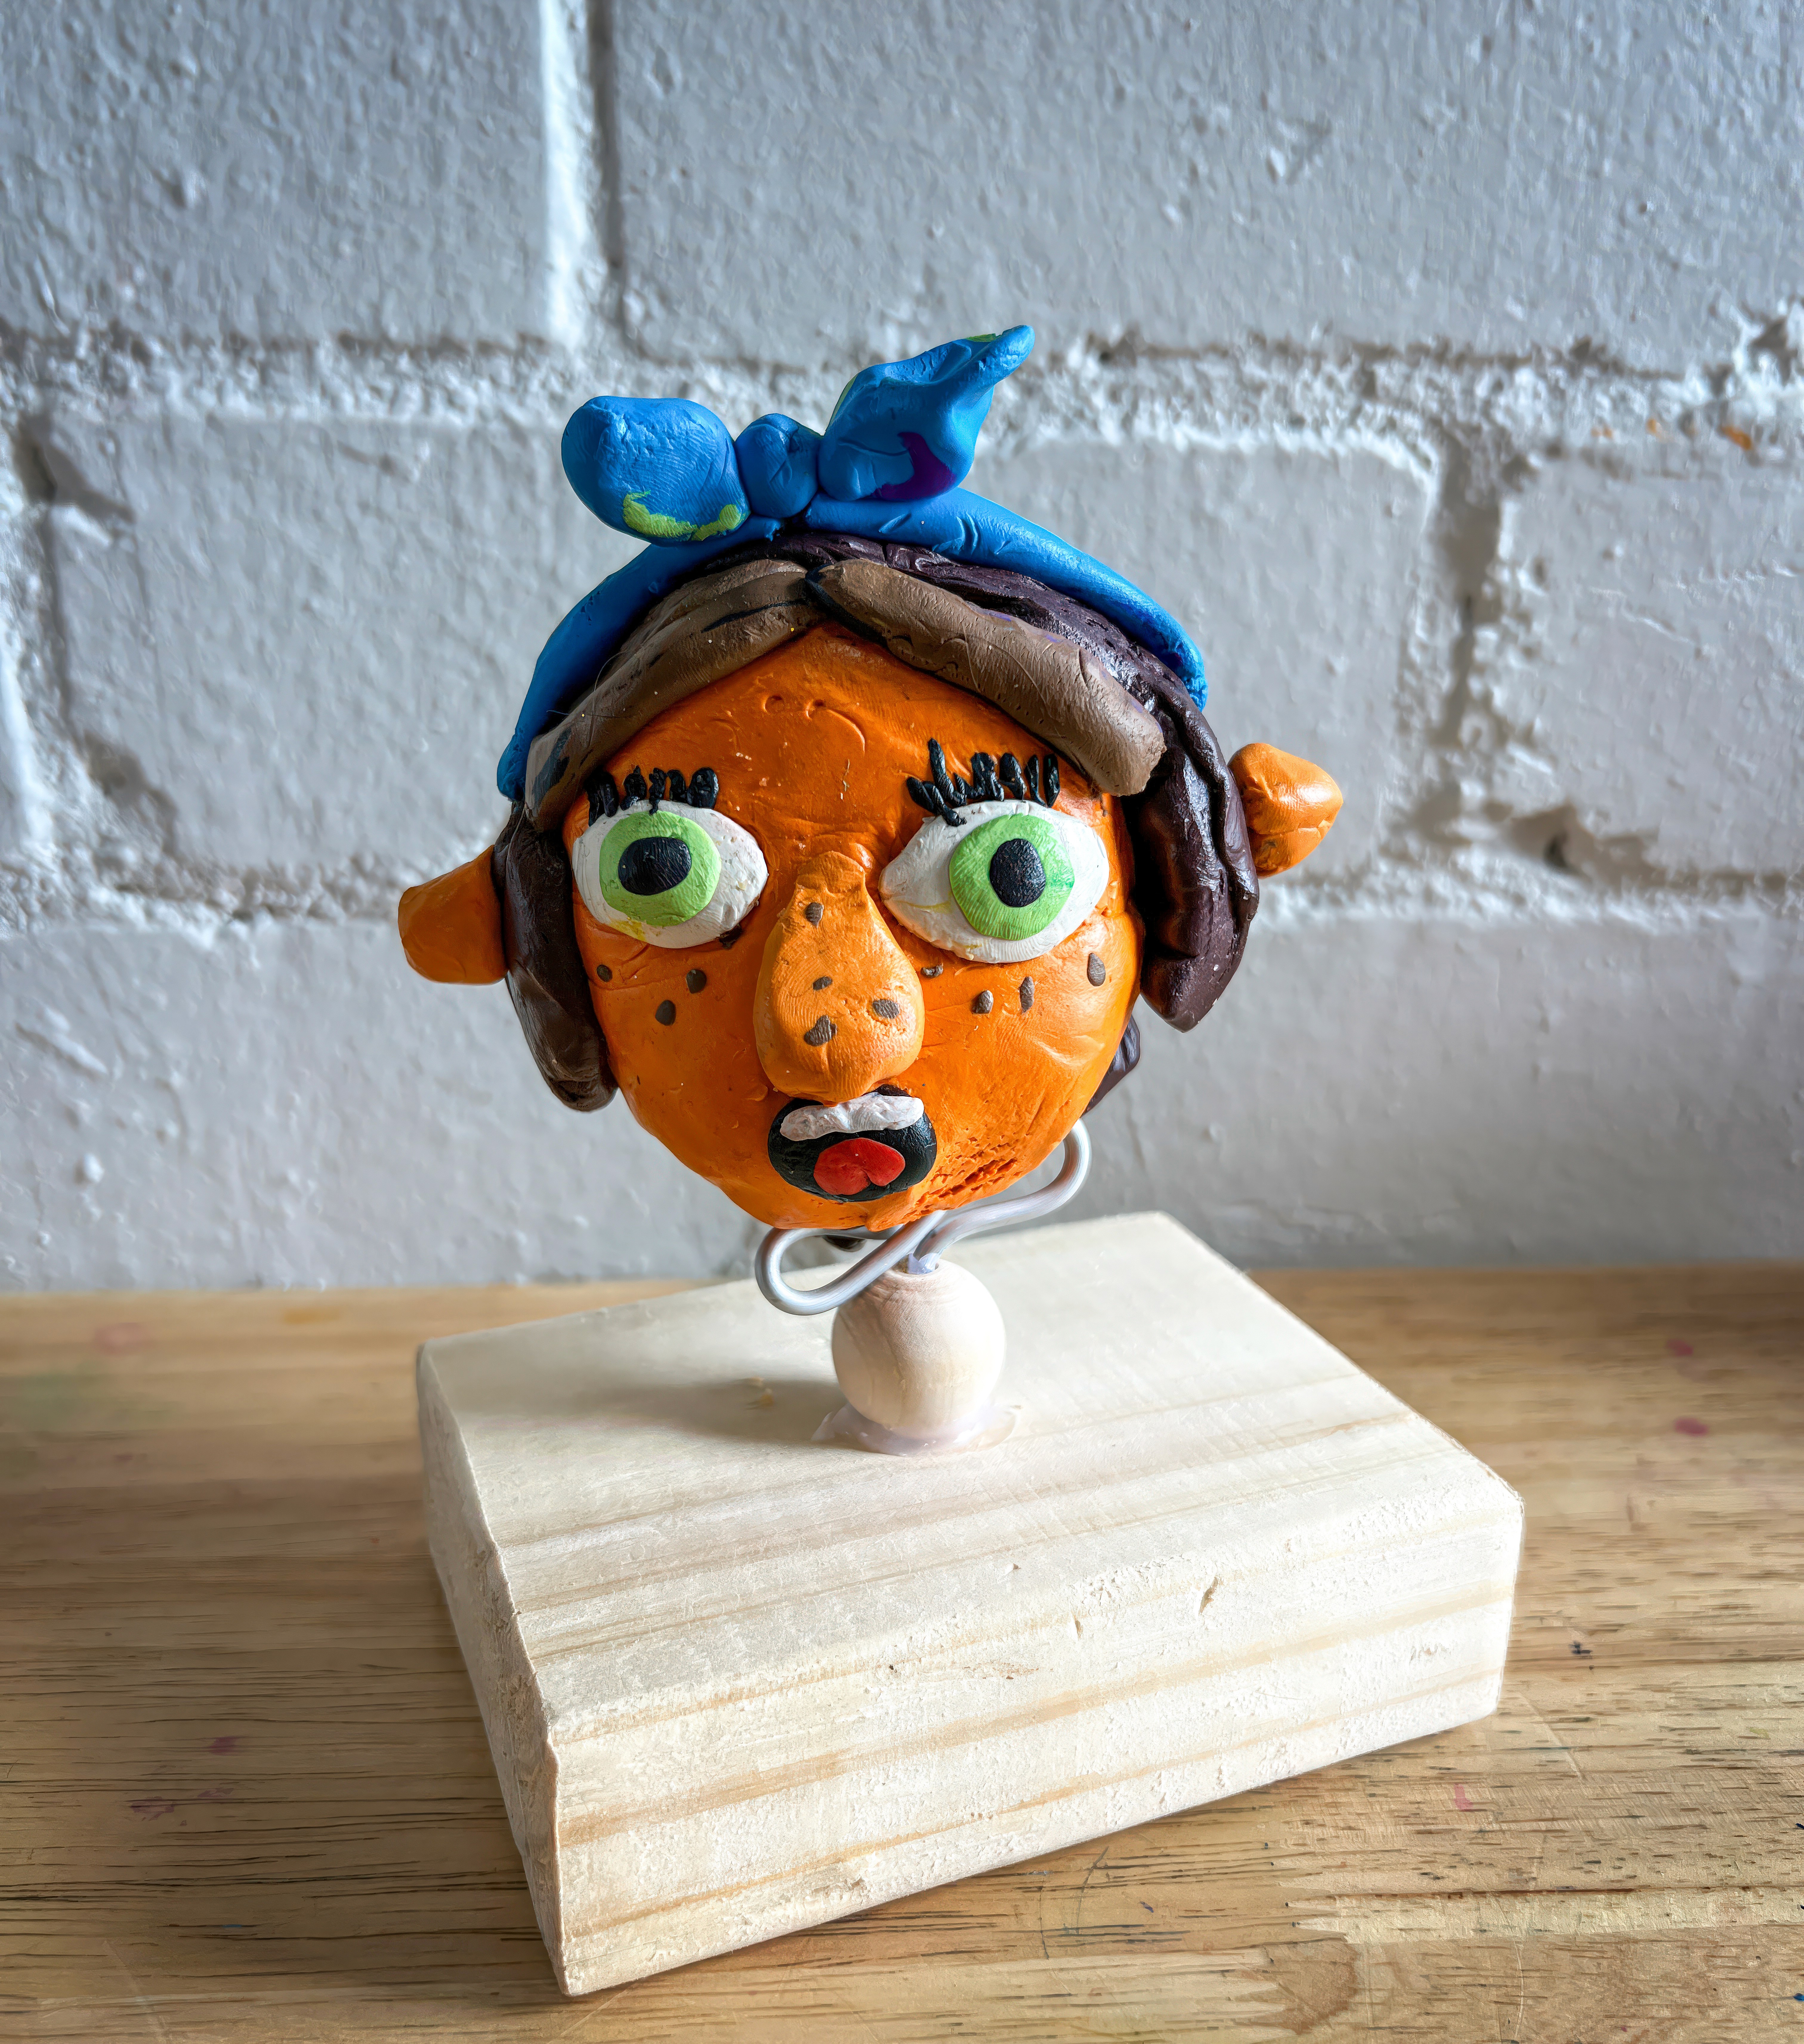
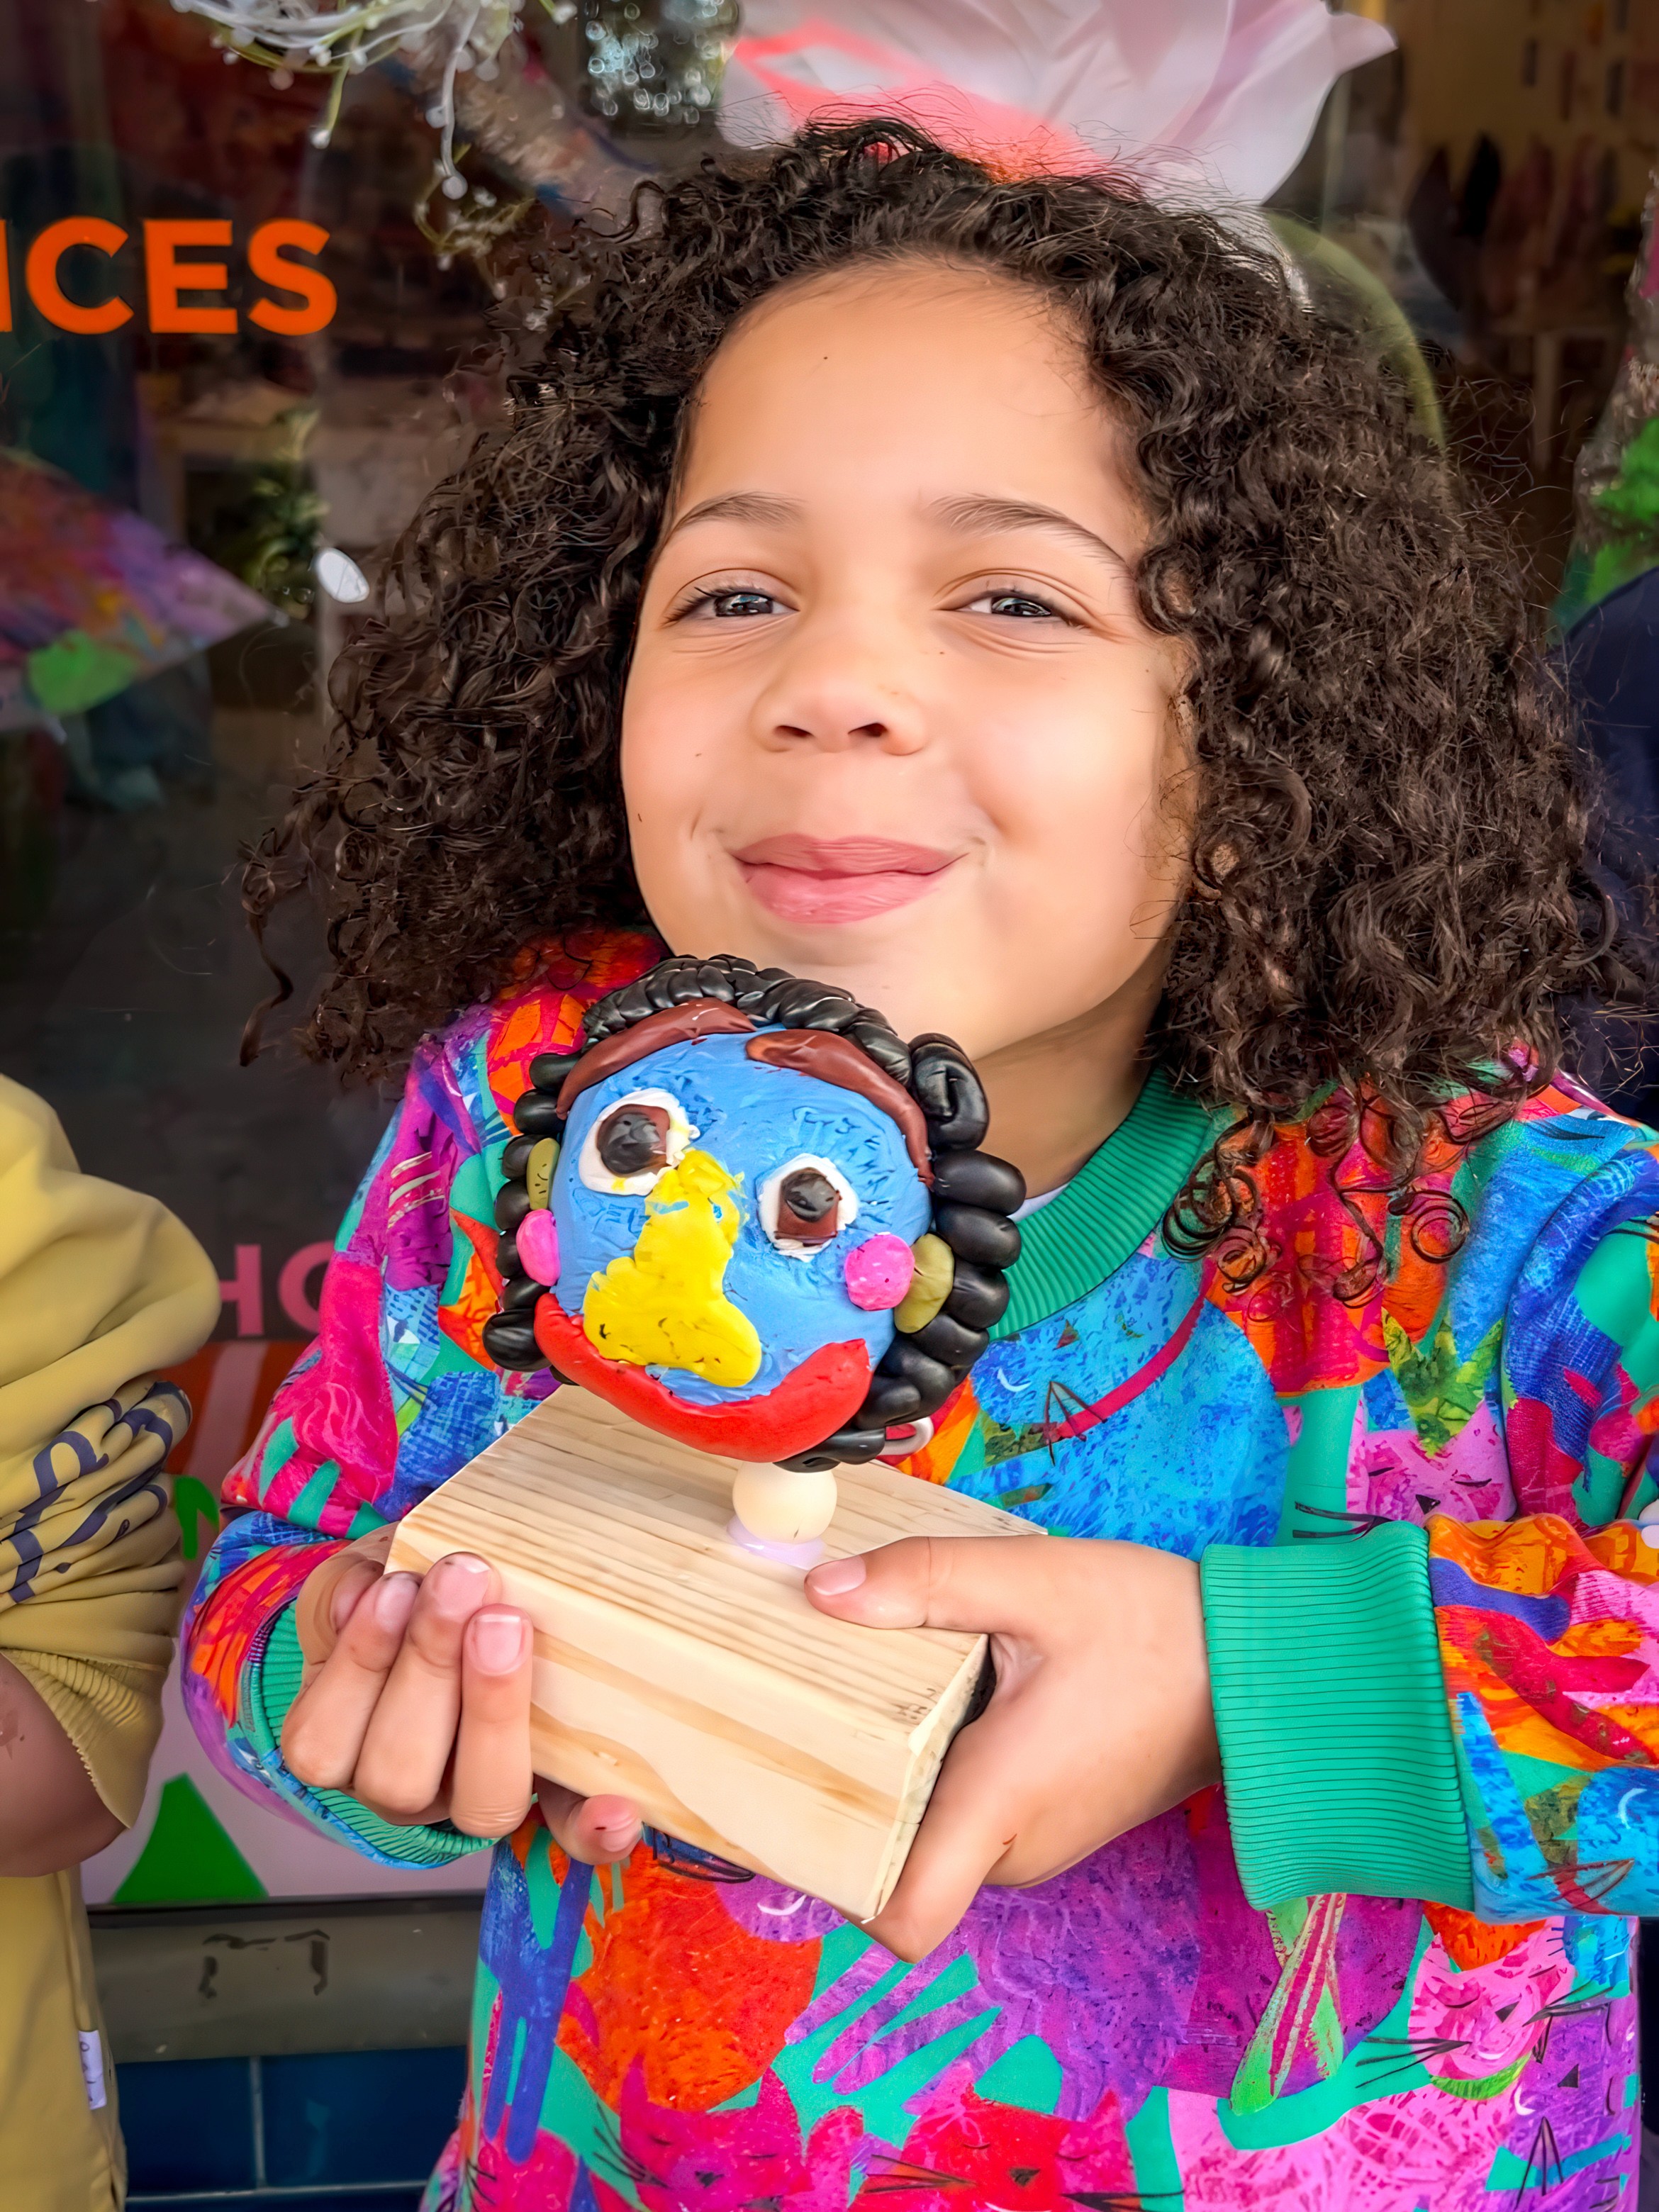
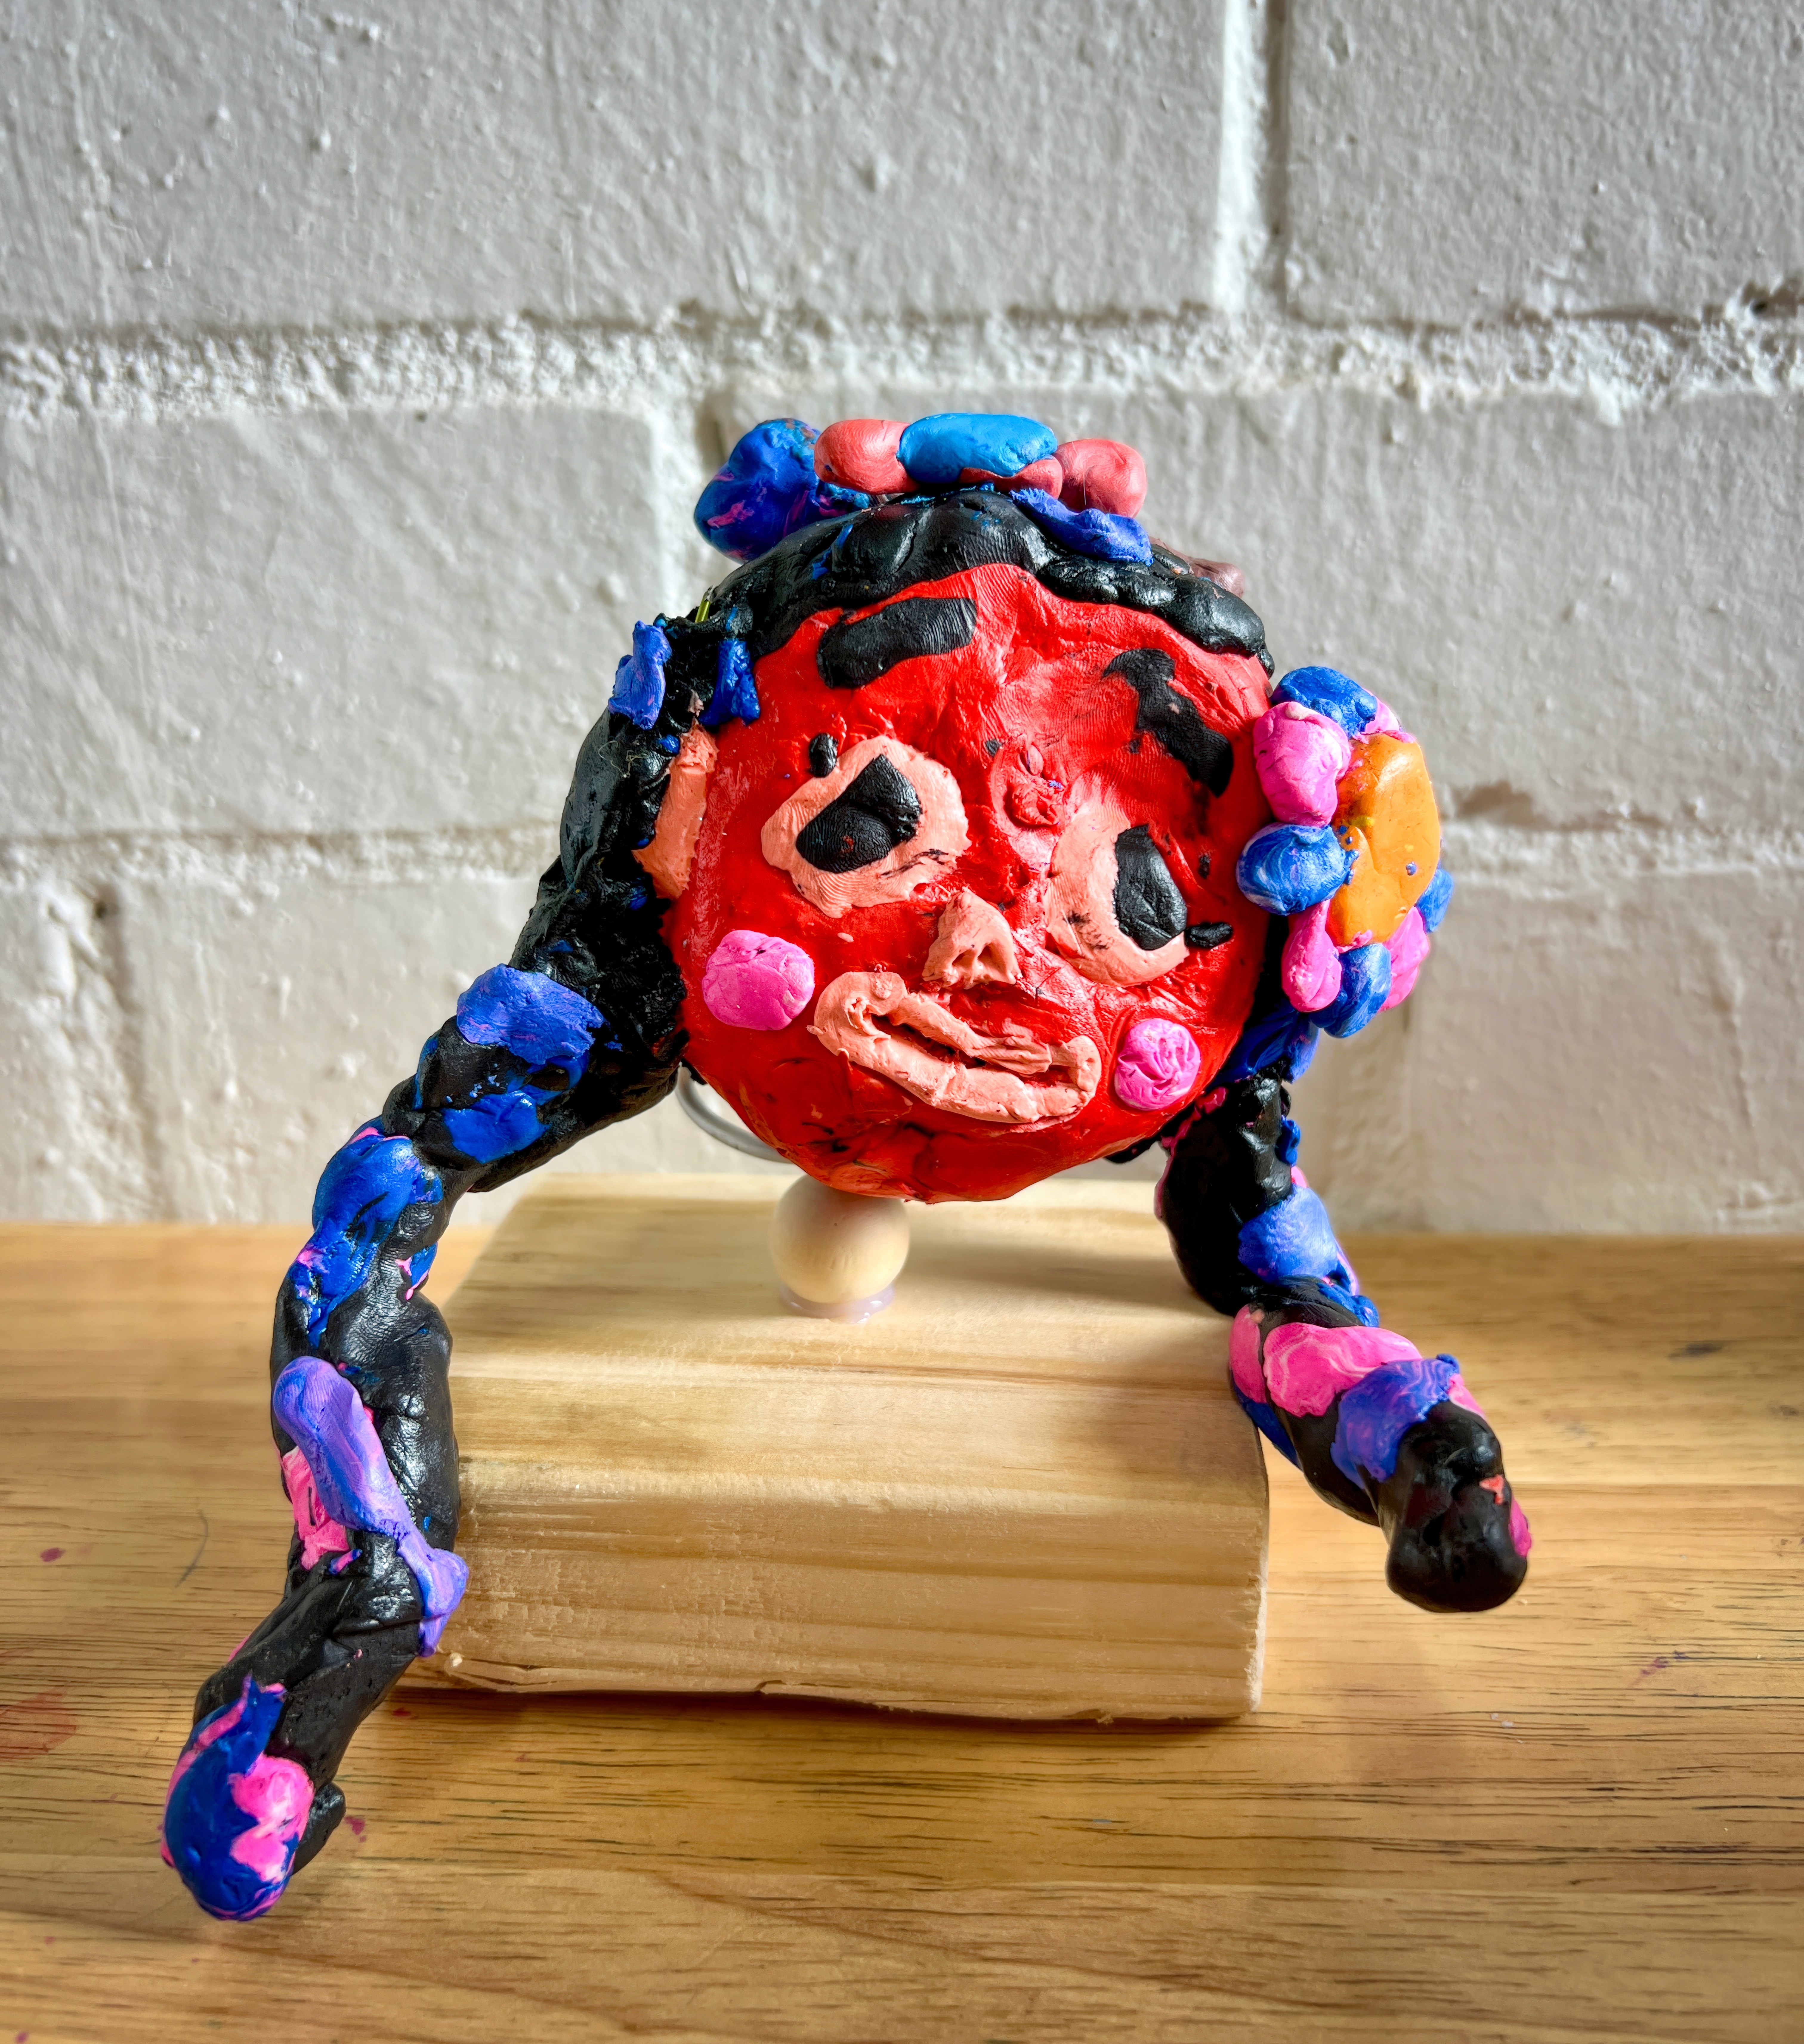
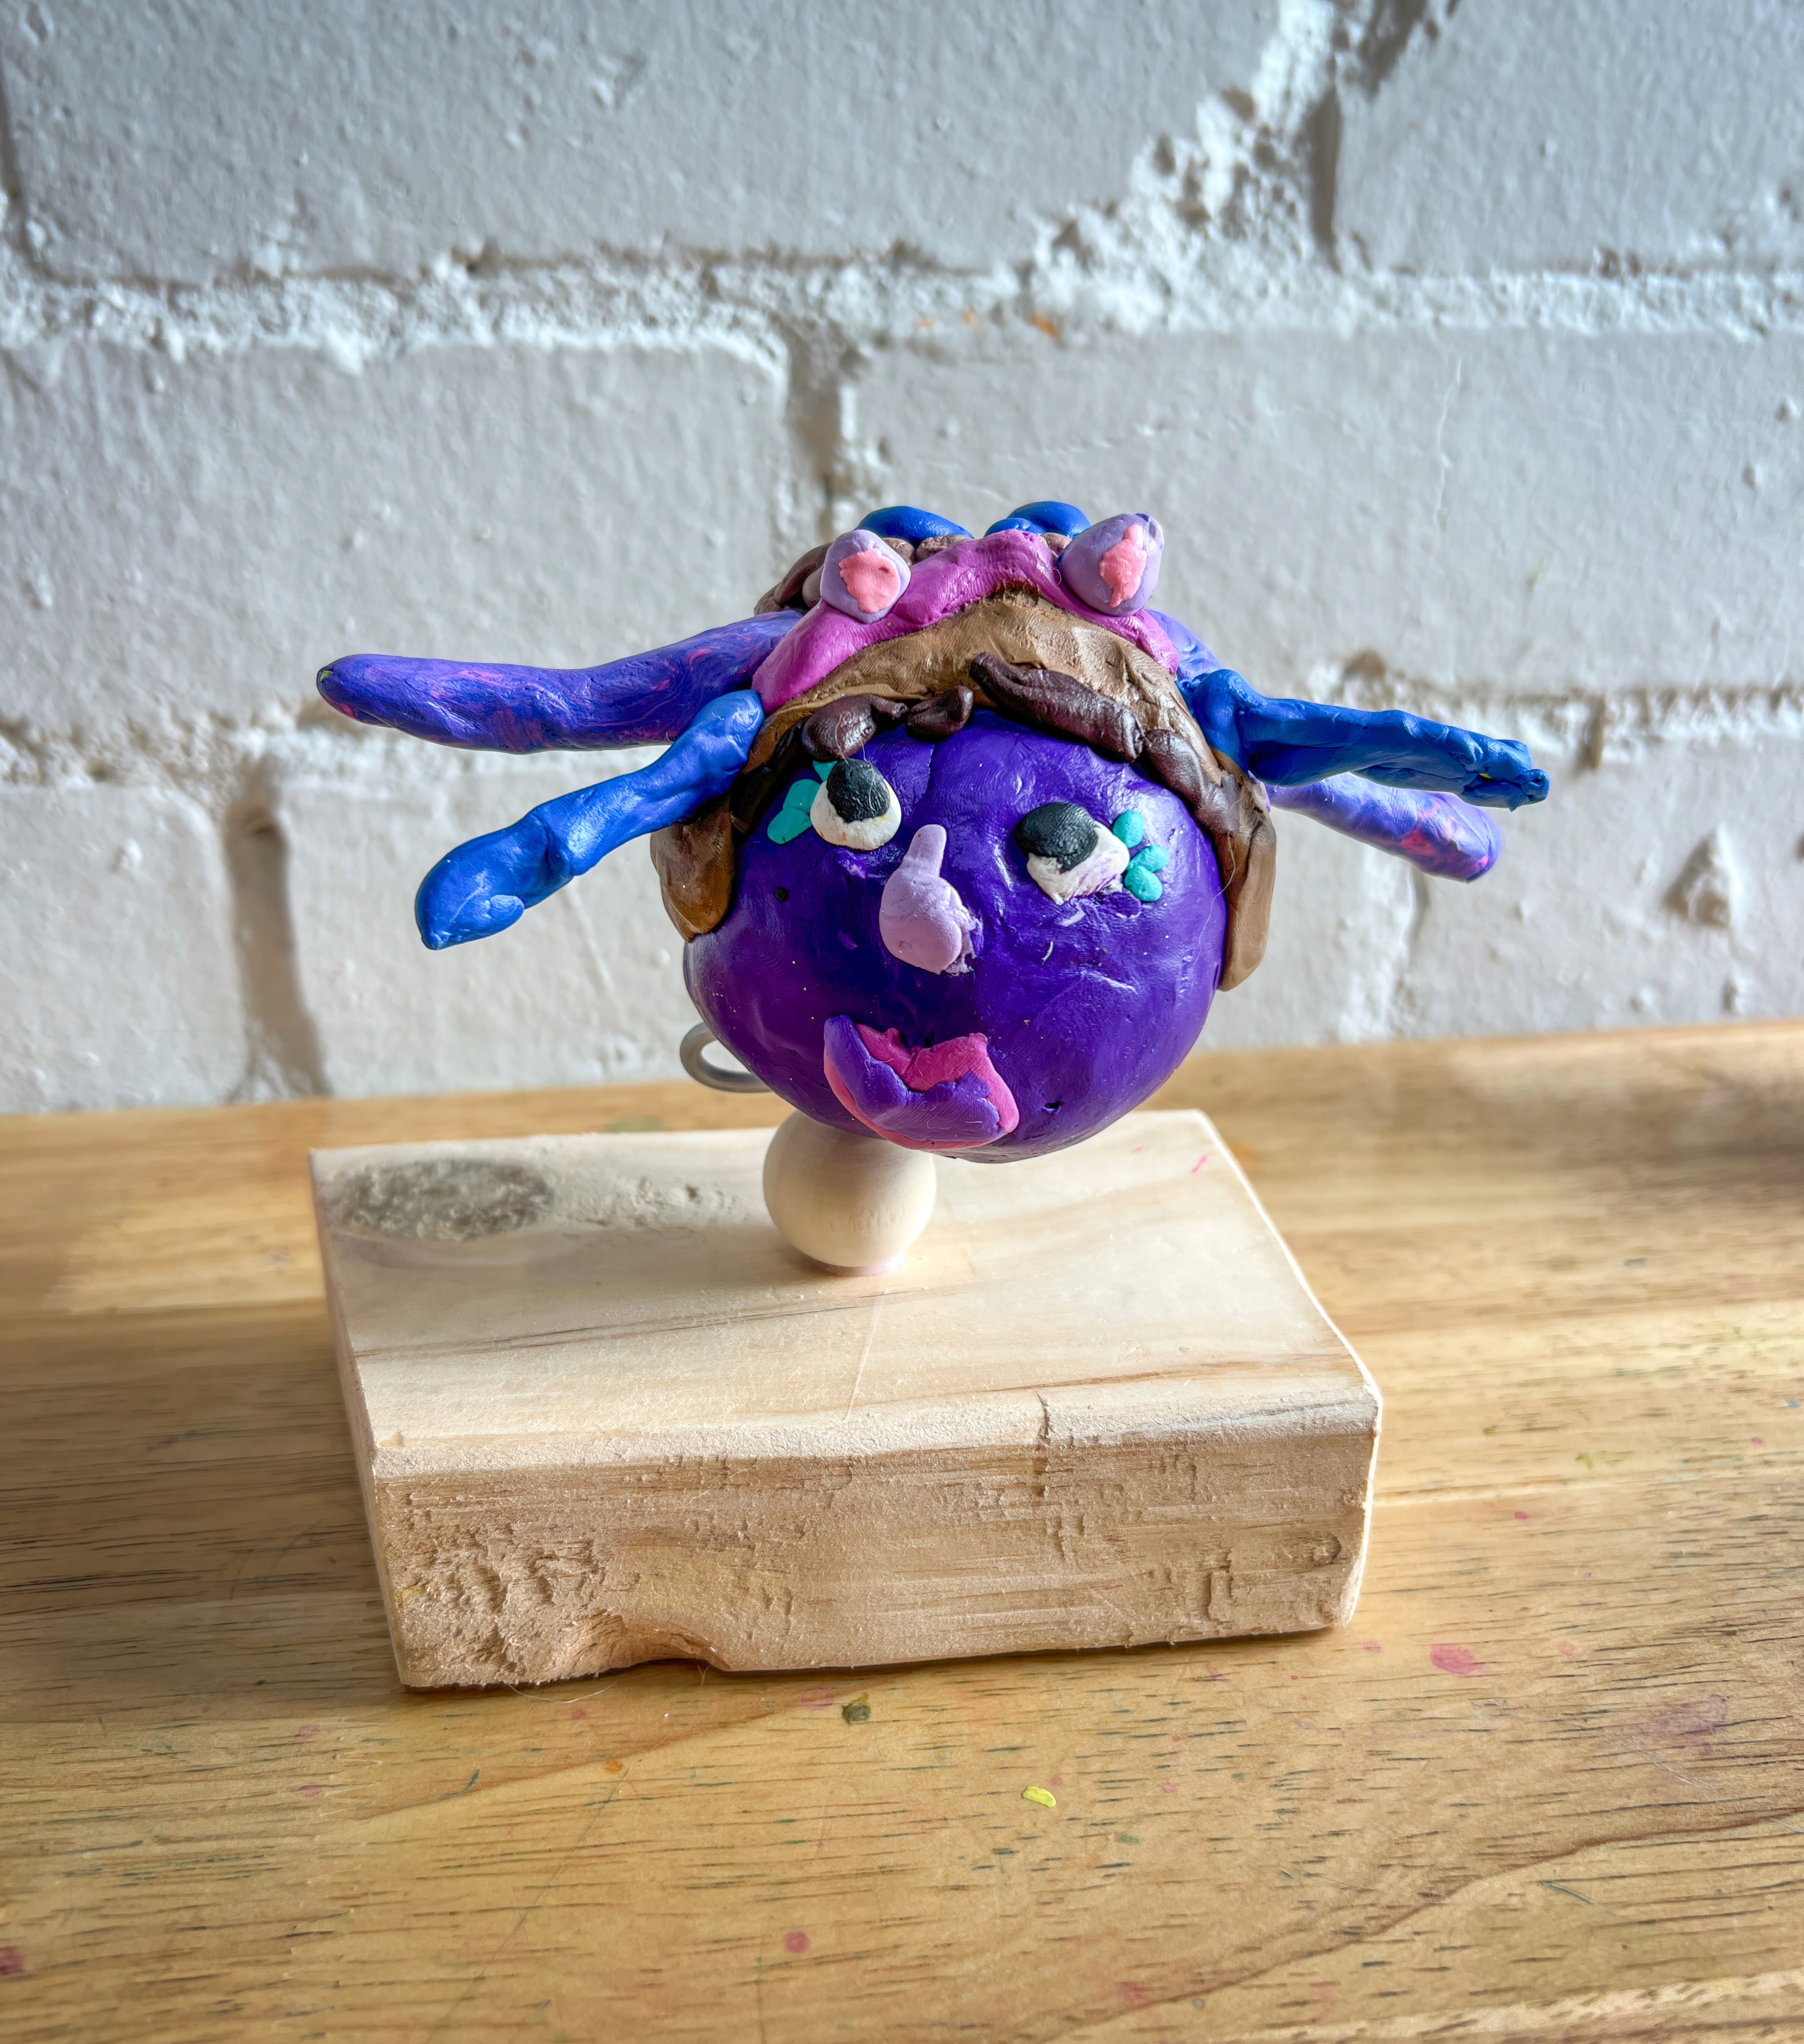
Plasticine Portrait Sculptures
Make a mini muse!
Bookmark
Sculpture

The Set Up
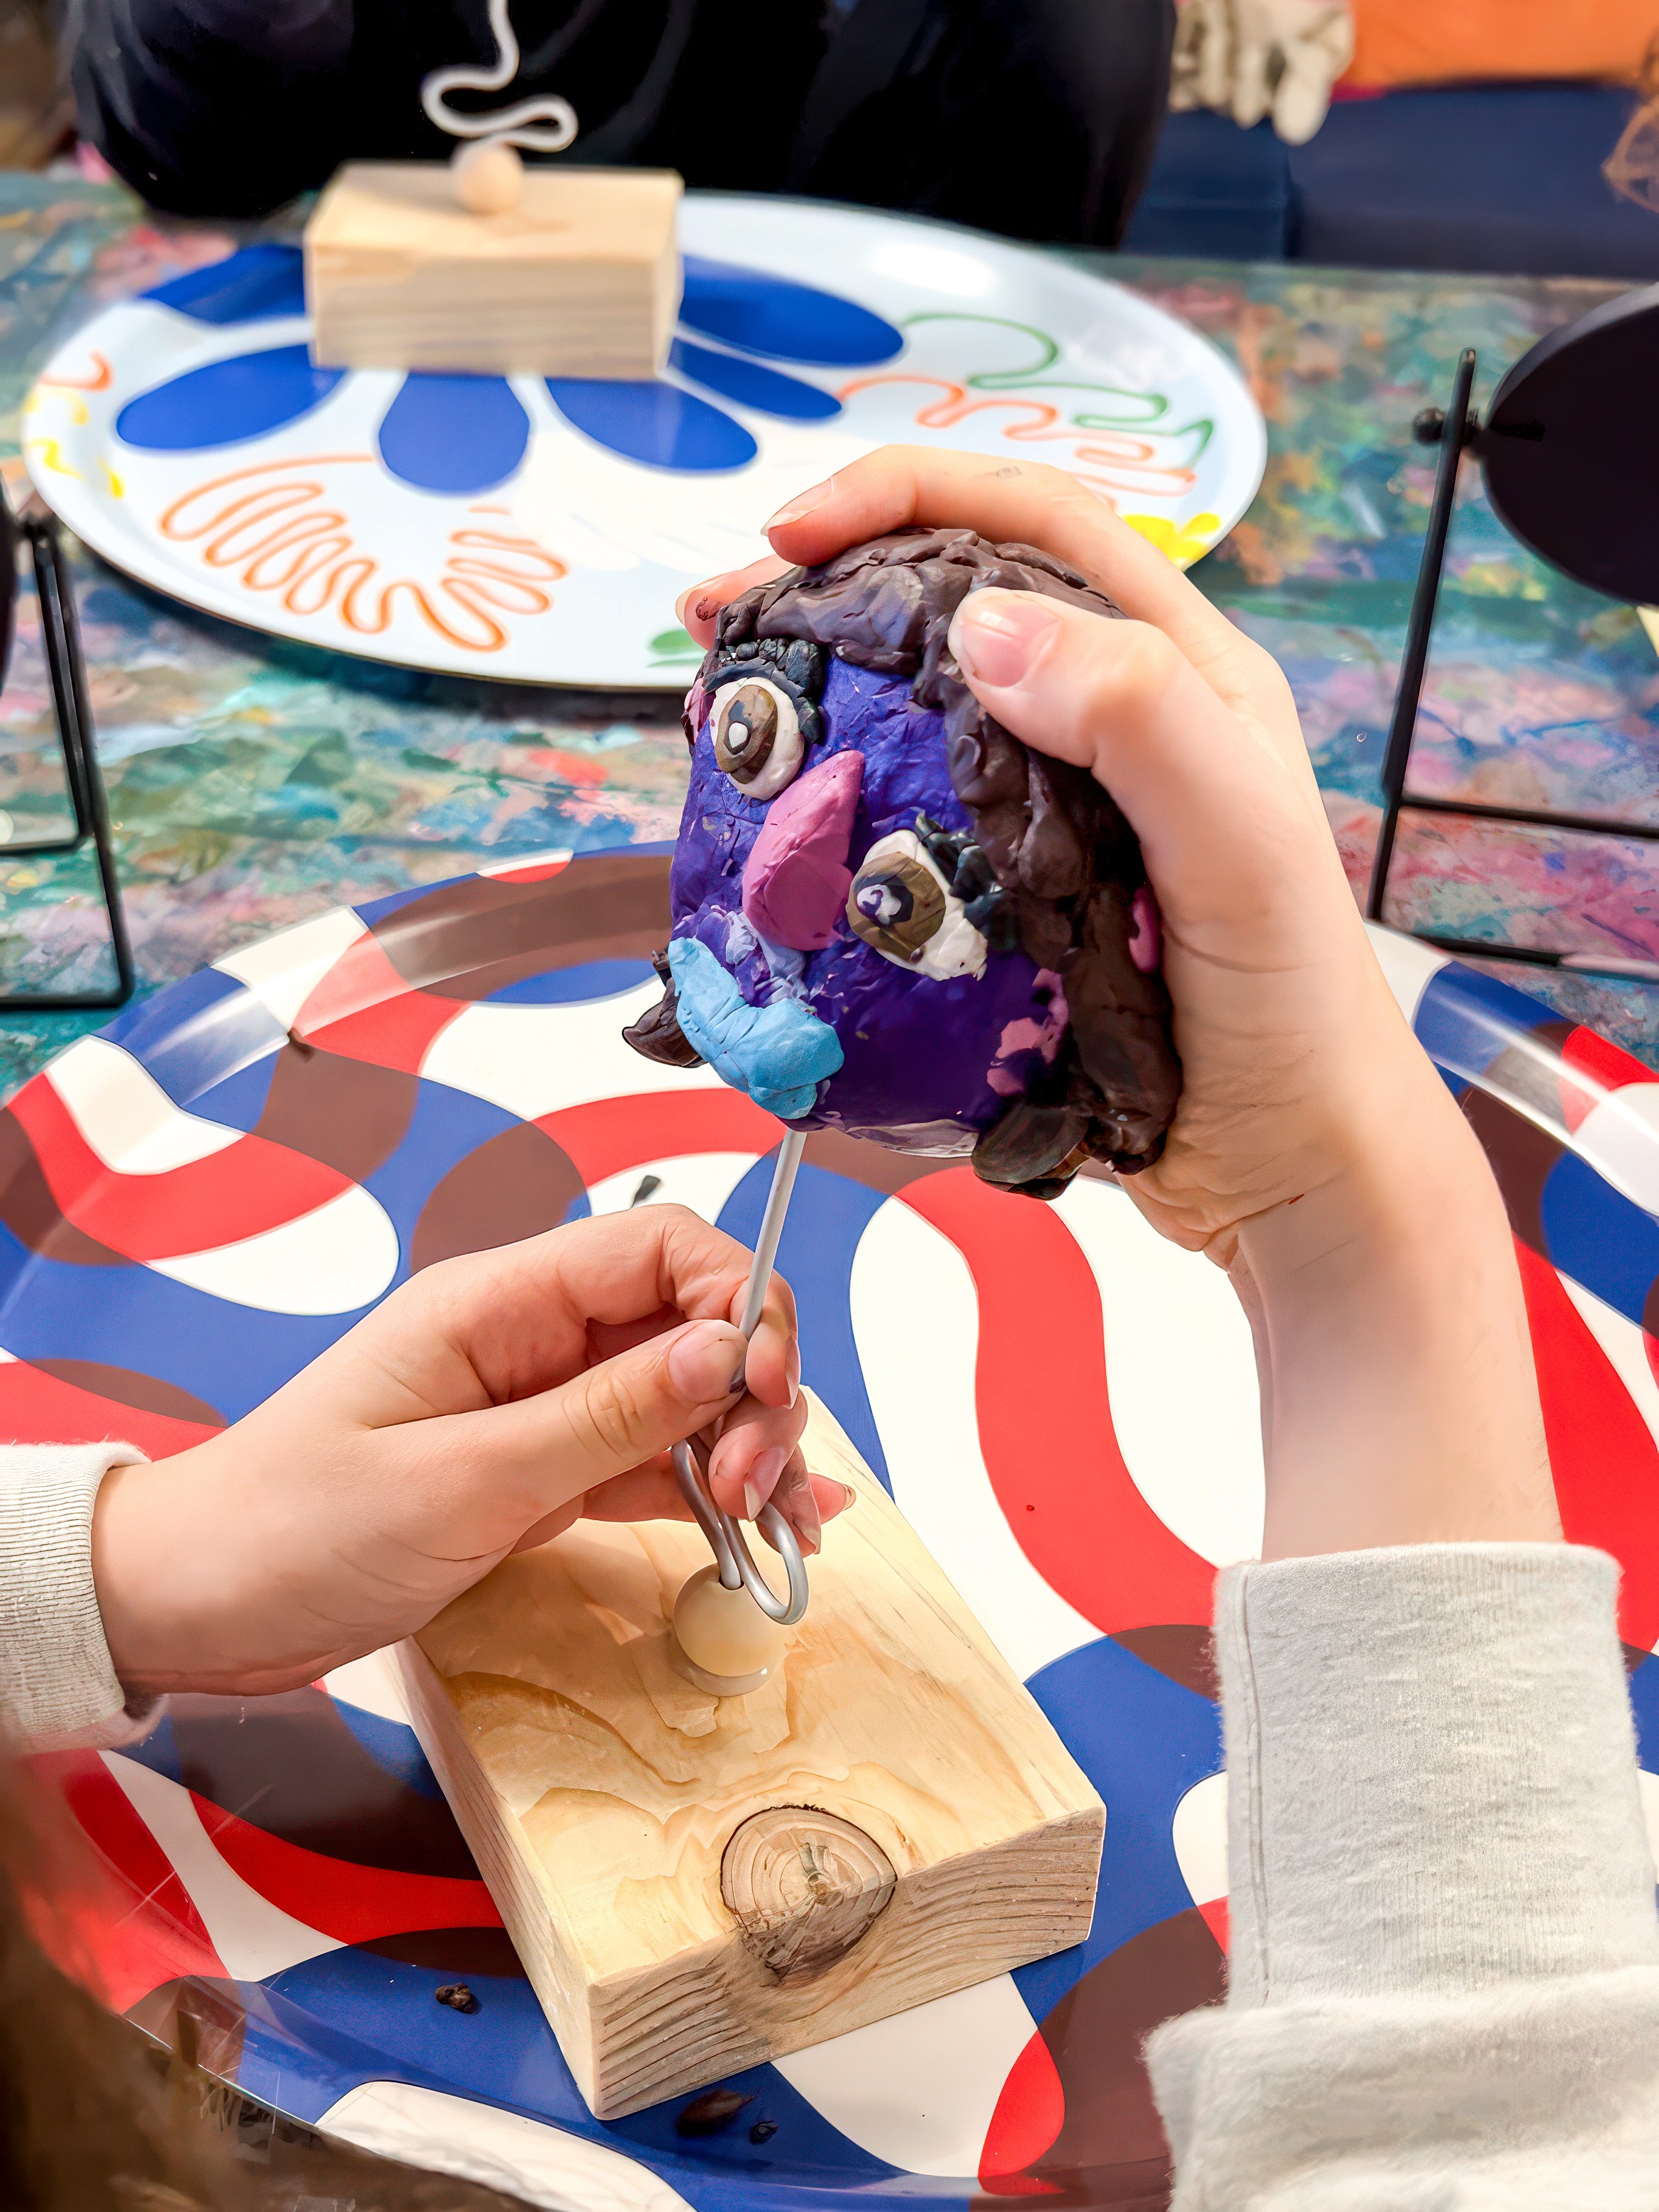
Start with a simple wooden block. Drill a hole in the centre, squeeze in some glue, and slide in a piece of florist wire (18 gauge is great) about twenty centimetres long. Pop a couple of beads on before the glue sets (they act like anchors so the head does not wobble). These bases are strong and ready for anything!
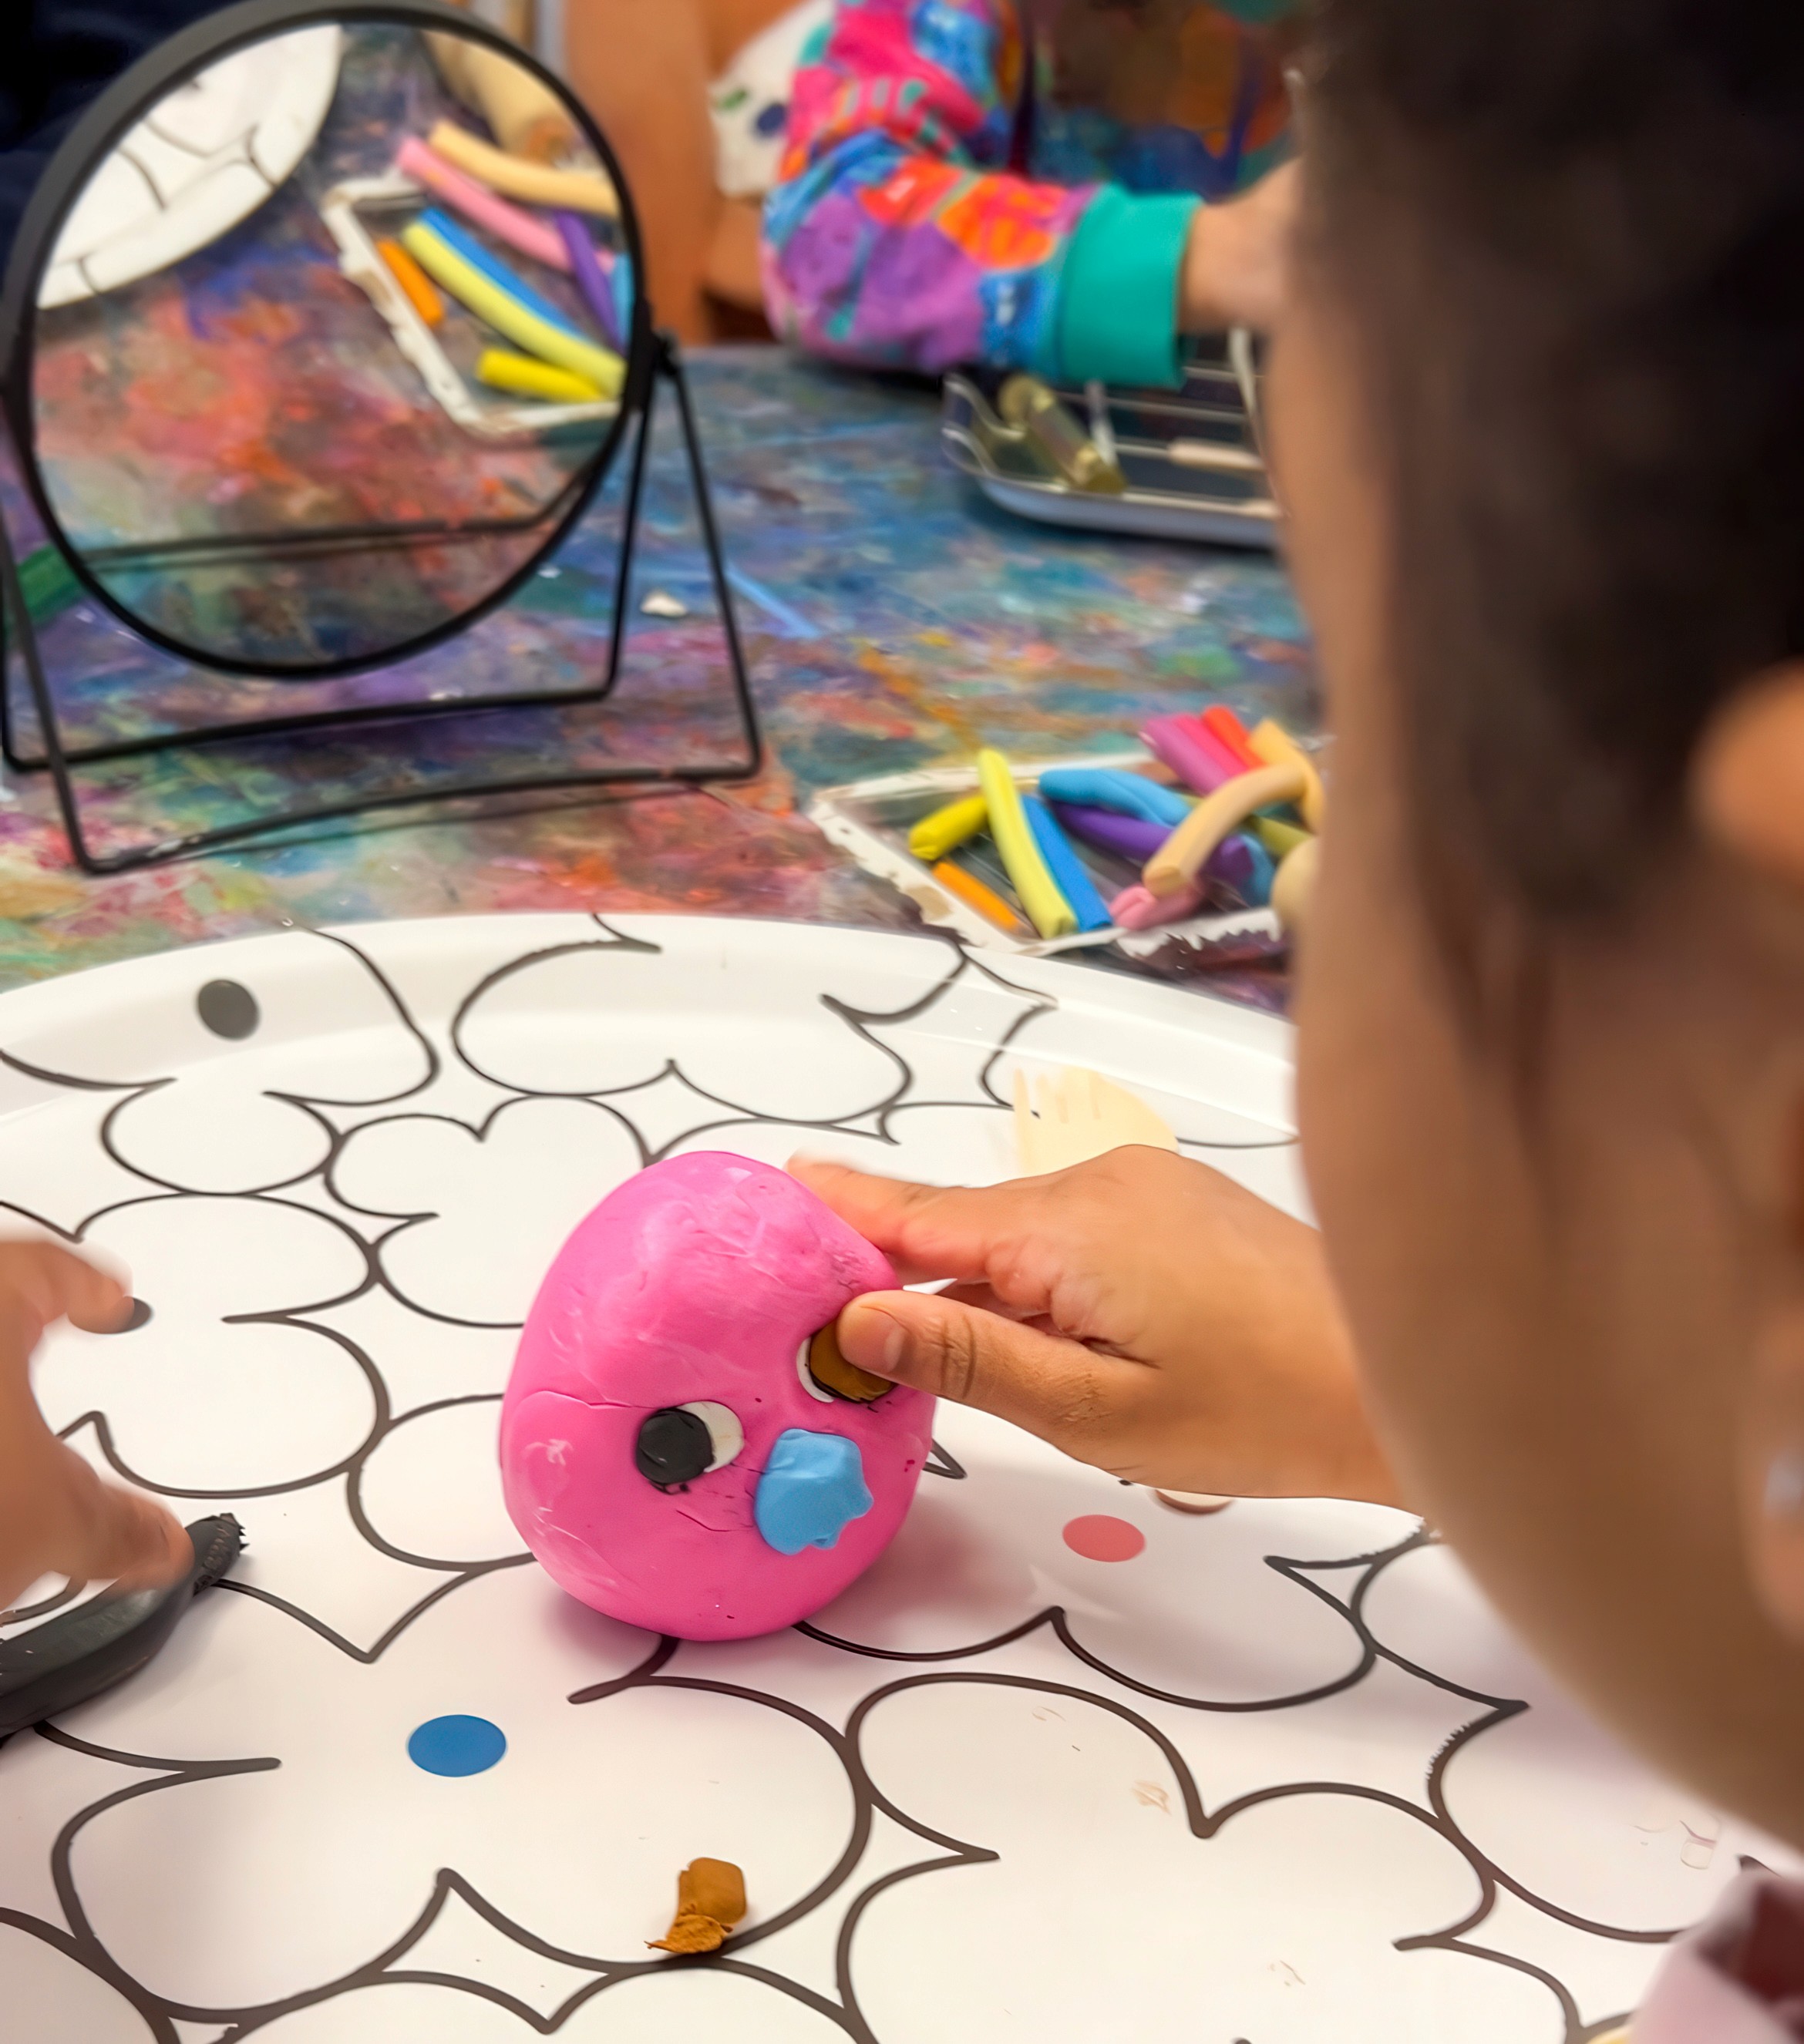
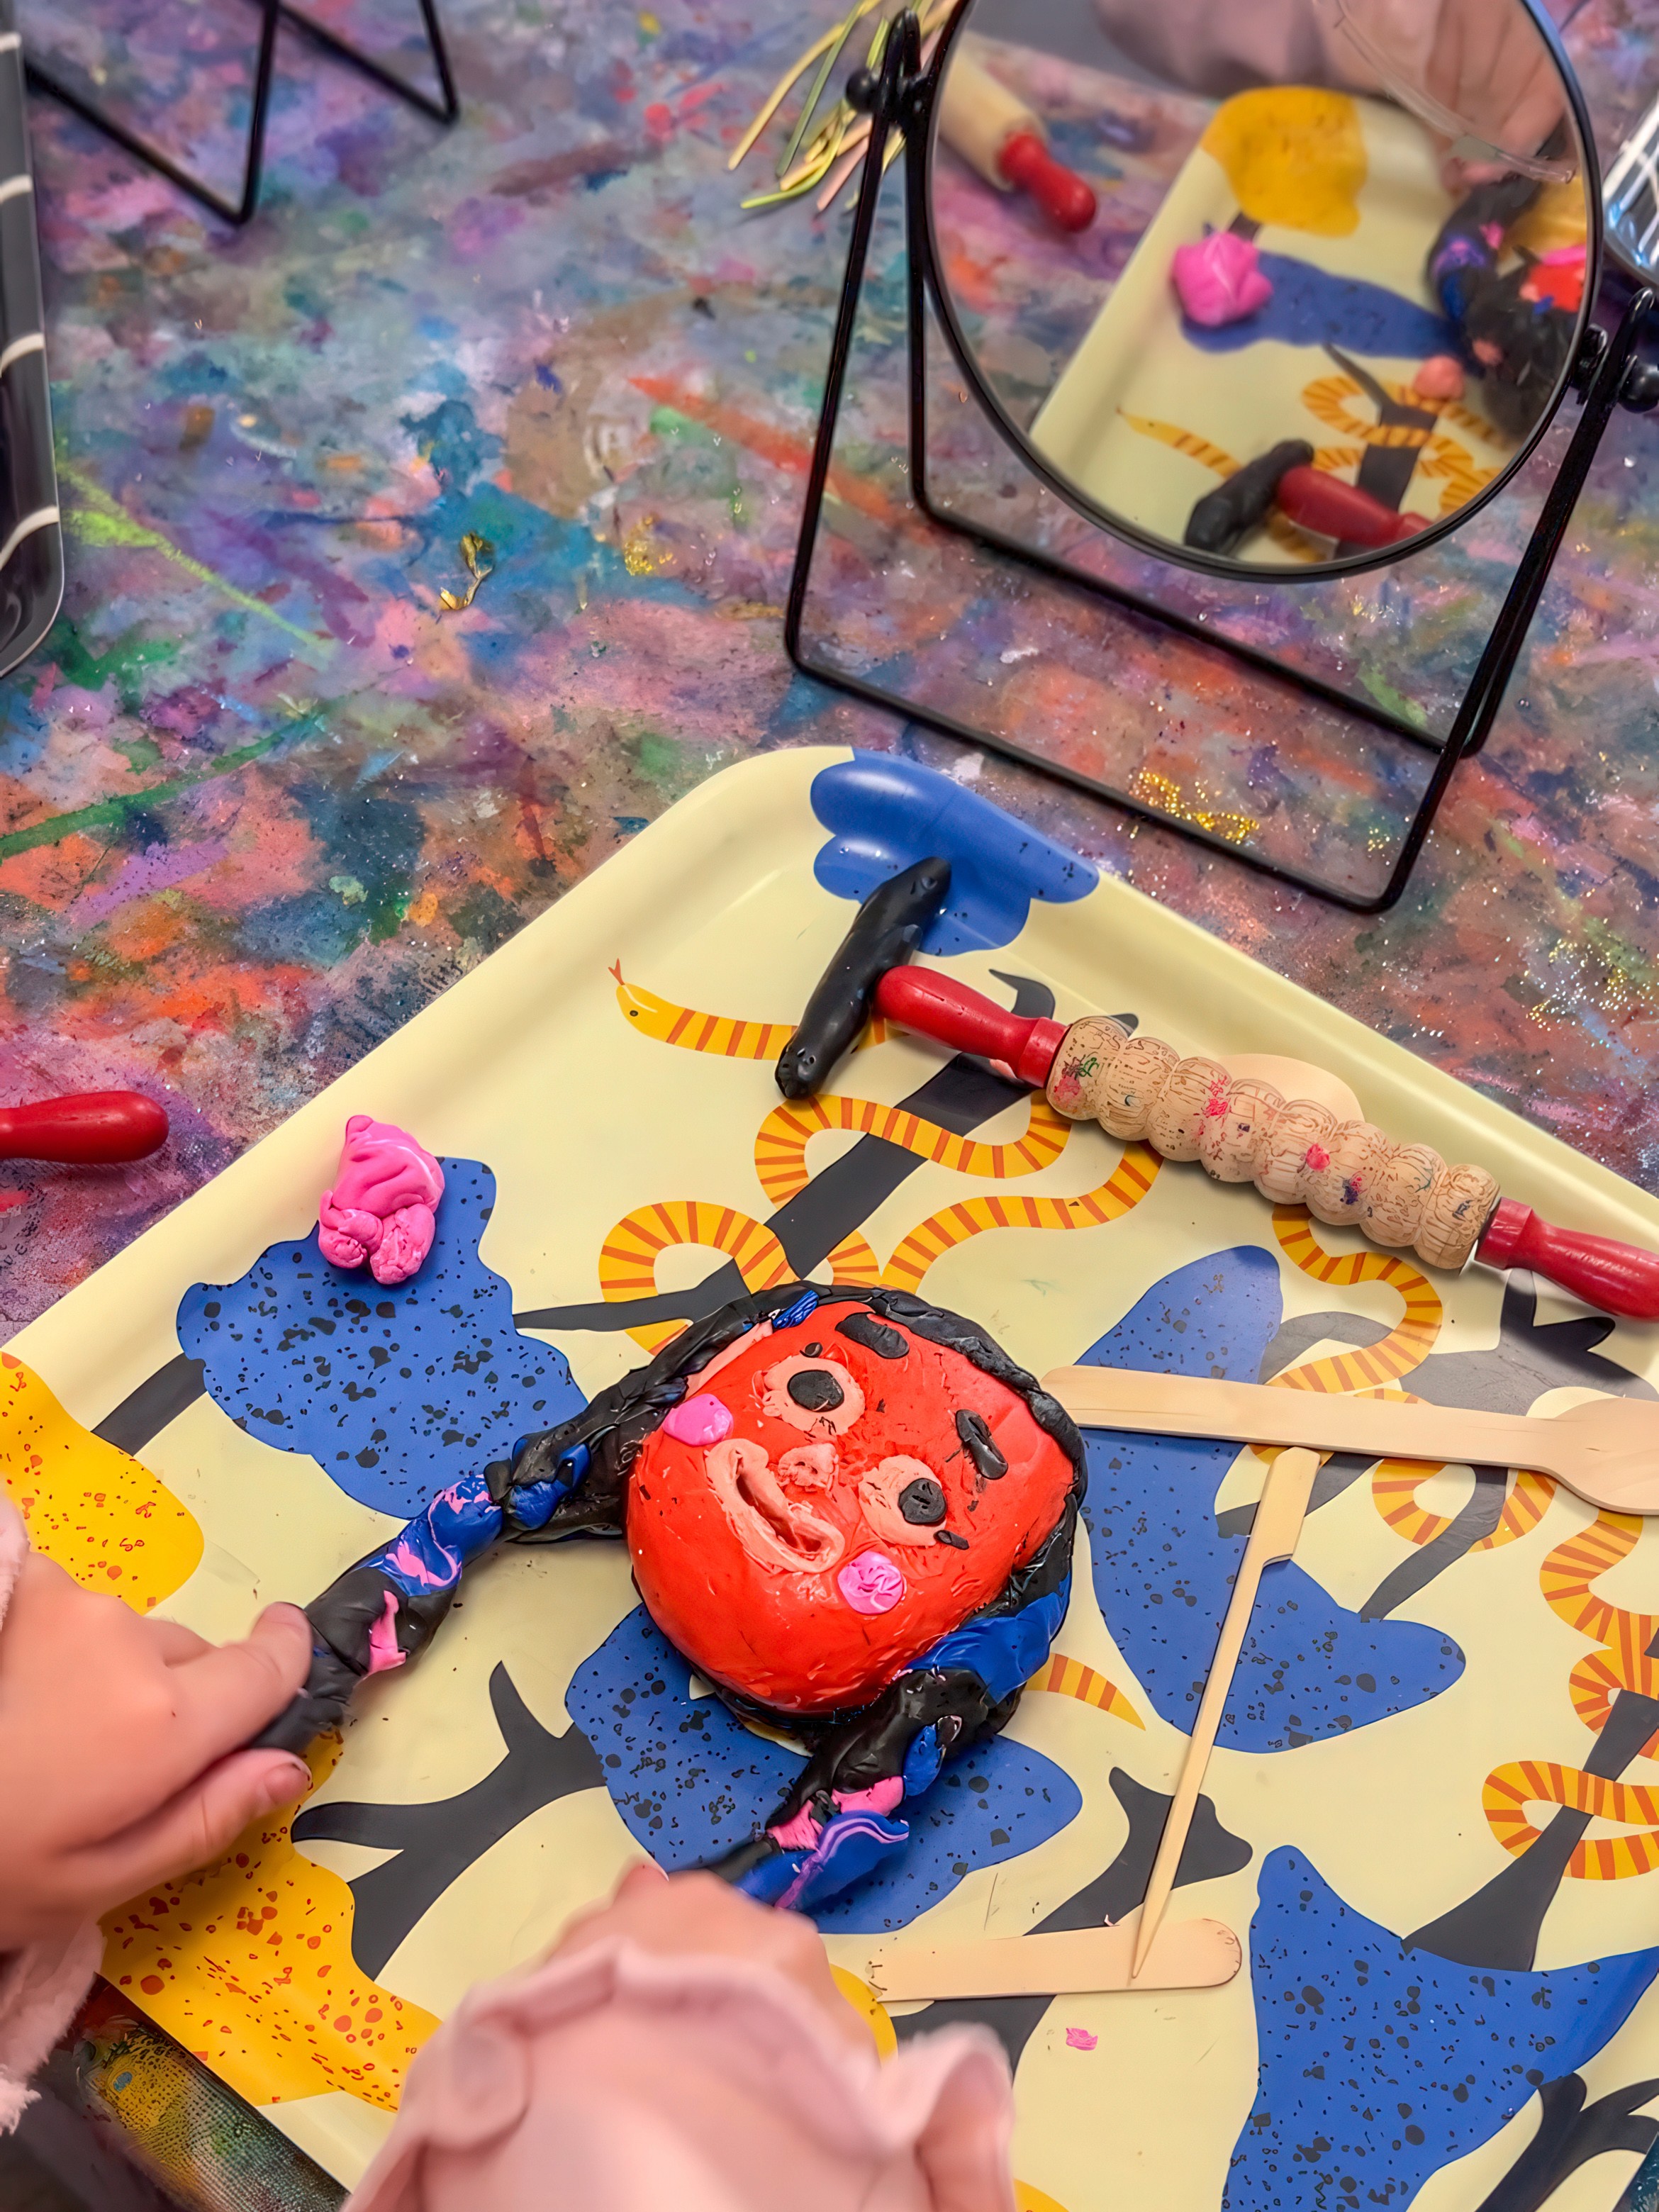
Fill trays with colourful plasticine, bright and tempting. Add rolling pins, skewers, spoons, and whatever shaping tools you love. Mirrors are essential here. Place them close so artists can lean in and notice their own features. Where exactly do your eyes sit? How far down does your hairline begin? What tiny detail would make your bust look like you? Maybe it's the curl of your fringe, the angle of your eyebrows or a scattering of freckles.
The Making
Plasticine is often quite stiff at first, so give it a good roll between your palms or slap it on the table a few times. Once it warms up, start shaping a head. Press your thumbs in for eye sockets. Roll coils for lips. Pinch slabs for hair. Keep checking the mirror and decide what matters most to capture. A single freckle or a dramatic eyebrow can suddenly turn it into you.
When the head feels complete, you're almost ready to slide it carefully onto the wire. First thought, it's a great idea to loop the wire at the base to create shoulders; it makes the whole sculpture feel more solid, more alive. Now is the moment the characters really come alive! Some look thoughtful, others wild or cheeky, all full of personality.
Variations
Mix two colours together for marbled swirls. Add jewellery, hats, or ribbons. Make a whole family of busts and see how each one takes on its own voice.
Materials
Wooden blocks
Drill and glue (hot glue or Gorilla Glue work best)
Thick Florist or armature wire (about 20cm pieces)
Wooden beads
Plasticine in assorted colours (250g for the head, plus extra for all of the features)
Rolling pins, skewers, spoons, shaping tools
Mirrors
Gallery
Back to Top
Plasticine Portrait Sculptures
Make a mini muse!
Bookmark
Sculpture
The Set Up
Start with a simple wooden block. Drill a hole in the centre, squeeze in some glue, and slide in a piece of florist wire (18 gauge is great) about twenty centimetres long. Pop a couple of beads on before the glue sets (they act like anchors so the head does not wobble). These bases are strong and ready for anything!
Fill trays with colourful plasticine, bright and tempting. Add rolling pins, skewers, spoons, and whatever shaping tools you love. Mirrors are essential here. Place them close so artists can lean in and notice their own features. Where exactly do your eyes sit? How far down does your hairline begin? What tiny detail would make your bust look like you? Maybe it's the curl of your fringe, the angle of your eyebrows or a scattering of freckles.
The Making
Plasticine is often quite stiff at first, so give it a good roll between your palms or slap it on the table a few times. Once it warms up, start shaping a head. Press your thumbs in for eye sockets. Roll coils for lips. Pinch slabs for hair. Keep checking the mirror and decide what matters most to capture. A single freckle or a dramatic eyebrow can suddenly turn it into you.
When the head feels complete, you're almost ready to slide it carefully onto the wire. First thought, it's a great idea to loop the wire at the base to create shoulders; it makes the whole sculpture feel more solid, more alive. Now is the moment the characters really come alive! Some look thoughtful, others wild or cheeky, all full of personality.
Variations
Mix two colours together for marbled swirls. Add jewellery, hats, or ribbons. Make a whole family of busts and see how each one takes on its own voice.
Materials
Wooden blocks
Drill and glue (hot glue or Gorilla Glue work best)
Thick Florist or armature wire (about 20cm pieces)
Wooden beads
Plasticine in assorted colours (250g for the head, plus extra for all of the features)
Rolling pins, skewers, spoons, shaping tools
Mirrors
Gallery
Back to Top
Giant Cubist Masks
Big faces & splashes of colour.
Bookmark
Sculpture
The Set Up
Masks are one of the most playful ways to explore identity. They give permission to exaggerate, to hide, to invent a new version of yourself. I love linking this to Picasso and Cubism, where faces were broken into shapes and rearranged in unexpected ways. At Smudge we often share that story afterwards once the children have already experienced the fun of creating.
Cut out large face shapes from sturdy cardboard as bases. For younger groups, pre cut a selection of eyes, mouths, and noses so they can jump straight in. Older artists love cutting and inventing their own features. Set the table with scissors, glue, scraps of foil, fabric, painted paper, and whatever odd bits you can gather.


The Making
Start by arranging features on the face without gluing straight away. Slide an eye up to the forehead, tip a mouth sideways, try three noses at once. Some designs turn abstract, others lean toward self portrait, all of them full of energy.
When the features feel right, glue them down and bring out the paints. This is when colour mixing steals the show! The best moments are when artists keep going past their first safe choices and discover shades they did not even know they wanted. No two masks ever end up the same, which is exactly the point.


Variations
Offer prompts like “only warm colours” or “paint with the brush in your non dominant hand.”
Add extras like feathers, yarn, or sequins for texture.
Try making an entire wall of masks for a group display; the more faces together, the more powerful it feels.
Materials
Cardboard bases cut into large face shapes
Pre cut facial features (eyes, mouths, noses) or materials for cutting your own
Scissors and glue
Poster or tempera paints
Brushes, water jars, palettes
Optional: feathers, yarn, sequins, collage extras
Mirrors
Gallery


Back to Top
Giant Cubist Masks
Big faces & splashes of colour.
Bookmark
Sculpture
The Set Up
Masks are one of the most playful ways to explore identity. They give permission to exaggerate, to hide, to invent a new version of yourself. I love linking this to Picasso and Cubism, where faces were broken into shapes and rearranged in unexpected ways. At Smudge we often share that story afterwards once the children have already experienced the fun of creating.
Cut out large face shapes from sturdy cardboard as bases. For younger groups, pre cut a selection of eyes, mouths, and noses so they can jump straight in. Older artists love cutting and inventing their own features. Set the table with scissors, glue, scraps of foil, fabric, painted paper, and whatever odd bits you can gather.
The Making
Start by arranging features on the face without gluing straight away. Slide an eye up to the forehead, tip a mouth sideways, try three noses at once. Some designs turn abstract, others lean toward self portrait, all of them full of energy.
When the features feel right, glue them down and bring out the paints. This is when colour mixing steals the show! The best moments are when artists keep going past their first safe choices and discover shades they did not even know they wanted. No two masks ever end up the same, which is exactly the point.
Variations
Offer prompts like “only warm colours” or “paint with the brush in your non dominant hand.”
Add extras like feathers, yarn, or sequins for texture.
Try making an entire wall of masks for a group display; the more faces together, the more powerful it feels.
Materials
Cardboard bases cut into large face shapes
Pre cut facial features (eyes, mouths, noses) or materials for cutting your own
Scissors and glue
Poster or tempera paints
Brushes, water jars, palettes
Optional: feathers, yarn, sequins, collage extras
Mirrors
Gallery
Back to Top
Face to Face Monoprints
It's impossible not to smile making these prints!
Bookmark
Print Making

The Set Up
Gather plexiglass, perspex, or even a lightweight clear clipboard (anything see-through and light enough to hold without strain). Lay out trays of tempera paint, thick card stock, and brushes of different sizes. At Smudge we always encourage artists to mix their own palettes. A portrait feels more personal when the colours come from your own hand!
This invitation has everything (and more). Laughter, colour, and that heart-racing moment of surprise when the print is revealed. I first learnt it through Little Ginger Studio in Sydney and it has been a Smudge favourite ever since.


The Making
Work in pairs. One person holds the plexiglass in front of their face, the other paints directly onto it. Trace the curve of a cheek, follow the line of the hair, notice the space between the eyes. It is a slow, playful kind of looking that often sparks giggles, especially when eyebrows end up a little too high or noses far too long. The sitter becomes part of the artwork, watching through the glass as their features appear in strokes of colour.
When the painting feels ready, lay the plexiglass flat with the fresh paint facing upwards. Place the card on top, press firmly with your hands or roll across with a brayer, then peel it back. The reveal is always the such an exciting part! Gasps and laughter and the joy of seeing what transferred and what blurred into something unexpected. Wash the plexiglass and swap roles so everyone experiences both sides of the process.


Variations
Layer several prints onto the same sheet to build colour, texture, and overlapping portraits.
Swap brushes for sponges, fingertips, or cotton buds to make marks with different textures.
Paint a portrait of a favourite toy, a plant from the table, or even an imaginary character if you want a change from faces.


Materials
Plexiglass, perspex, or clear clipboards
Thick card stock or paper
Poster or tempera paint
Brushes in different sizes
Palettes for mixing
Water jars and cloths for cleaning
Brayer or roller (optional)
Back to Top
Face to Face Monoprints
It's impossible not to smile making these prints!
Bookmark
Print Making
The Set Up
Gather plexiglass, perspex, or even a lightweight clear clipboard (anything see-through and light enough to hold without strain). Lay out trays of tempera paint, thick card stock, and brushes of different sizes. At Smudge we always encourage artists to mix their own palettes. A portrait feels more personal when the colours come from your own hand!
This invitation has everything (and more). Laughter, colour, and that heart-racing moment of surprise when the print is revealed. I first learnt it through Little Ginger Studio in Sydney and it has been a Smudge favourite ever since.
The Making
Work in pairs. One person holds the plexiglass in front of their face, the other paints directly onto it. Trace the curve of a cheek, follow the line of the hair, notice the space between the eyes. It is a slow, playful kind of looking that often sparks giggles, especially when eyebrows end up a little too high or noses far too long. The sitter becomes part of the artwork, watching through the glass as their features appear in strokes of colour.
When the painting feels ready, lay the plexiglass flat with the fresh paint facing upwards. Place the card on top, press firmly with your hands or roll across with a brayer, then peel it back. The reveal is always the such an exciting part! Gasps and laughter and the joy of seeing what transferred and what blurred into something unexpected. Wash the plexiglass and swap roles so everyone experiences both sides of the process.
Variations
Layer several prints onto the same sheet to build colour, texture, and overlapping portraits.
Swap brushes for sponges, fingertips, or cotton buds to make marks with different textures.
Paint a portrait of a favourite toy, a plant from the table, or even an imaginary character if you want a change from faces.
Materials
Plexiglass, perspex, or clear clipboards
Thick card stock or paper
Poster or tempera paint
Brushes in different sizes
Palettes for mixing
Water jars and cloths for cleaning
Brayer or roller (optional)
Back to Top
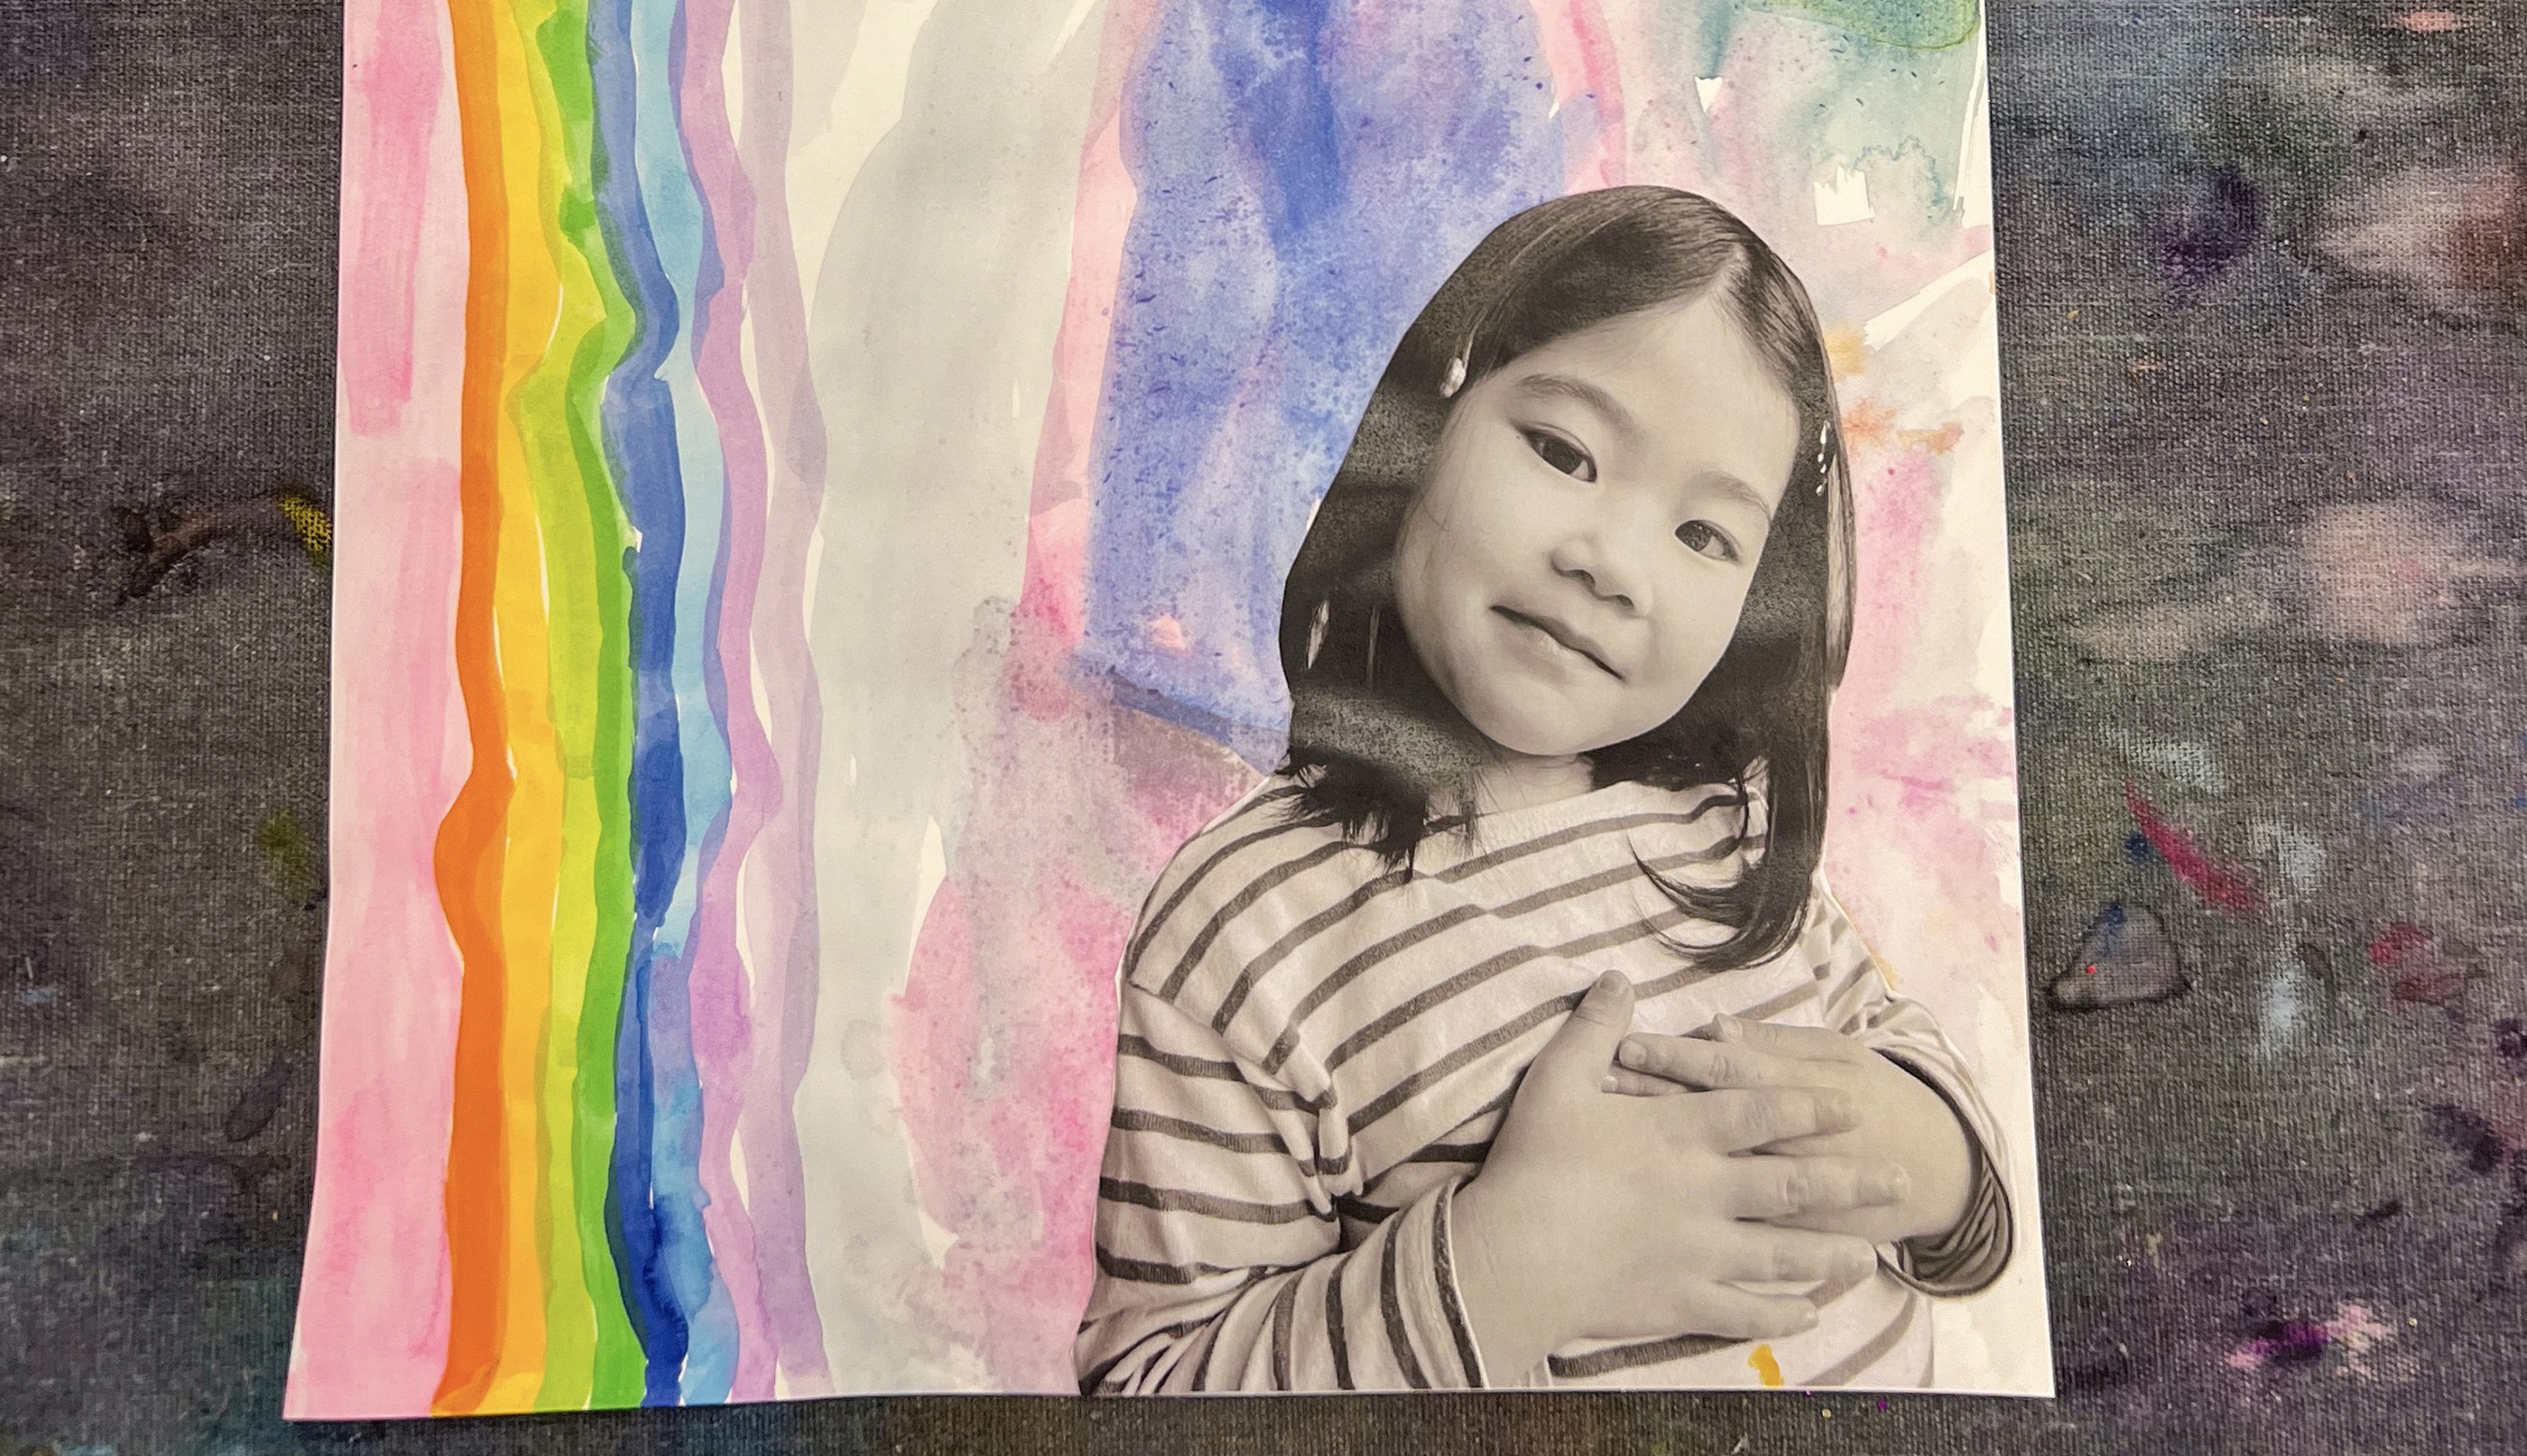
Watercolour Portraits
Create the most gorgeous snapshot in time.
Bookmark
Painting & Drawing

The Set Up
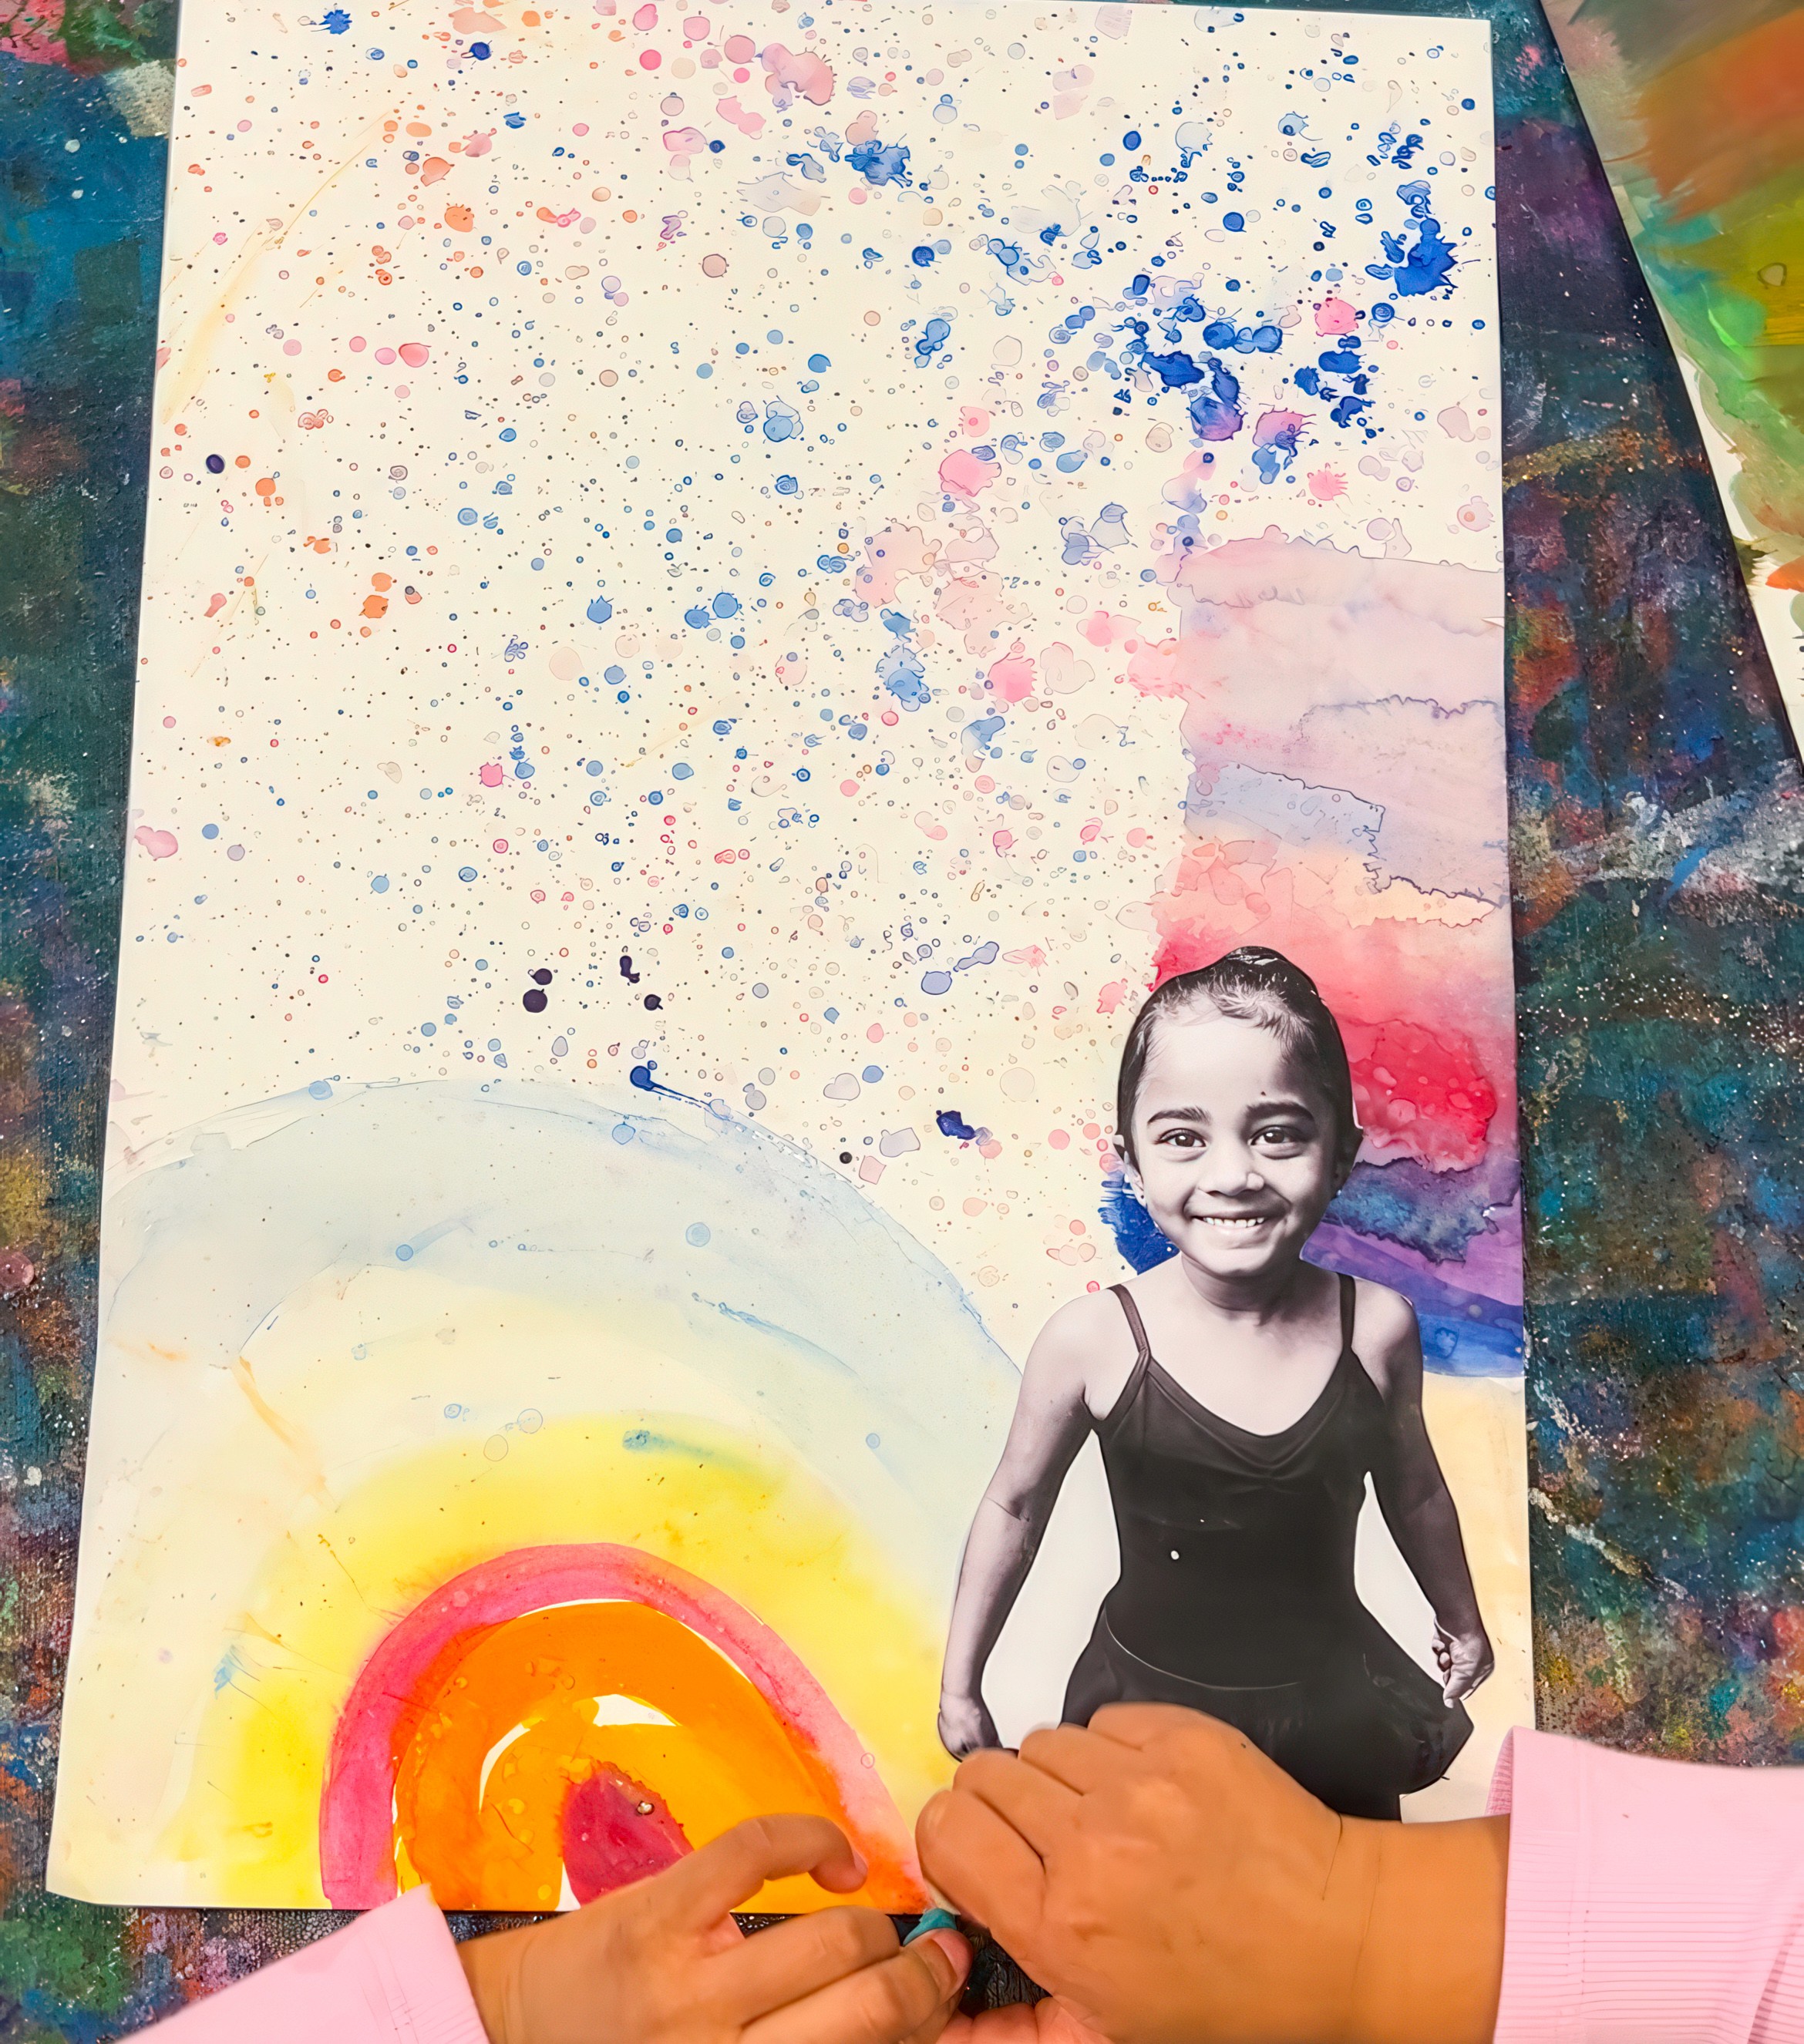
There is something about a black and white photo set against colour that always feels like magic! These portraits have become one of my absolute favourites at Smudge, so much so that we offer them as a Party Theme as well. My own children made theirs years ago and they still hang in our kitchen; giving me a smile every time I walk past.
Print monochrome photos of each artist and use Canva’s background remover for clean edges. Thick paper works best as a base. Add painter’s tape borders if you want that crisp framed look when the tape peels away. Set out a full palette of watercolours so the backgrounds can be as bold, soft, or unexpected as the artist chooses.


The Making
I love starting with the background. Paint first, let it dry, and then place the portrait on top. The clash between monochrome and colour is striking. It makes artists stop and think about placement: high or low, centred or off to the side. That decision becomes part of the meaning.
You can just as easily glue the portrait first and paint around it. Both approaches are beautiful. Sometimes prompts help spark ideas. What does your imagination look like? What colours feel like you today? Where is a place that feels special to you?
I will never forget when a four year old told me, “my imagination looks like sparkles falling in a rainbow.” It was the perfect reminder of why these portraits matter and that they catch a little piece of a person at that moment in time!


Variations
Turn them into mixed media by adding sequins, felt, or fabric scraps. Ask “what else belongs in this portrait with you?” and let artists collage those things in (maybe a favourite toy, a pet, a flower, a symbol?). Each extra layer deepens the story.


Materials
Printed black and white portraits
Thick paper or cardstock
Watercolour paints and palettes
Brushes, water jars, cloths
Painter’s tape (optional, for borders)
Glue sticks or PVA
Collage extras: sequins, felt, fabric scraps
Back to Top
Watercolour Portraits
Create the most gorgeous snapshot in time.
Bookmark
Painting & Drawing
The Set Up
There is something about a black and white photo set against colour that always feels like magic! These portraits have become one of my absolute favourites at Smudge, so much so that we offer them as a Party Theme as well. My own children made theirs years ago and they still hang in our kitchen; giving me a smile every time I walk past.
Print monochrome photos of each artist and use Canva’s background remover for clean edges. Thick paper works best as a base. Add painter’s tape borders if you want that crisp framed look when the tape peels away. Set out a full palette of watercolours so the backgrounds can be as bold, soft, or unexpected as the artist chooses.
The Making
I love starting with the background. Paint first, let it dry, and then place the portrait on top. The clash between monochrome and colour is striking. It makes artists stop and think about placement: high or low, centred or off to the side. That decision becomes part of the meaning.
You can just as easily glue the portrait first and paint around it. Both approaches are beautiful. Sometimes prompts help spark ideas. What does your imagination look like? What colours feel like you today? Where is a place that feels special to you?
I will never forget when a four year old told me, “my imagination looks like sparkles falling in a rainbow.” It was the perfect reminder of why these portraits matter and that they catch a little piece of a person at that moment in time!
Variations
Turn them into mixed media by adding sequins, felt, or fabric scraps. Ask “what else belongs in this portrait with you?” and let artists collage those things in (maybe a favourite toy, a pet, a flower, a symbol?). Each extra layer deepens the story.
Materials
Printed black and white portraits
Thick paper or cardstock
Watercolour paints and palettes
Brushes, water jars, cloths
Painter’s tape (optional, for borders)
Glue sticks or PVA
Collage extras: sequins, felt, fabric scraps
Back to Top
Self Portraits
Look and notice and paint and draw. Will you see yourself differently?
Bookmark
Painting & Drawing
The Set Up
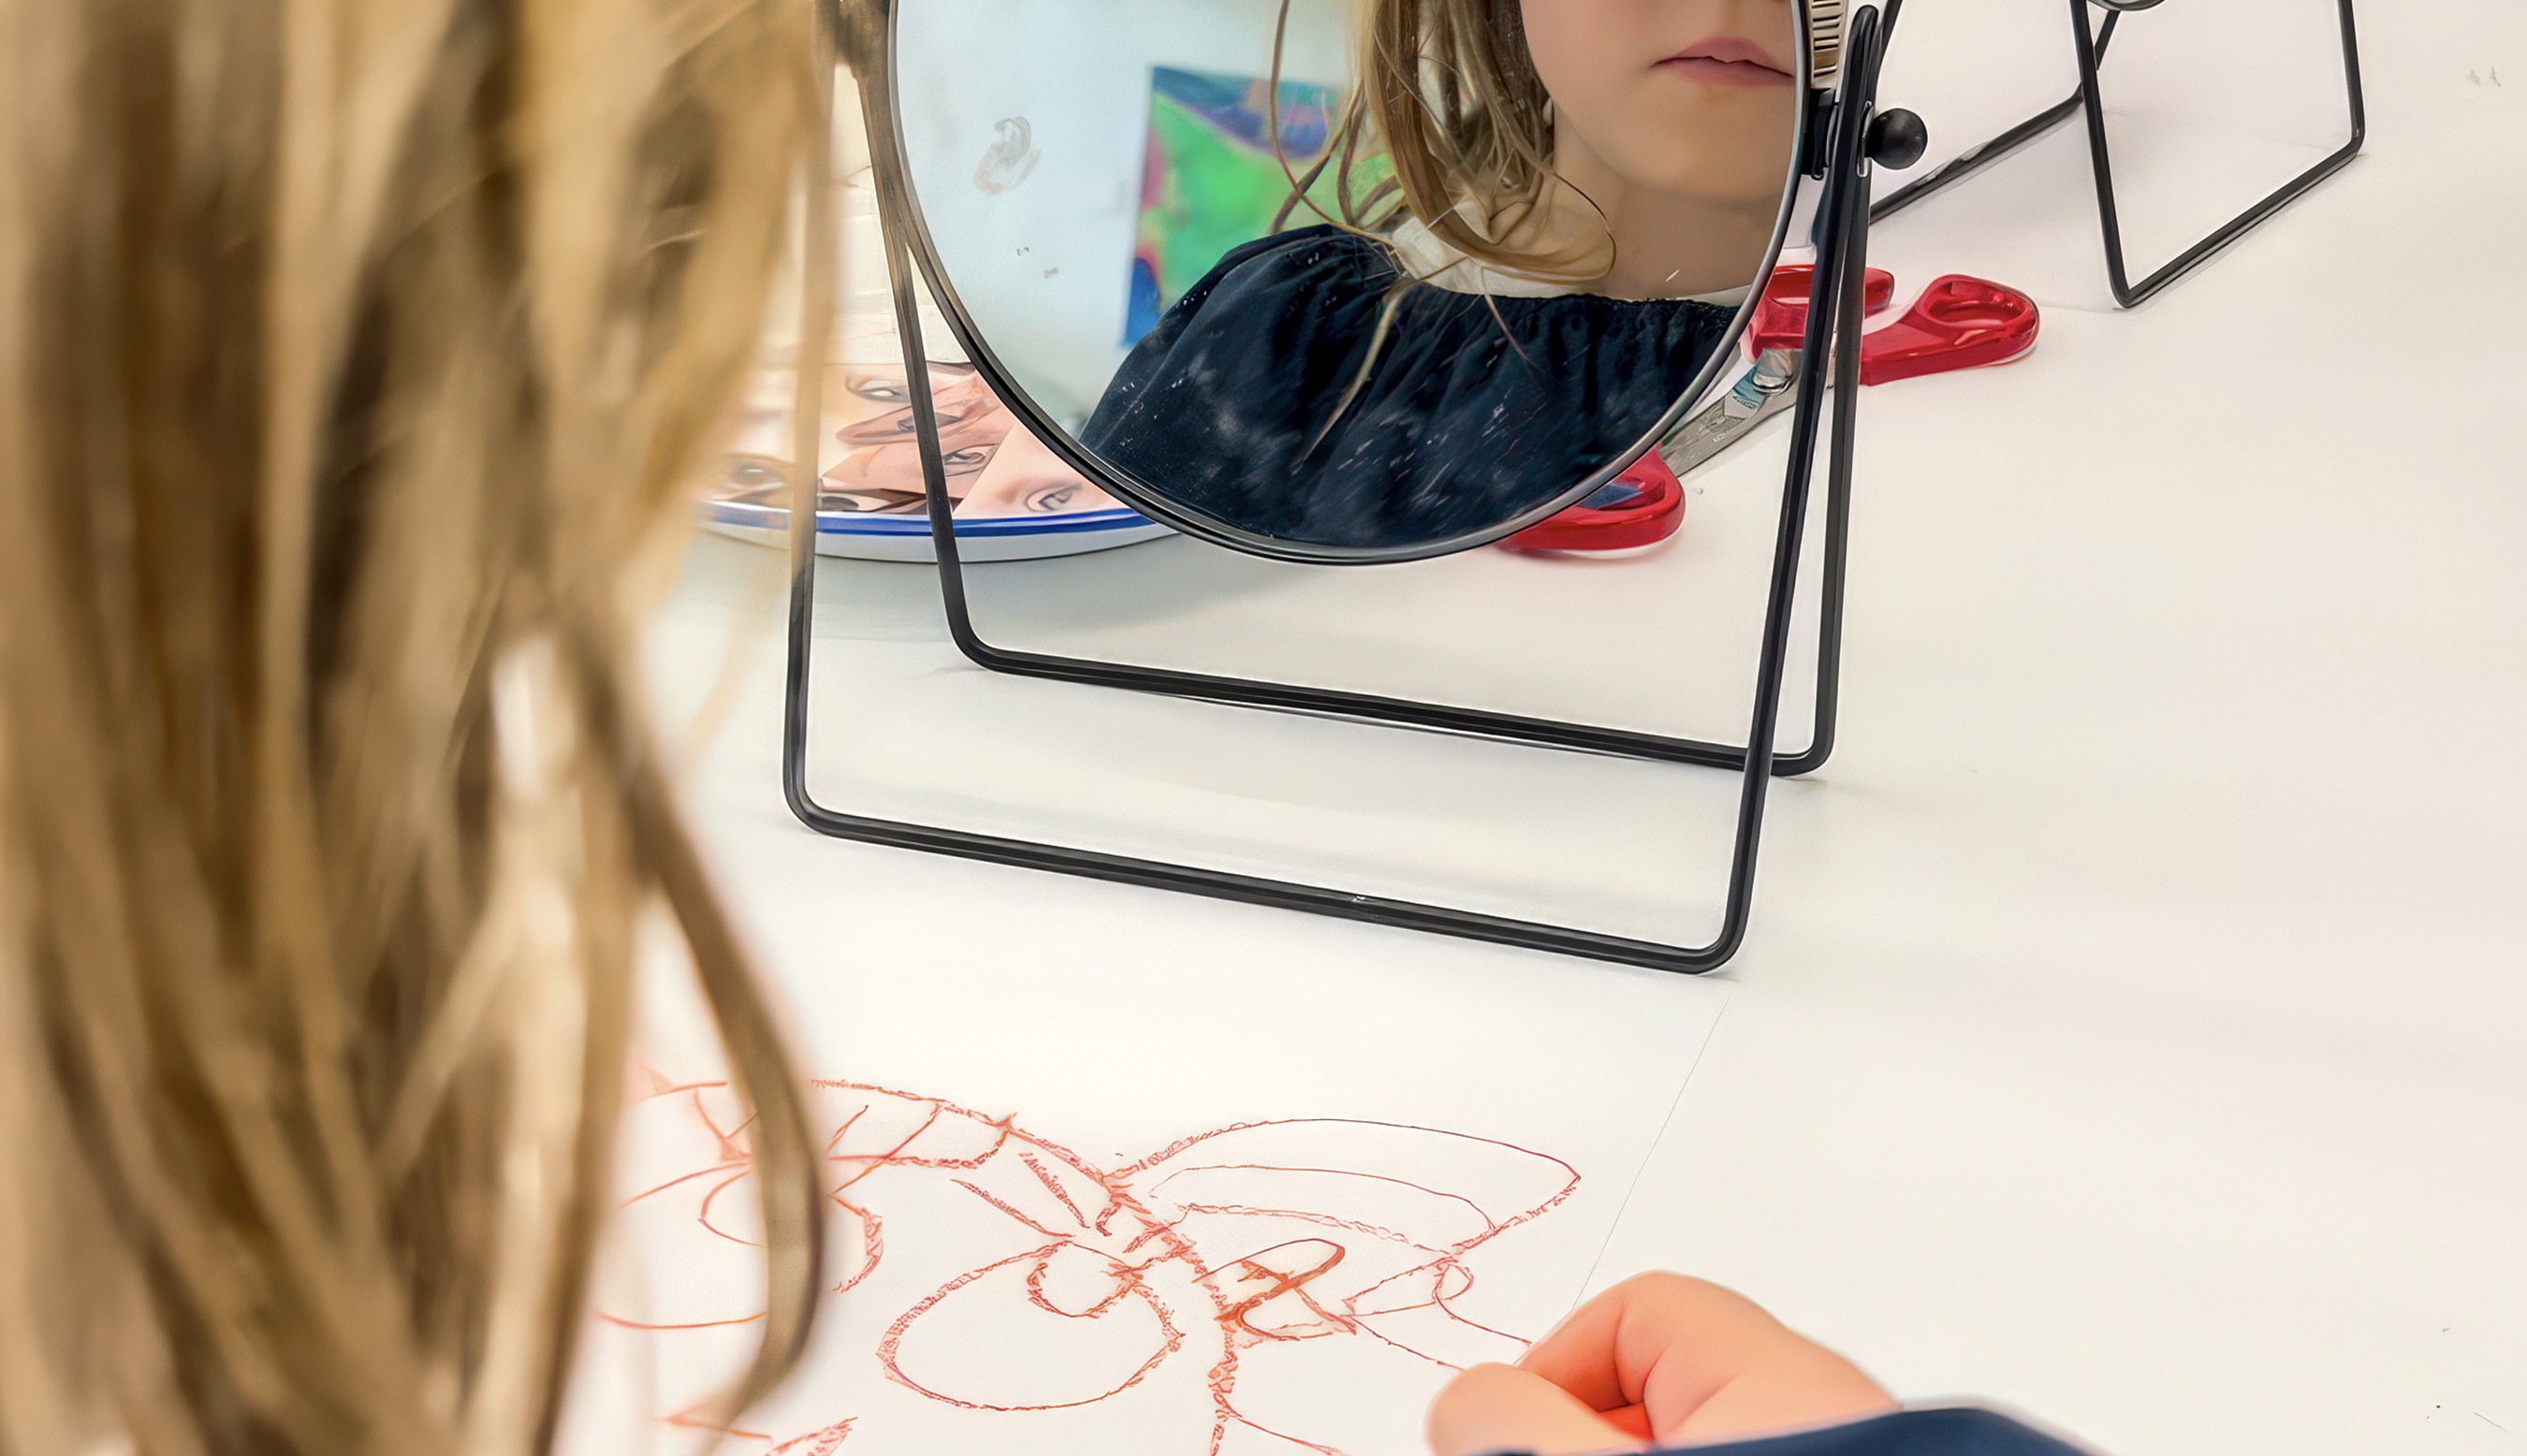
Mirrors always bring a sense of importance. Set one up at each place with paper and brushes ready to go. For younger groups, black paint works beautifully. For older ones, try sumi ink or drawing ink for rich, fluid lines.


The Making
Settle in and really look. Where does your hairline begin? How far apart are your eyes? What shape does your mouth make when you are concentrating? Some artists dive in quickly with bold, loose strokes. Others take their time, noticing details they have never studied before.
Each portrait becomes a snapshot of how you see yourself in this exact moment. One of the joys of self portraiture is watching those snapshots change over time. I still think back to the way our wild creator Olive used to draw her people — tiny round heads with stick arms and legs, eyes wide and smiling. Years later her portraits carry more detail, more expression, more of her. The process itself tells a story of growing up.
This practice of looking and translating has been around for centuries. Rembrandt painted himself more than 80 times, charting the changes of his face and his life. Frida Kahlo used self portraiture to express her inner world as much as her outer one. Children may not know those names yet, but the act of turning toward a mirror and making marks belongs to the same long, human story.


Variations
Try continuous line drawings where the brush never leaves the page.
Do blind contour portraits with your eyes closed and enjoy the wobble.
Scale it up into a wall sized portrait and use your whole body to draw.


Materials
Small mirrors
Paper or card
Black paint, sumi ink, or drawing ink
Brushes, palettes, water jars, cloths
Back to Top
Self Portraits
Look and notice and paint and draw. Will you see yourself differently?
Bookmark
Painting & Drawing
The Set Up
Mirrors always bring a sense of importance. Set one up at each place with paper and brushes ready to go. For younger groups, black paint works beautifully. For older ones, try sumi ink or drawing ink for rich, fluid lines.
The Making
Settle in and really look. Where does your hairline begin? How far apart are your eyes? What shape does your mouth make when you are concentrating? Some artists dive in quickly with bold, loose strokes. Others take their time, noticing details they have never studied before.
Each portrait becomes a snapshot of how you see yourself in this exact moment. One of the joys of self portraiture is watching those snapshots change over time. I still think back to the way our wild creator Olive used to draw her people — tiny round heads with stick arms and legs, eyes wide and smiling. Years later her portraits carry more detail, more expression, more of her. The process itself tells a story of growing up.
This practice of looking and translating has been around for centuries. Rembrandt painted himself more than 80 times, charting the changes of his face and his life. Frida Kahlo used self portraiture to express her inner world as much as her outer one. Children may not know those names yet, but the act of turning toward a mirror and making marks belongs to the same long, human story.
Variations
Try continuous line drawings where the brush never leaves the page.
Do blind contour portraits with your eyes closed and enjoy the wobble.
Scale it up into a wall sized portrait and use your whole body to draw.
Materials
Small mirrors
Paper or card
Black paint, sumi ink, or drawing ink
Brushes, palettes, water jars, cloths
Back to Top
Mirror Painting Outside
Paint on a mirror and let the sky join in!
Bookmark
Creative Exploration

The Set Up
Take the mirrors outside and let the world join in! Child-safe acrylic mirrors are best as they're safe (obviously!), light, and easy to move. Lay them flat on the ground or across a low table.
Paint sticks are our Smudge go-to because of the smooth and vibrant marks. Plus, they're easy to wipe away when you are ready to begin again!
The Making
Lean over and paint directly onto your reflection. Trace your features if you like, or follow the drifting shapes in the clouds above. Sometimes the branches sway and change the whole scene, and the painting shifts along with it.
If you're indoors then the reflections of windows, lamps, or even people walking by bring their own unexpected layers.


Variations
Spray lightly with water to blur colours into each other.
Work collaboratively, adding to each other’s marks until the mirror is full.
Wipe it clean and start fresh as many times as you like! As always, the joy is in the play.
Materials
Child-safe acrylic mirrors (small tabletop mirrors or larger ones that can lay flat)
Paint sticks (chalk markers could also work)
Spray bottles with water (optional, for blending)
Cloths or sponges for wiping clean
Back to Top
Mirror Painting Outside
Paint on a mirror and let the sky join in!
Bookmark
Creative Exploration
The Set Up
Take the mirrors outside and let the world join in! Child-safe acrylic mirrors are best as they're safe (obviously!), light, and easy to move. Lay them flat on the ground or across a low table.
Paint sticks are our Smudge go-to because of the smooth and vibrant marks. Plus, they're easy to wipe away when you are ready to begin again!
The Making
Lean over and paint directly onto your reflection. Trace your features if you like, or follow the drifting shapes in the clouds above. Sometimes the branches sway and change the whole scene, and the painting shifts along with it.
If you're indoors then the reflections of windows, lamps, or even people walking by bring their own unexpected layers.
Variations
Spray lightly with water to blur colours into each other.
Work collaboratively, adding to each other’s marks until the mirror is full.
Wipe it clean and start fresh as many times as you like! As always, the joy is in the play.
Materials
Child-safe acrylic mirrors (small tabletop mirrors or larger ones that can lay flat)
Paint sticks (chalk markers could also work)
Spray bottles with water (optional, for blending)
Cloths or sponges for wiping clean
Back to Top
Dressing The Mannequins
Costume a tiny person! Strike a pose! Tell a story!
Bookmark
Creative Exploration

The Set Up
Lay out wooden artist mannequins and surround them with loose parts: playdough, fabric scraps, wool, sequins, buttons, beads, pipe cleaners, anything that feels like it belongs in a teeny costume trunk!
The more unexpected the mix, the better. Thrifted fabric and old costume scraps are especially brilliant because they already carry a bit of history and character.


The Making
Start adding bits and pieces until the mannequin has a whole new personality.
Maybe it ends up in a cape, maybe it sprouts a crown of feathers, maybe its arms get wrapped in coils of playdough. Bend the mannequins into poses and suddenly they feel like performers, superheroes, dancers, or statues. The best bit is that nothing is fixed. You can strip it back, swap it around, pass it to someone else, and the character shifts again (and again!).


Variations
Use the dressed mannequin as the subject for a drawing session. Pose it, light it, and sketch what you see.
Materials
Wooden artist mannequins
Playdough or plasticine
Fabric scraps, ribbons, wool (thrifted pieces are wonderful)
Sequins, buttons, beads, feathers, pipe cleaners
Any other loose parts you love
Gallery

Back to Top
Dressing The Mannequins
Costume a tiny person! Strike a pose! Tell a story!
Bookmark
Creative Exploration
The Set Up
Lay out wooden artist mannequins and surround them with loose parts: playdough, fabric scraps, wool, sequins, buttons, beads, pipe cleaners, anything that feels like it belongs in a teeny costume trunk!
The more unexpected the mix, the better. Thrifted fabric and old costume scraps are especially brilliant because they already carry a bit of history and character.
The Making
Start adding bits and pieces until the mannequin has a whole new personality.
Maybe it ends up in a cape, maybe it sprouts a crown of feathers, maybe its arms get wrapped in coils of playdough. Bend the mannequins into poses and suddenly they feel like performers, superheroes, dancers, or statues. The best bit is that nothing is fixed. You can strip it back, swap it around, pass it to someone else, and the character shifts again (and again!).
Variations
Use the dressed mannequin as the subject for a drawing session. Pose it, light it, and sketch what you see.
Materials
Wooden artist mannequins
Playdough or plasticine
Fabric scraps, ribbons, wool (thrifted pieces are wonderful)
Sequins, buttons, beads, feathers, pipe cleaners
Any other loose parts you love
Gallery
Back to Top
