
ARTFUL EXPERIENCES
Curtain Of Colours
Spray a leaf-lined curtain and watch colours drift, drip, and mix!
Bookmark
Installations

The Set Up
Lay the curtain or large fabric sheet flat on the floor or a long table before you hang it up. This is the moment to cover it with simple leaf outlines using a permanent marker. Sharpies work beautifully because the ink stays put once the spray hits. The outlines are loose guides, not colouring-in shapes because they give artists something to spray into, around, or completely over.
Once your drawing is done, hang the curtain across a wall or fence and protect the floor with a painter’s canvas or drop cloth.
Fill spray bottles with liquid watercolour, about ten drops per bottle to begin with, then adjust if you want softer washes or bold, glowing colour.
At Smudge we often set this up indoors, which feels wonderfully bold. Just check your fabric first. Thin curtains let colour spray through to the wall, which I secretly love, though it may not be ideal on a fresh white wall at home! Outdoors against a fence works just as well and can be easier to set up.


The Making
The first spray is always the most exciting isn't it! A cloud of colour hangs in the air before sinking into the fabric. Drips run down like rain and spread into shapes you could never plan. Reds bleed into yellows and suddenly a patch of orange glows across the curtain. Aim a bottle right at the middle of a leaf outline and the veins start to stand out, or spray across the whole sheet and watch shapes disappear under a flood of colour. The more the bottles are passed around, the faster the curtain transforms. What began as a blank sheet quickly feels like a wild autumn wall, shifting and growing with every layer of spray.


Variations
If fabric feels too big, tape together sheets of cardboard or paper and let the colours soak into those. Sponges and wide brushes change the marks completely, giving you heavy streaks and drips instead of mist. Once the curtain is dry, cut it into smaller pieces to save as collage paper. They always turn into the most beautiful scraps for later projects!
Materials
Curtain or large sheet of fabric
Permanent marker (Sharpies work best)
Spray bottles
Liquid watercolours
Painter’s canvas or drop cloth
Brushes or sponges (optional)
Back to Top
Curtain Of Colours
Spray a leaf-lined curtain and watch colours drift, drip, and mix!
Bookmark
Installations
The Set Up
Lay the curtain or large fabric sheet flat on the floor or a long table before you hang it up. This is the moment to cover it with simple leaf outlines using a permanent marker. Sharpies work beautifully because the ink stays put once the spray hits. The outlines are loose guides, not colouring-in shapes because they give artists something to spray into, around, or completely over.
Once your drawing is done, hang the curtain across a wall or fence and protect the floor with a painter’s canvas or drop cloth.
Fill spray bottles with liquid watercolour, about ten drops per bottle to begin with, then adjust if you want softer washes or bold, glowing colour.
At Smudge we often set this up indoors, which feels wonderfully bold. Just check your fabric first. Thin curtains let colour spray through to the wall, which I secretly love, though it may not be ideal on a fresh white wall at home! Outdoors against a fence works just as well and can be easier to set up.
The Making
The first spray is always the most exciting isn't it! A cloud of colour hangs in the air before sinking into the fabric. Drips run down like rain and spread into shapes you could never plan. Reds bleed into yellows and suddenly a patch of orange glows across the curtain. Aim a bottle right at the middle of a leaf outline and the veins start to stand out, or spray across the whole sheet and watch shapes disappear under a flood of colour. The more the bottles are passed around, the faster the curtain transforms. What began as a blank sheet quickly feels like a wild autumn wall, shifting and growing with every layer of spray.
Variations
If fabric feels too big, tape together sheets of cardboard or paper and let the colours soak into those. Sponges and wide brushes change the marks completely, giving you heavy streaks and drips instead of mist. Once the curtain is dry, cut it into smaller pieces to save as collage paper. They always turn into the most beautiful scraps for later projects!
Materials
Curtain or large sheet of fabric
Permanent marker (Sharpies work best)
Spray bottles
Liquid watercolours
Painter’s canvas or drop cloth
Brushes or sponges (optional)
Back to Top
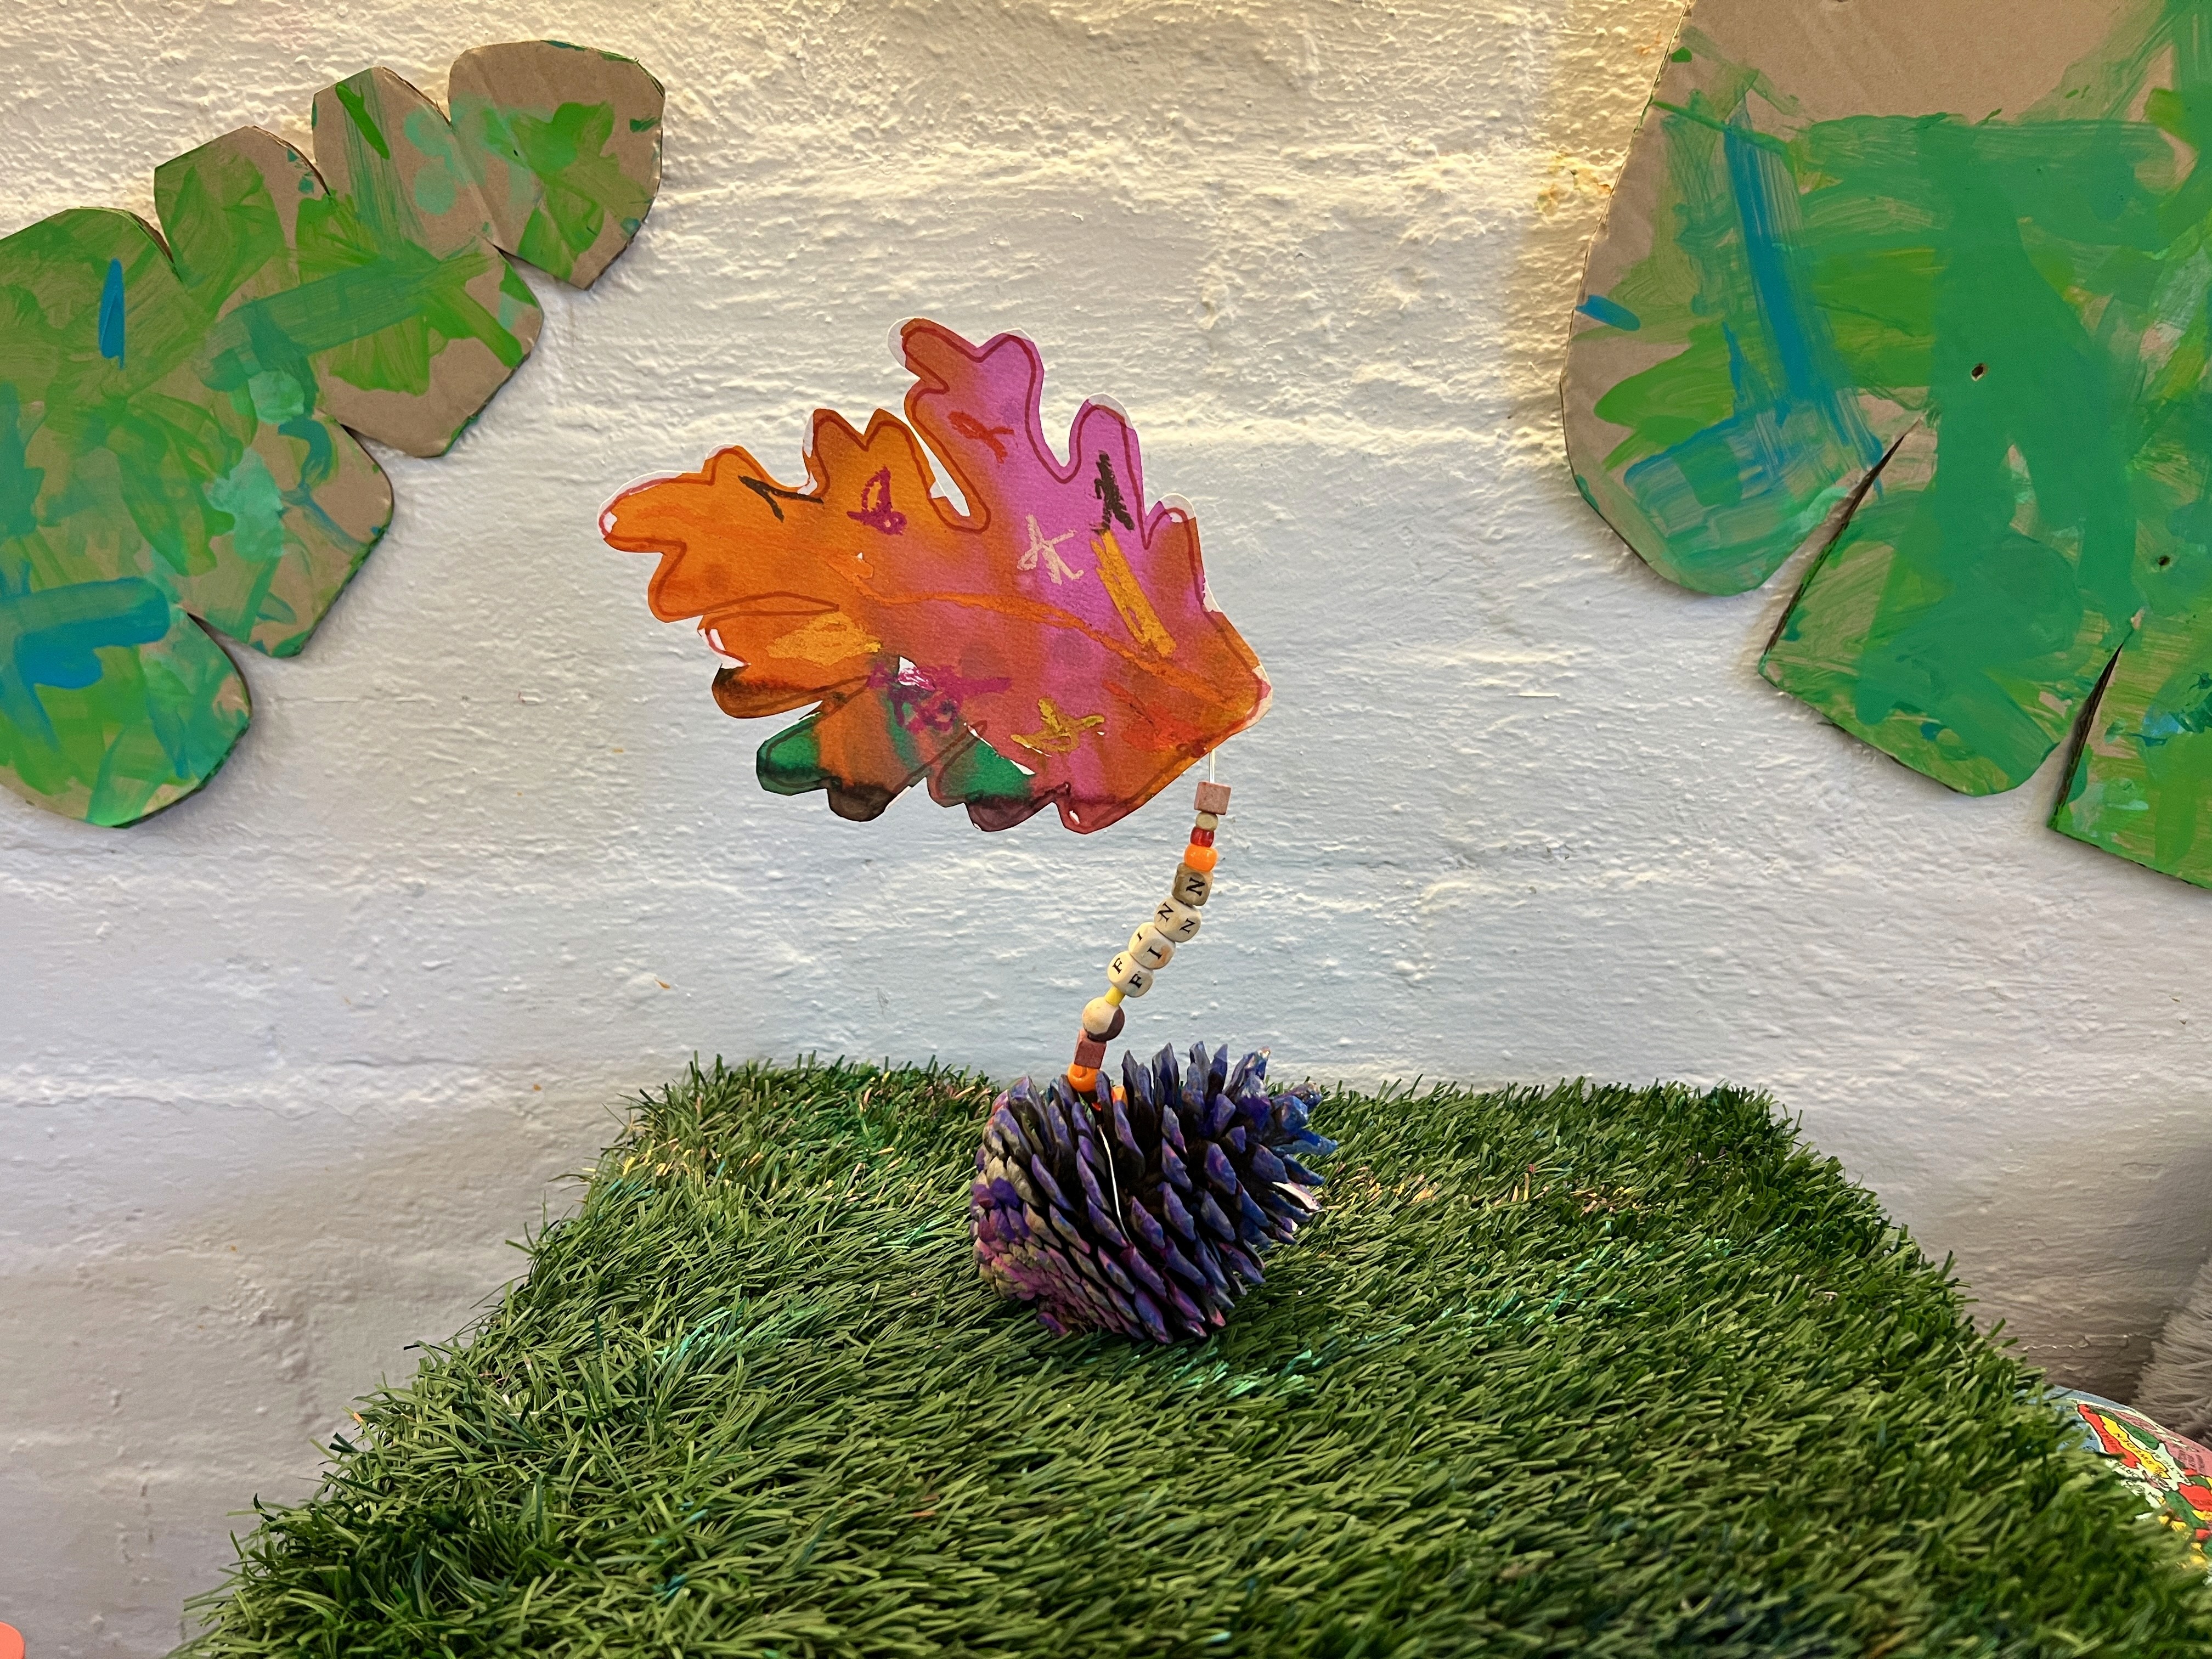
Pinecone Sculptures
Wrap, bead, and bend wire around found cones to build playful, balancing forms.
Bookmark
Sculpture

The Set Up
See a pinecone, pick it up!
They are already little sculptures in their own right, aren't they? Rough, spiky, perfectly balanced one moment and rolling away the next. The grooves make them brilliant for wrapping wire. Set out a pile of pinecones along with florist wire (18 gauge works well), beads, tape, and a collection of leaves ready to paint. Goggles are worth adding here. They keep eyes safe and, even better, they make the whole process feel like very serious sculptor’s work (in the best possible way).


The Making
Start by wrapping wire tightly around the pinecone until it feels secure, then leave a stem of wire standing tall. Thread on beads so the stem begins to shimmer with colour. Attach a painted leaf at the top and twist the wire into arcs and loops, watching how the sculpture shifts as it grows. Some lean delicately, others shoot upwards, and every adjustment changes the balance. Wire is very forgiving so you can bend and re-bend until it feels just right.
There is always a moment when a pinecone wobbles, tips over, and everyone bursts out laughing before bending the wire again to find a new way for it to stand tall.


Variations
Paint leaves in autumn shades of red, orange, yellow, or pink using watercolour, paint sticks, or tempera. Drizzle paint directly over the pinecones for extra texture and colour. Build a whole cluster of them and display together like a forest of tiny sculptures.
Materials
Pinecones
Florist wire (18 gauge)
Beads and sequins
Painted paper or real leaves
Tape
Goggles
Paint and brushes
Back to Top
Pinecone Sculptures
Wrap, bead, and bend wire around found cones to build playful, balancing forms.
Bookmark
Sculpture
The Set Up
See a pinecone, pick it up!
They are already little sculptures in their own right, aren't they? Rough, spiky, perfectly balanced one moment and rolling away the next. The grooves make them brilliant for wrapping wire. Set out a pile of pinecones along with florist wire (18 gauge works well), beads, tape, and a collection of leaves ready to paint. Goggles are worth adding here. They keep eyes safe and, even better, they make the whole process feel like very serious sculptor’s work (in the best possible way).
The Making
Start by wrapping wire tightly around the pinecone until it feels secure, then leave a stem of wire standing tall. Thread on beads so the stem begins to shimmer with colour. Attach a painted leaf at the top and twist the wire into arcs and loops, watching how the sculpture shifts as it grows. Some lean delicately, others shoot upwards, and every adjustment changes the balance. Wire is very forgiving so you can bend and re-bend until it feels just right.
There is always a moment when a pinecone wobbles, tips over, and everyone bursts out laughing before bending the wire again to find a new way for it to stand tall.
Variations
Paint leaves in autumn shades of red, orange, yellow, or pink using watercolour, paint sticks, or tempera. Drizzle paint directly over the pinecones for extra texture and colour. Build a whole cluster of them and display together like a forest of tiny sculptures.
Materials
Pinecones
Florist wire (18 gauge)
Beads and sequins
Painted paper or real leaves
Tape
Goggles
Paint and brushes
Back to Top
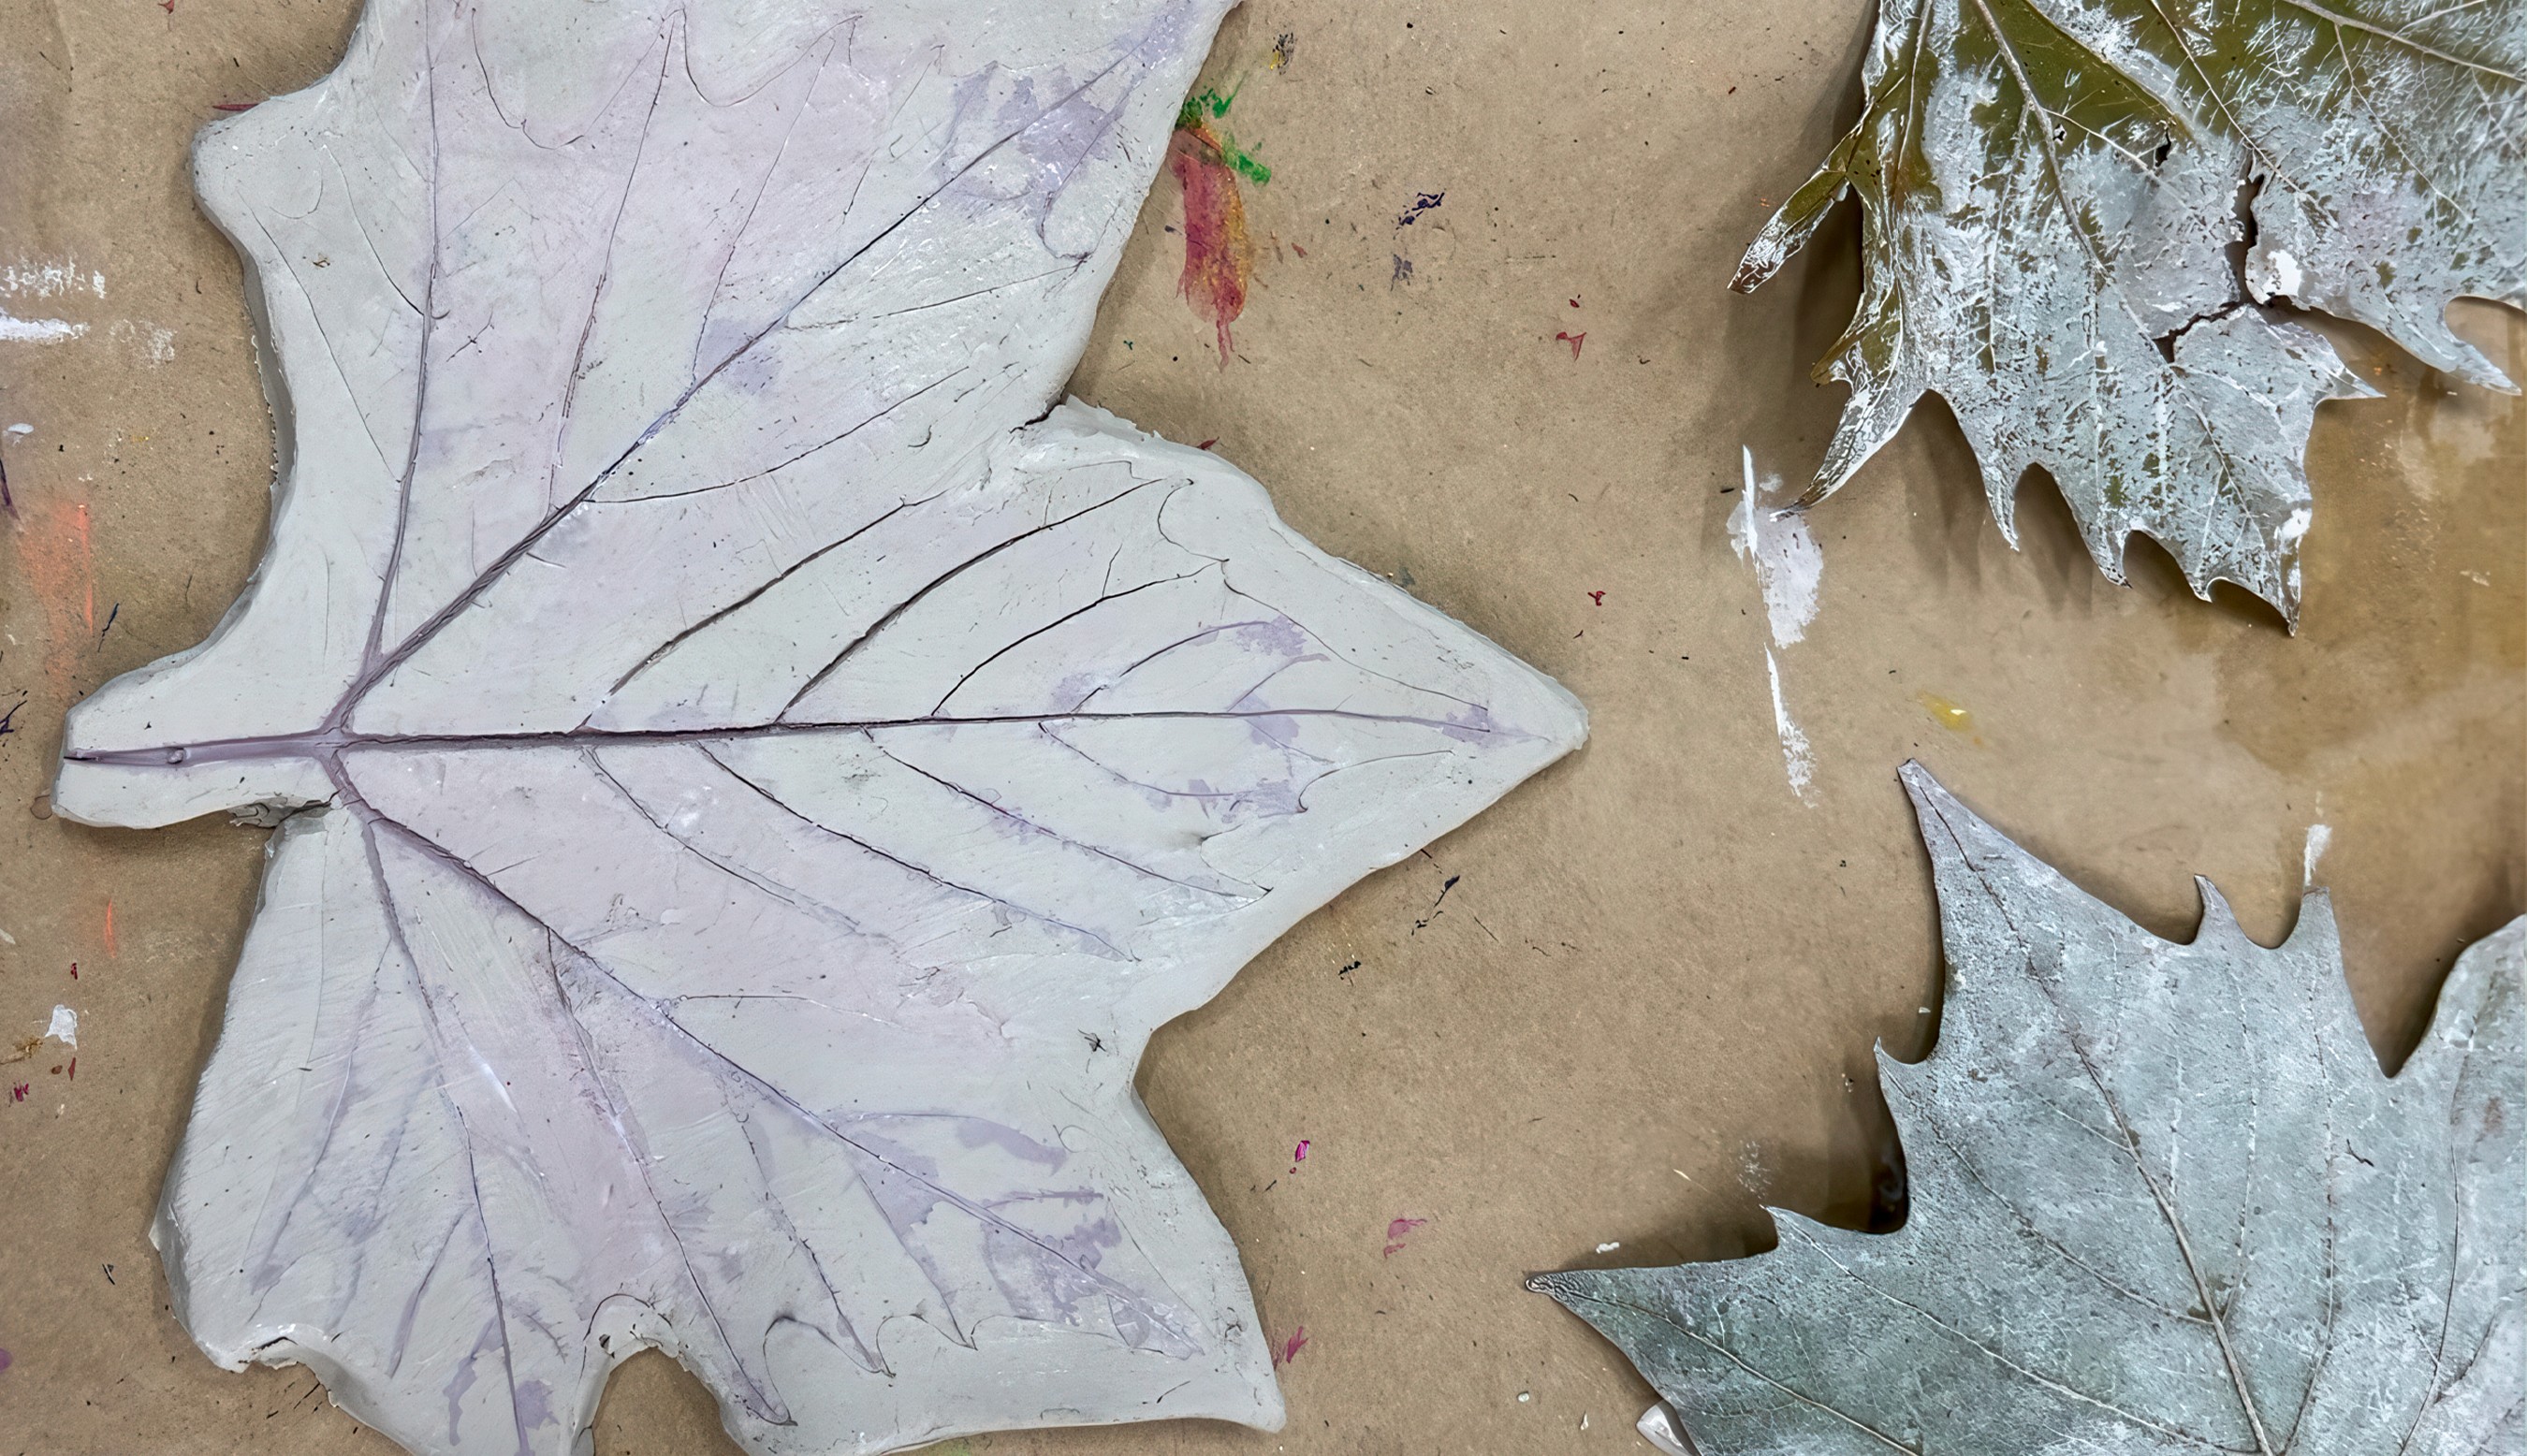
Clay Leaf Prints
Press real leaves into clay and keep the season’s veins and edges forever.
Bookmark
Sculpture
The Set Up
Air dry clay is our go-to at Smudge since we don't have an oven, but any clay will work. Hand out trays or plates so the clay can be rolled, warmed, and played with before the “real” making begins. Rolling, patting, even giving it a few firm thuds against the table softens it up. Do not overwork it or it will fill with air bubbles, though honestly a few cracks feel perfectly in keeping with crunchy autumn leaves. Collect a basket of leaves with strong veins and the more variety in shape and size the better!
The Making
Roll the clay into a slab, just a little bigger than your chosen leaf. Place the leaf vein side down, then roll over it firmly with a rolling pin or even a glass jar. Peeling it away to reveal the print is always a moment of pure magic! The delicate lines suddenly pressed into the clay forever.
Sometimes leaves rip or crumble, but that only adds to the experience, and picking out the little pieces is oddly satisfying. Trim around the shape with a butter knife, leaving a border if you want the edges to curl upwards into a shallow dish. Everyone (including me!) loves seeing how each leaf behaves differently; a bold oak leaves one kind of memory, while a fragile fern leaves another.


Variations
Stamp words, letters, or tiny patterns into the clay before it dries.
Curl the edges into bowls for treasures, or keep them flat as tiles.
Once dry, paint or seal the surface with Modge Podge (or similar), or leave it plain so the shadows of the veins stay sharp.
You could scatter the finished pieces across a shelf or windowsill and the space suddenly feels like it has its own indoor forest floor.
Materials
Air dry clay (or any clay you prefer)
Autumn leaves with strong veins
Rolling pins or jars
Butter knives or clay tools
Trays or plates for rolling
Optional: paint, brushes, sealant
Back to Top
Clay Leaf Prints
Press real leaves into clay and keep the season’s veins and edges forever.
Bookmark
Sculpture
The Set Up
Air dry clay is our go-to at Smudge since we don't have an oven, but any clay will work. Hand out trays or plates so the clay can be rolled, warmed, and played with before the “real” making begins. Rolling, patting, even giving it a few firm thuds against the table softens it up. Do not overwork it or it will fill with air bubbles, though honestly a few cracks feel perfectly in keeping with crunchy autumn leaves. Collect a basket of leaves with strong veins and the more variety in shape and size the better!
The Making
Roll the clay into a slab, just a little bigger than your chosen leaf. Place the leaf vein side down, then roll over it firmly with a rolling pin or even a glass jar. Peeling it away to reveal the print is always a moment of pure magic! The delicate lines suddenly pressed into the clay forever.
Sometimes leaves rip or crumble, but that only adds to the experience, and picking out the little pieces is oddly satisfying. Trim around the shape with a butter knife, leaving a border if you want the edges to curl upwards into a shallow dish. Everyone (including me!) loves seeing how each leaf behaves differently; a bold oak leaves one kind of memory, while a fragile fern leaves another.
Variations
Stamp words, letters, or tiny patterns into the clay before it dries.
Curl the edges into bowls for treasures, or keep them flat as tiles.
Once dry, paint or seal the surface with Modge Podge (or similar), or leave it plain so the shadows of the veins stay sharp.
You could scatter the finished pieces across a shelf or windowsill and the space suddenly feels like it has its own indoor forest floor.
Materials
Air dry clay (or any clay you prefer)
Autumn leaves with strong veins
Rolling pins or jars
Butter knives or clay tools
Trays or plates for rolling
Optional: paint, brushes, sealant
Back to Top
Leaf Resist Paintings
Watch as the leaves appear from the background.
Bookmark
Painting & Drawing

The Set Up
Paint sticks are one of our favourite materials at Smudge. They glide on smooth like lipstick, blend in seconds, and dry instantly so the play never slows down. Start by filling the page with bold abstract shapes in a chosen palette. Could you work only with warm autumn tones, or mix in cool blues and greens for contrast? Pause to chat about how different colours feel — does a fiery orange make the page buzz, while a soft blue calms it down? Paint works beautifully too, it just needs time to dry in the sunshine or a quick blast with a hairdryer.


The Making
Once the background is alive with colour, bring in a collection of autumn leaves. Trace their outlines directly onto the page, or for an extra challenge, draw them by looking closely, like a still life. When the shapes are ready, use a black or white paint stick to block in all the spaces around them. Suddenly the leaves glow with the colours underneath.
White softens everything, letting the background shine through in a misty, almost translucent way. Black does the opposite, locking the colour inside the leaves so they glow like stained glass. Try layering the two together — what happens if you put down white first, then black, or the other way around? Each order changes the effect. There is no single right way, only endless experiments in how colour can shift and surprise.


Variations
Layer leaves over each other so the colours stack in unexpected ways. Add fine details inside the leaf shapes with markers or gel pens. Try metallic paint sticks so the leaves shimmer and catch the light, as if frost has settled across the page.
Materials
Paint sticks in a range of colours (or paint if you prefer)
Thick paper or card
A variety of autumn leaves
Black and white paint sticks
Markers, gel pens, or metallic paint sticks for details
Back to Top
Leaf Resist Paintings
Watch as the leaves appear from the background.
Bookmark
Painting & Drawing
The Set Up
Paint sticks are one of our favourite materials at Smudge. They glide on smooth like lipstick, blend in seconds, and dry instantly so the play never slows down. Start by filling the page with bold abstract shapes in a chosen palette. Could you work only with warm autumn tones, or mix in cool blues and greens for contrast? Pause to chat about how different colours feel — does a fiery orange make the page buzz, while a soft blue calms it down? Paint works beautifully too, it just needs time to dry in the sunshine or a quick blast with a hairdryer.
The Making
Once the background is alive with colour, bring in a collection of autumn leaves. Trace their outlines directly onto the page, or for an extra challenge, draw them by looking closely, like a still life. When the shapes are ready, use a black or white paint stick to block in all the spaces around them. Suddenly the leaves glow with the colours underneath.
White softens everything, letting the background shine through in a misty, almost translucent way. Black does the opposite, locking the colour inside the leaves so they glow like stained glass. Try layering the two together — what happens if you put down white first, then black, or the other way around? Each order changes the effect. There is no single right way, only endless experiments in how colour can shift and surprise.
Variations
Layer leaves over each other so the colours stack in unexpected ways. Add fine details inside the leaf shapes with markers or gel pens. Try metallic paint sticks so the leaves shimmer and catch the light, as if frost has settled across the page.
Materials
Paint sticks in a range of colours (or paint if you prefer)
Thick paper or card
A variety of autumn leaves
Black and white paint sticks
Markers, gel pens, or metallic paint sticks for details
Back to Top
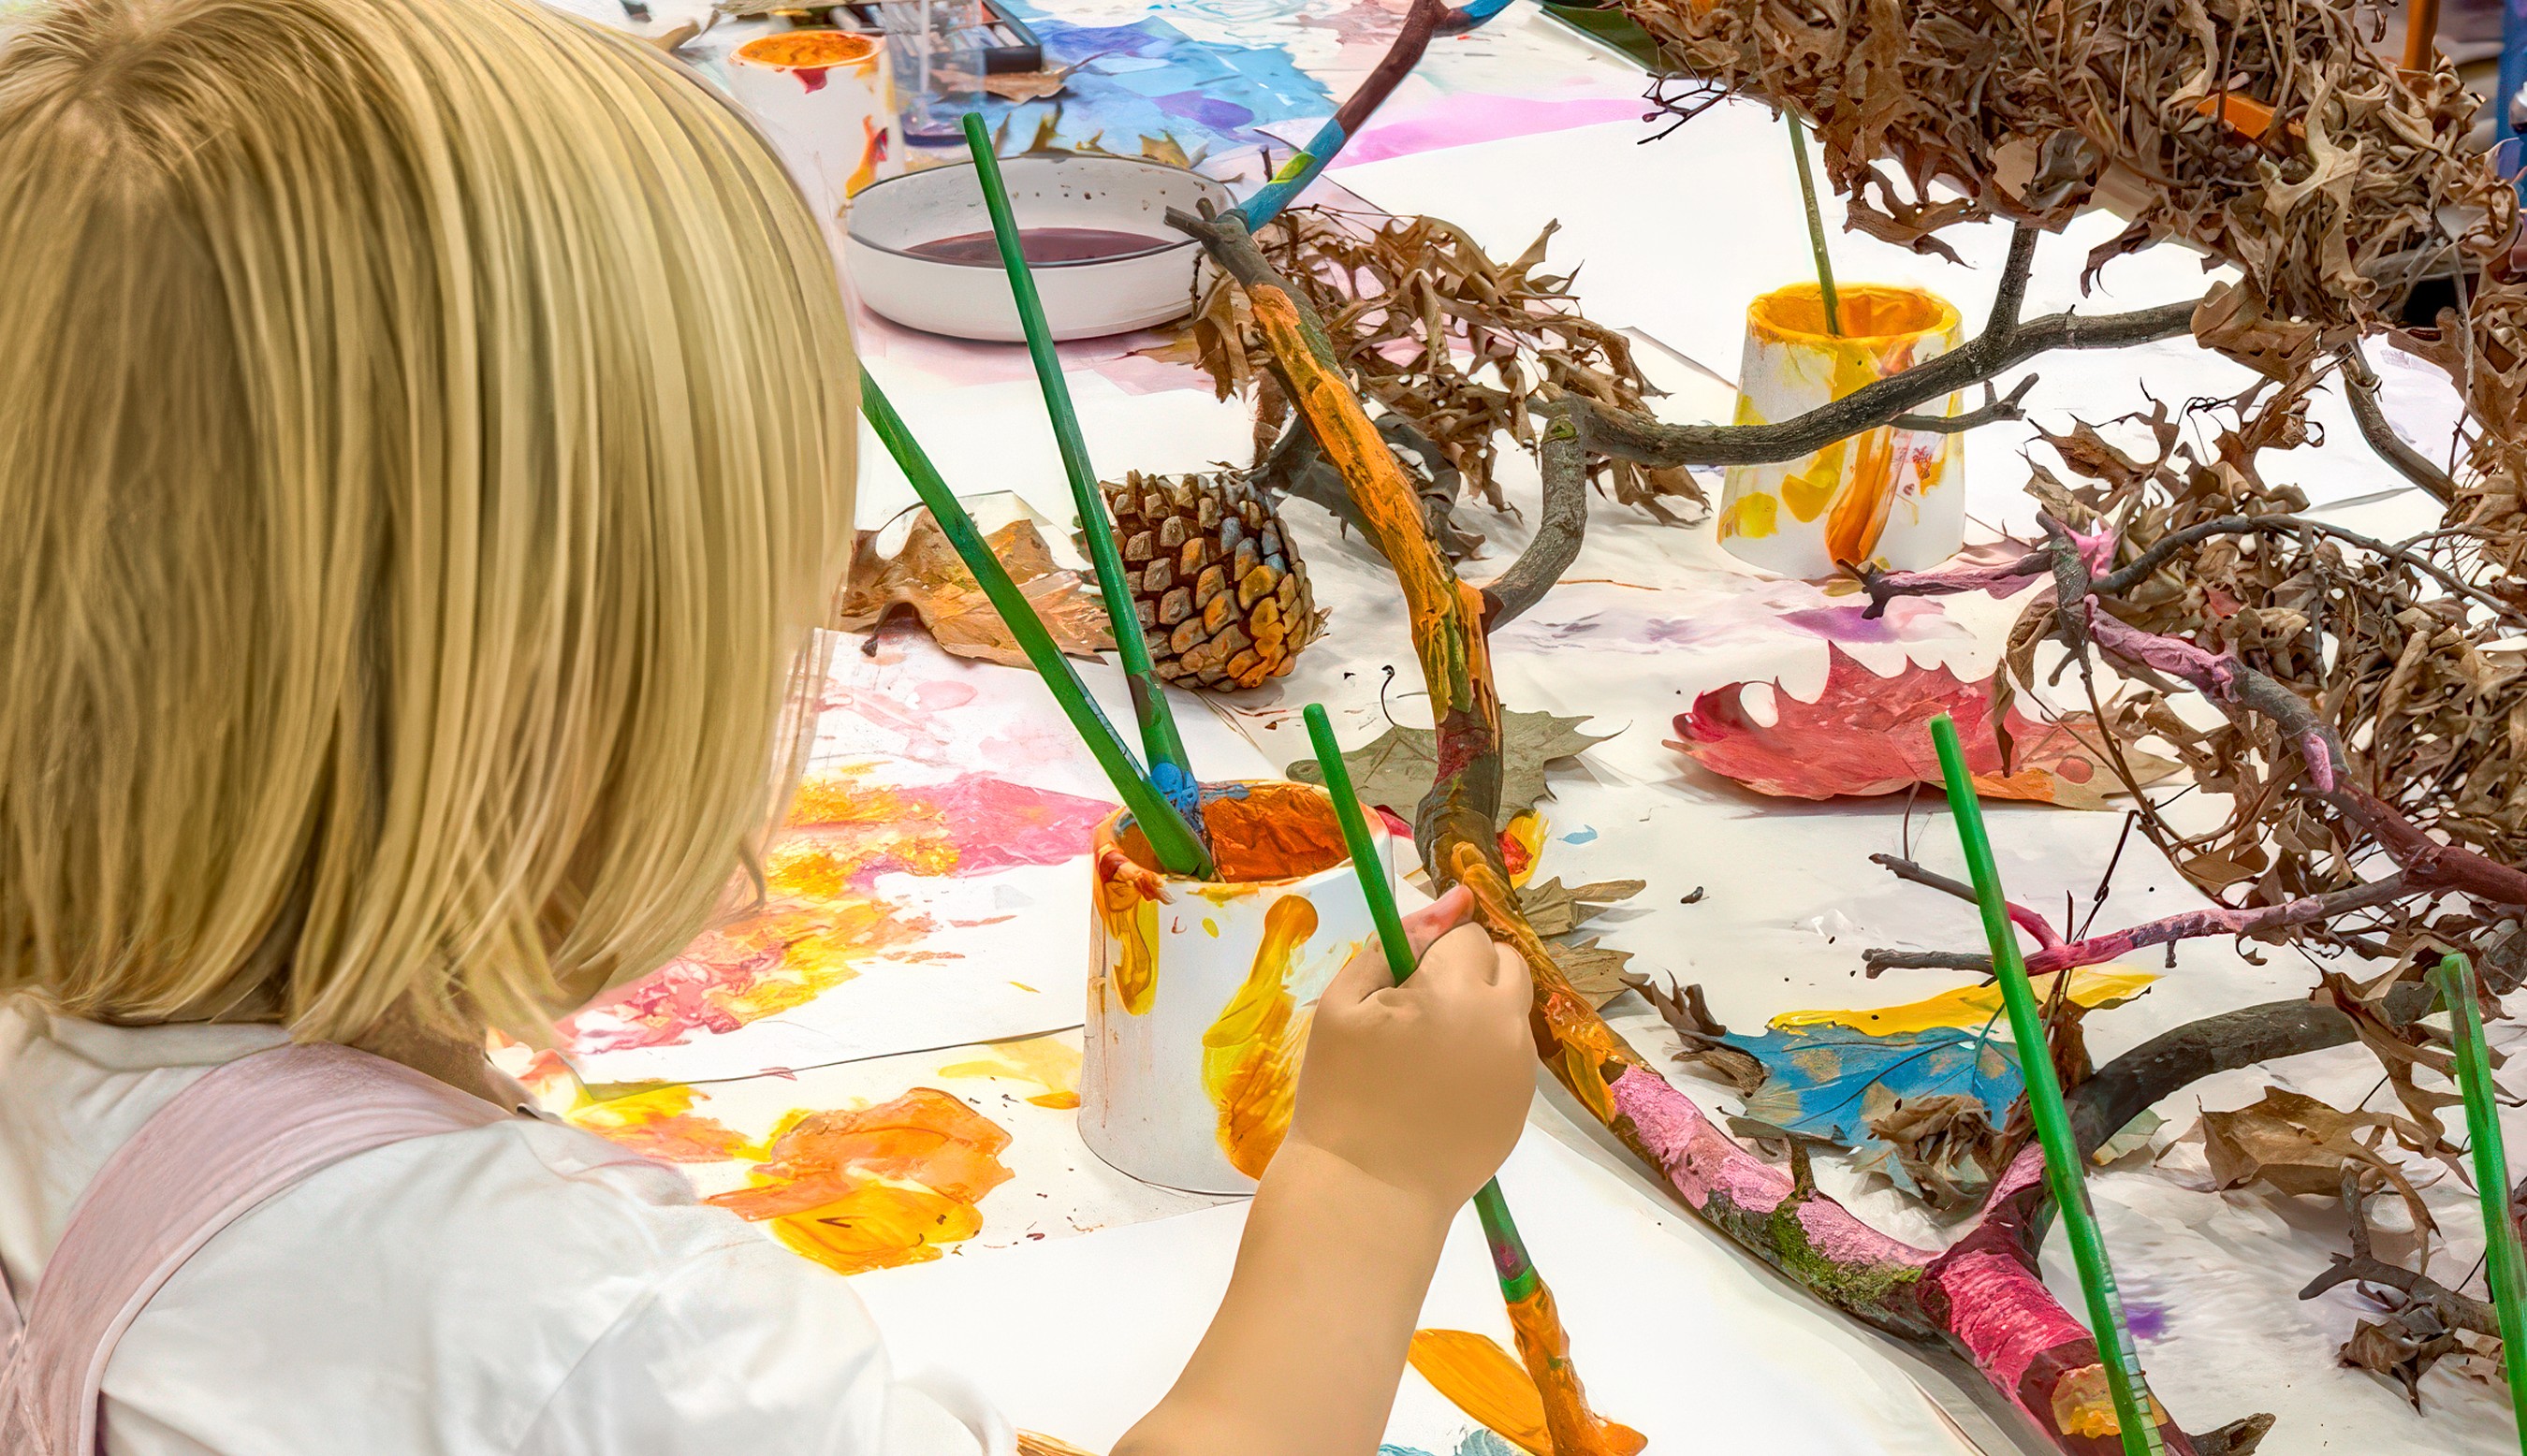
Painting Fallen Branches
Let your brushes meet bark! You'll bring the season inside, in the very best way,
Bookmark
Creative Exploration
The Set Up
Go for a walk and gather fallen branches. Even before the paint comes out, your table will look alive piled with twigs, sticks, and curved limbs. Cover the surface with a drop cloth, set out jars of poster paint, brushes of every size, and water for rinsing.
The Making
Paint never sits politely on bark, does it? It soaks in, skips over ridges, drips onto the table, and sometimes runs the length of a branch before settling in the cracks. That unpredictability is half the fun! Keep turning the branch and notice how every new angle asks for a different mark. Some strokes flood colour into the grooves, others leave streaks that almost glow against the wood.
At Smudge, we love standing the finished branches upright in a pot — suddenly the studio has its own autumn tree, bold and bright and impossible to ignore!
Variations
Try chunky brushes on thick branches for big gestures, or tiny detail brushes for fine lines that trace the bark. Once dry, wrap parts in yarn, add beads, or layer on more colour until the branches feel like a mix of painting and sculpture.
Materials
Fallen branches
Poster or tempera paint
Water jars
Brushes in a range of sizes
Drop cloth or old sheet
Optional: yarn, beads, glue
Back to Top
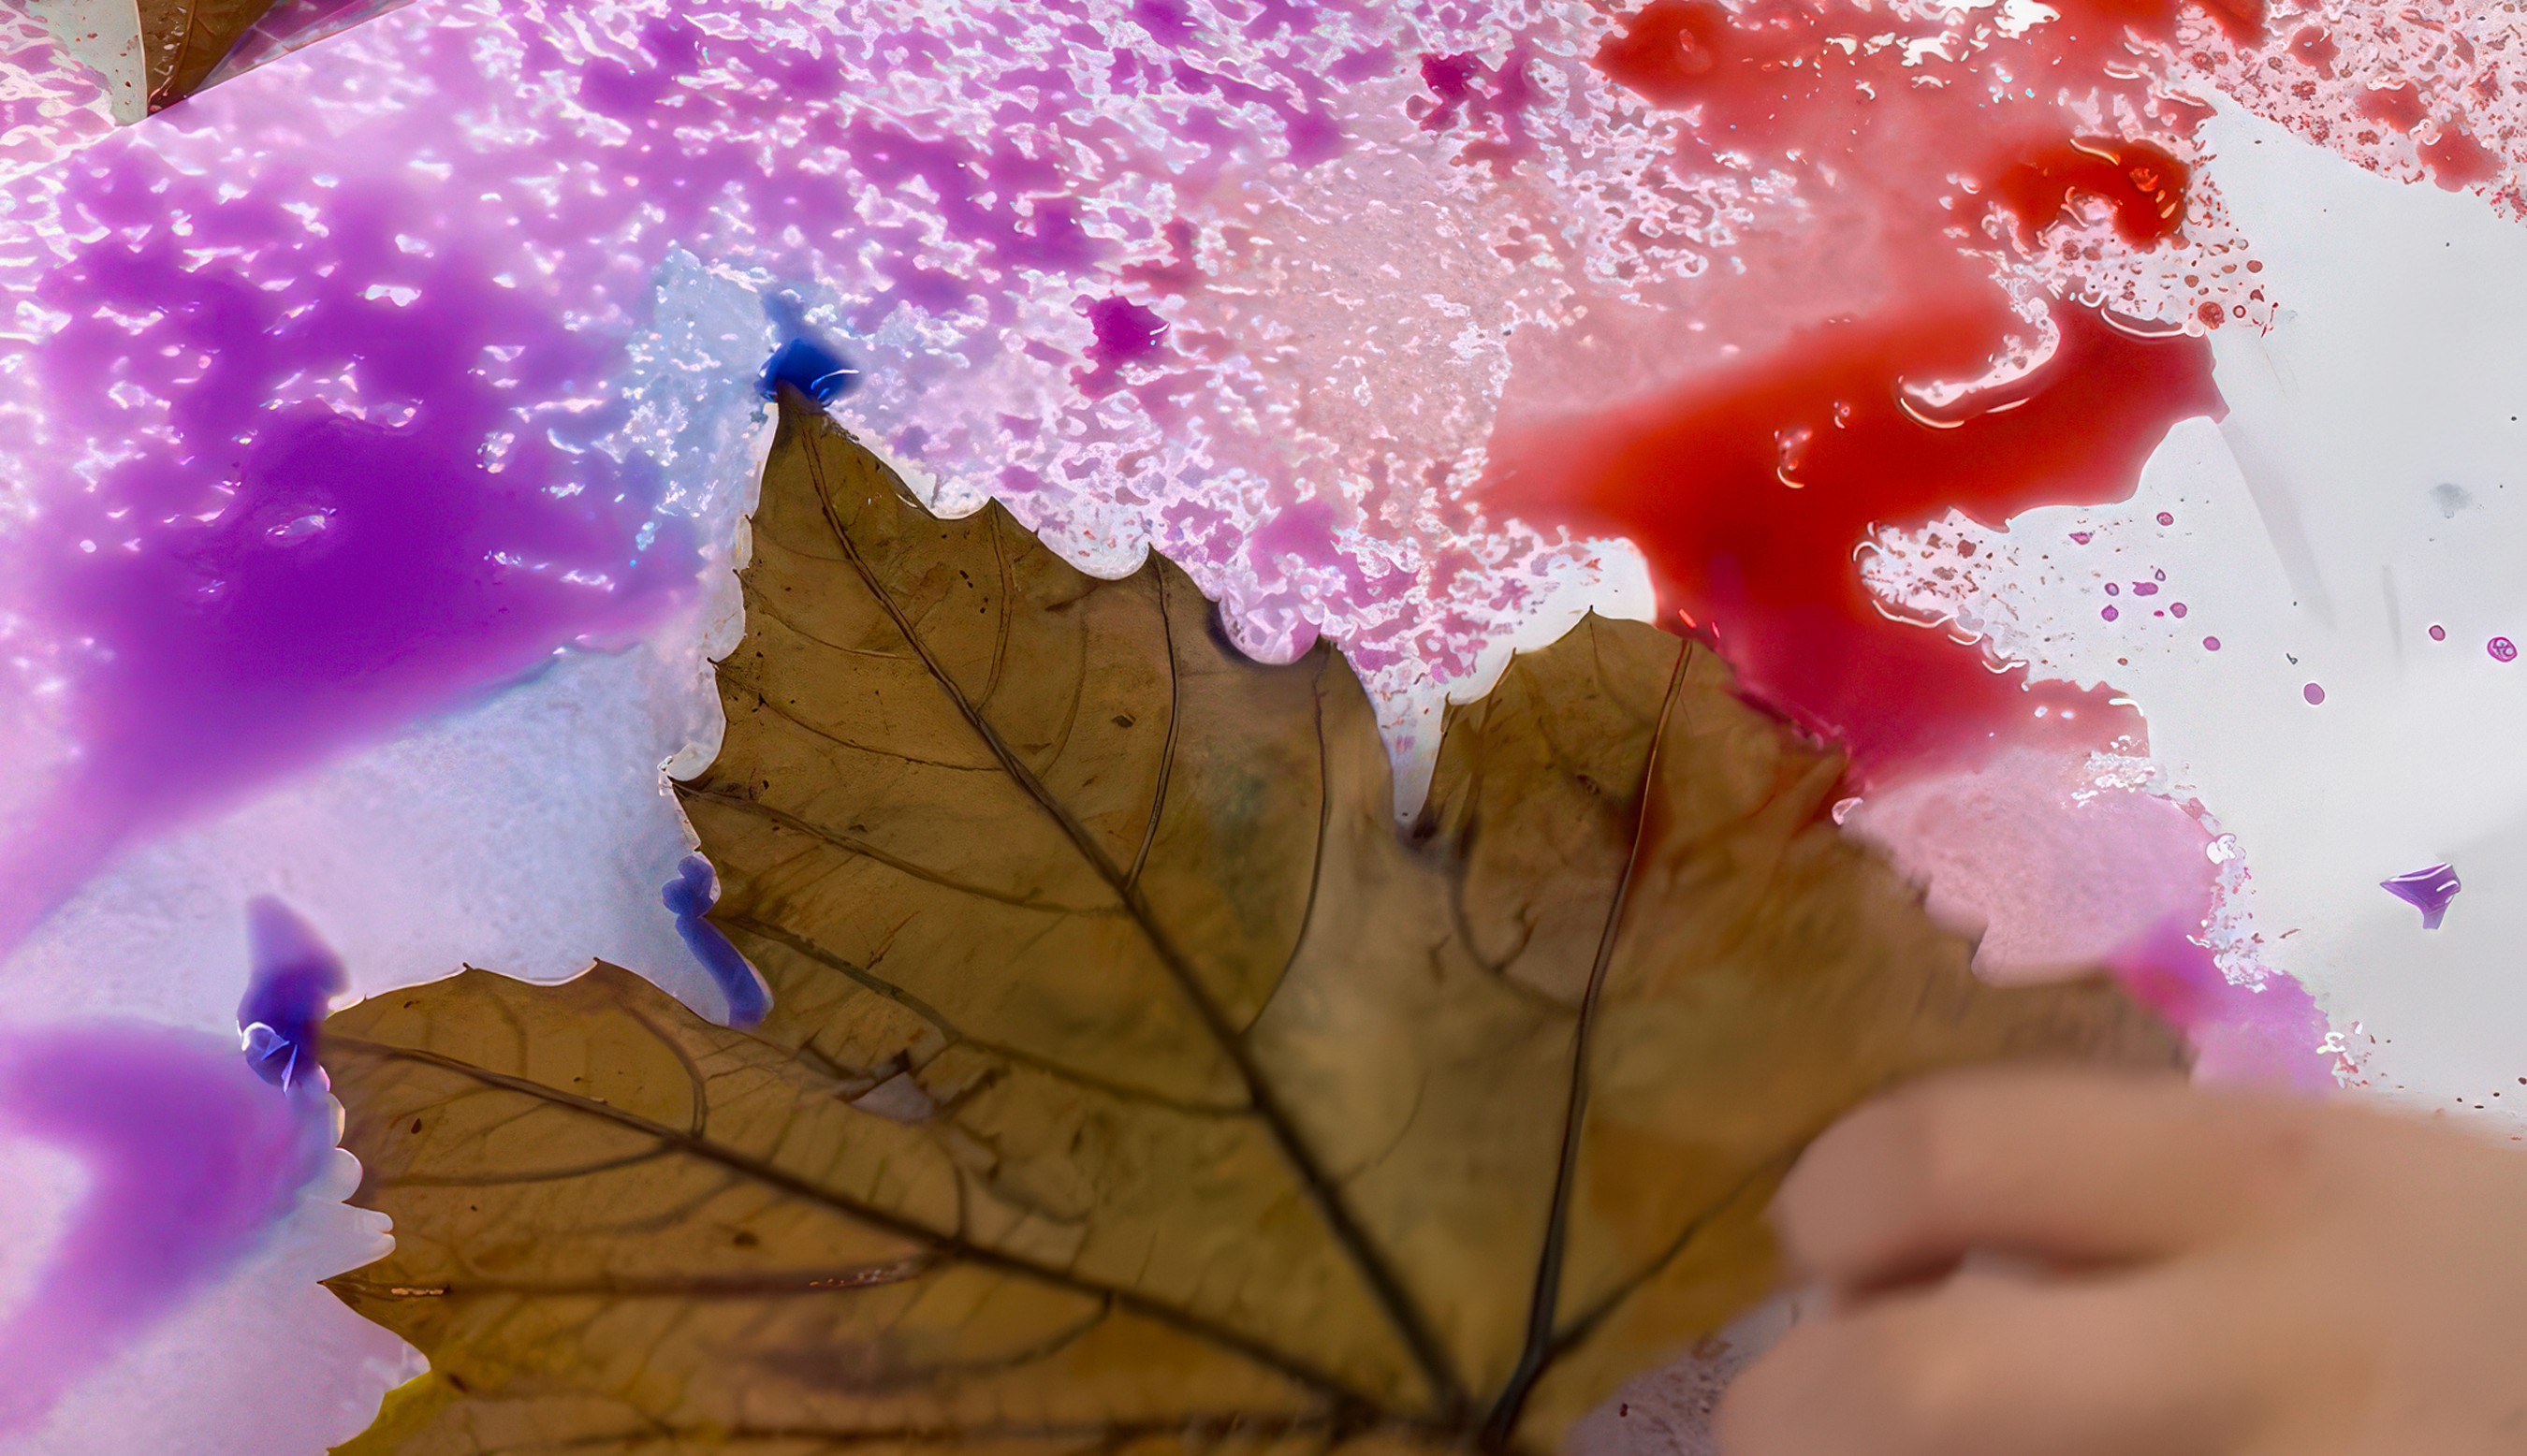
Ghost Leaves
What gorgeous shapes can leaves and mists of colour make?
Bookmark
Print Making
The Set Up
Pile the table with leaves gathered from outside. It doesn't matter if they are freshly fallen or dry and brittle, each one brings its own kind of magic. Spread them out beside thick craft paper or watercolour sheets. Fill spray bottles with liquid watercolours, about ten drops each to start. Adjust until the colours feel as soft or as bold as you want.
The Making
Scatter leaves across the page and spray. Hold the bottle high and colour drifts down like mist, settling softly into the gaps. Spray close and the edges come out sharp, almost like shadows frozen mid-fall. The moment the leaf is lifted never (ever) gets old; crisp white silhouettes with the gorgeous bursts of colour. Keep layering! Add more leaves, tilt them on angles, spray again.


Variations
Try metallic sprays or shimmer paint so the silhouettes catch the light like frosted leaves in early morning.
Build a collaborative piece where everyone adds to the same sheet, each spray leaving behind a trace of the moment.
Materials
Autumn leaves (fresh, dry, curled, or flat)
Thick craft or watercolour paper
Spray bottles
Liquid watercolours
Optional metallic sprays or shimmer paint
Drop cloths or protective covering
Back to Top
Ghost Leaves
What gorgeous shapes can leaves and mists of colour make?
Bookmark
Print Making
The Set Up
Pile the table with leaves gathered from outside. It doesn't matter if they are freshly fallen or dry and brittle, each one brings its own kind of magic. Spread them out beside thick craft paper or watercolour sheets. Fill spray bottles with liquid watercolours, about ten drops each to start. Adjust until the colours feel as soft or as bold as you want.
The Making
Scatter leaves across the page and spray. Hold the bottle high and colour drifts down like mist, settling softly into the gaps. Spray close and the edges come out sharp, almost like shadows frozen mid-fall. The moment the leaf is lifted never (ever) gets old; crisp white silhouettes with the gorgeous bursts of colour. Keep layering! Add more leaves, tilt them on angles, spray again.
Variations
Try metallic sprays or shimmer paint so the silhouettes catch the light like frosted leaves in early morning.
Build a collaborative piece where everyone adds to the same sheet, each spray leaving behind a trace of the moment.
Materials
Autumn leaves (fresh, dry, curled, or flat)
Thick craft or watercolour paper
Spray bottles
Liquid watercolours
Optional metallic sprays or shimmer paint
Drop cloths or protective covering
Back to Top
Spin Art Leaves
Squeeze and spin and lift to reveal! A Smudge favourite process.
Bookmark
Print Making
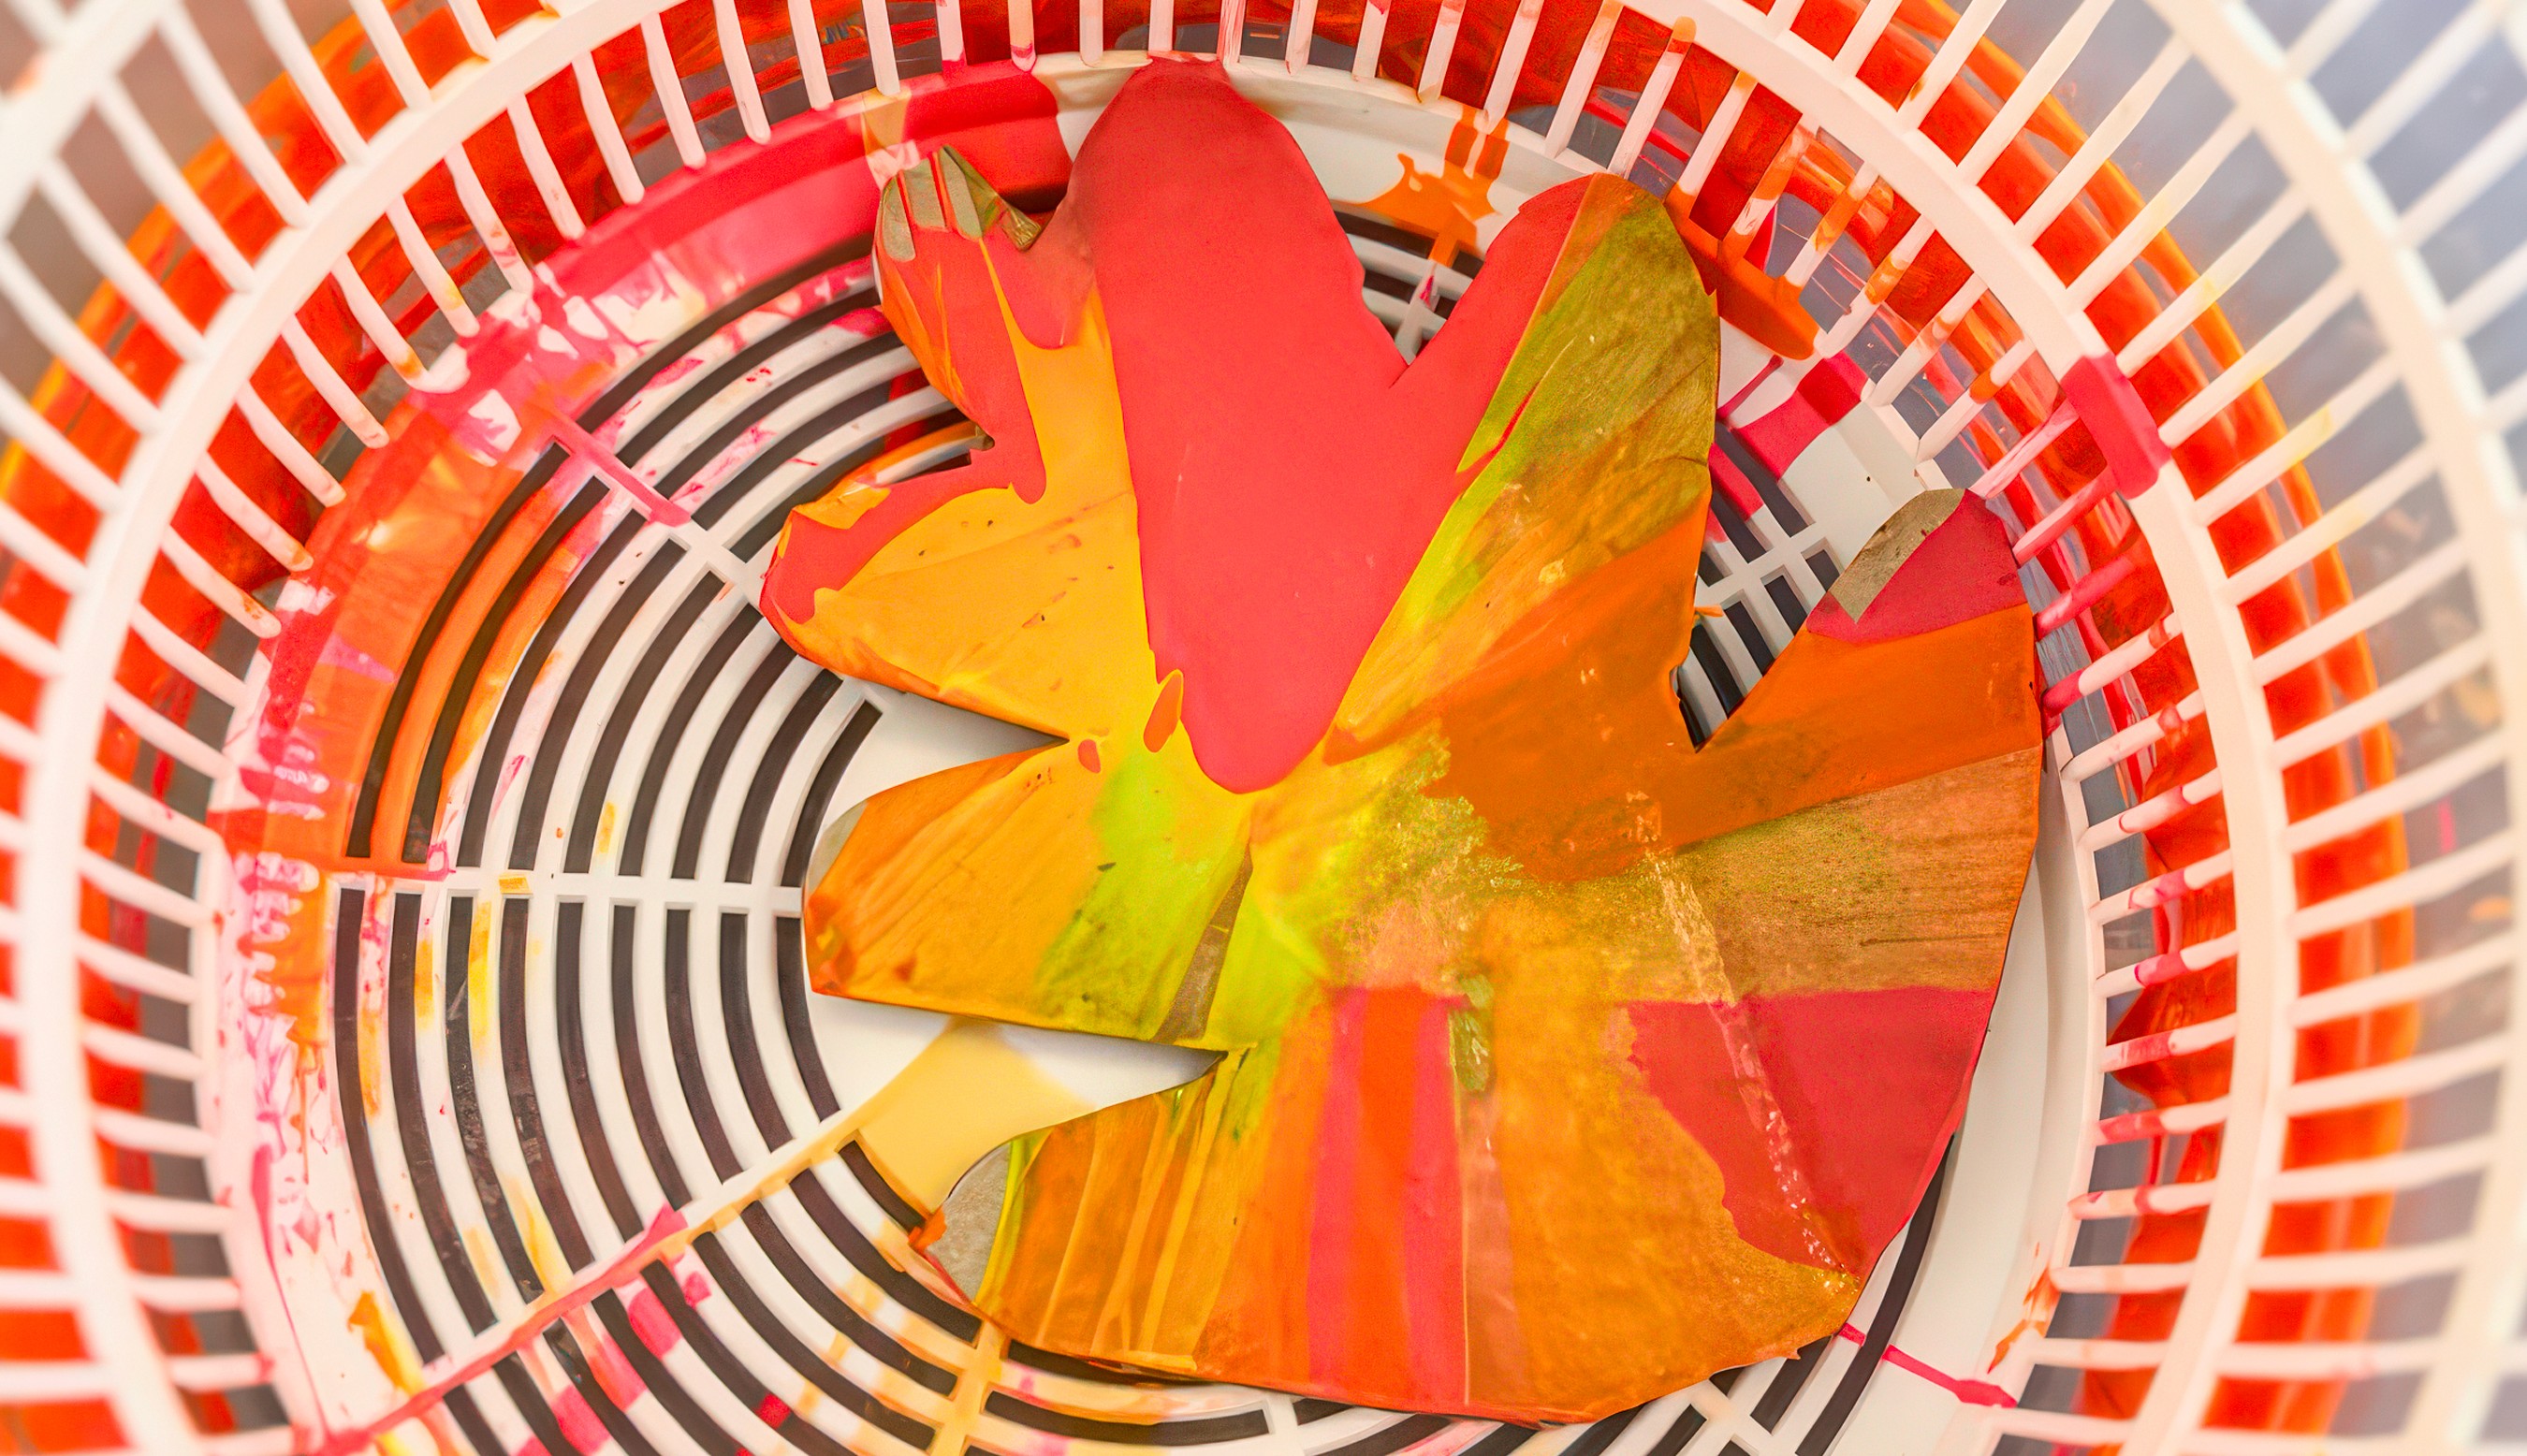
The Set Up
Set the salad spinner on the table and have sturdy card circles ready to drop in. Thick cardboard works beautifully. Plywood coasters or pre cut shapes are brilliant if you want pieces that last. Or keep it open ended and lay out plain paper so artists can draw and cut their own leaves or any shape at all. Fill squeezy bottles with poster or tempera paint. The Ikea MALA fluorescent ones are our favourite because a small squeeze goes a long way and they build hand strength. Plus you can pop the top off to keep refilling with any paint you like. Keep a tray or rack nearby for drying.


The Making
Place a shape in the basket. Add drizzles of paint. You could try a dot in the middle, then try a ring near the edge, then cross a few lines and see which spin you love best. Close the lid and give it a real spin. The reveal is the magic and just the best part! Lids lift, everyone leans in, and the colour has flown outward into bursts and spirals. Rotate the circle and spin again if you want more movement. If you're planning on hanging them, punching a hole beforehand is a little easier, but after the paint is dry works great too.


Variations
String a cluster of leaves into a garland or mobile. Clip them onto painted branches for a bright autumn bouquet. Build layers by spinning, drying, rotating, then spinning again. Try a tiny 'mask' with stickers or tape and peel them off after the spin for crisp lines inside the swirls.
Materials
Salad spinner
Circles of card or thick cardboard that fit the basket
Plywood coasters or pre cut shapes
Plain paper for drawing and cutting custom leaves
Refillable squeezy paint bottles
Poster or tempera paint
Scissors, hole punch, string or wool
Tray or rack for drying
Back to Top
Spin Art Leaves
Squeeze and spin and lift to reveal! A Smudge favourite process.
Bookmark
Print Making
The Set Up
Set the salad spinner on the table and have sturdy card circles ready to drop in. Thick cardboard works beautifully. Plywood coasters or pre cut shapes are brilliant if you want pieces that last. Or keep it open ended and lay out plain paper so artists can draw and cut their own leaves or any shape at all. Fill squeezy bottles with poster or tempera paint. The Ikea MALA fluorescent ones are our favourite because a small squeeze goes a long way and they build hand strength. Plus you can pop the top off to keep refilling with any paint you like. Keep a tray or rack nearby for drying.
The Making
Place a shape in the basket. Add drizzles of paint. You could try a dot in the middle, then try a ring near the edge, then cross a few lines and see which spin you love best. Close the lid and give it a real spin. The reveal is the magic and just the best part! Lids lift, everyone leans in, and the colour has flown outward into bursts and spirals. Rotate the circle and spin again if you want more movement. If you're planning on hanging them, punching a hole beforehand is a little easier, but after the paint is dry works great too.
Variations
String a cluster of leaves into a garland or mobile. Clip them onto painted branches for a bright autumn bouquet. Build layers by spinning, drying, rotating, then spinning again. Try a tiny 'mask' with stickers or tape and peel them off after the spin for crisp lines inside the swirls.
Materials
Salad spinner
Circles of card or thick cardboard that fit the basket
Plywood coasters or pre cut shapes
Plain paper for drawing and cutting custom leaves
Refillable squeezy paint bottles
Poster or tempera paint
Scissors, hole punch, string or wool
Tray or rack for drying
Back to Top
Fall Collage
Let leaves, foil, and fabric collide into one glowing page.
Bookmark
Collage

The Set Up
Spread the table with a harvest of scraps in autumn colours. Fabric offcuts, shiny foil, paint swatches, pressed leaves, and pieces of bark all belong here. Add in old postcards, pages from past artworks, washi tape, and anything else waiting for a second life. Keep scissors, glue, and shape punches close at hand.
For an extra spark, include thin foil (kitchen foil or saved wrappers). Press a leaf under the foil and gently rub across it with the side of an oil pastel or paint stick. Suddenly the veins and edges appear in shimmering relief, like a fossil. These embossed foils become striking elements to layer into the collage.
The Making
Press a leaf under the foil and rub until its veins appear like a secret map.
Rip or cut…which feels better in your hands? Layer bark across shiny paper, then cover it with fabric and peel a corner back so the textures jostle against each other. Could a collage feel more like a landscape, or maybe like a basket of treasures tipped out on the table? Try tucking scraps under each other, scattering pieces loosely, or building up thick ridges of texture. Every choice changes the story, and every page ends up gorgeously different!


Variations
Add simple shadow play: fold paper scraps or mount pieces onto cardboard strips so they lift off the page. Under a lamp, the collage throws shadows that move and change throughout the day.
Stain the base paper first with natural inks made from beetroot, onion skins, or turmeric. The earthy washes give the whole piece a warm undertone before the collage even begins.
Materials
Fabric scraps, foil, paint swatches
Pressed leaves, bark, seeds
Thin foil sheets for embossing
Oil pastels or paint sticks
Old postcards or recycled artworks
Washi tape and stickers
Scissors, glue sticks or PVA
Shape punches (optional)
Back to Top
Fall Collage
Let leaves, foil, and fabric collide into one glowing page.
Bookmark
Collage
The Set Up
Spread the table with a harvest of scraps in autumn colours. Fabric offcuts, shiny foil, paint swatches, pressed leaves, and pieces of bark all belong here. Add in old postcards, pages from past artworks, washi tape, and anything else waiting for a second life. Keep scissors, glue, and shape punches close at hand.
For an extra spark, include thin foil (kitchen foil or saved wrappers). Press a leaf under the foil and gently rub across it with the side of an oil pastel or paint stick. Suddenly the veins and edges appear in shimmering relief, like a fossil. These embossed foils become striking elements to layer into the collage.
The Making
Press a leaf under the foil and rub until its veins appear like a secret map.
Rip or cut…which feels better in your hands? Layer bark across shiny paper, then cover it with fabric and peel a corner back so the textures jostle against each other. Could a collage feel more like a landscape, or maybe like a basket of treasures tipped out on the table? Try tucking scraps under each other, scattering pieces loosely, or building up thick ridges of texture. Every choice changes the story, and every page ends up gorgeously different!
Variations
Add simple shadow play: fold paper scraps or mount pieces onto cardboard strips so they lift off the page. Under a lamp, the collage throws shadows that move and change throughout the day.
Stain the base paper first with natural inks made from beetroot, onion skins, or turmeric. The earthy washes give the whole piece a warm undertone before the collage even begins.
Materials
Fabric scraps, foil, paint swatches
Pressed leaves, bark, seeds
Thin foil sheets for embossing
Oil pastels or paint sticks
Old postcards or recycled artworks
Washi tape and stickers
Scissors, glue sticks or PVA
Shape punches (optional)
Back to Top
