
ARTFUL EXPERIENCES
Painted Wardrobe
The ultimate hanging canvas!
Bookmark
Installations
The Set Up
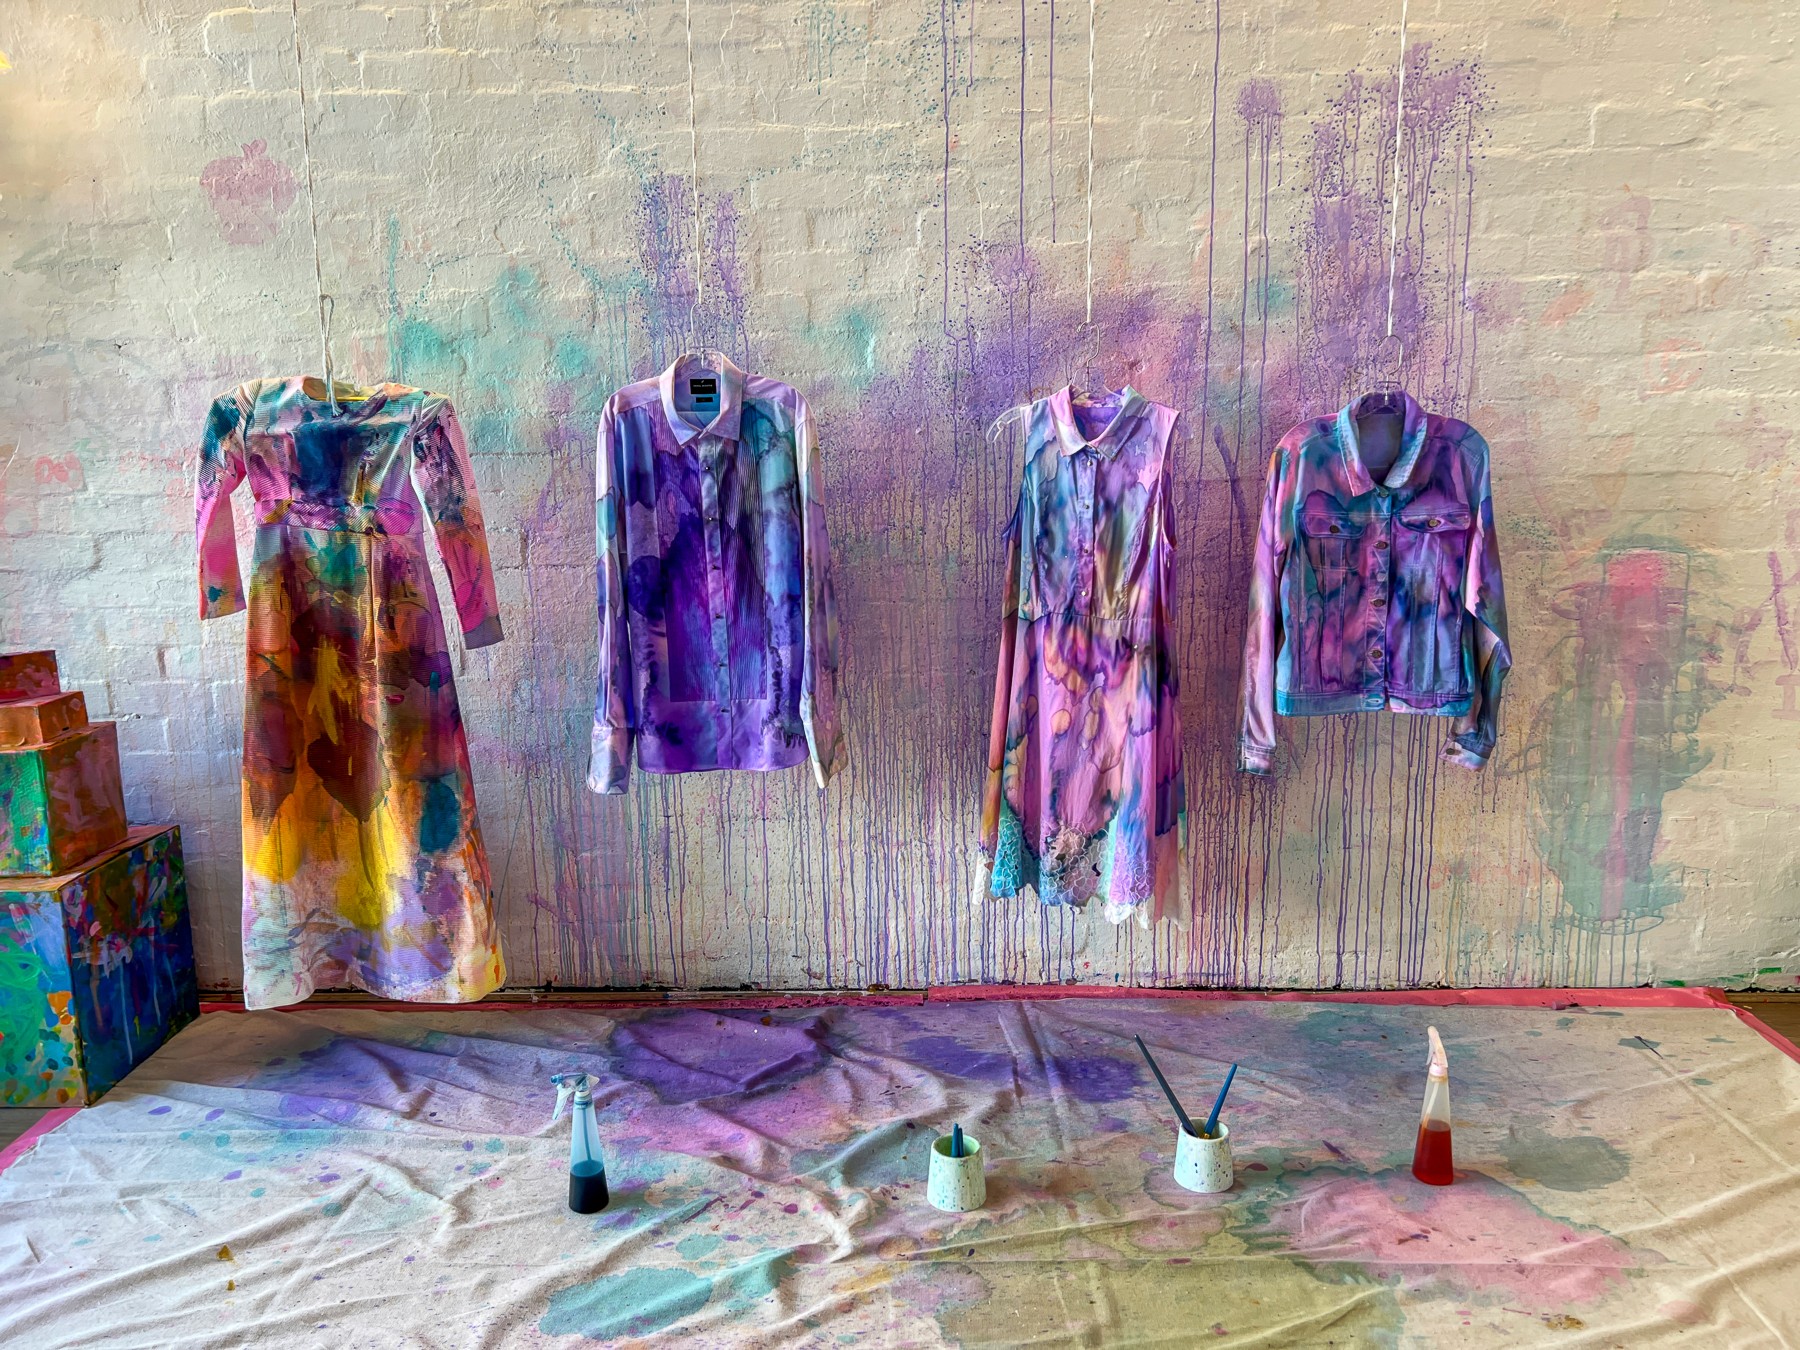
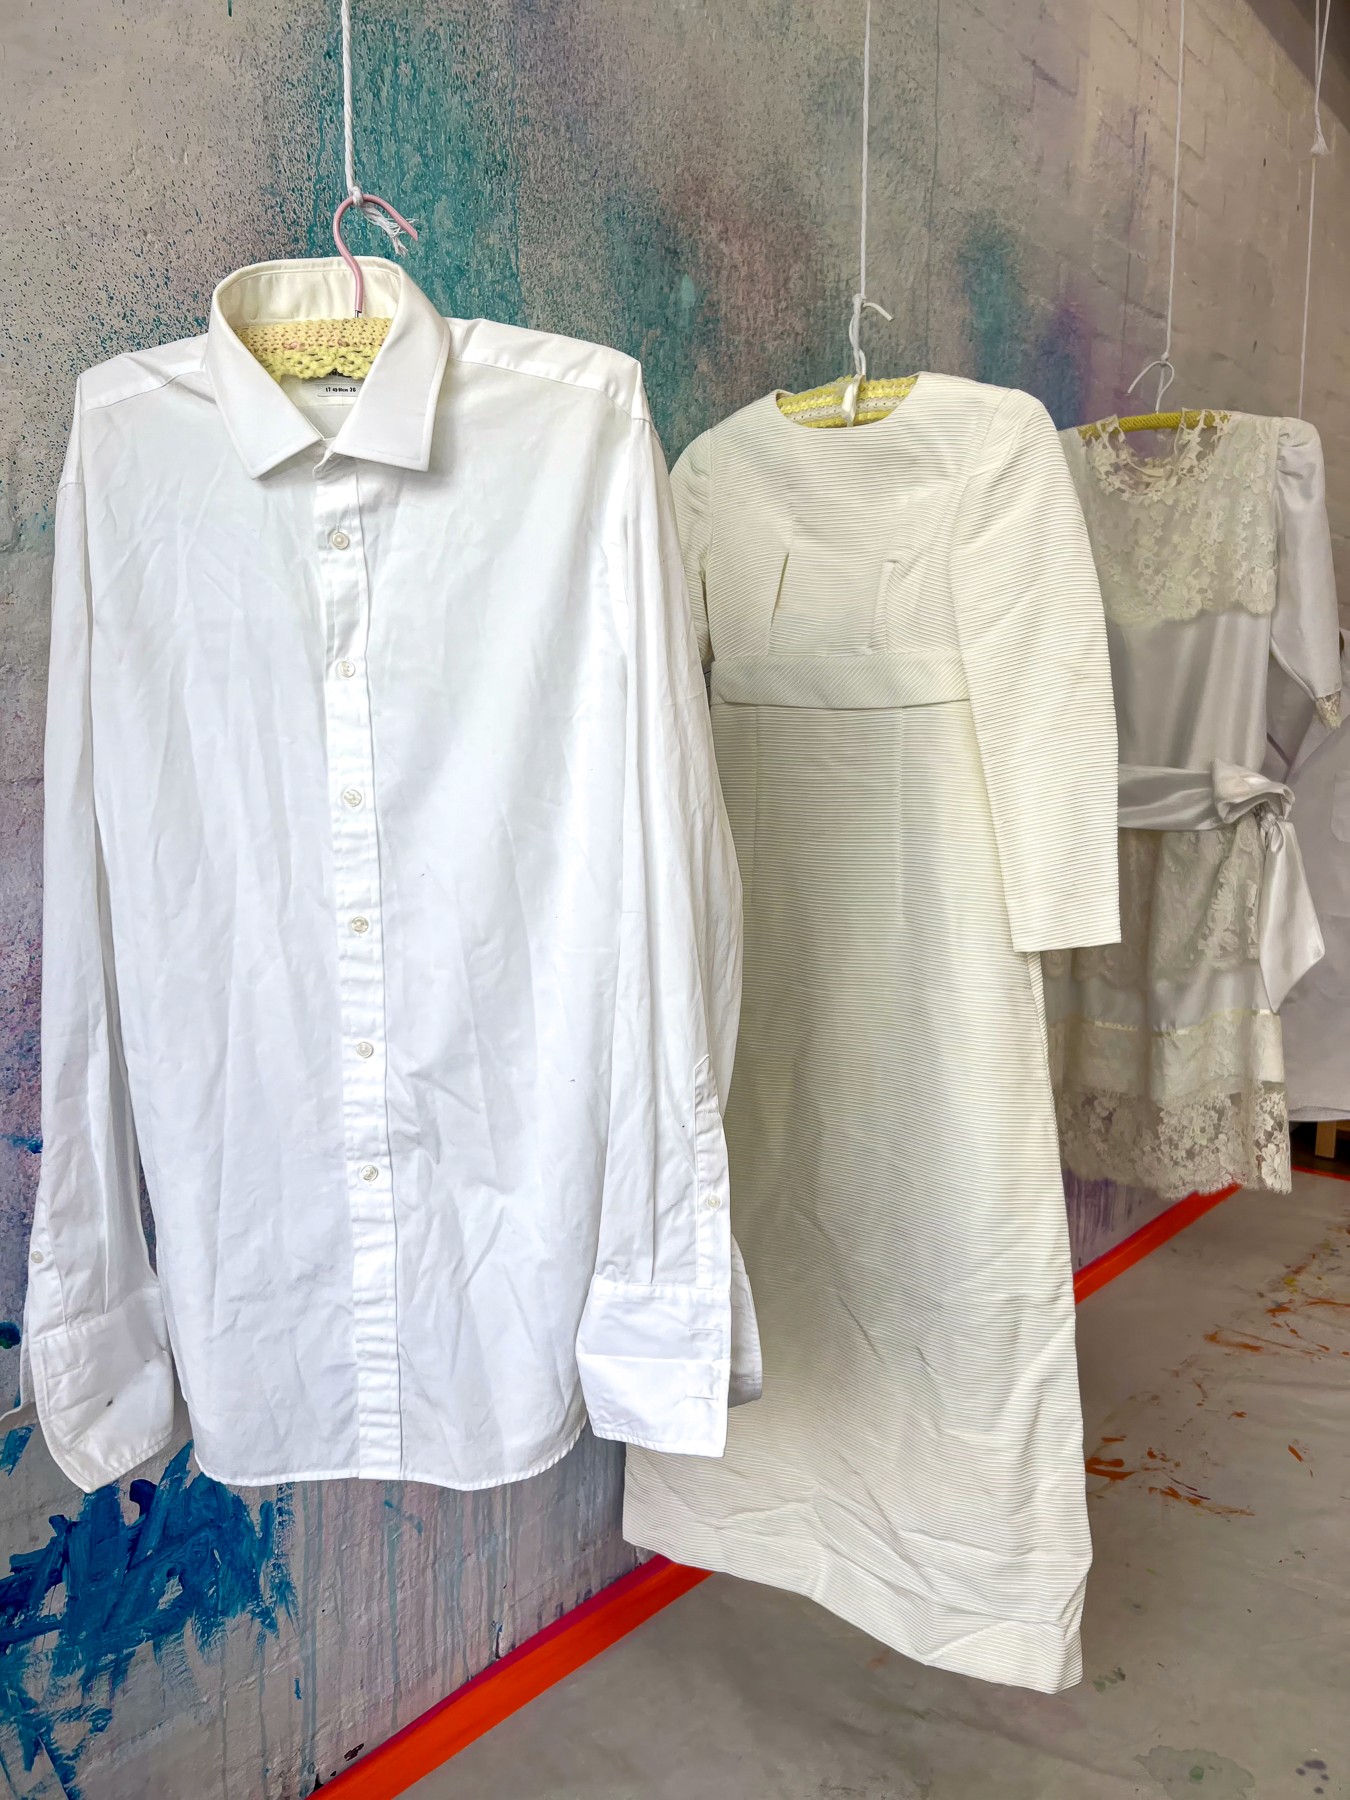
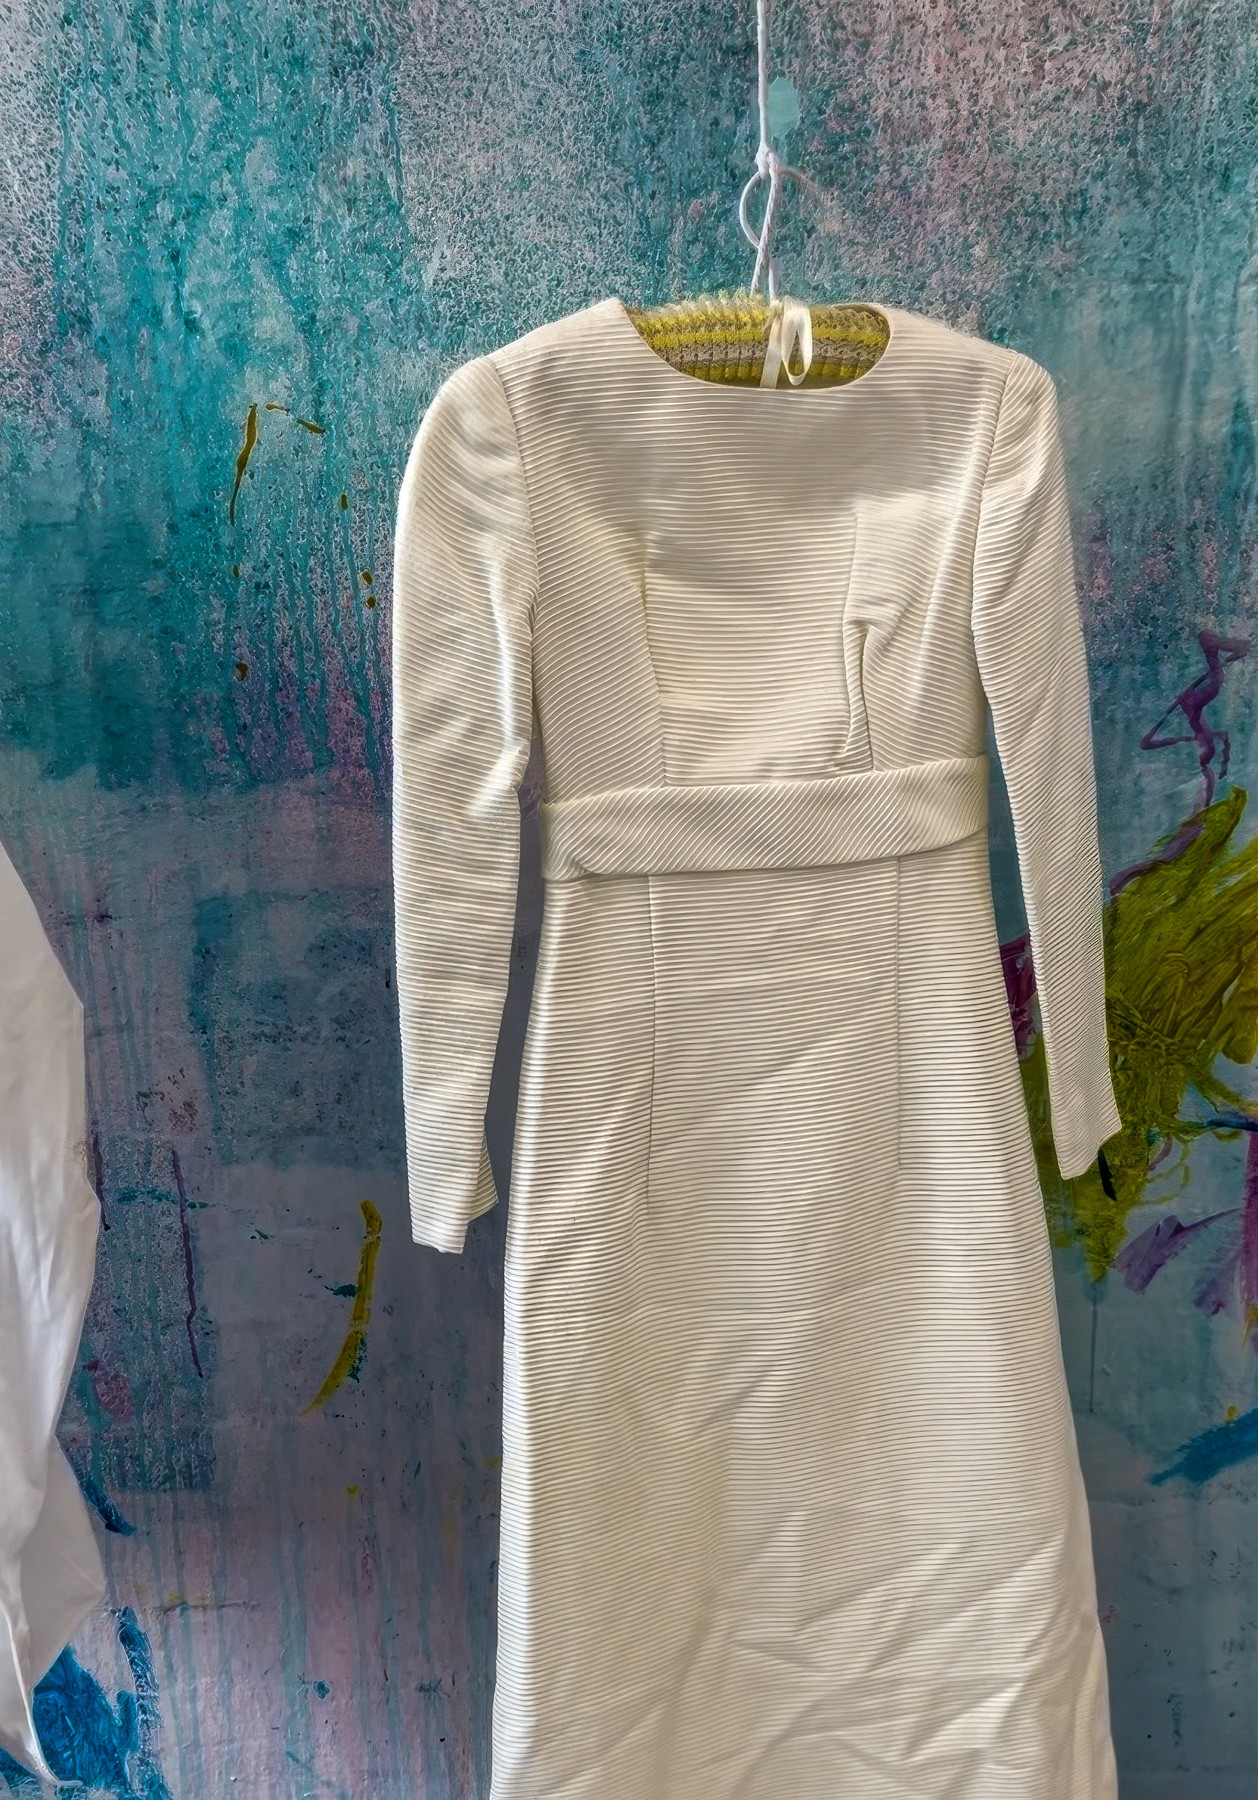
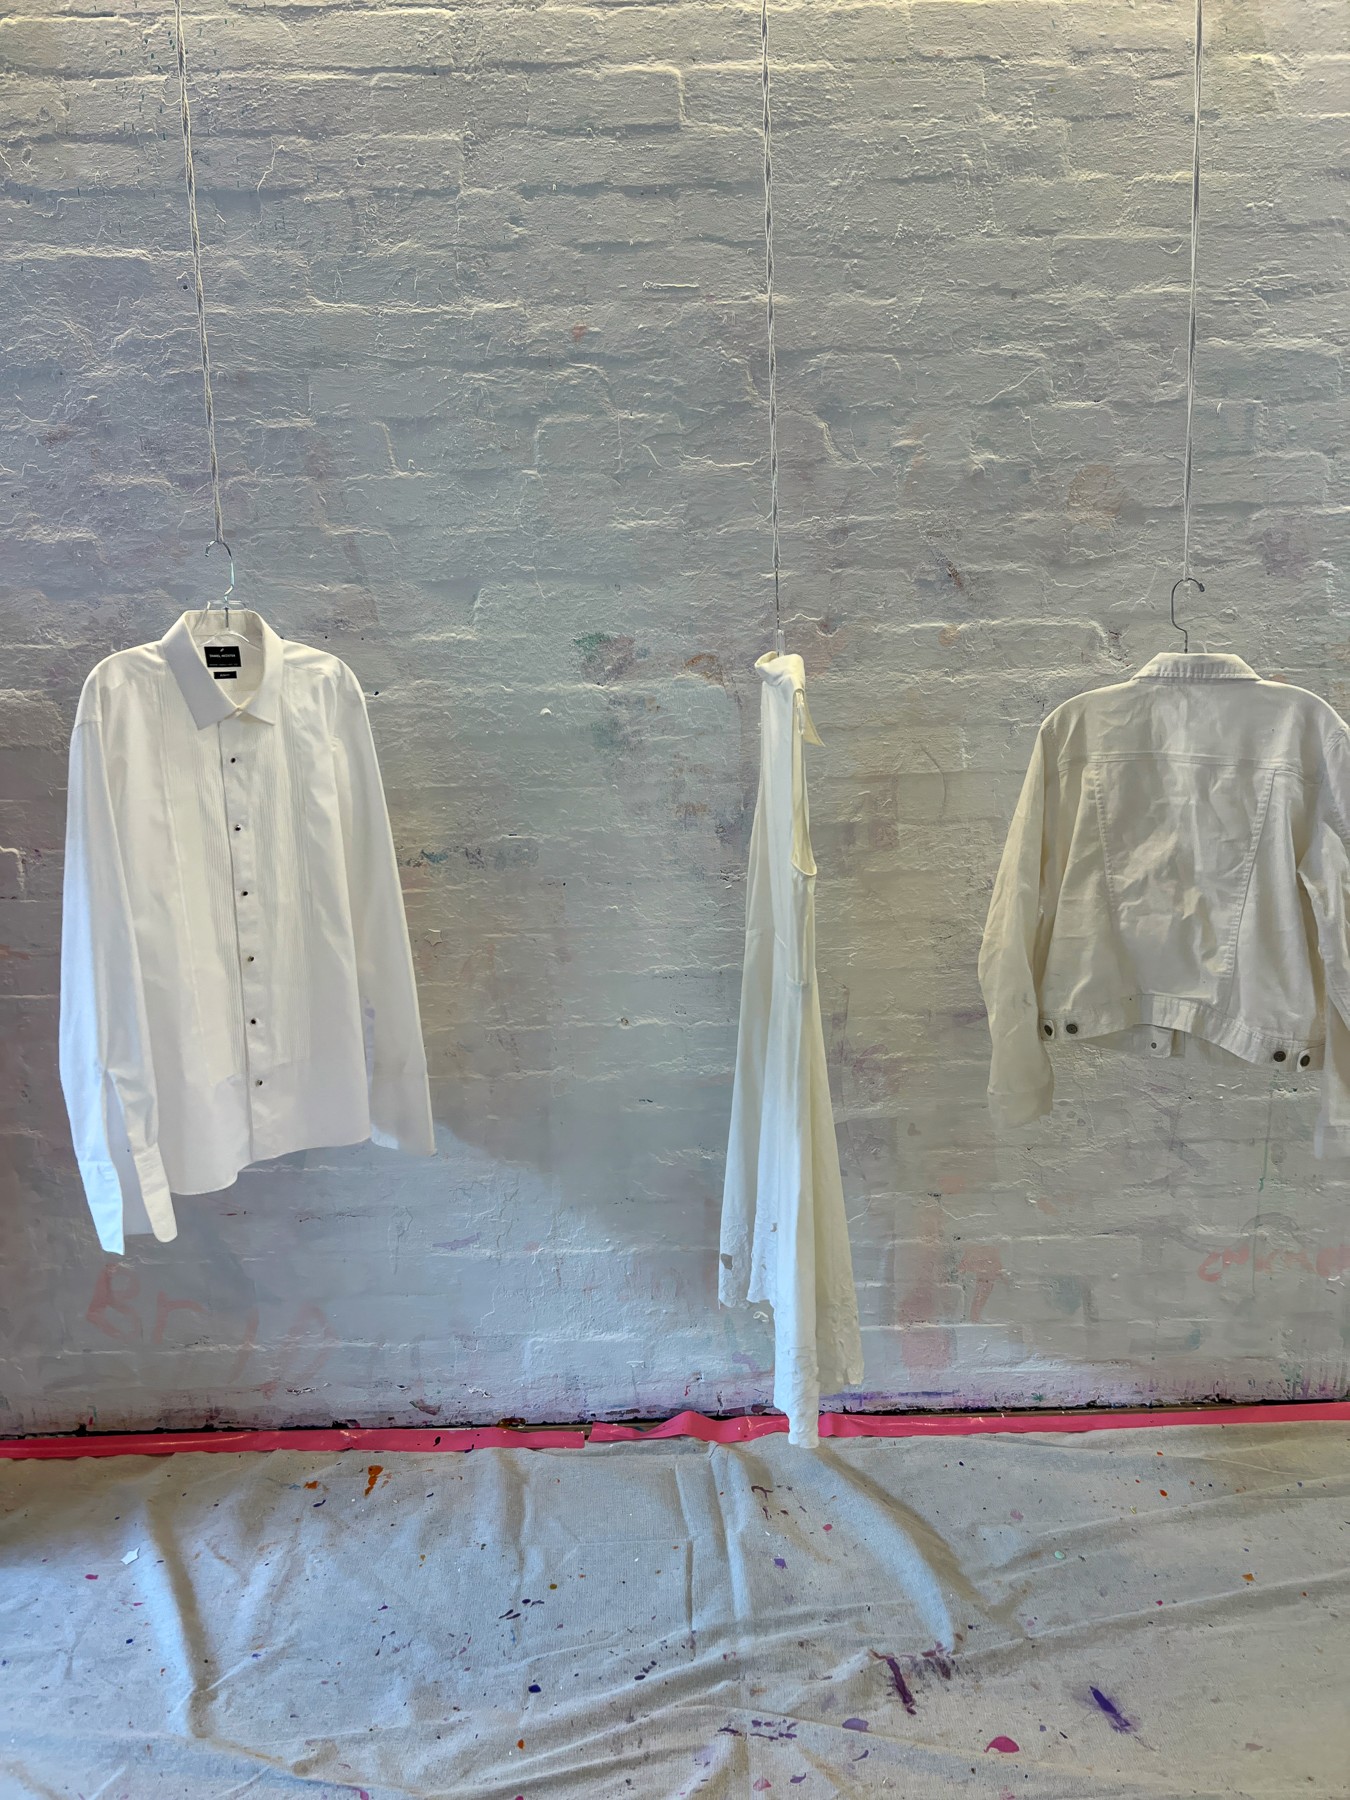
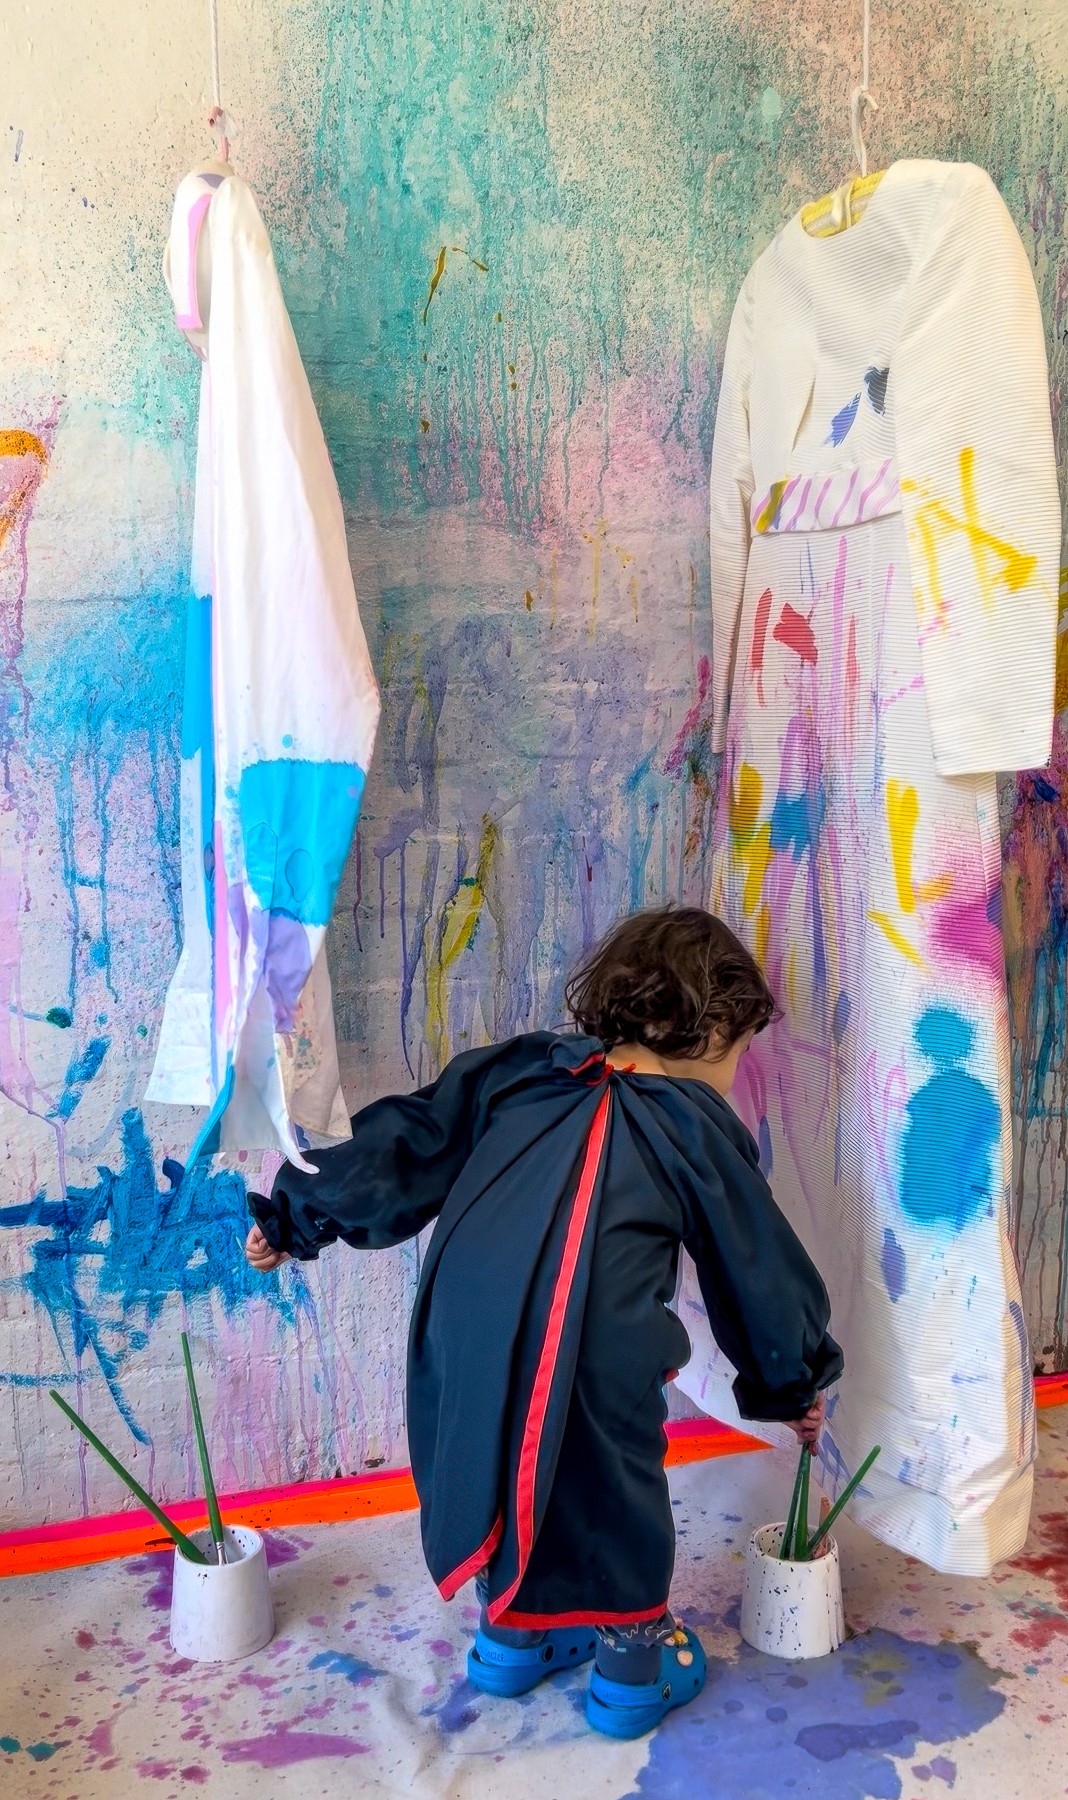
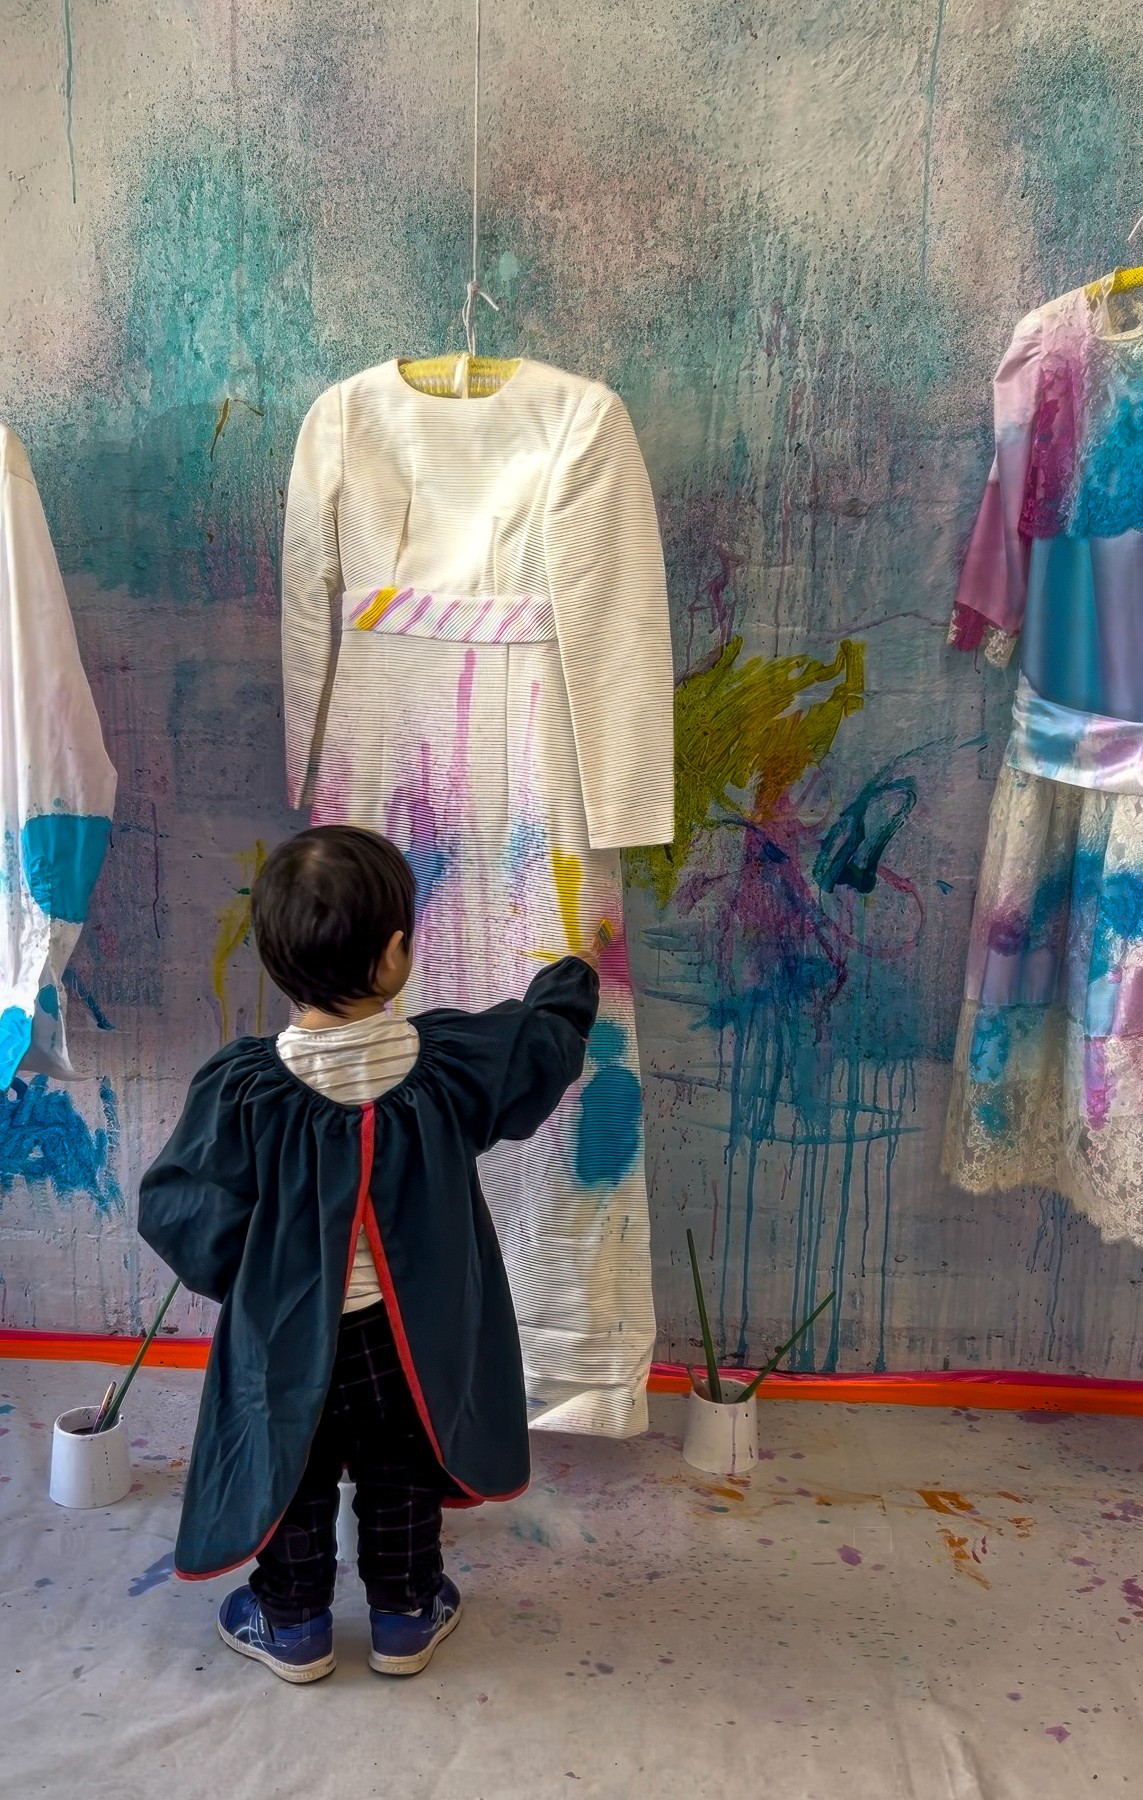
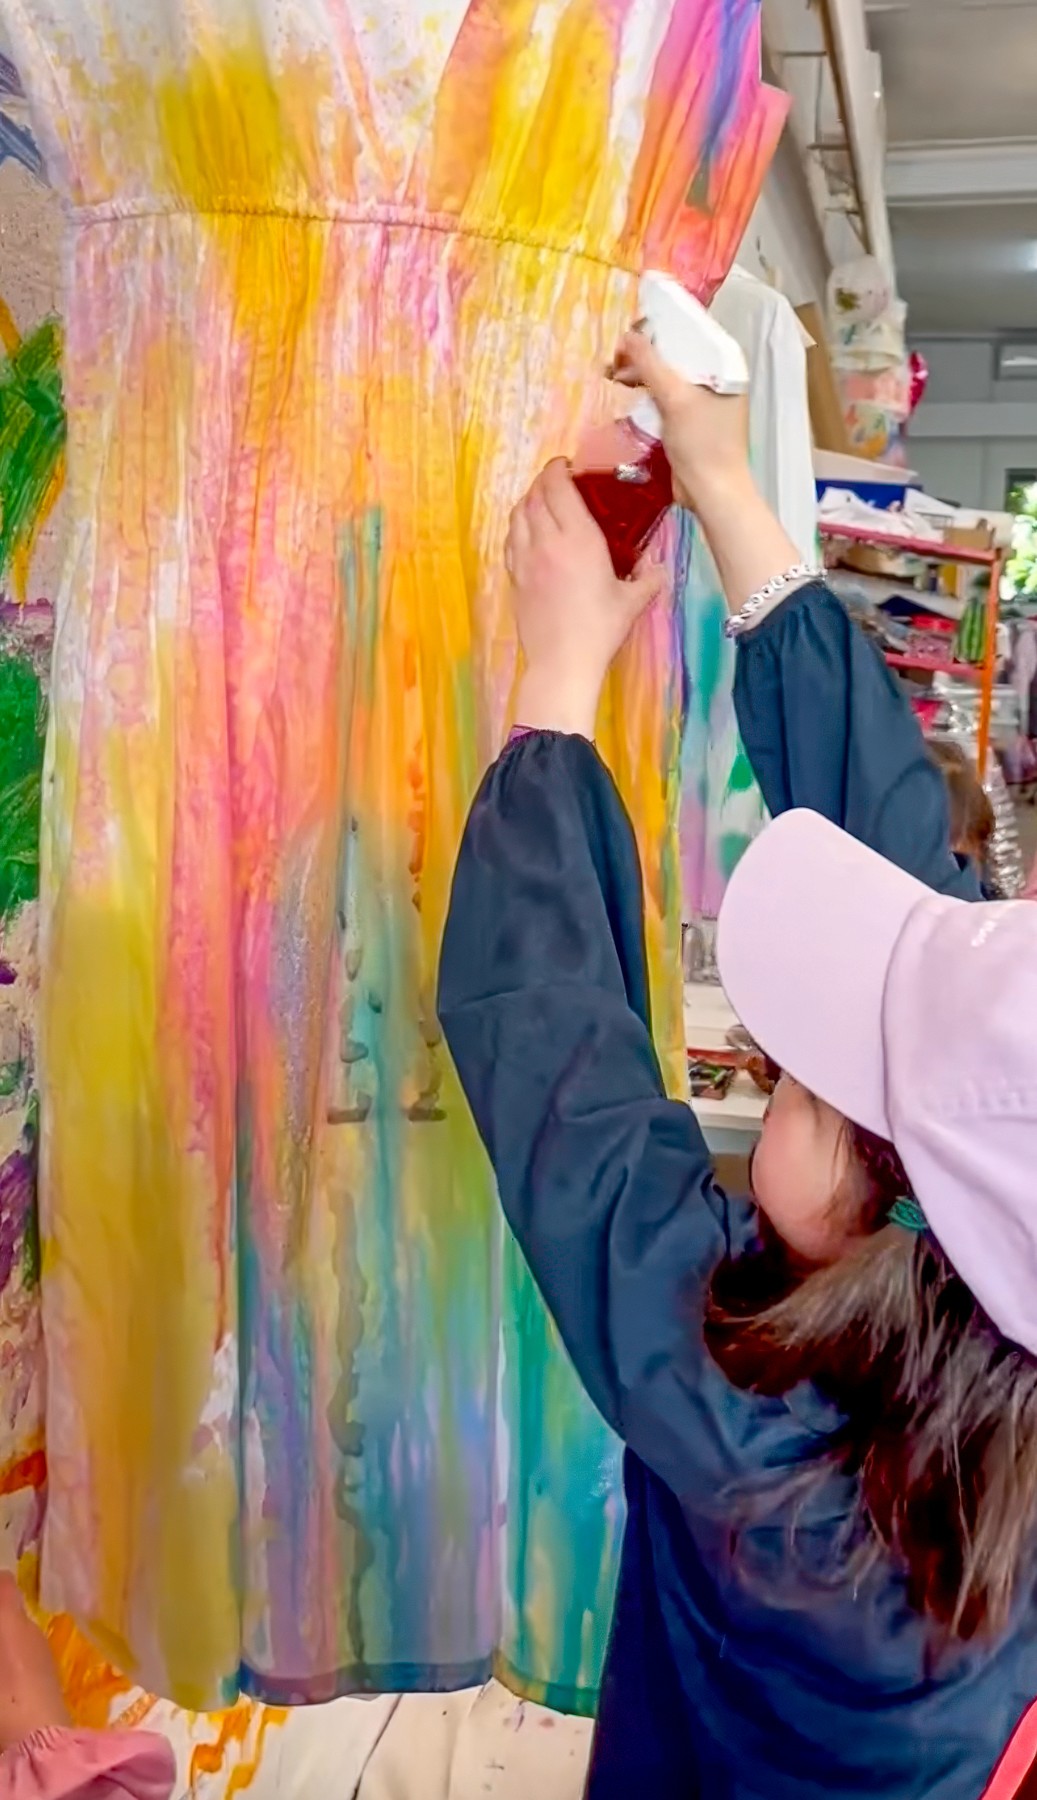
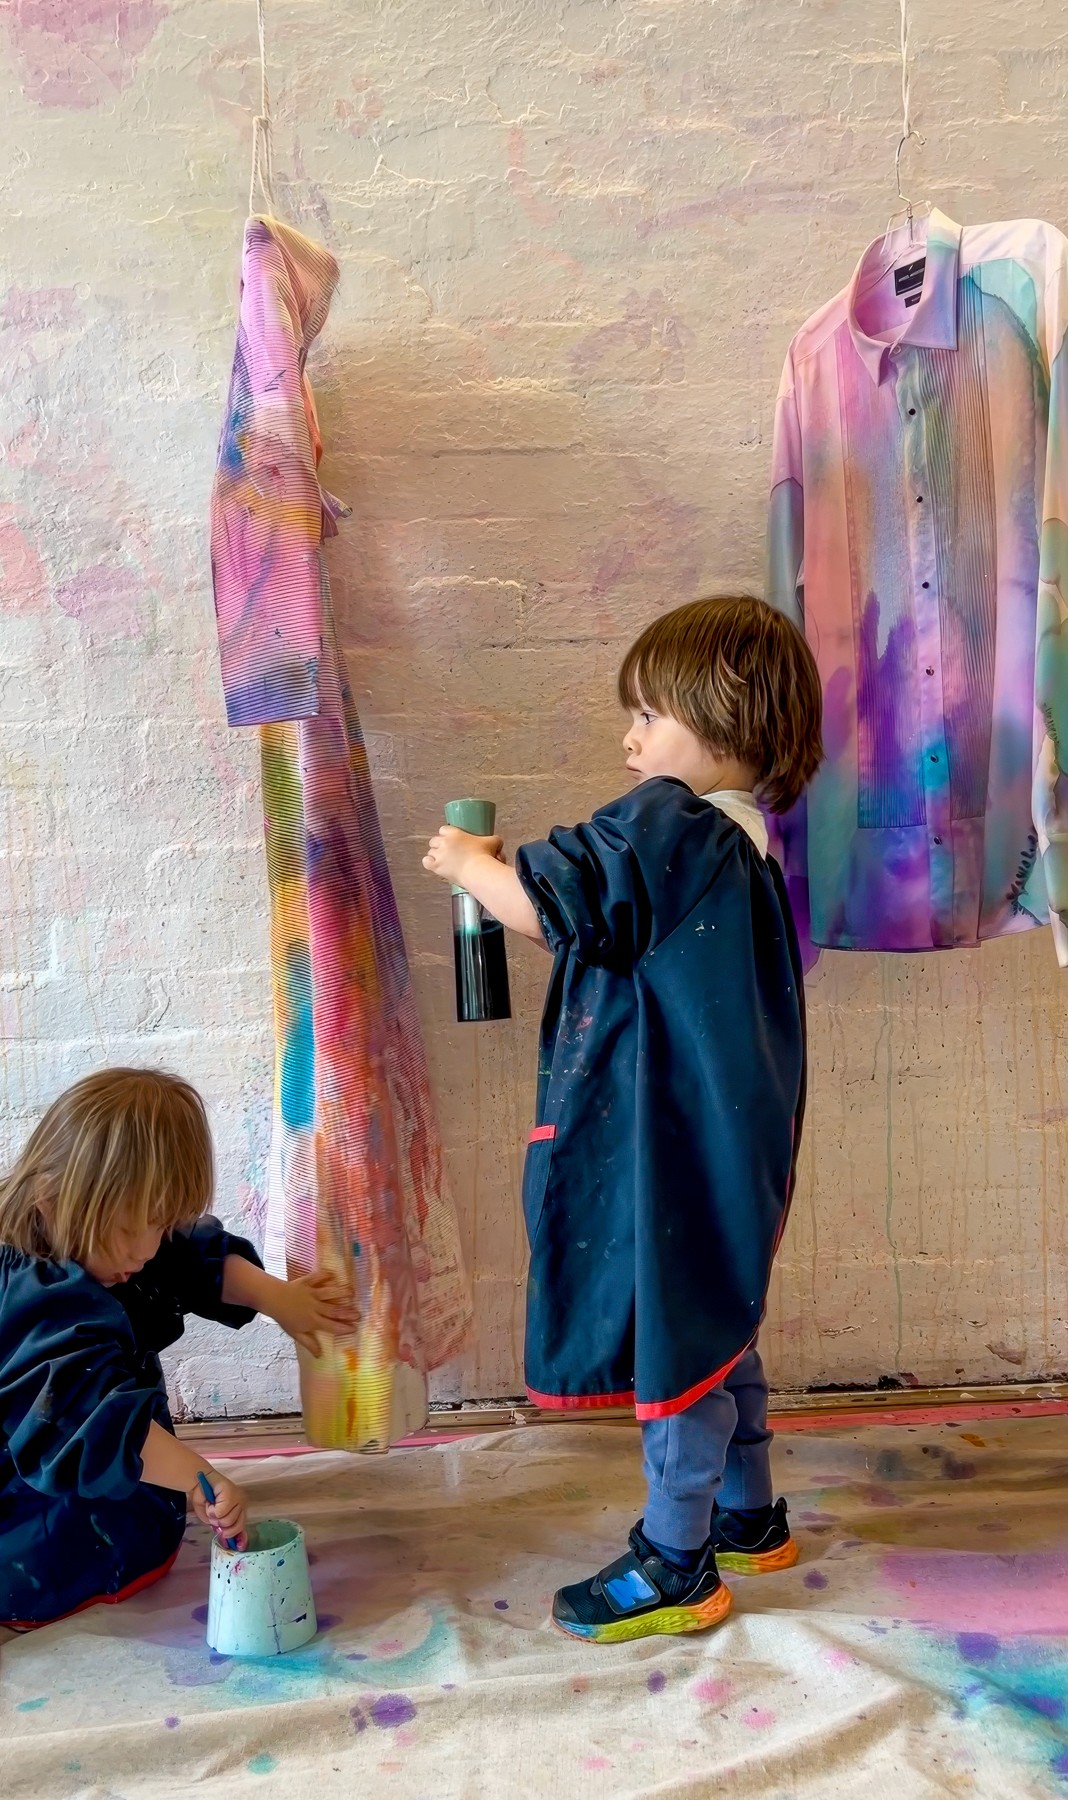
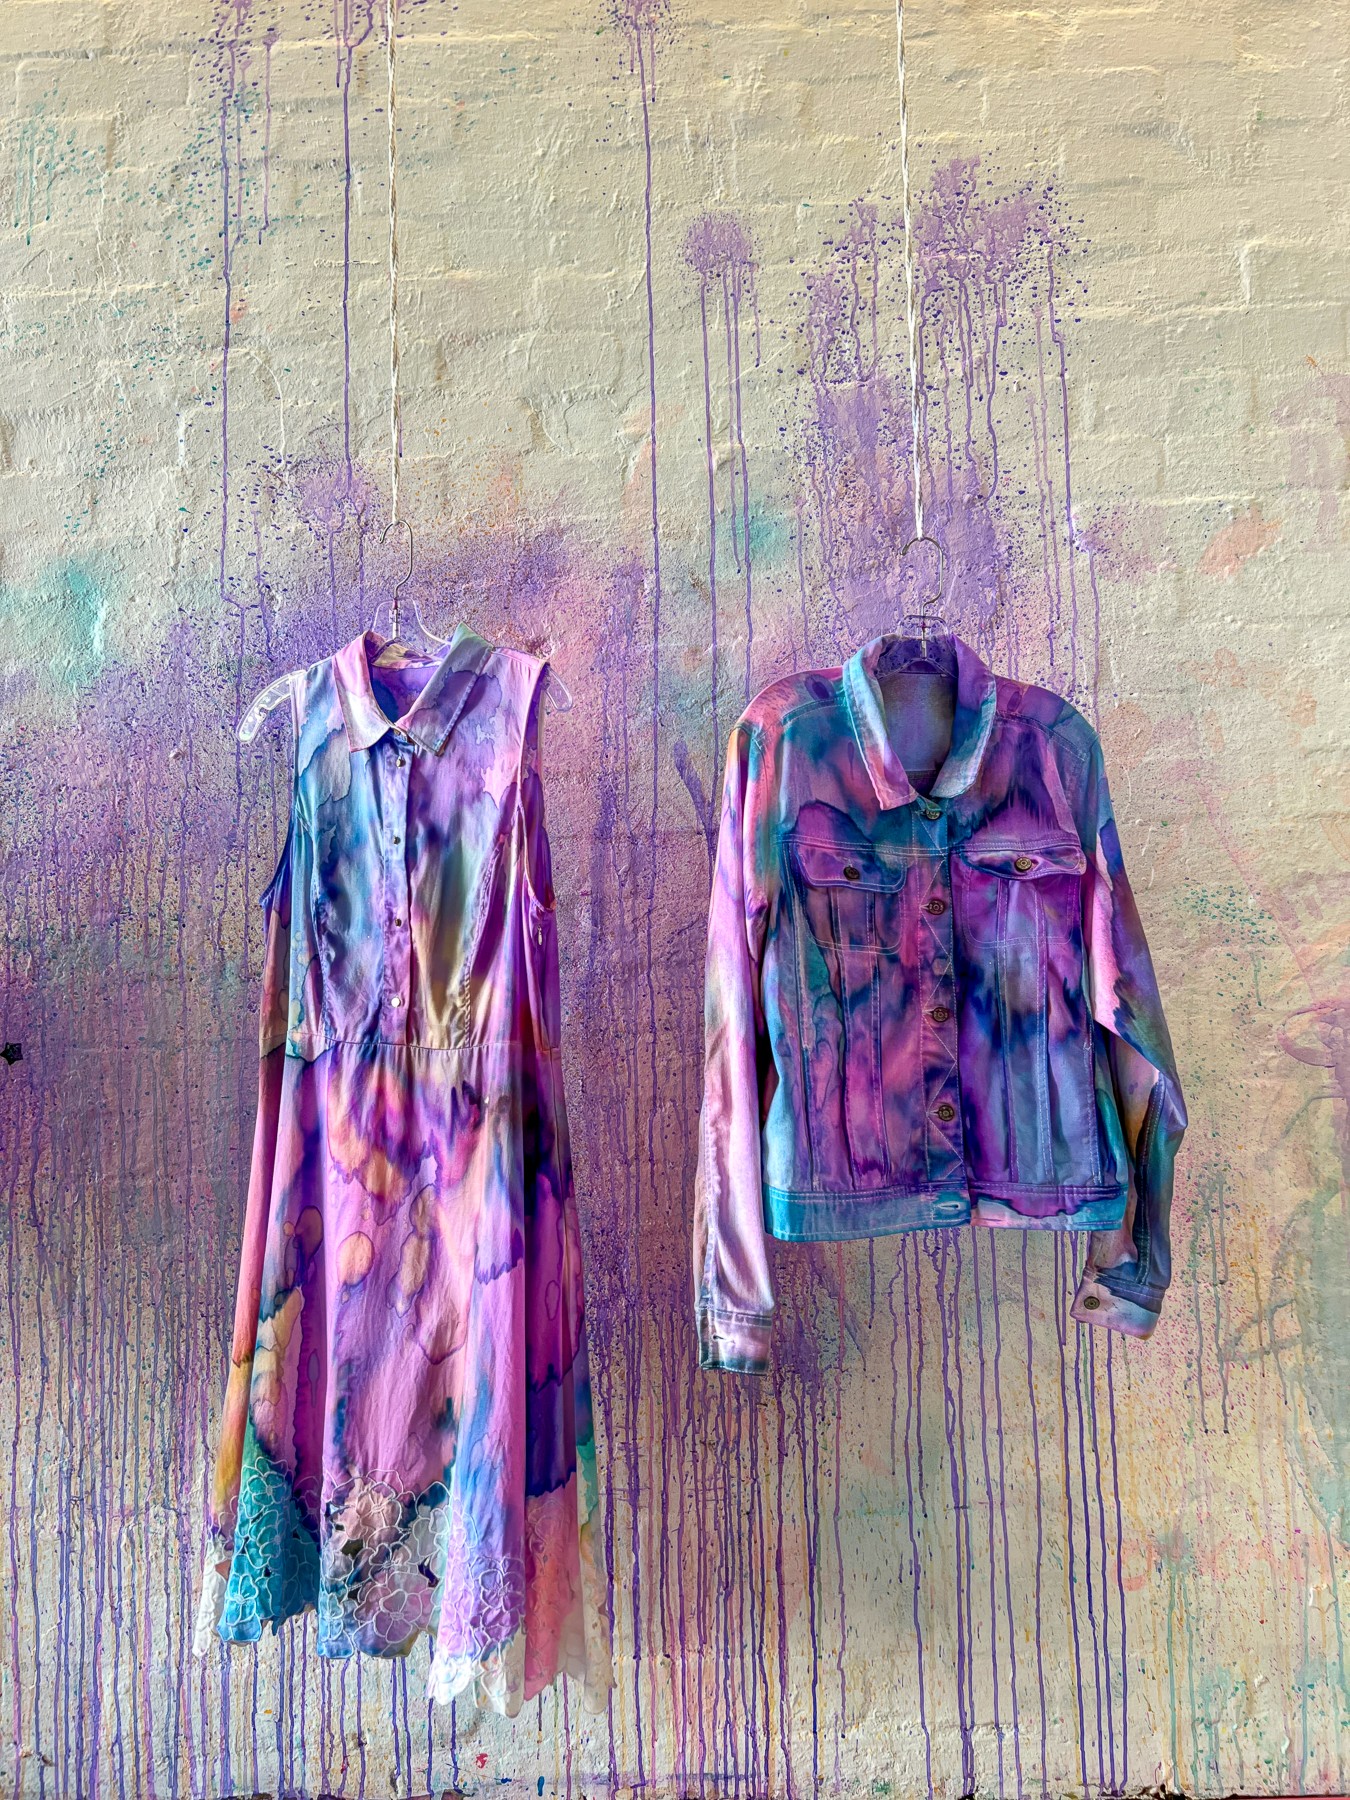
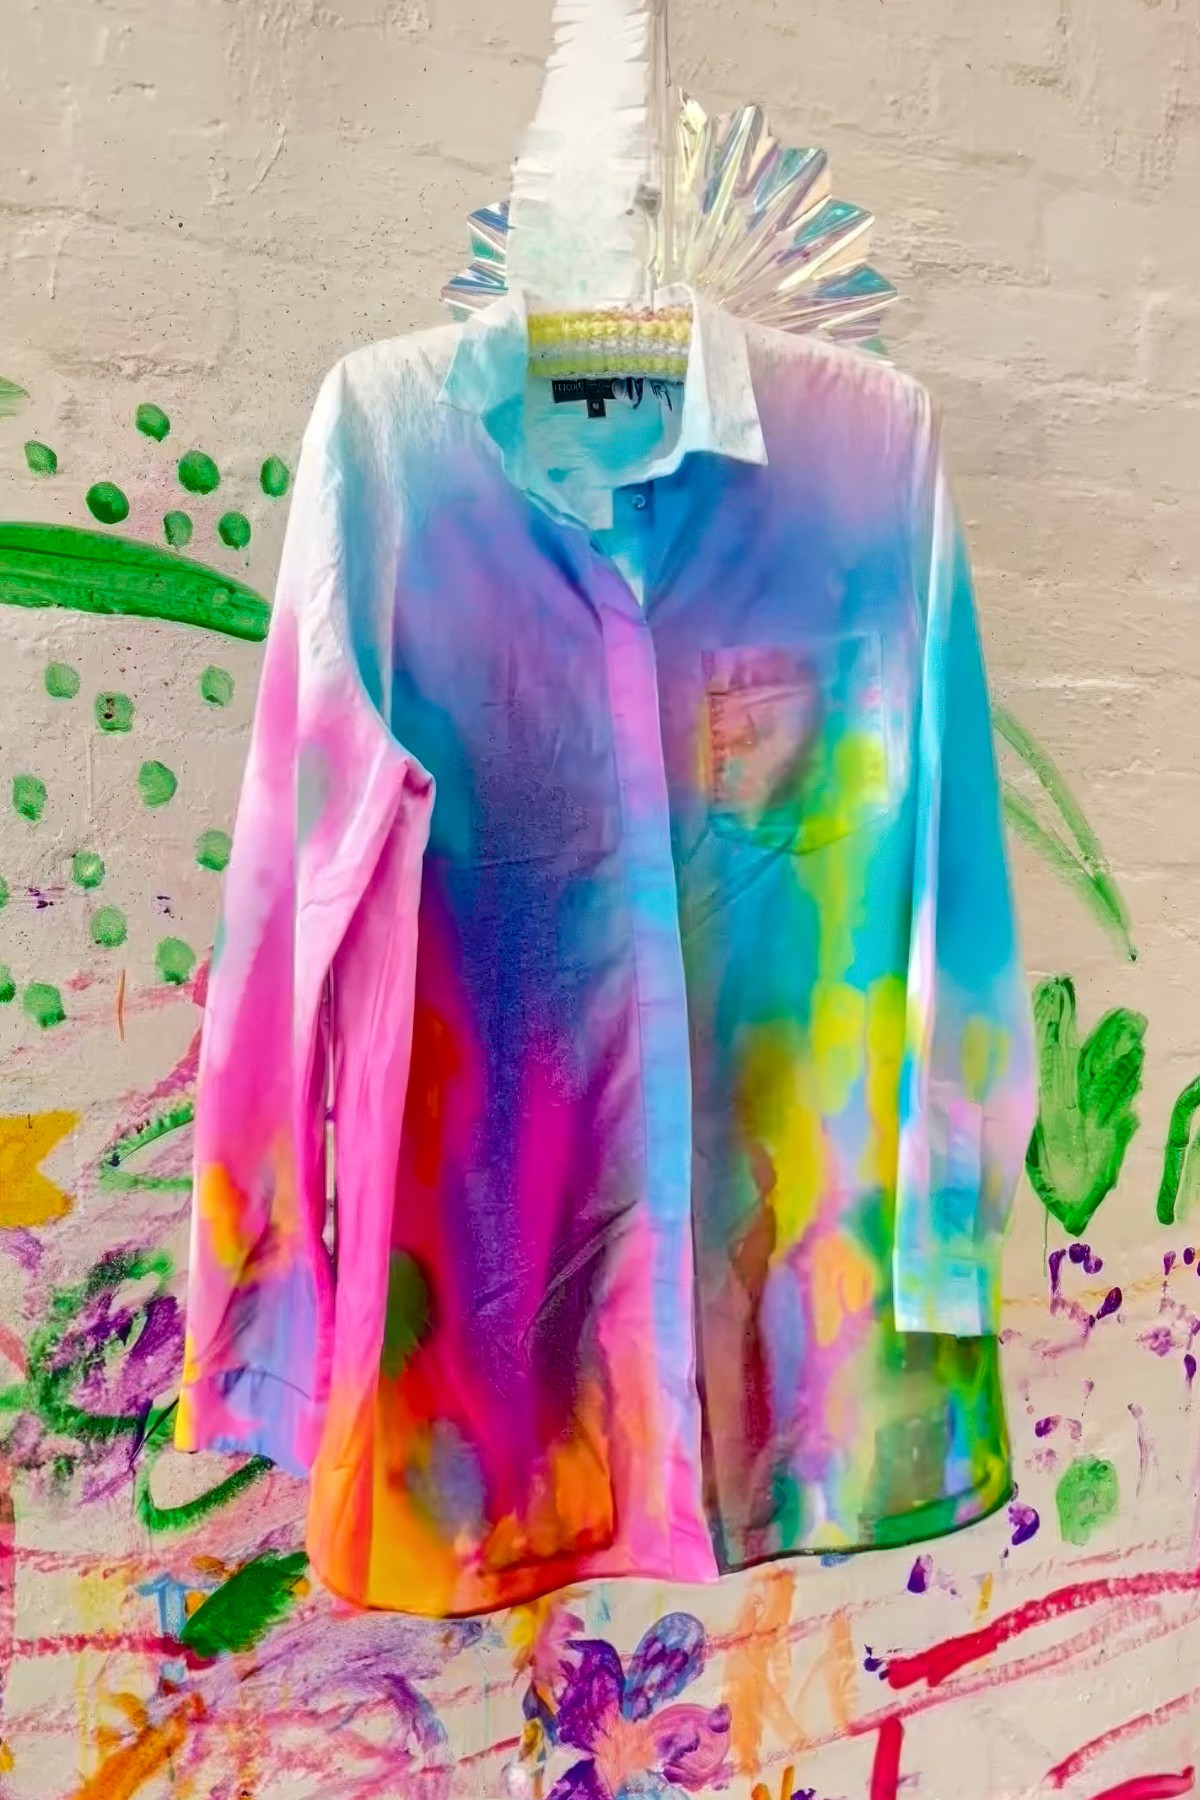
This installation is such a show stopper! A whole row of white clothing floating in mid-air… shirts, dresses, overalls, jackets. My absolute favourite addition has been a 1960s dress I found in the back of my local opp shop. Elsie, the most stylish lady who volunteers her time at the shop, told me the dress had been donated forever ago. All of these these gorgeous fashion gems become blank canvases!
Hang the pieces at different heights on coat hangers so they sway and turn as kids move through them. Indoors is my preference at Smudge because the clean white wall behind them makes the colours pop throughout the creating, but a washing line outdoors works beautifully too.
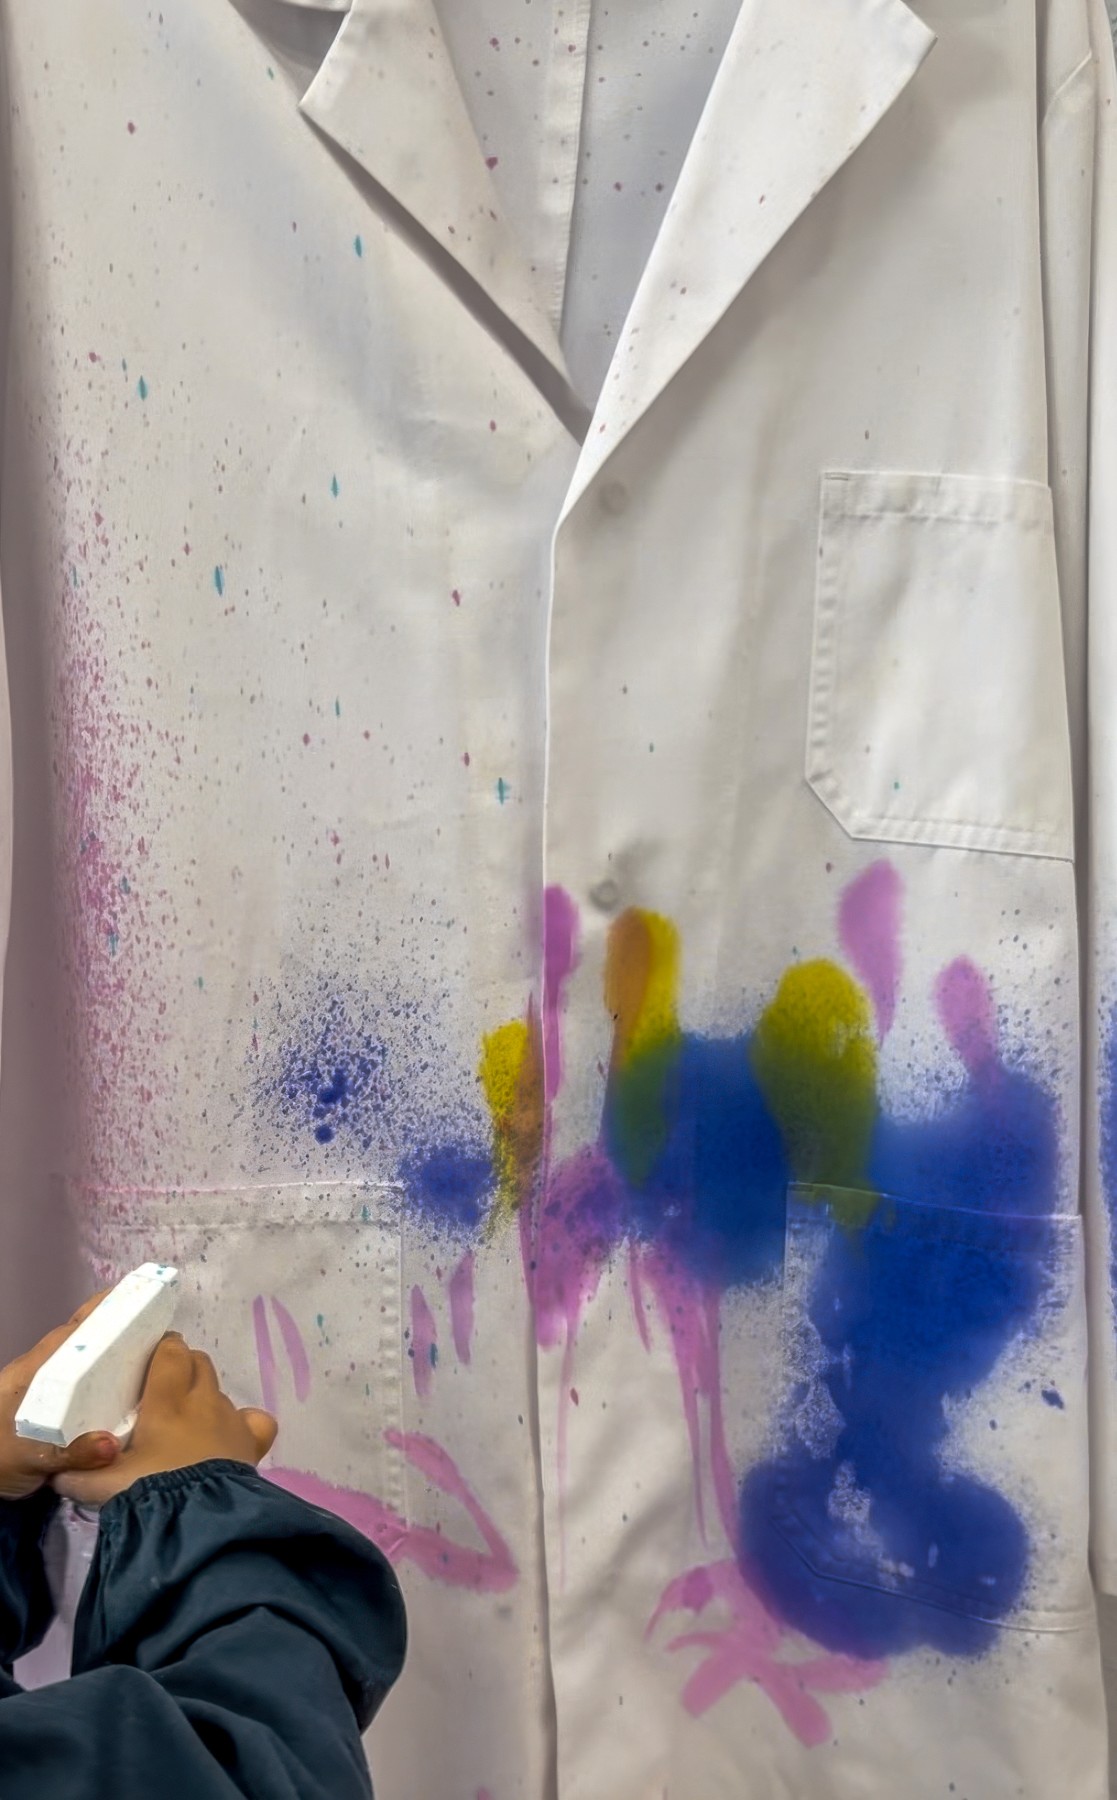
Offer liquid watercolours with brushes and spray bottles. You can dilute with water as little or as much as you like! I aim for stronger, bolder colours and it’s a good idea to think about how the colours will mix together on the fabric.
Smudge Tip: Opp / thrift shops are treasure troves for white clothing. Look in the sleepwear section, men’s shirts, kids’ racks… anything cotton or linen takes colour particularly beautifully.
The Making
Like so many of our installation experiences, the magic is in the movement. Walking through hanging clothes creates a calming rhythm as the pieces spin and sway.
Encourage the kids to step back every so often to see how the whole installation is changing. It’s group art without needing to choreograph a single thing. There’s no “pattern” to chase; just colour and gesture and curiosity and joy.
Materials
White clothing from opp shops or your own stash
Liquid watercolours
Brushes and spray bottles
String or washing line
coat hangers
Drop sheets (fabric or plastic-backed canvas)
Back to Top
Painted Wardrobe
The ultimate hanging canvas!
Bookmark
Installations
The Set Up
This installation is such a show stopper! A whole row of white clothing floating in mid-air… shirts, dresses, overalls, jackets. My absolute favourite addition has been a 1960s dress I found in the back of my local opp shop. Elsie, the most stylish lady who volunteers her time at the shop, told me the dress had been donated forever ago. All of these these gorgeous fashion gems become blank canvases!
Hang the pieces at different heights on coat hangers so they sway and turn as kids move through them. Indoors is my preference at Smudge because the clean white wall behind them makes the colours pop throughout the creating, but a washing line outdoors works beautifully too.
Offer liquid watercolours with brushes and spray bottles. You can dilute with water as little or as much as you like! I aim for stronger, bolder colours and it’s a good idea to think about how the colours will mix together on the fabric.
Smudge Tip: Opp / thrift shops are treasure troves for white clothing. Look in the sleepwear section, men’s shirts, kids’ racks… anything cotton or linen takes colour particularly beautifully.
The Making
Like so many of our installation experiences, the magic is in the movement. Walking through hanging clothes creates a calming rhythm as the pieces spin and sway.
Encourage the kids to step back every so often to see how the whole installation is changing. It’s group art without needing to choreograph a single thing. There’s no “pattern” to chase; just colour and gesture and curiosity and joy.
Materials
White clothing from opp shops or your own stash
Liquid watercolours
Brushes and spray bottles
String or washing line
coat hangers
Drop sheets (fabric or plastic-backed canvas)
Back to Top
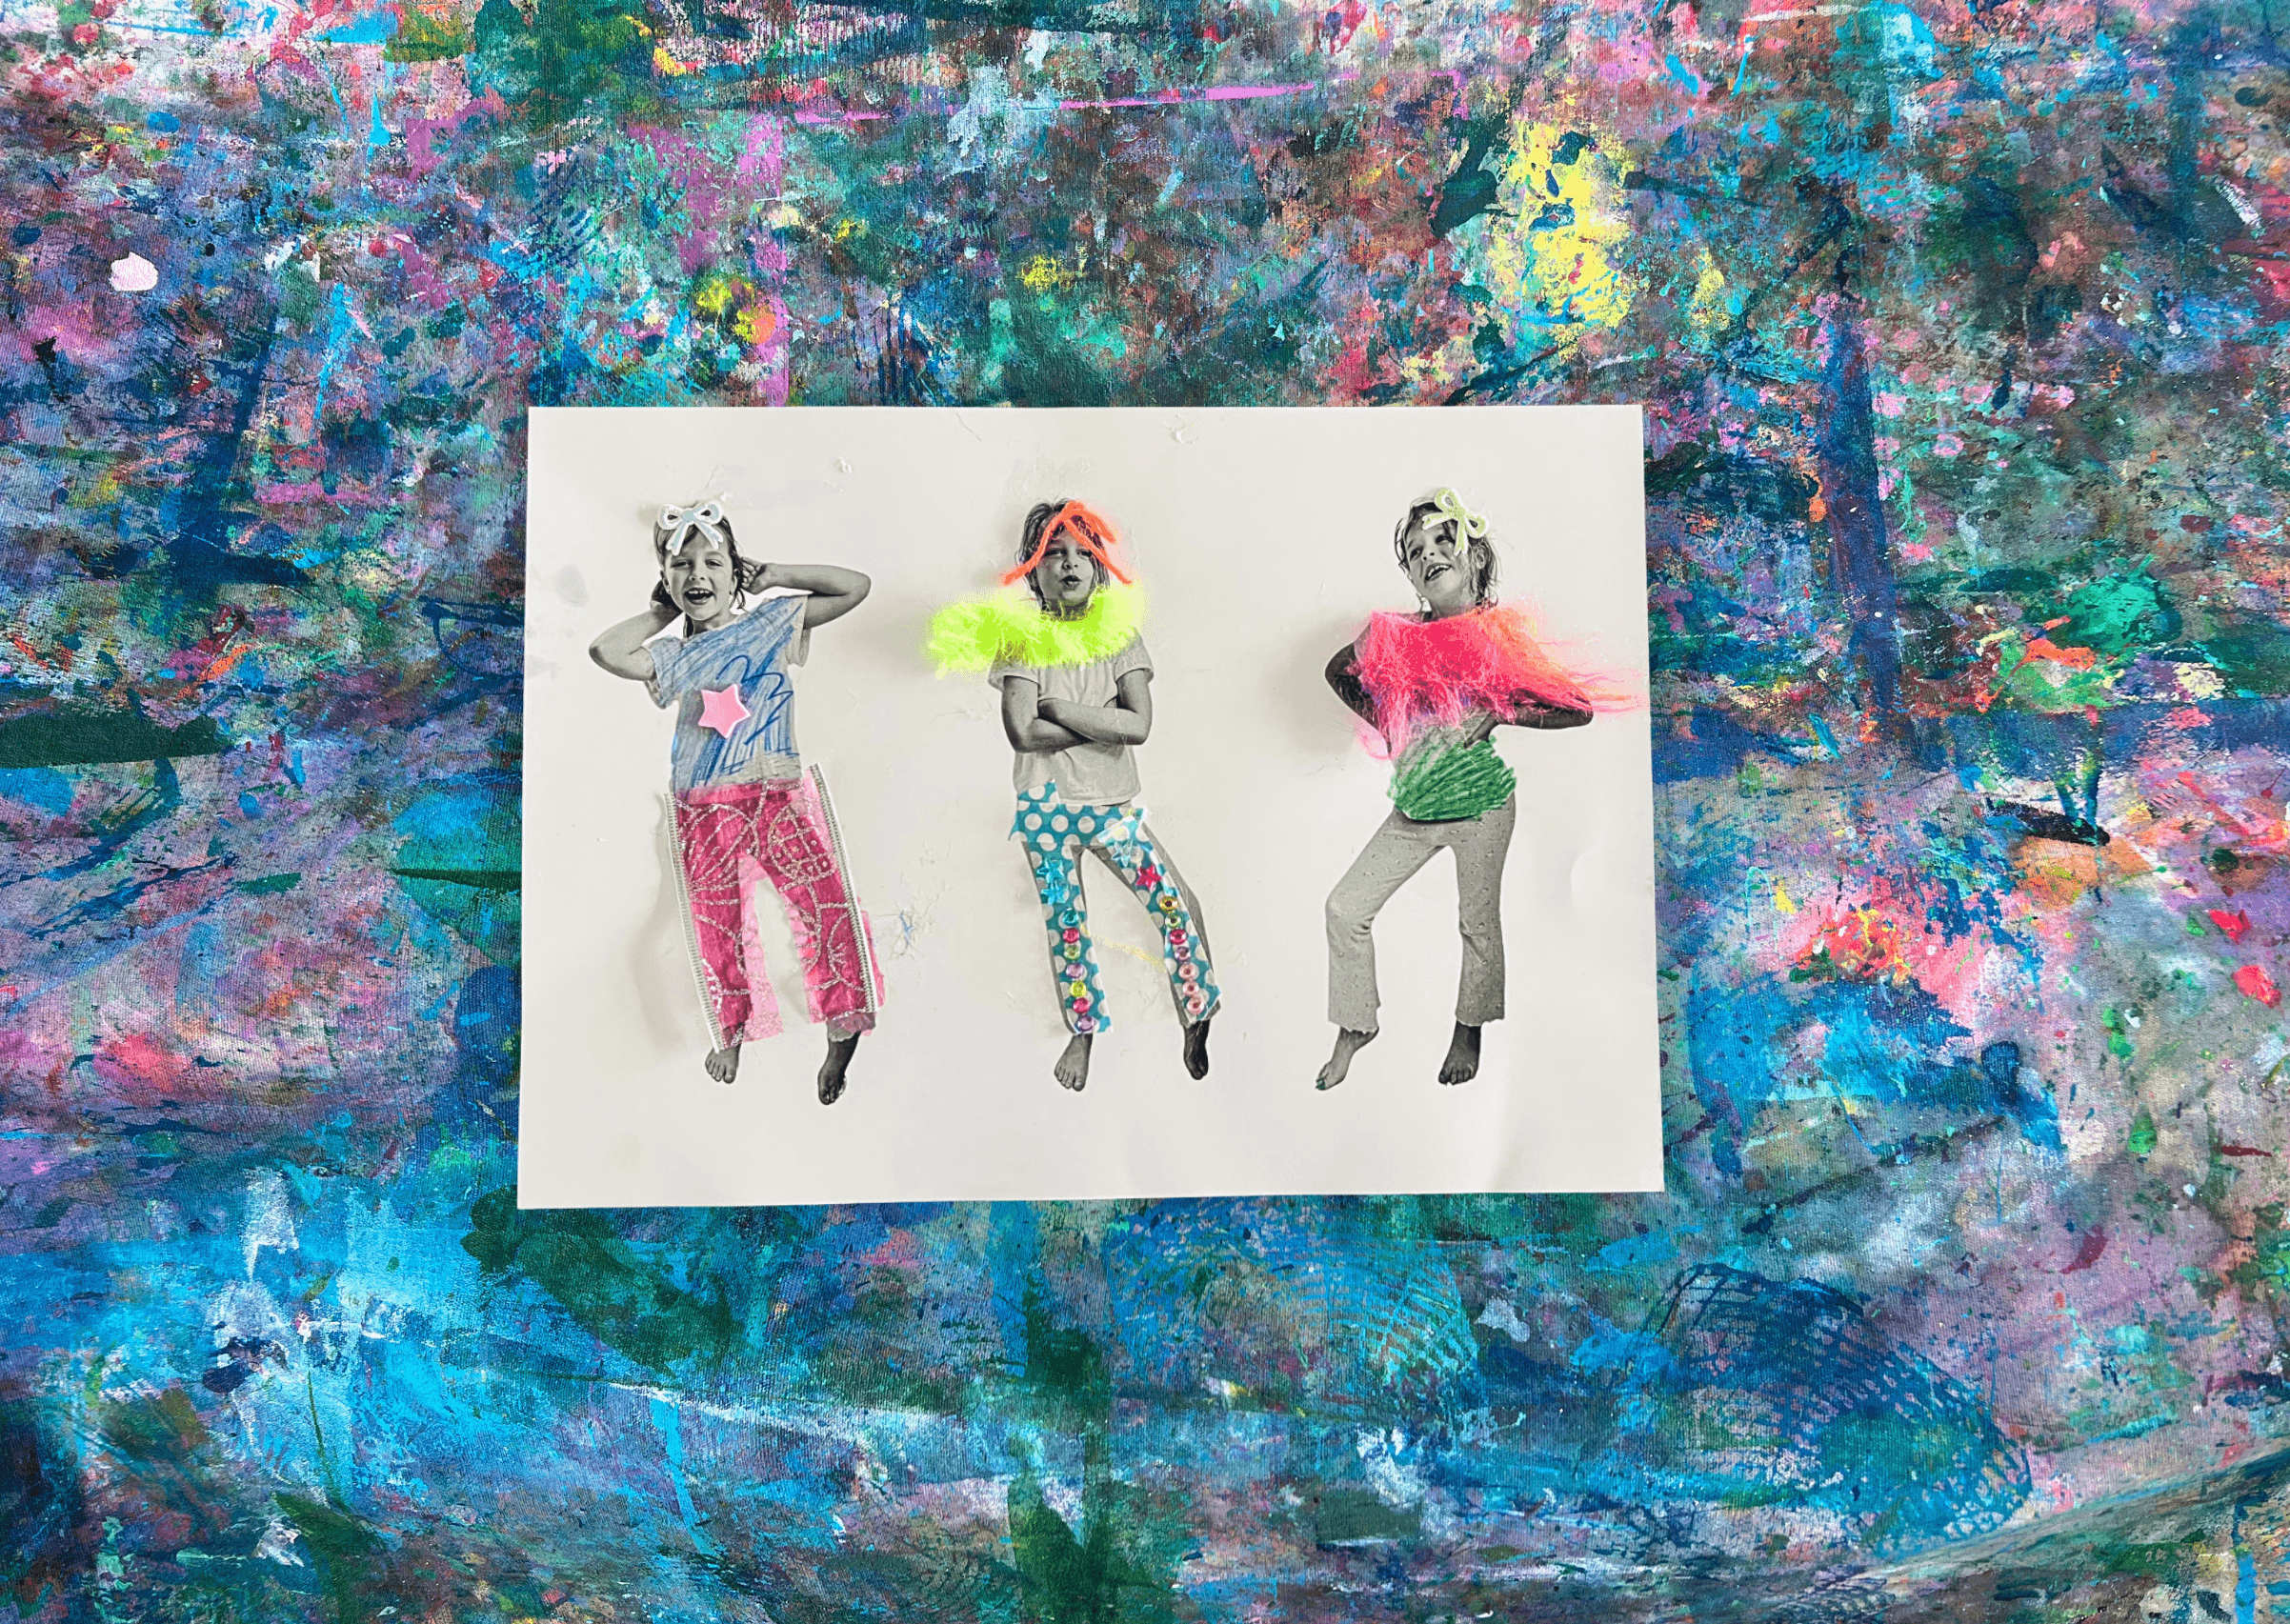
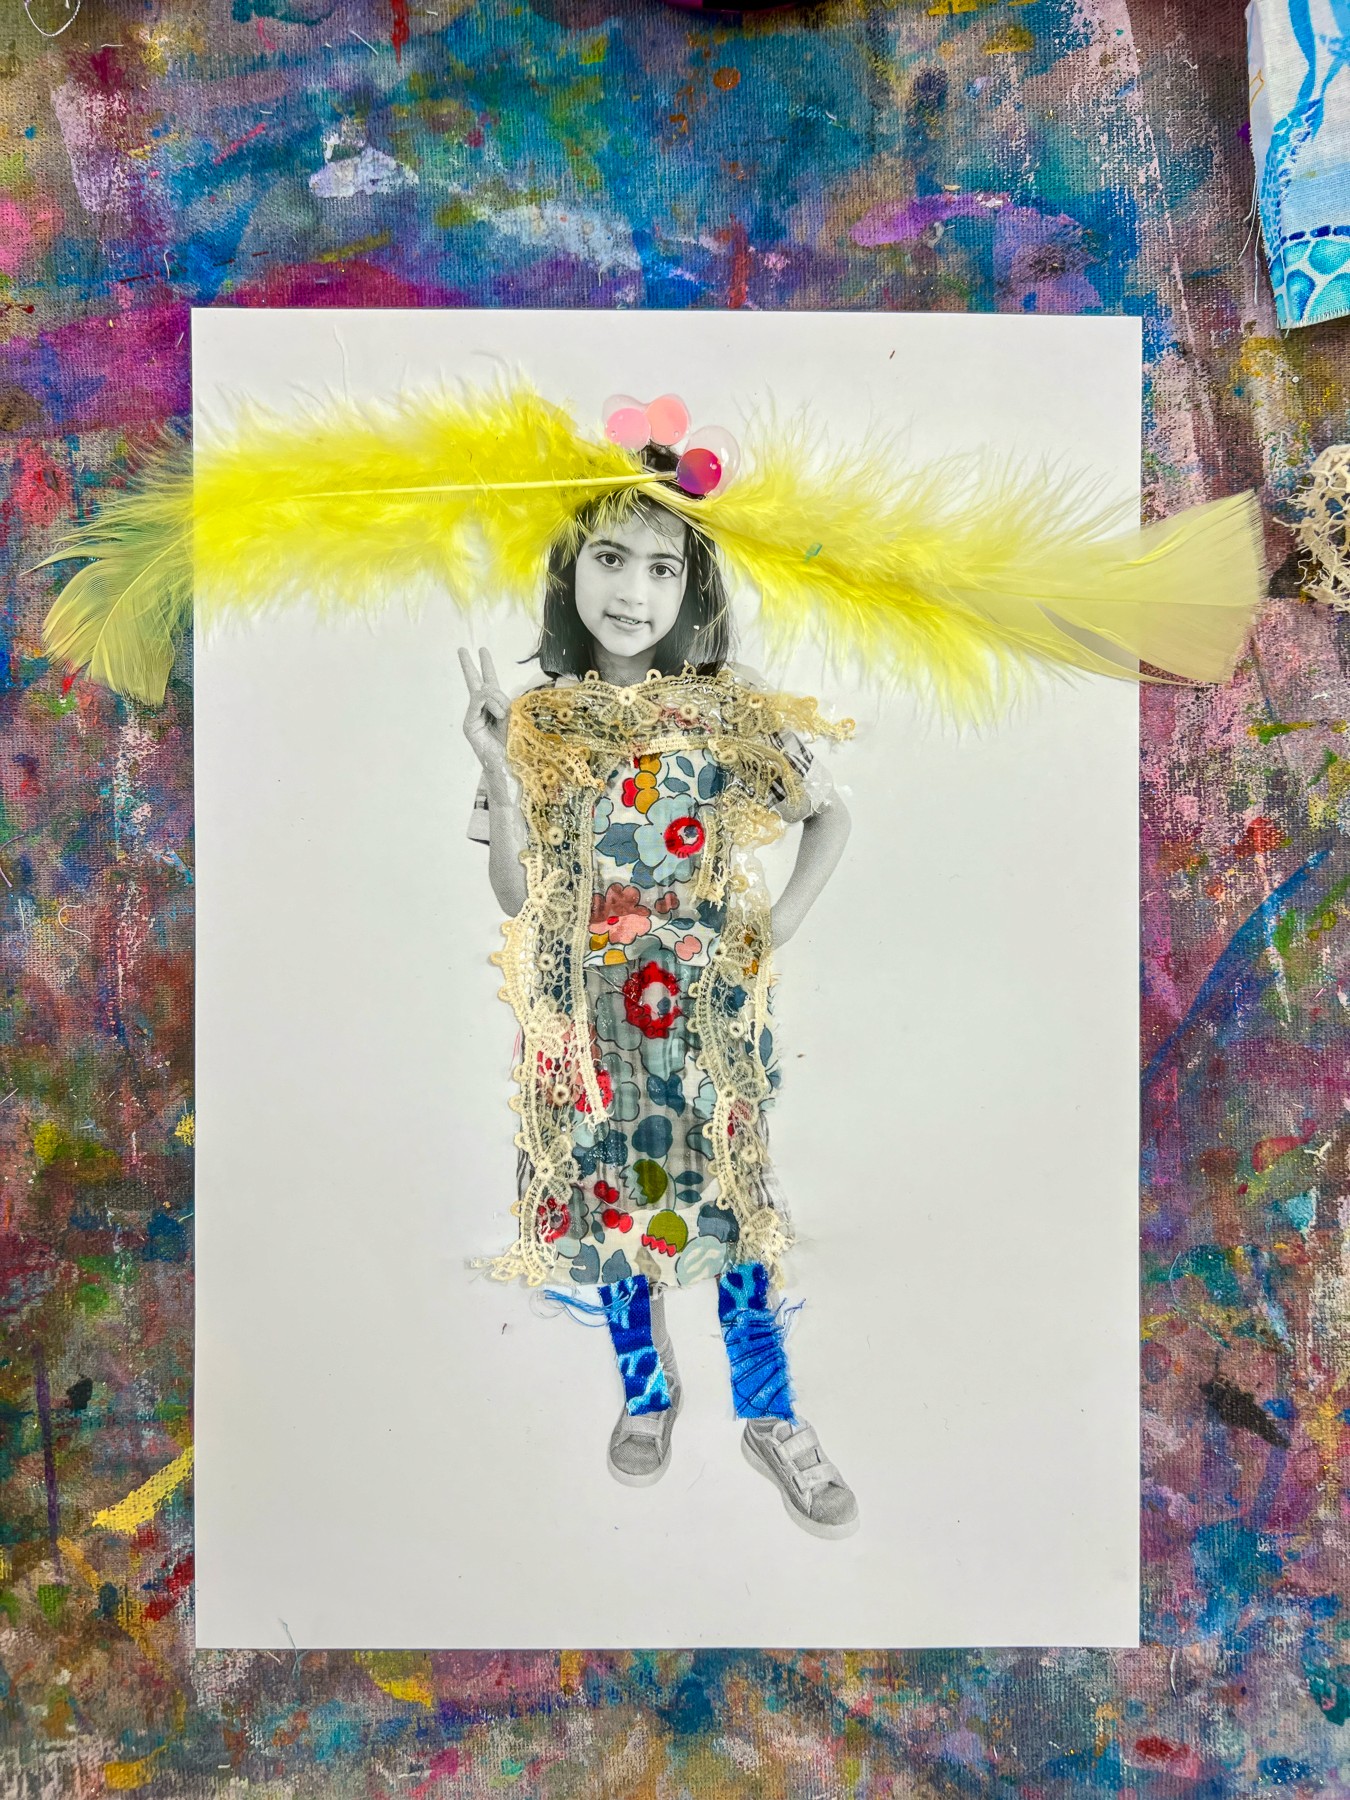
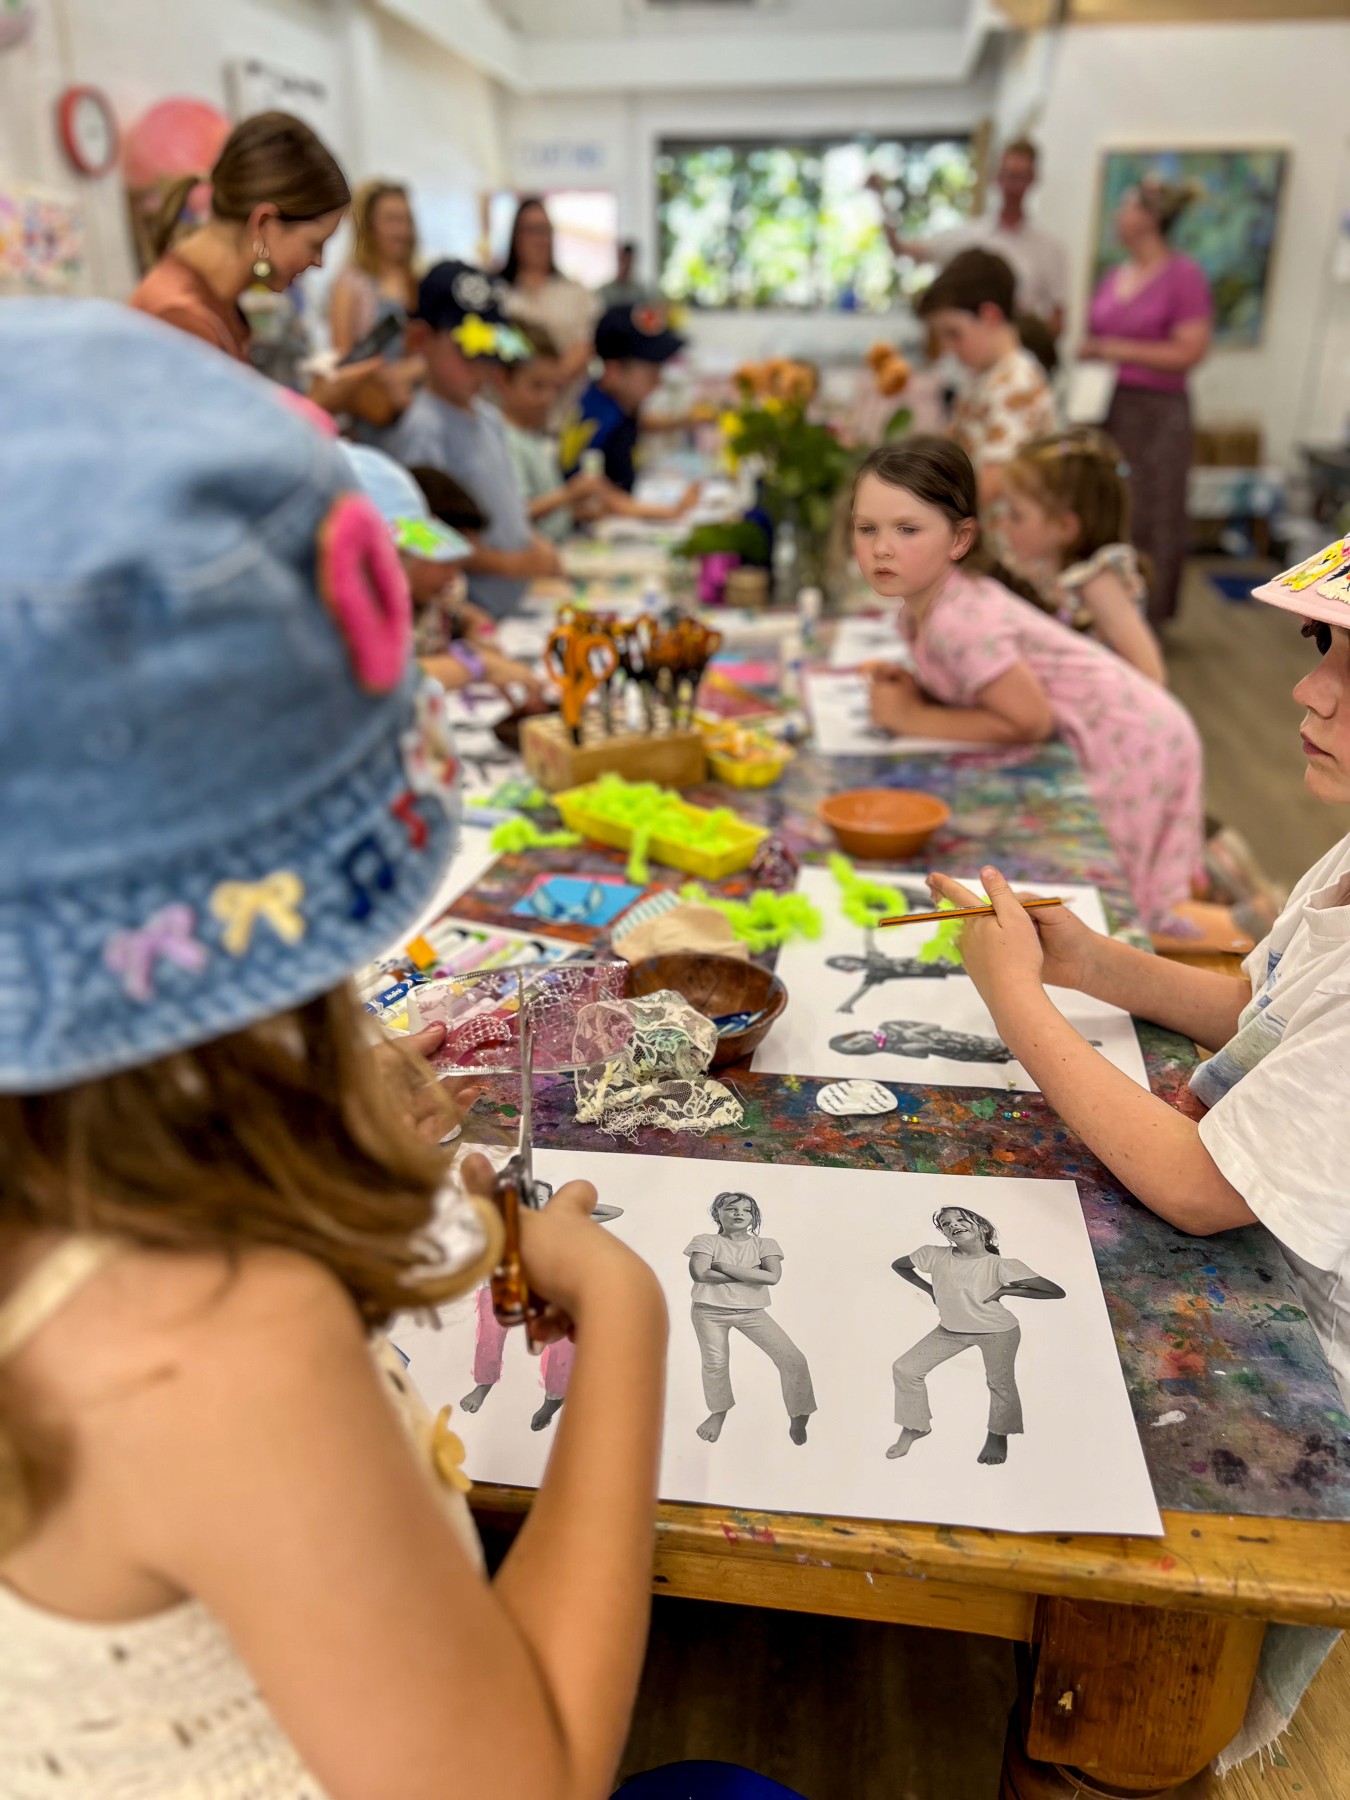
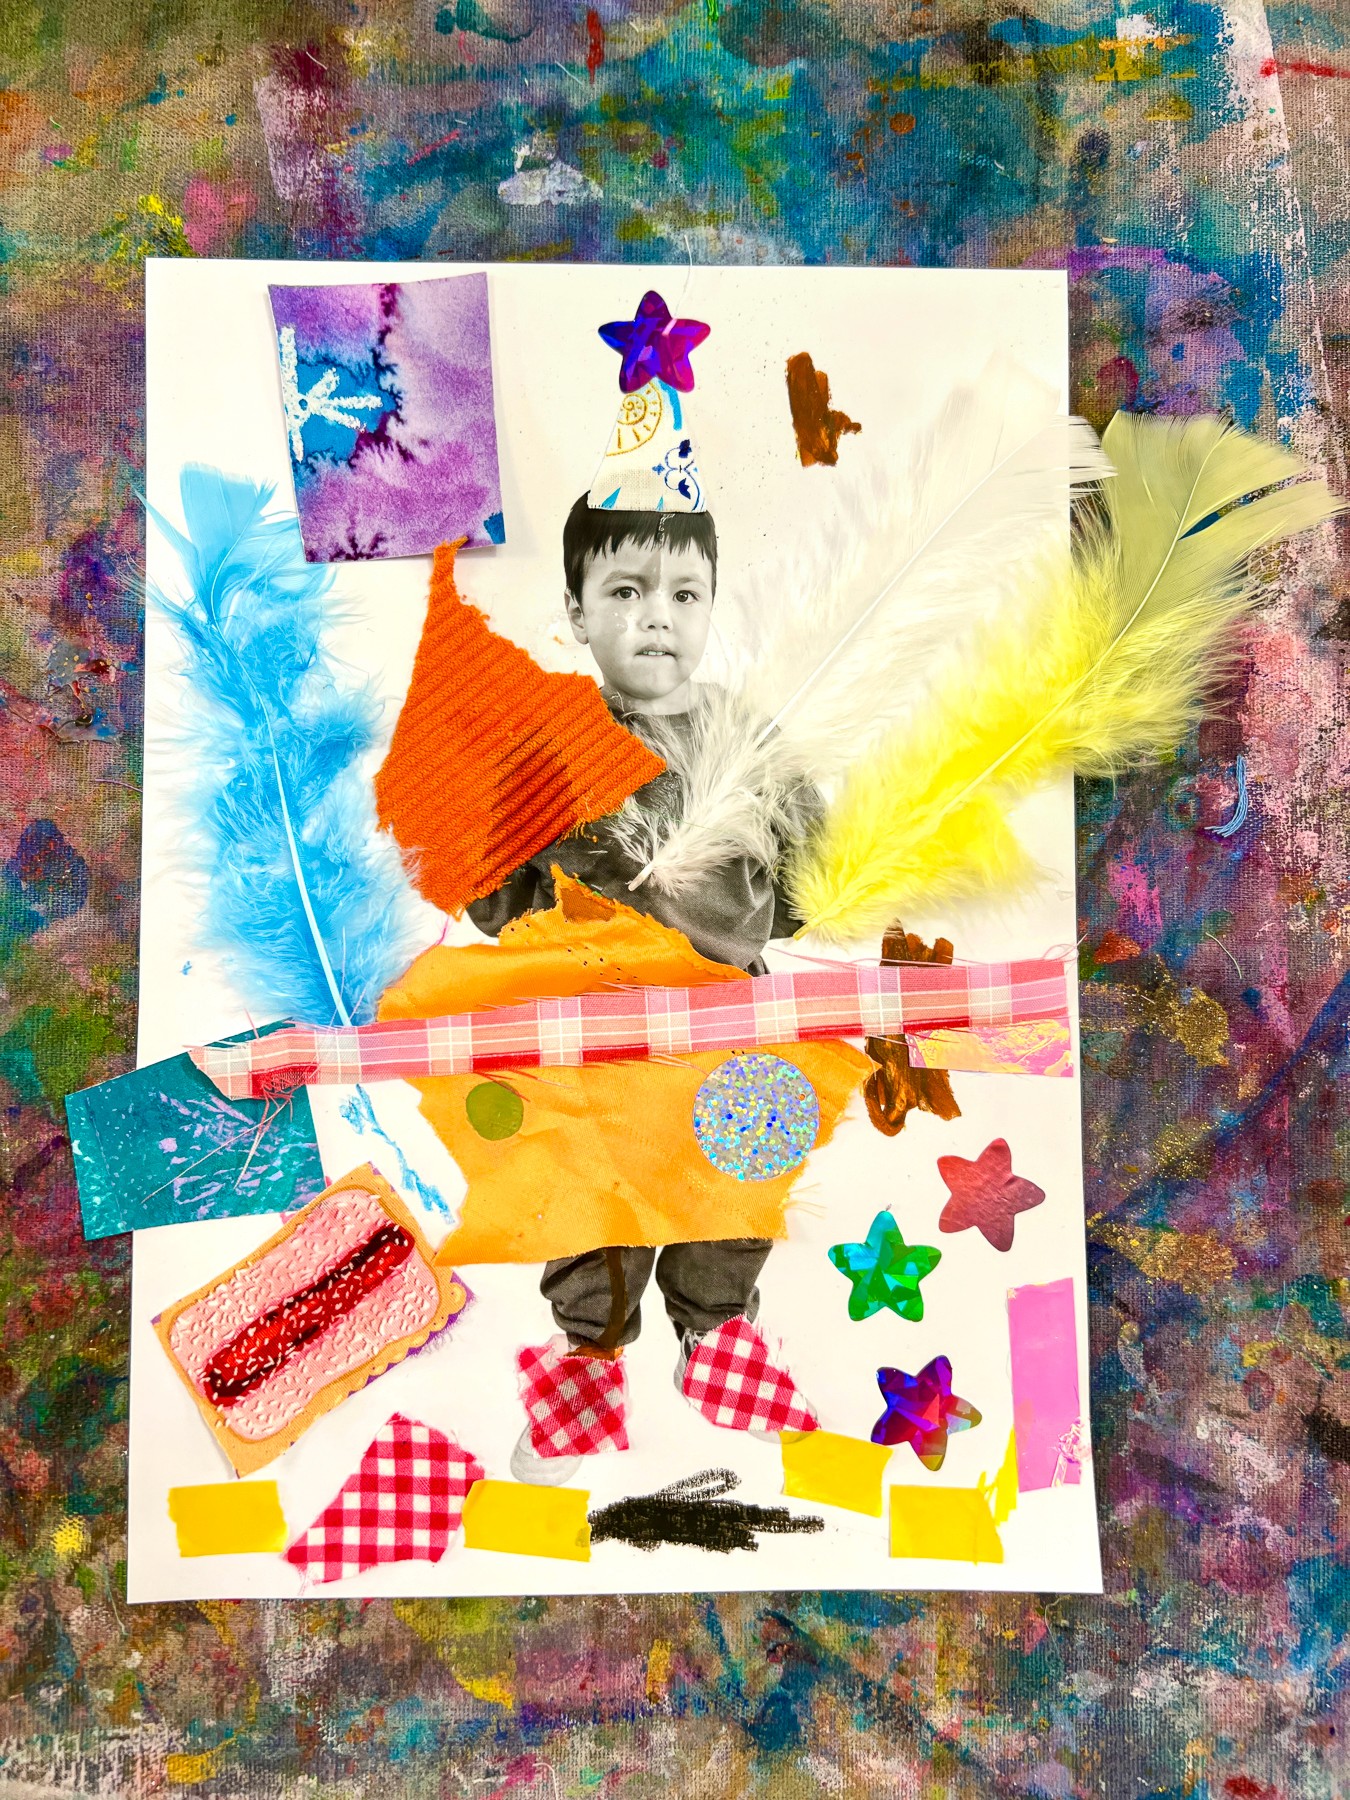
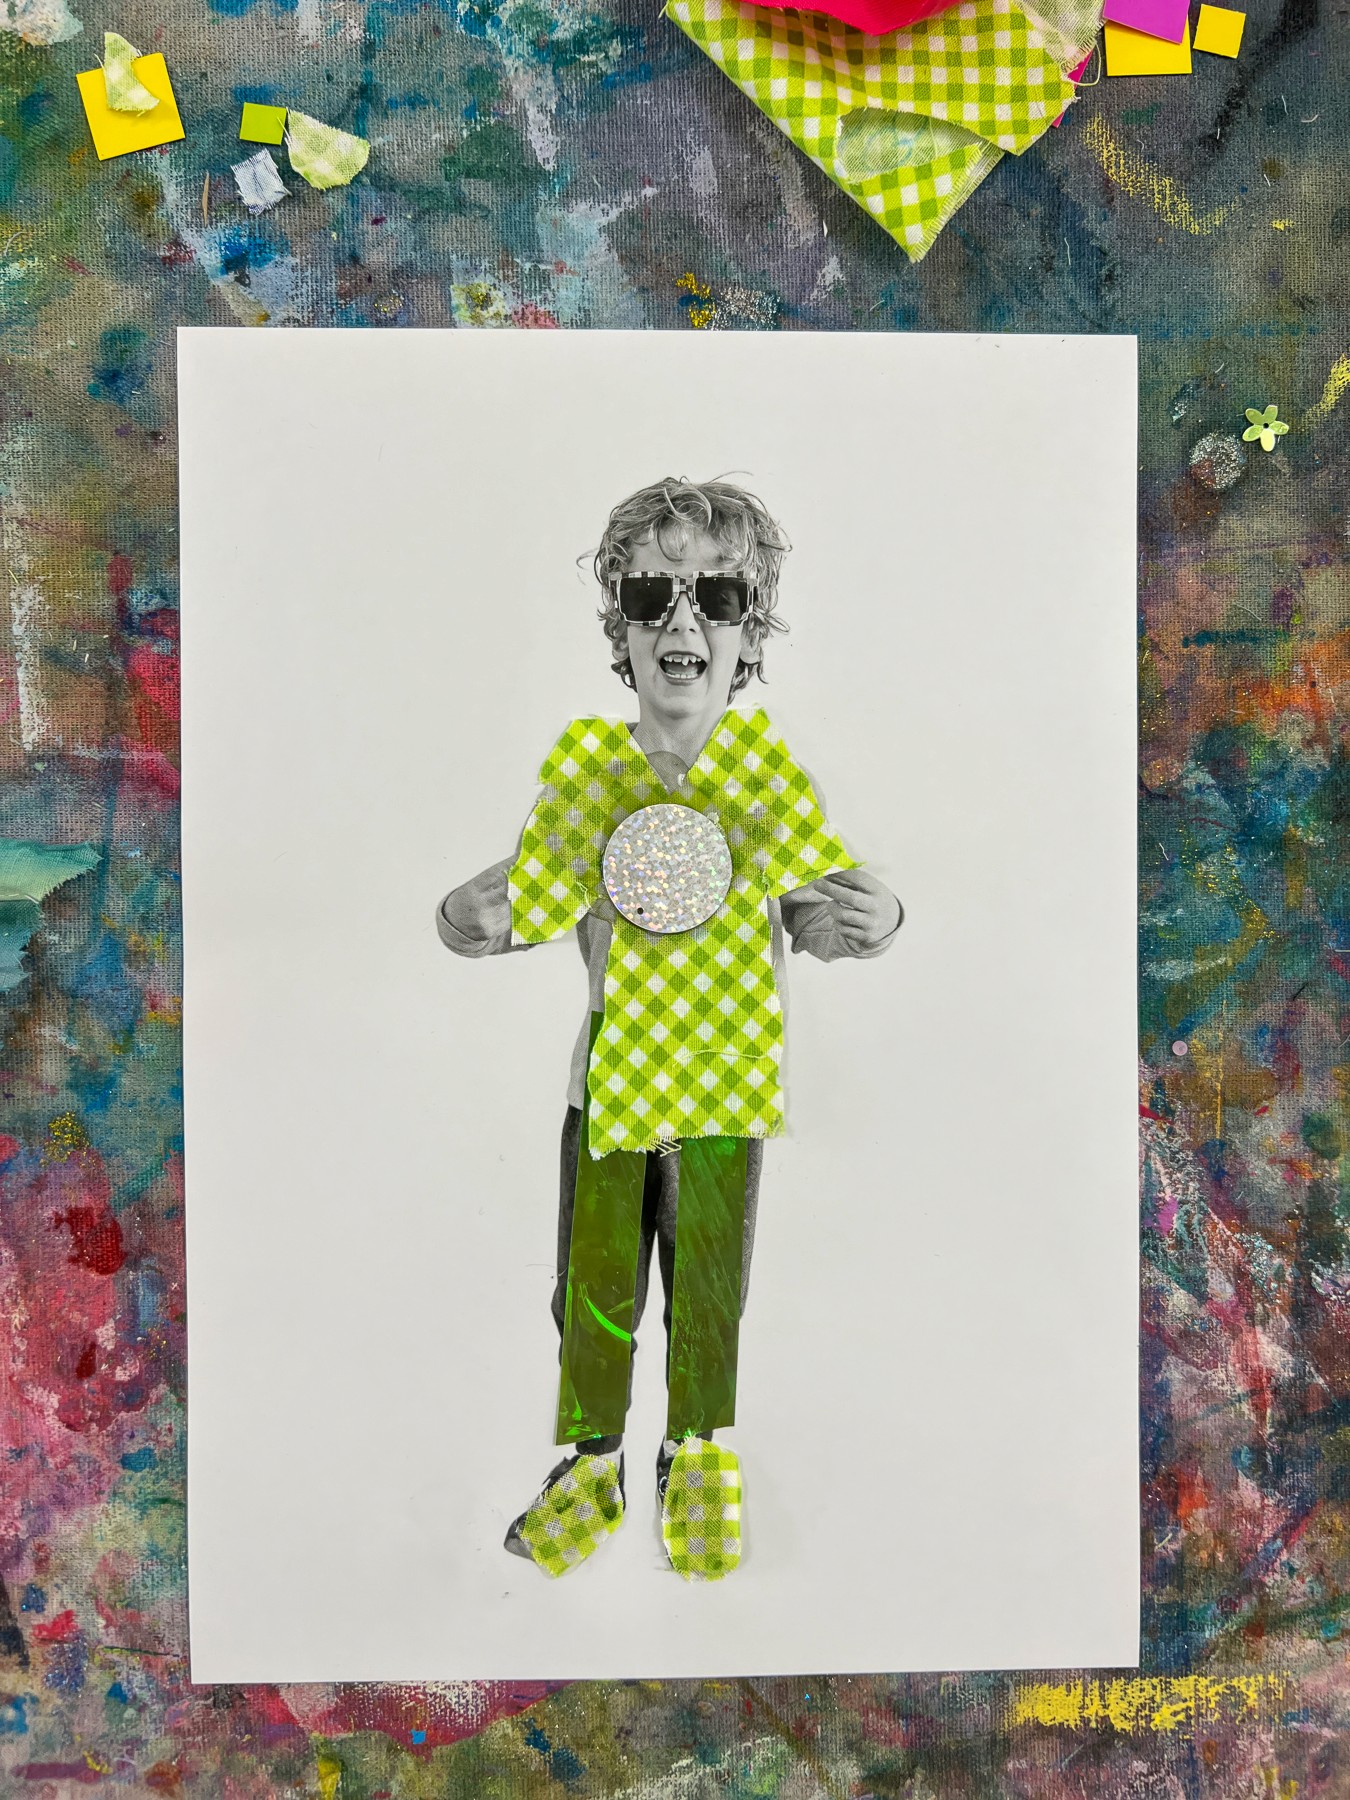
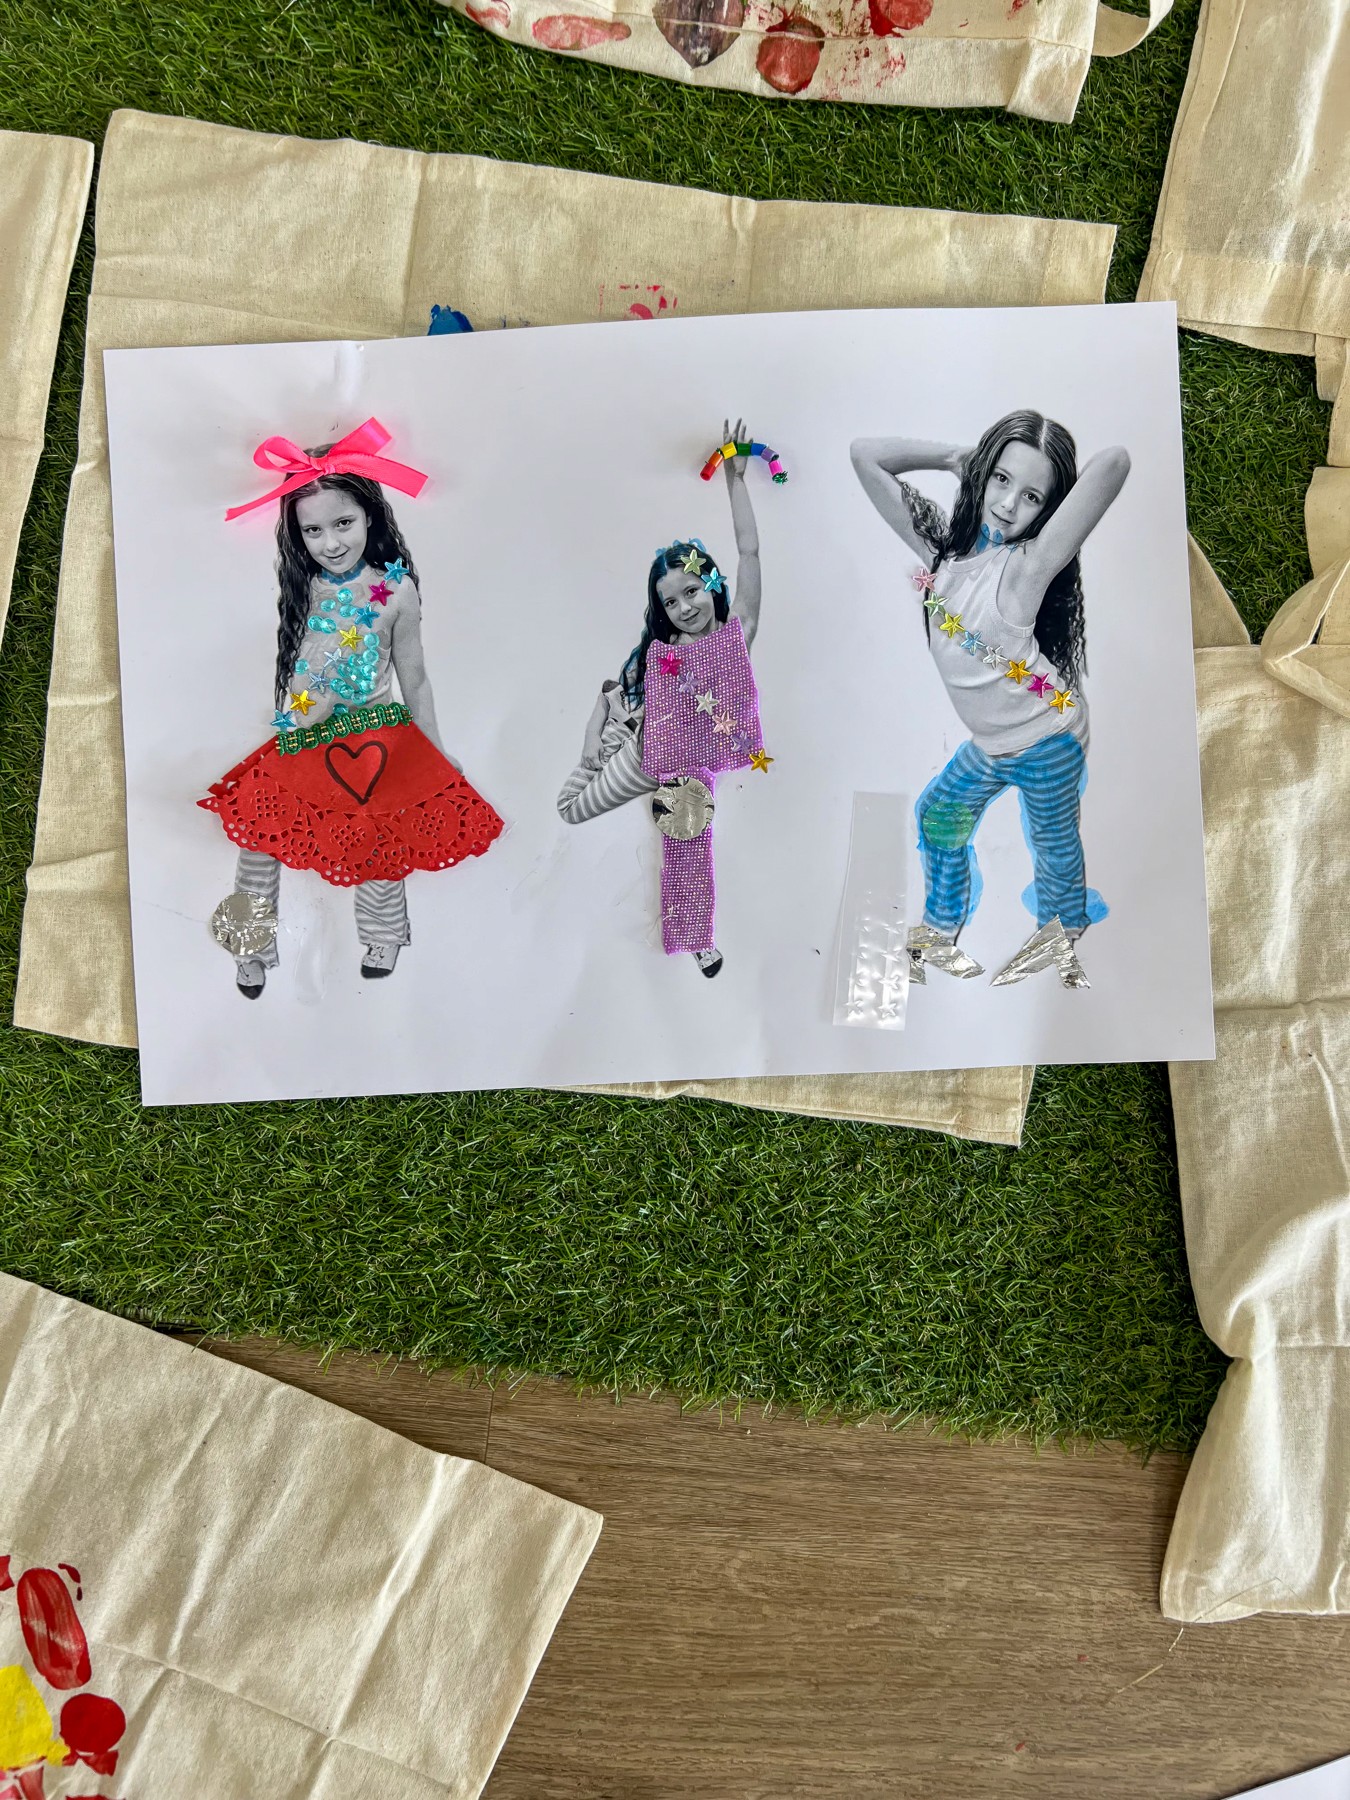
Collage Fashion Design
Cut, layer, style, repeat.
Bookmark
Collage
The Set Up
This idea was inspired by Shannon Merenstein’s incredible book ‘Collage Workshop for Kids’, created with the art educators at The Eric Carle Museum. Their work celebrates open ended making, real materials, and the joy of every child creating something completely their own. It’s the perfect spark for a fashion twist!
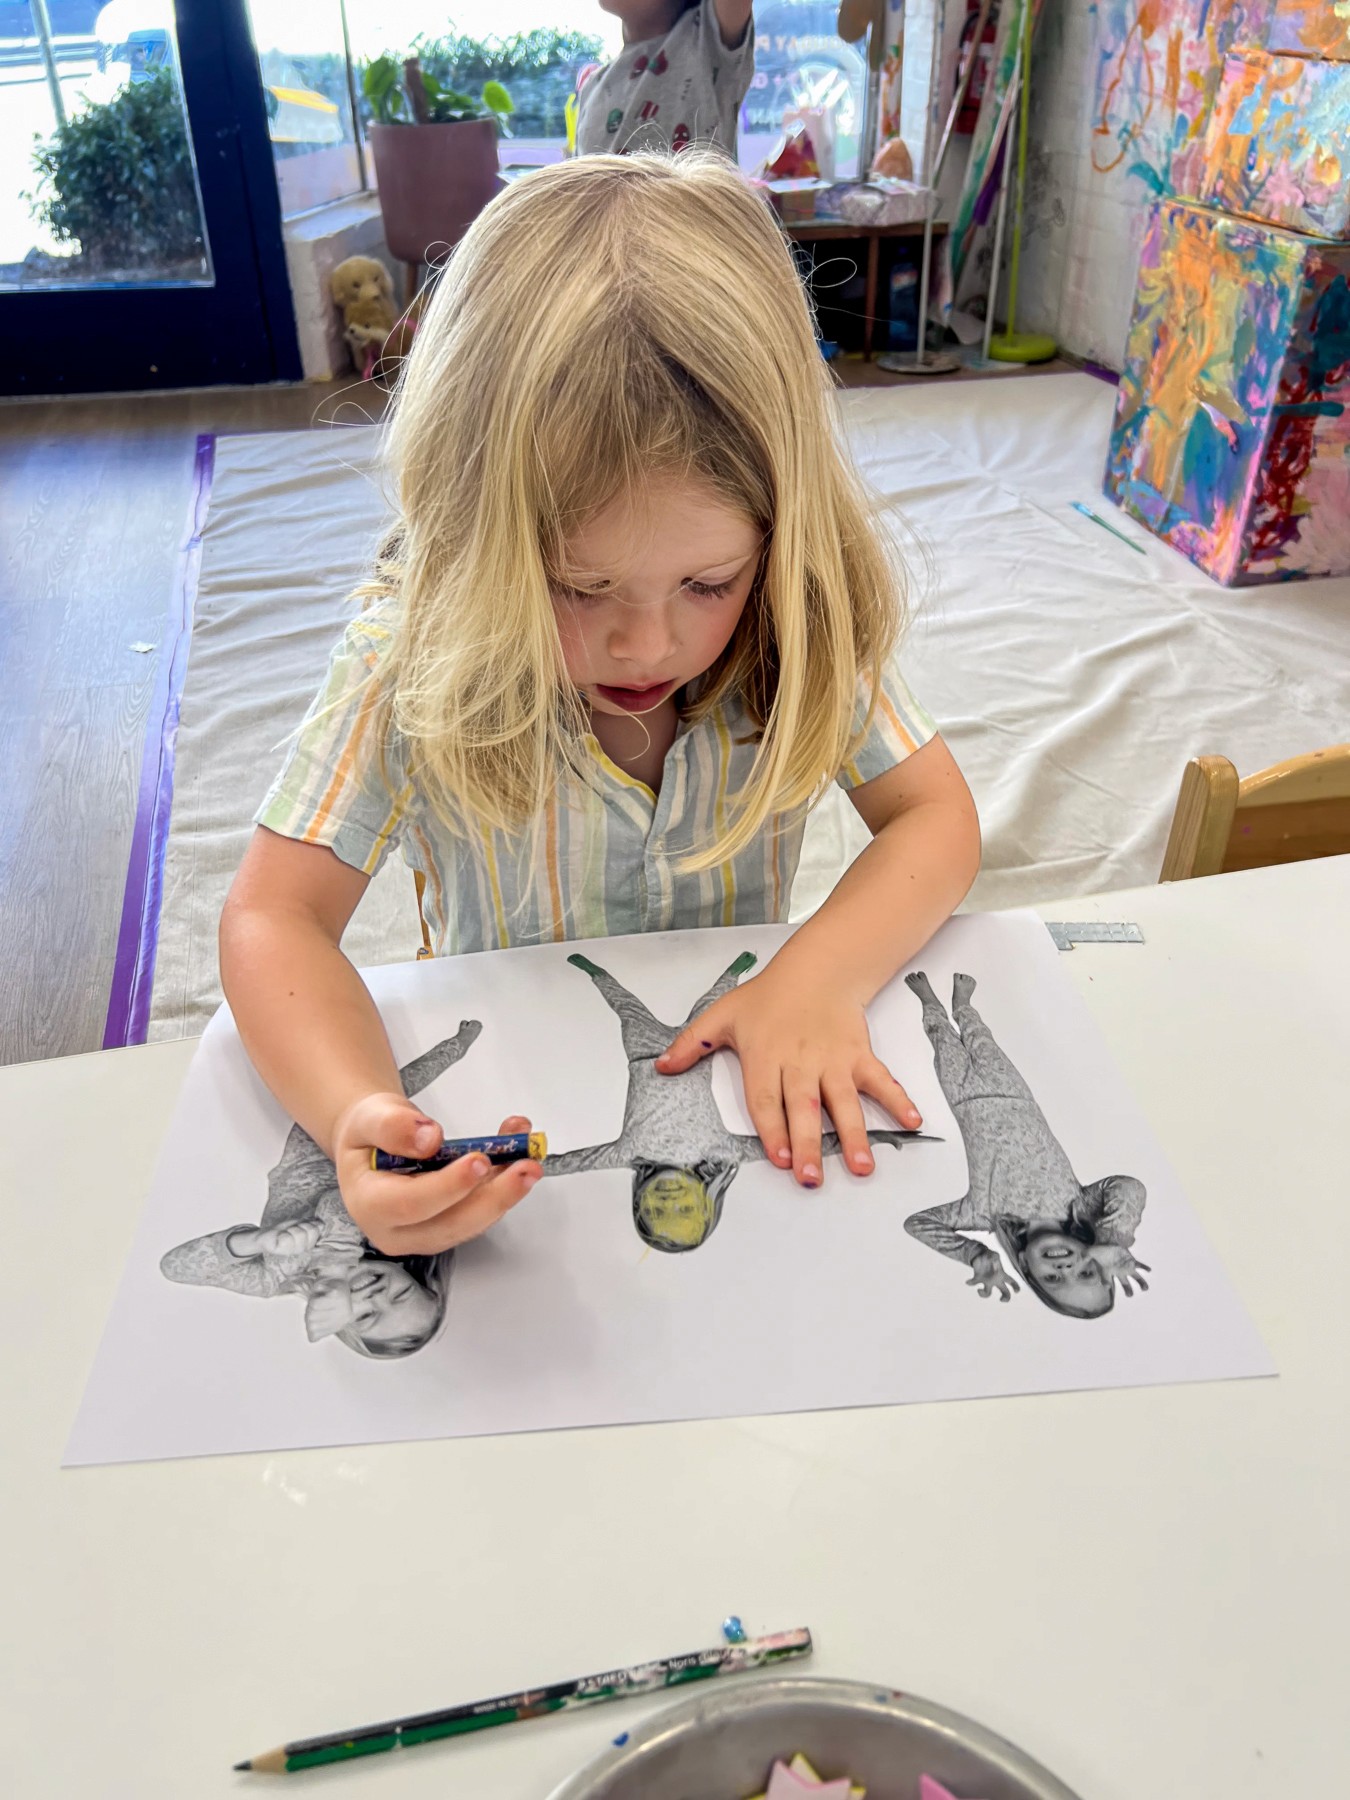
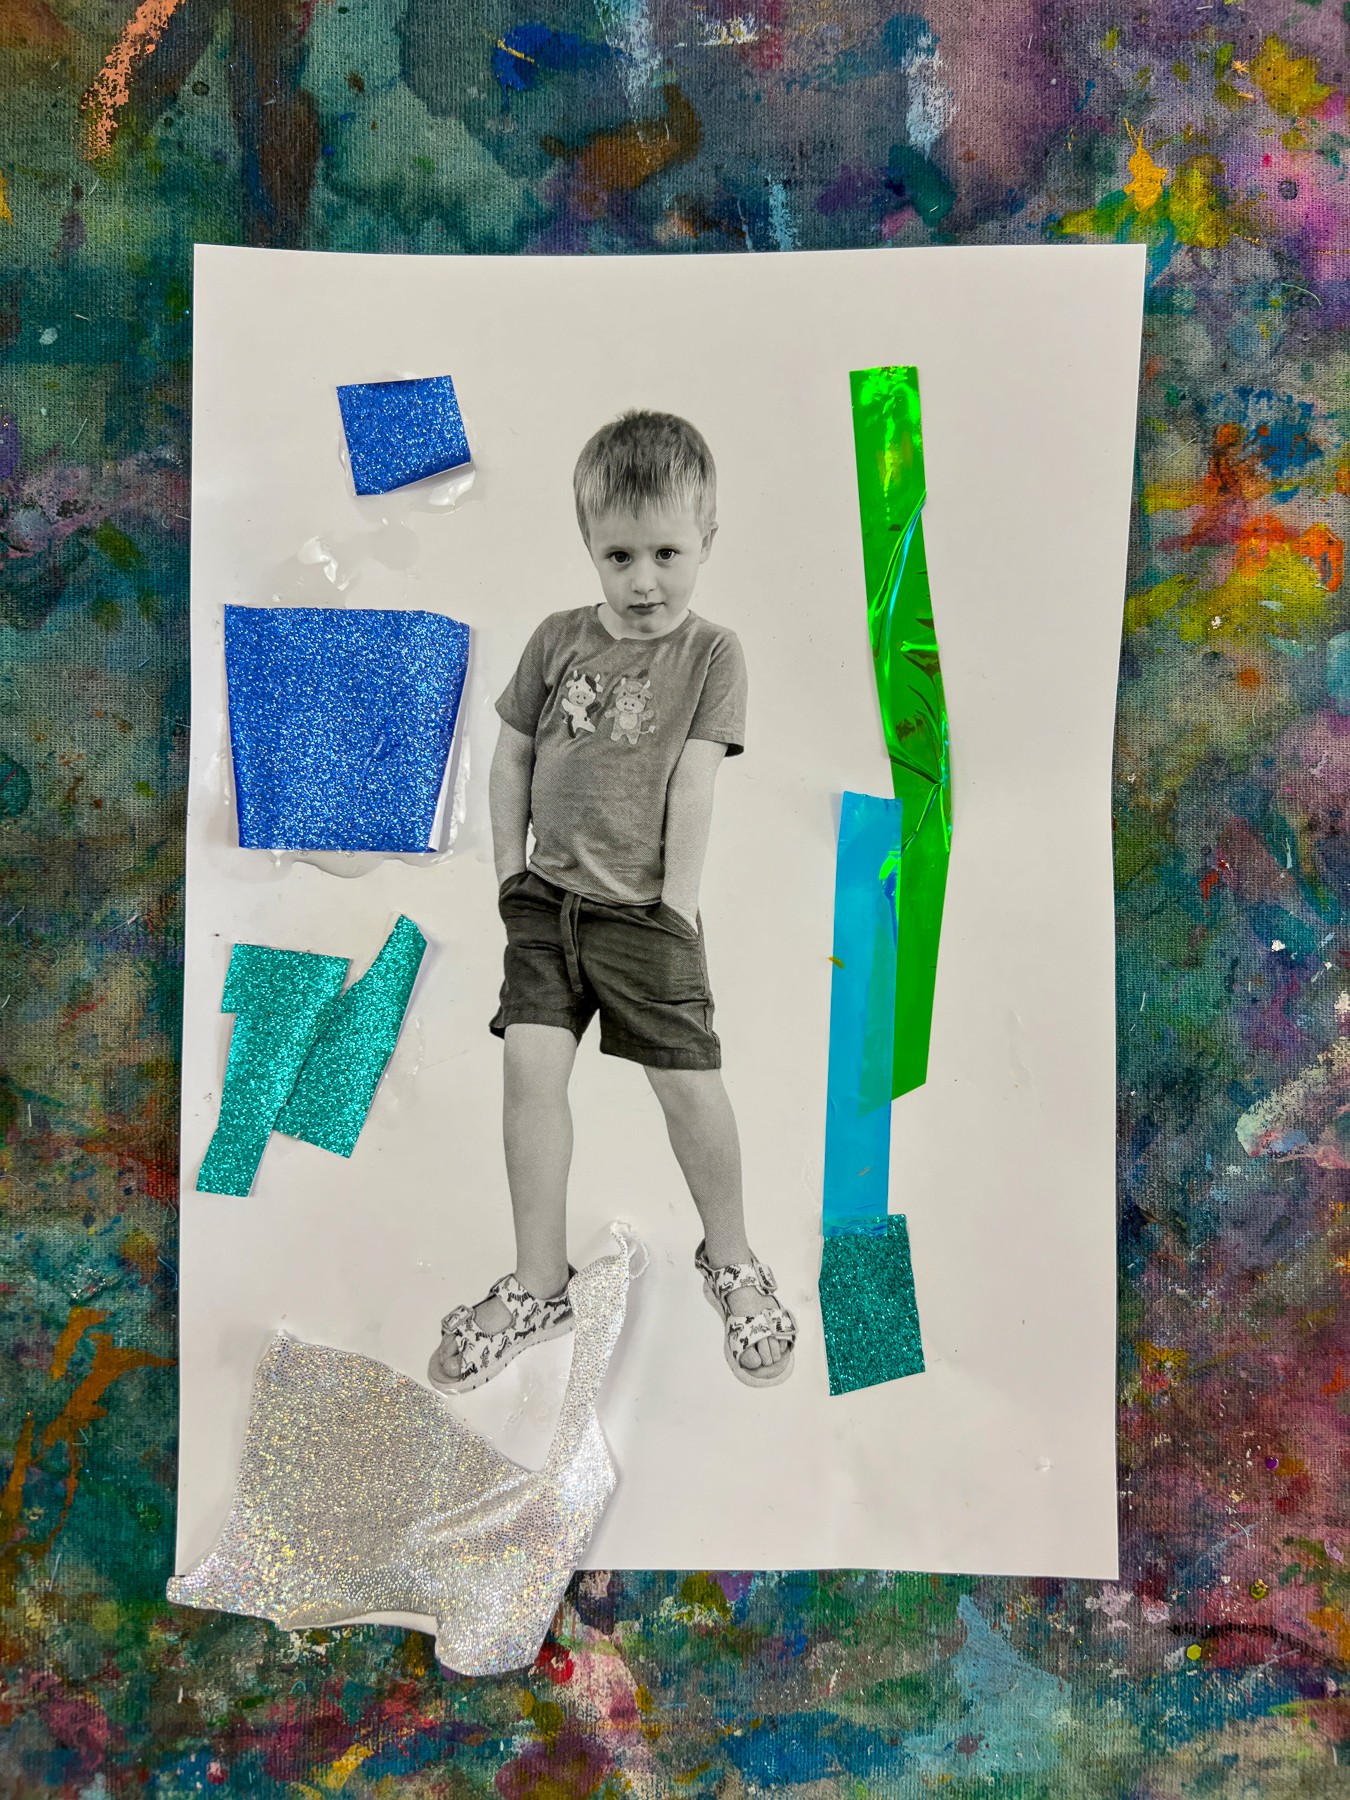
Start with black and white full length photos of each child. I like taking a few different poses and printing them as a little trio for a gorgeous final display, but a single portrait works just as well.
I upload the photo to Canva, click remove background, switch it to mono, and print on thick paper so it can handle a good amount of glue and texture. Or you could just print the photo as normal and then cut around the body and paste onto another piece of cardstock.
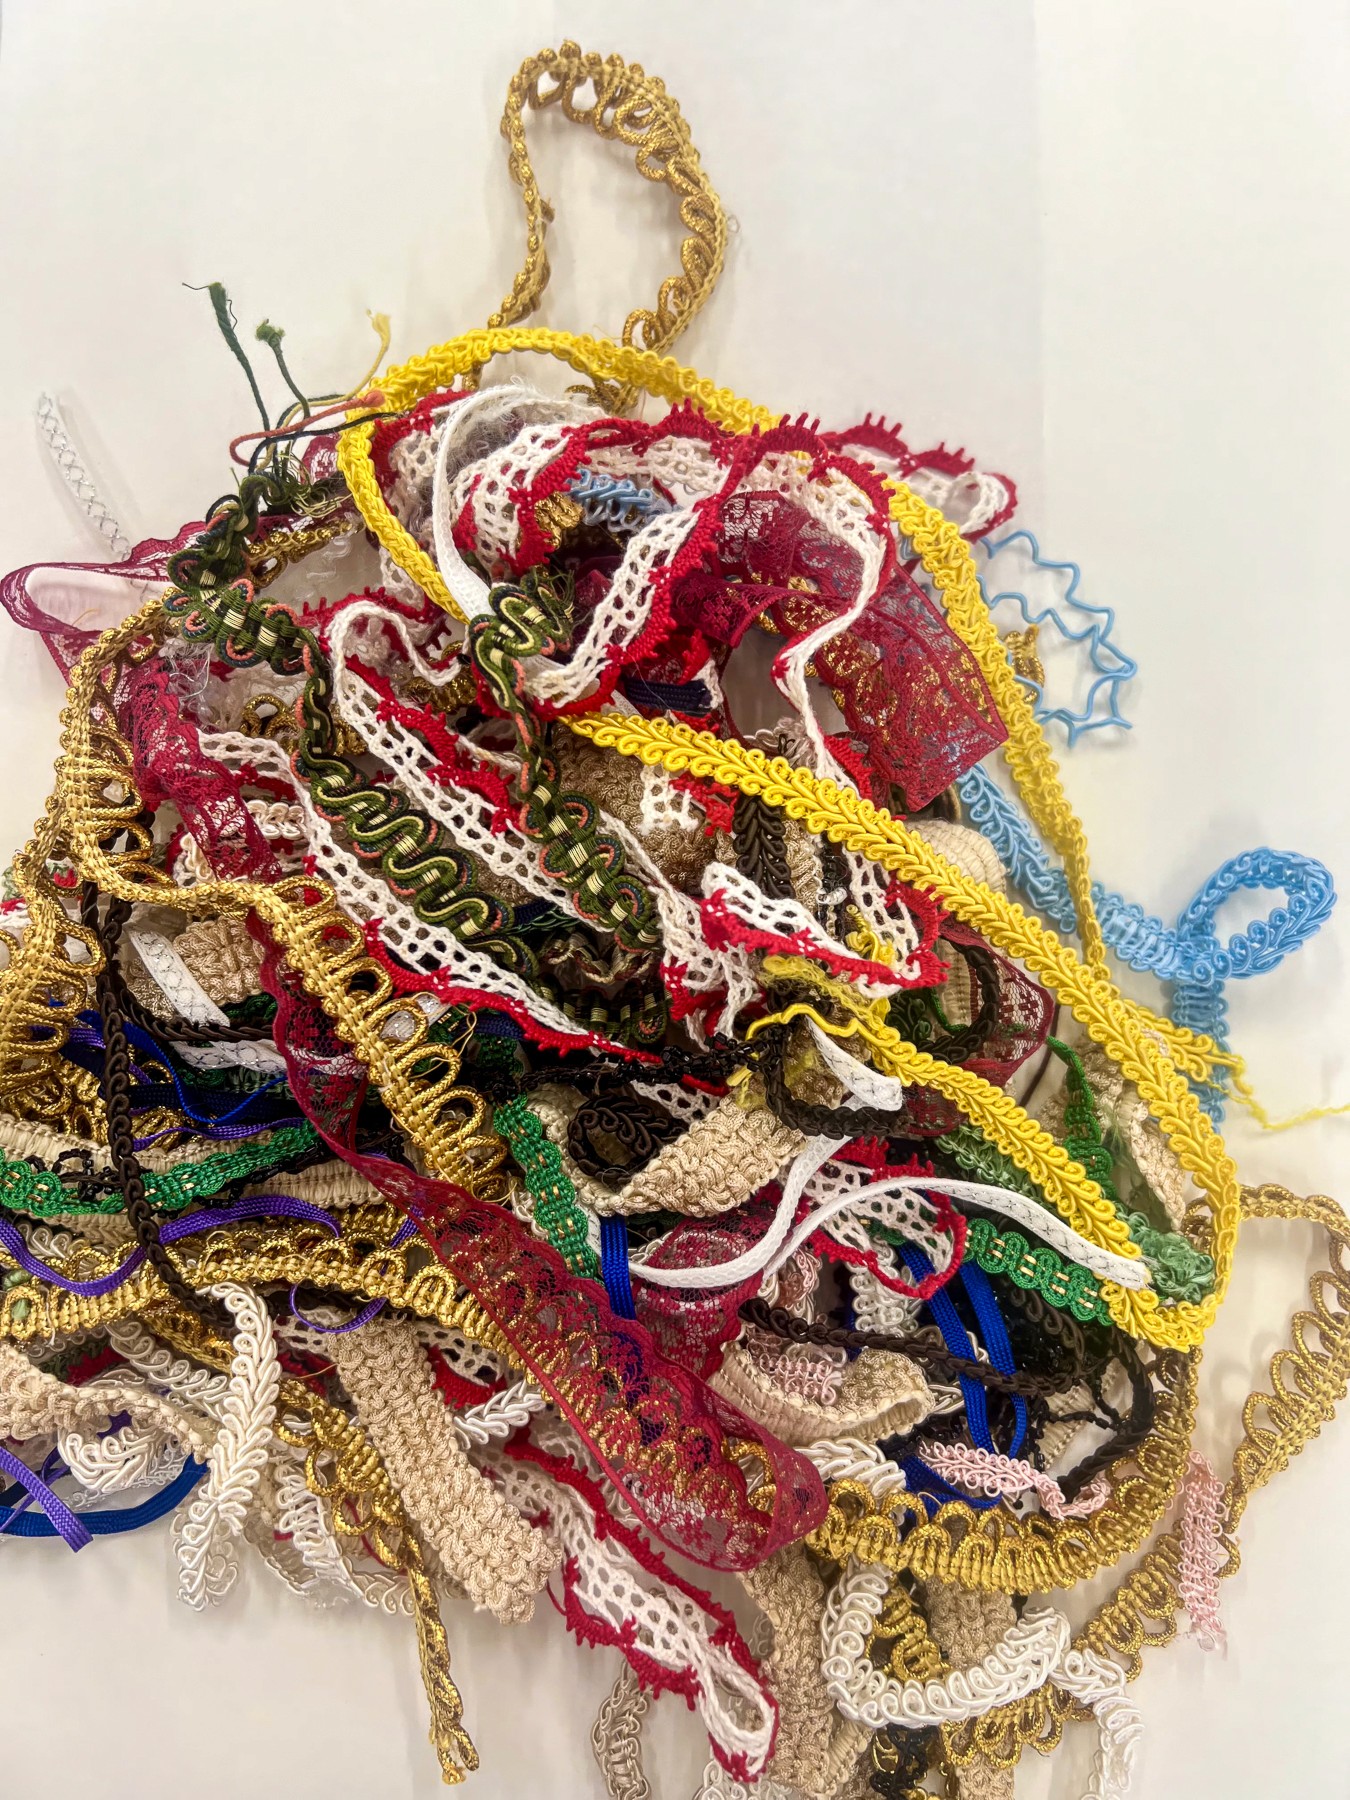
Set out a curated pile of fashion goodness. Fabric scraps, ribbons, sequins, buttons, lace, feathers, trims, anything with colour or personality. Add oil pastels and PVA glue. Old clothing from op shops can be cut into the most incredible tiny “textile” pieces. Silk, tulle, crinkled cotton, beaded trim. Kids respond so beautifully to real textures. Think of it as a miniature designer studio with plenty of choice, but without overwhelming them.
The Making
Encourage the artists to think about character rather than outfit. Who is this person? Where are they going? What kind of mood do they have today? But remember that there aren’t any rules! Some pieces end up whimsical and bold, others lean sculptural with little twists and pleats of fabric.
As they layer, you might like to talk about how fashion and colour communicate feeling. A stiff collar can feel powerful and beautiful. A flowing ribbon can feel soft and secure.
Artist Study: Rei Kawakubo ‘Comme des Garçons’
Kawakubo is one of the most fearless fashion designers in the world. She began her career in Tokyo, then took over Paris runways with work that refused to fit inside any rulebook. Instead of neat sketches, Rei often starts by tearing paper, pinning fabric, layering odd shapes and shifting pieces around until something feels alive. Her designs aren’t about looking perfect. They are about emotion, character and the curiosity to try something that hasn’t existed before. It is the most beautiful reminder that fashion is self expression long before it becomes clothing!
Variations
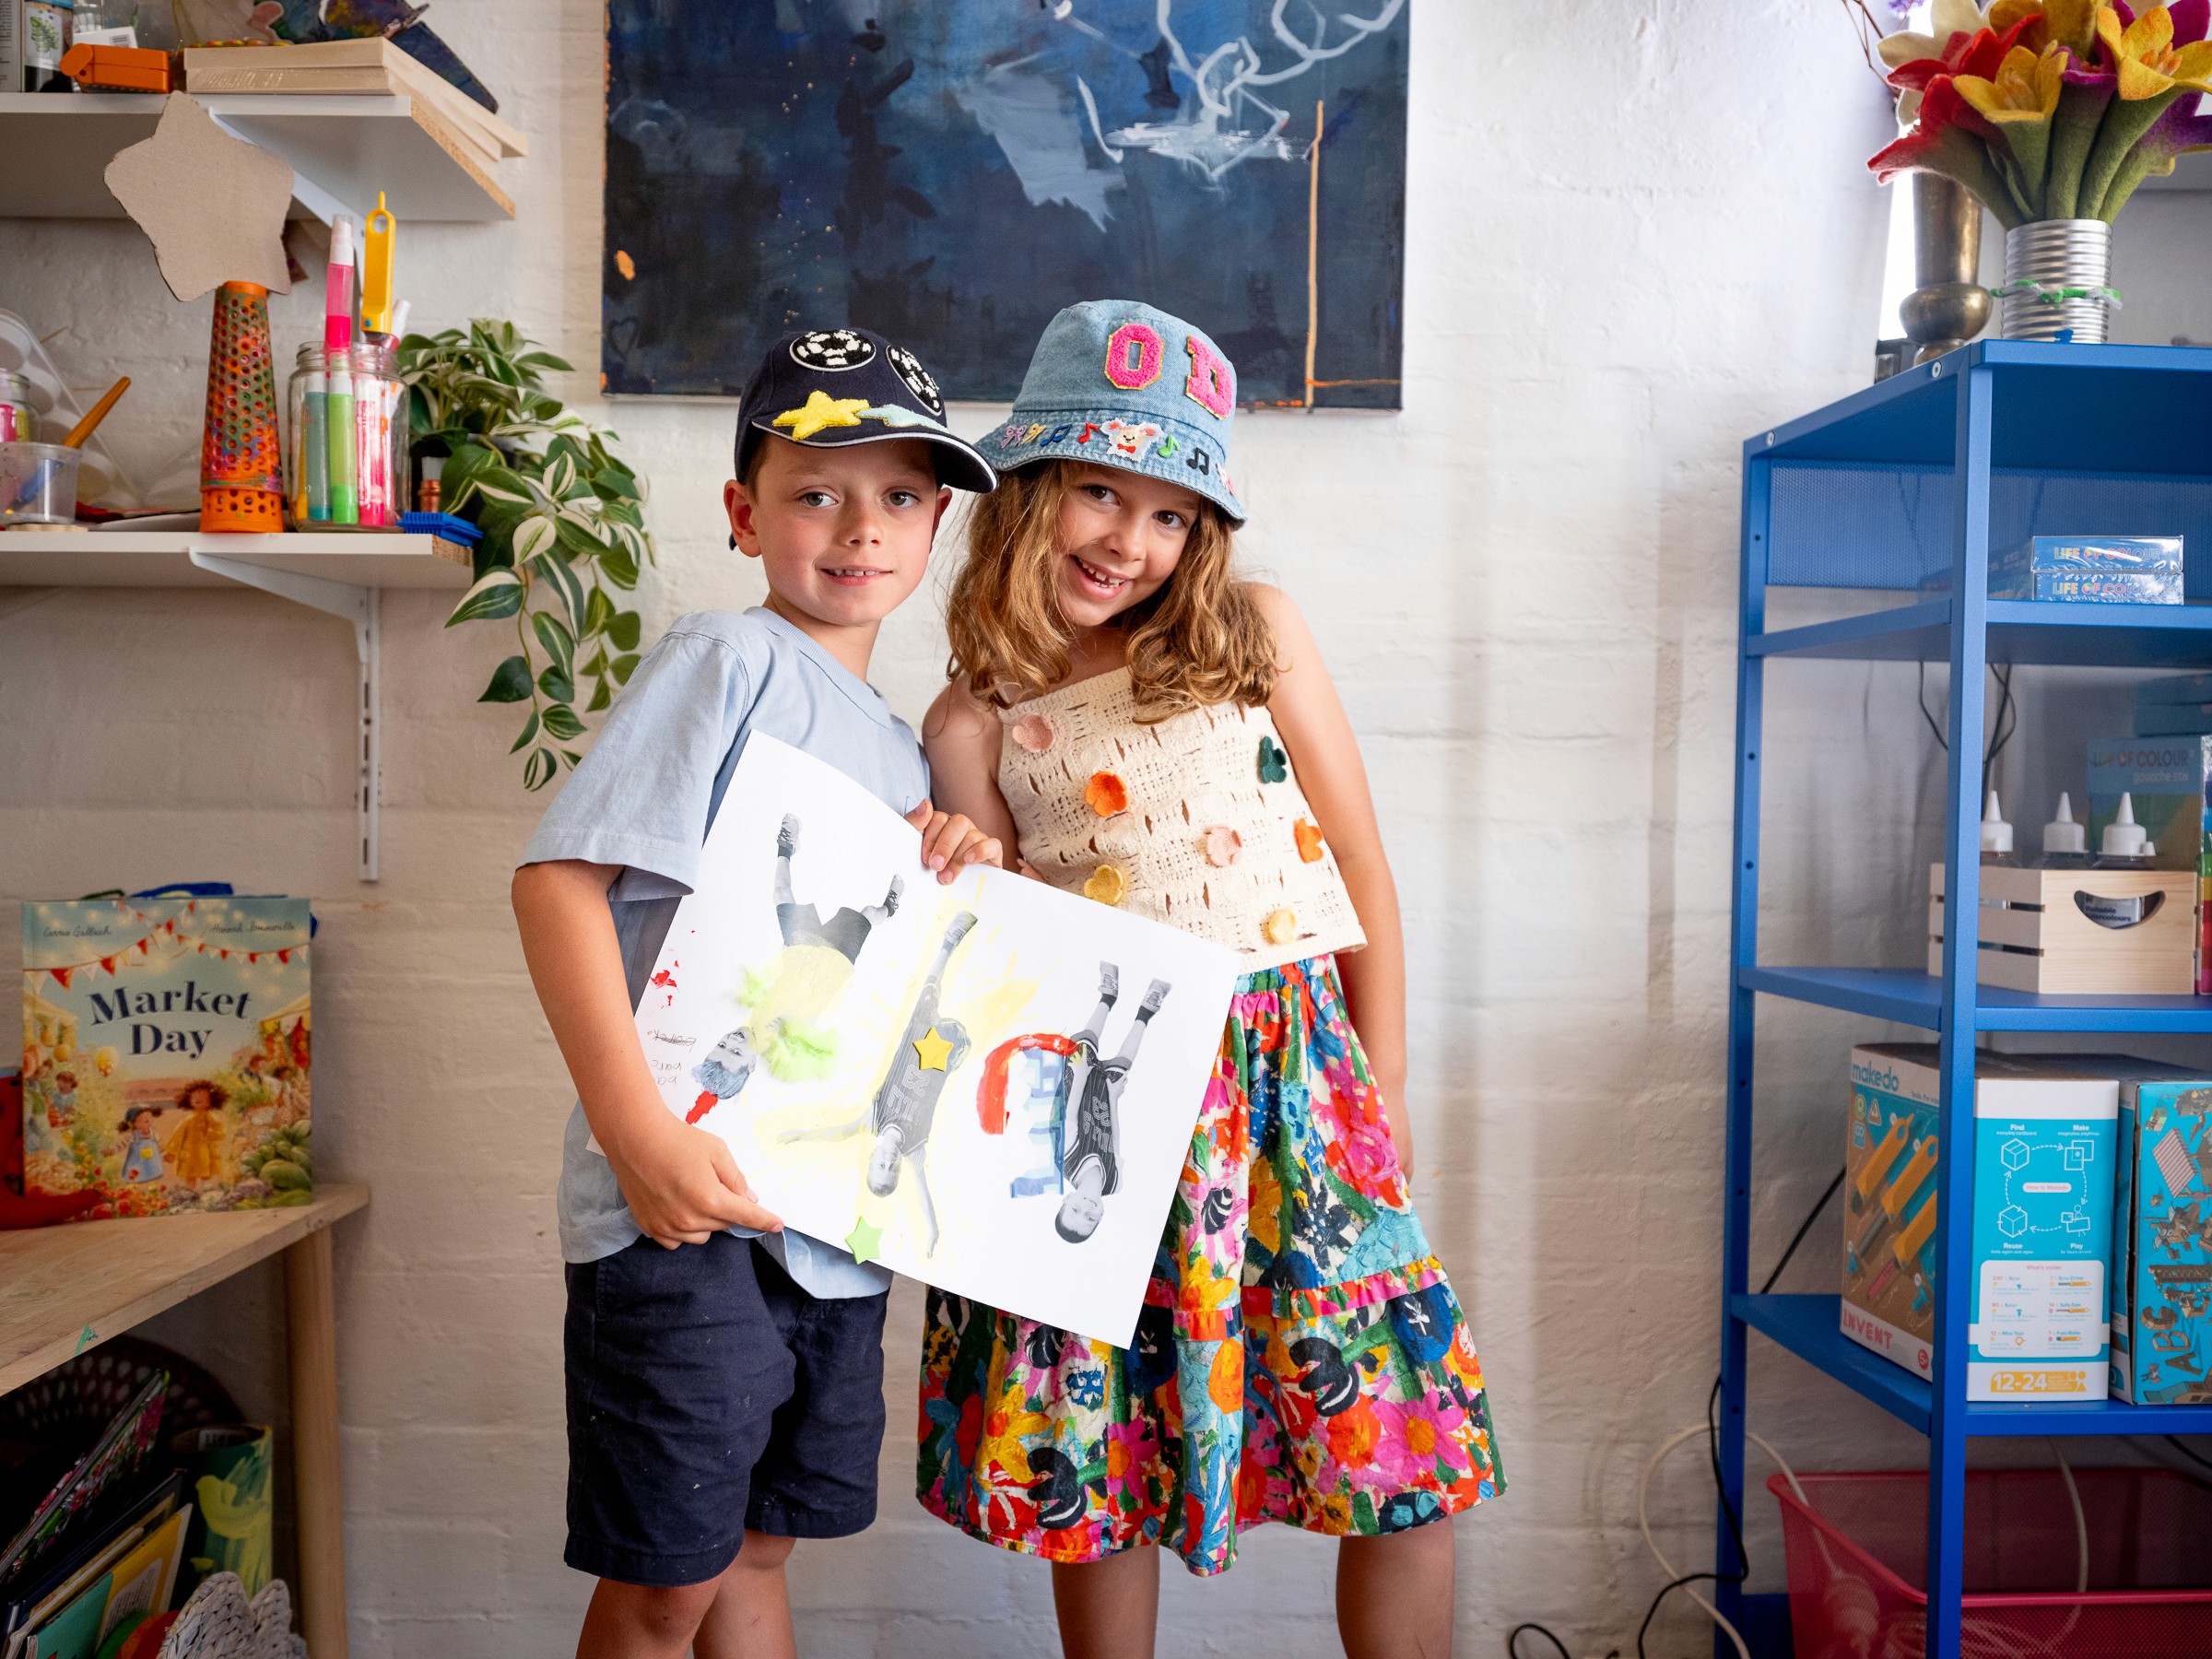
Make a whole runway by lining up each child’s trio of poses.
Create a group “fashion house” by assigning themes and letting everyone design within the brief.
Materials
Black and white printed photos
Fabric scraps, ribbons, lace, trims
Sequins, buttons, feathers, pom poms
Oil pastels
PVA glue
Scissors
Cardstock for backing
Back to Top
Collage Fashion Design
Cut, layer, style, repeat.
Bookmark
Collage
The Set Up
This idea was inspired by Shannon Merenstein’s incredible book ‘Collage Workshop for Kids’, created with the art educators at The Eric Carle Museum. Their work celebrates open ended making, real materials, and the joy of every child creating something completely their own. It’s the perfect spark for a fashion twist!
Start with black and white full length photos of each child. I like taking a few different poses and printing them as a little trio for a gorgeous final display, but a single portrait works just as well.
I upload the photo to Canva, click remove background, switch it to mono, and print on thick paper so it can handle a good amount of glue and texture. Or you could just print the photo as normal and then cut around the body and paste onto another piece of cardstock.
Set out a curated pile of fashion goodness. Fabric scraps, ribbons, sequins, buttons, lace, feathers, trims, anything with colour or personality. Add oil pastels and PVA glue. Old clothing from op shops can be cut into the most incredible tiny “textile” pieces. Silk, tulle, crinkled cotton, beaded trim. Kids respond so beautifully to real textures. Think of it as a miniature designer studio with plenty of choice, but without overwhelming them.
The Making
Encourage the artists to think about character rather than outfit. Who is this person? Where are they going? What kind of mood do they have today? But remember that there aren’t any rules! Some pieces end up whimsical and bold, others lean sculptural with little twists and pleats of fabric.
As they layer, you might like to talk about how fashion and colour communicate feeling. A stiff collar can feel powerful and beautiful. A flowing ribbon can feel soft and secure.
Artist Study: Rei Kawakubo ‘Comme des Garçons’
Kawakubo is one of the most fearless fashion designers in the world. She began her career in Tokyo, then took over Paris runways with work that refused to fit inside any rulebook. Instead of neat sketches, Rei often starts by tearing paper, pinning fabric, layering odd shapes and shifting pieces around until something feels alive. Her designs aren’t about looking perfect. They are about emotion, character and the curiosity to try something that hasn’t existed before. It is the most beautiful reminder that fashion is self expression long before it becomes clothing!
Variations
Make a whole runway by lining up each child’s trio of poses.
Create a group “fashion house” by assigning themes and letting everyone design within the brief.
Materials
Black and white printed photos
Fabric scraps, ribbons, lace, trims
Sequins, buttons, feathers, pom poms
Oil pastels
PVA glue
Scissors
Cardstock for backing
Back to Top
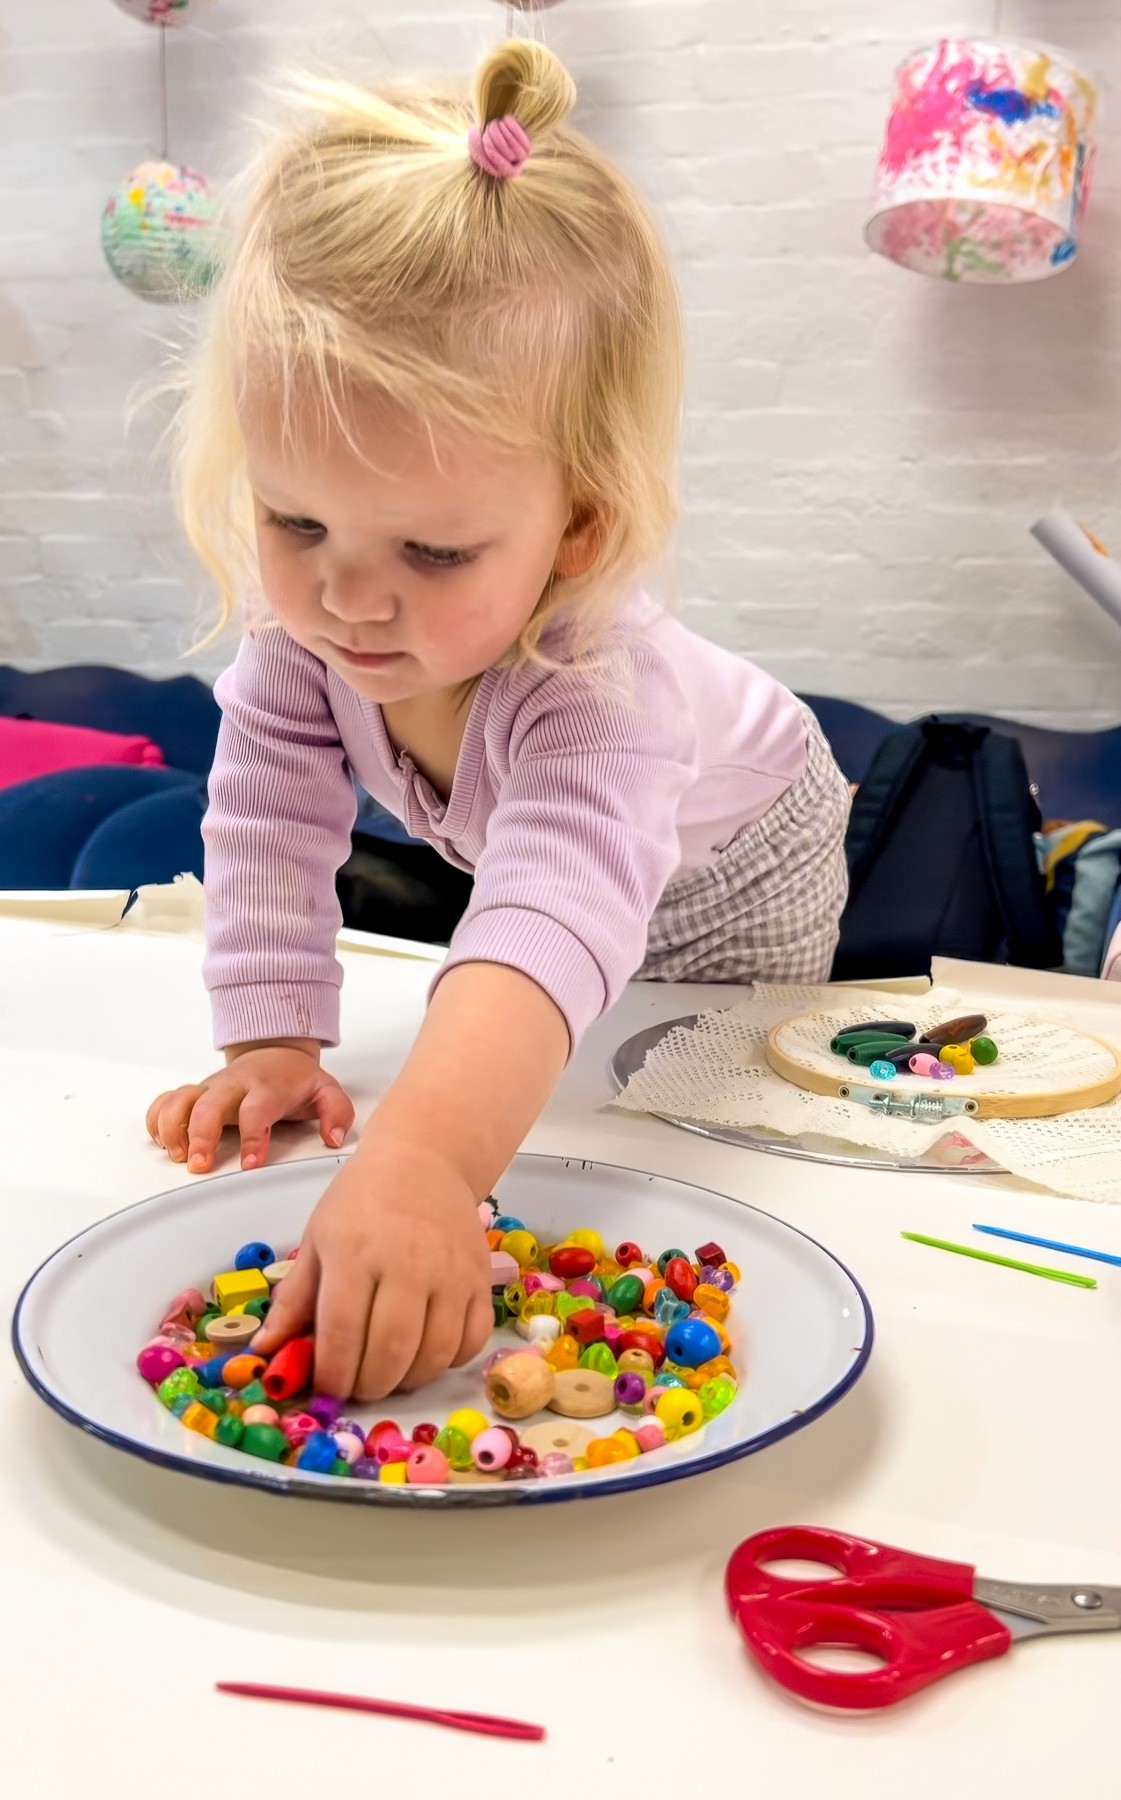
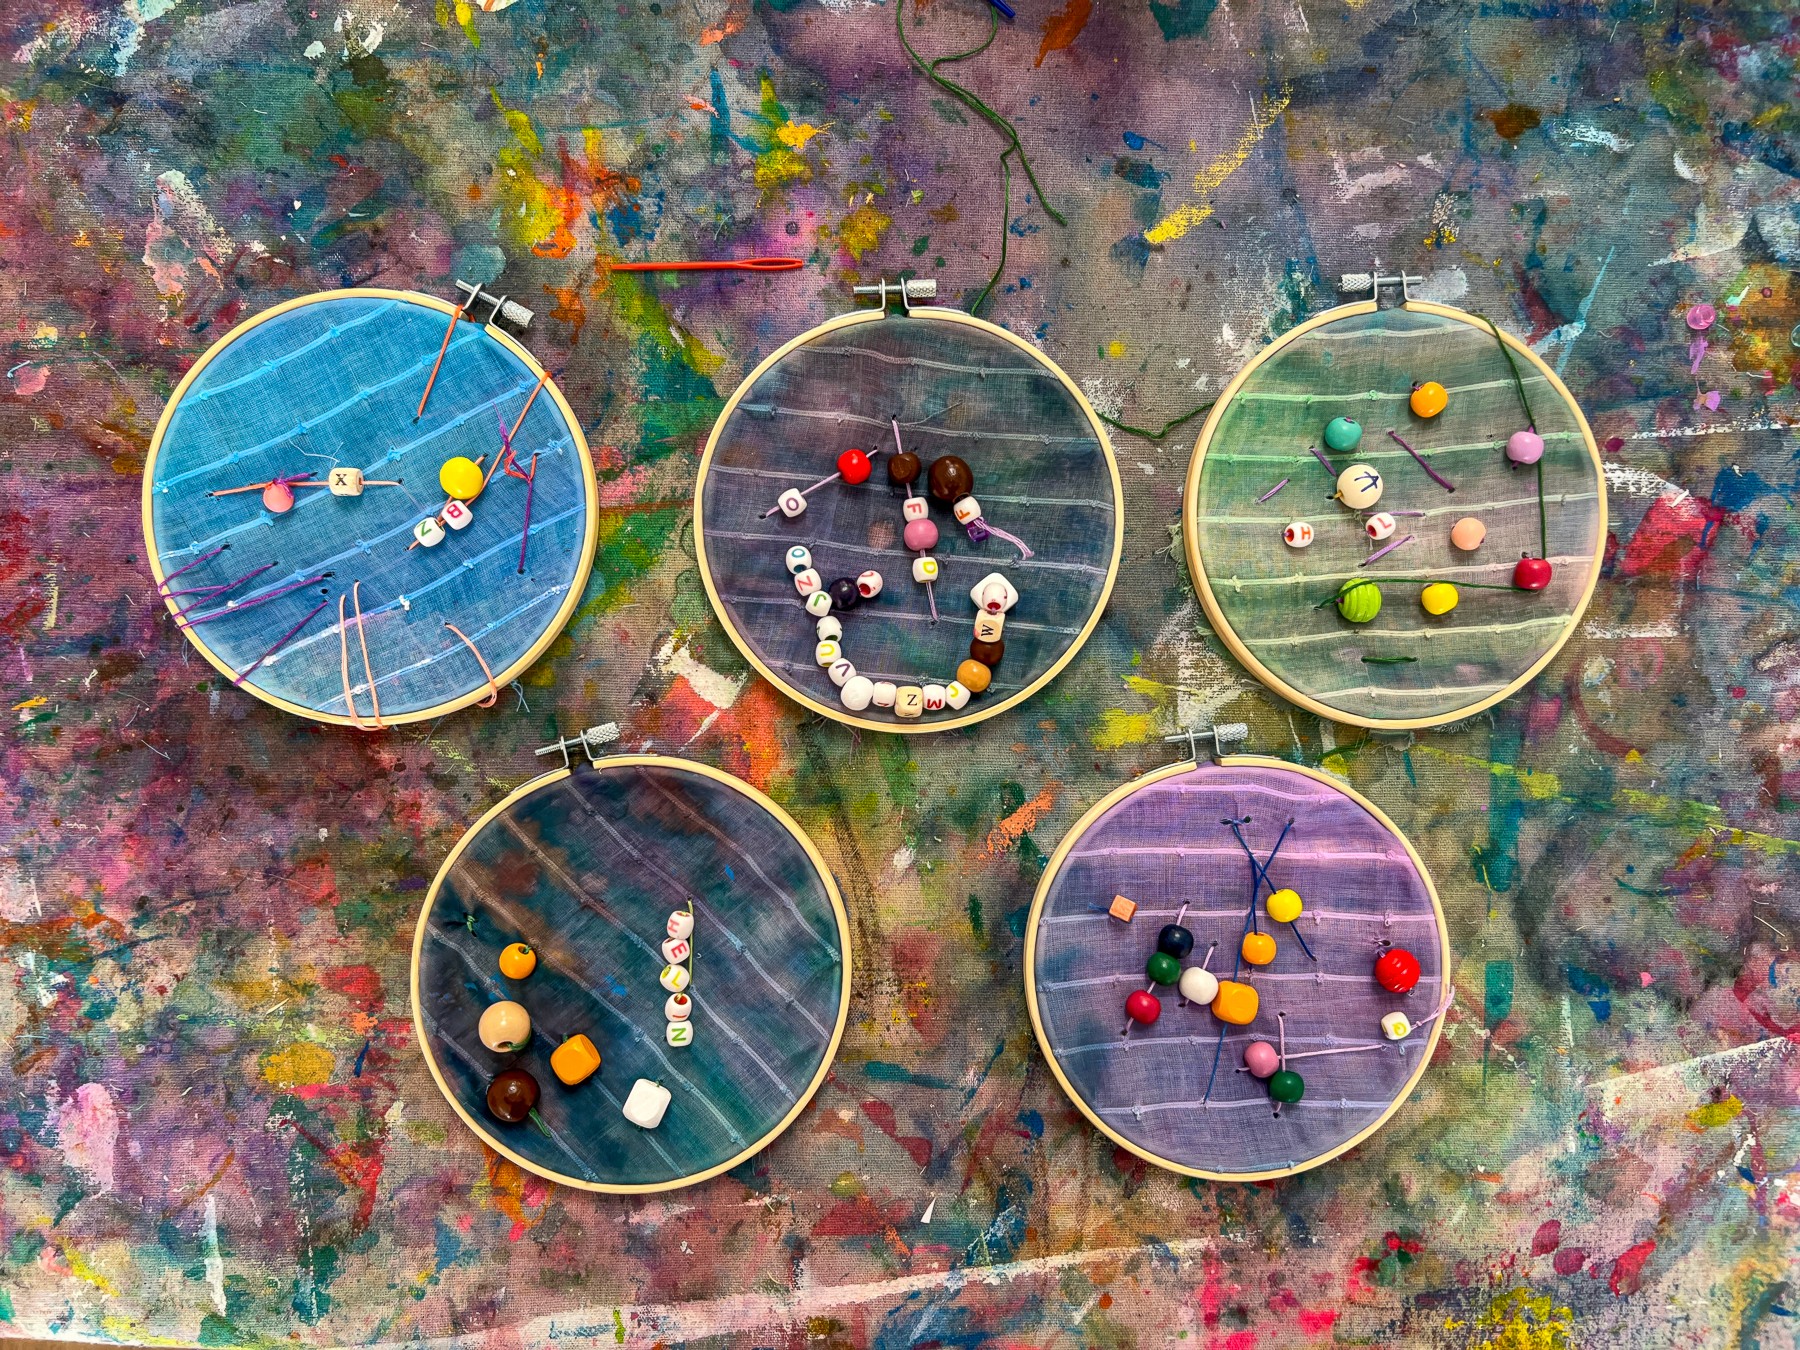
Embroidery Hoop Sewing
Threads and Textures
Bookmark
Sculpture
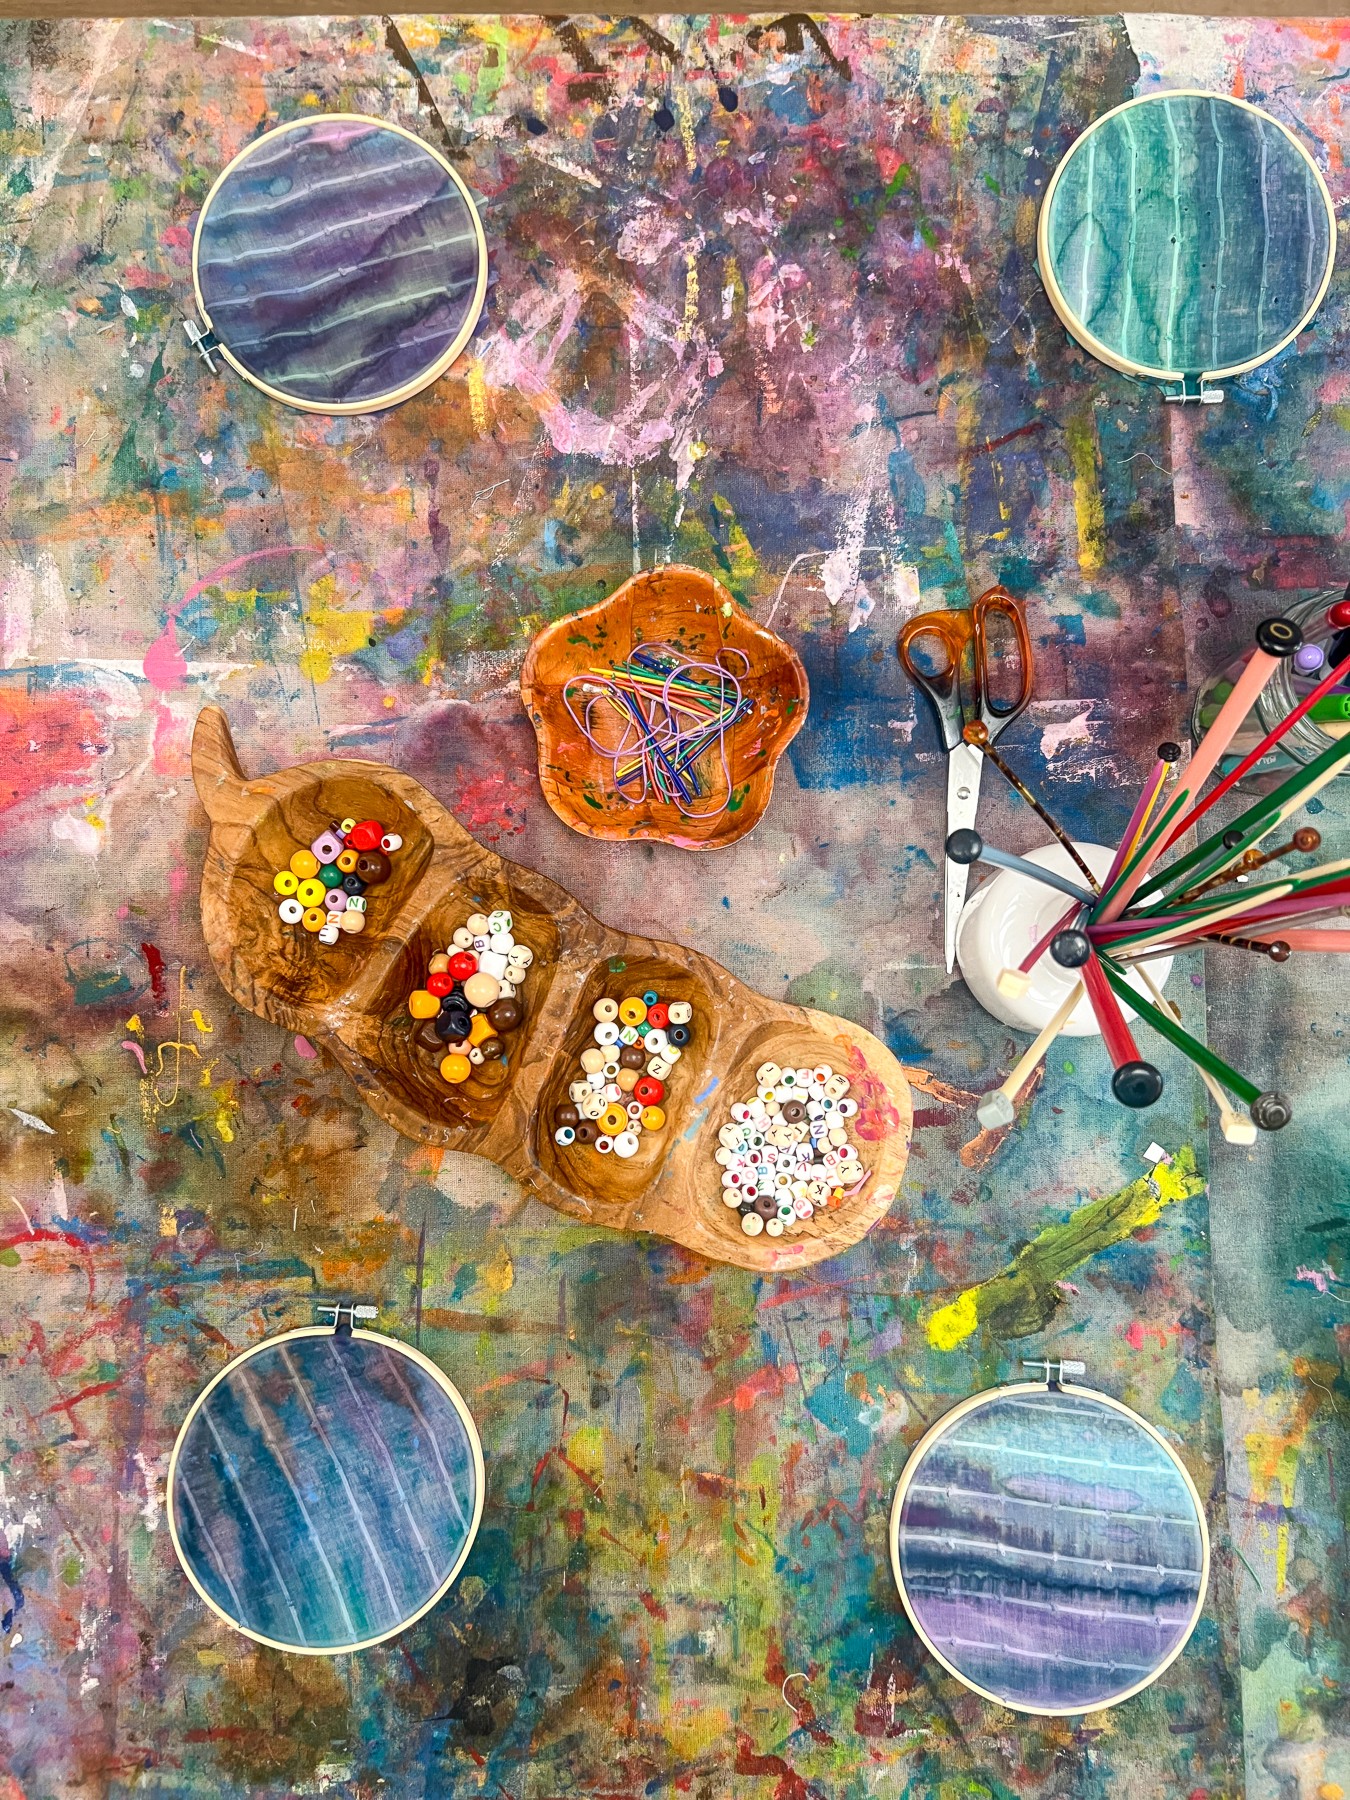
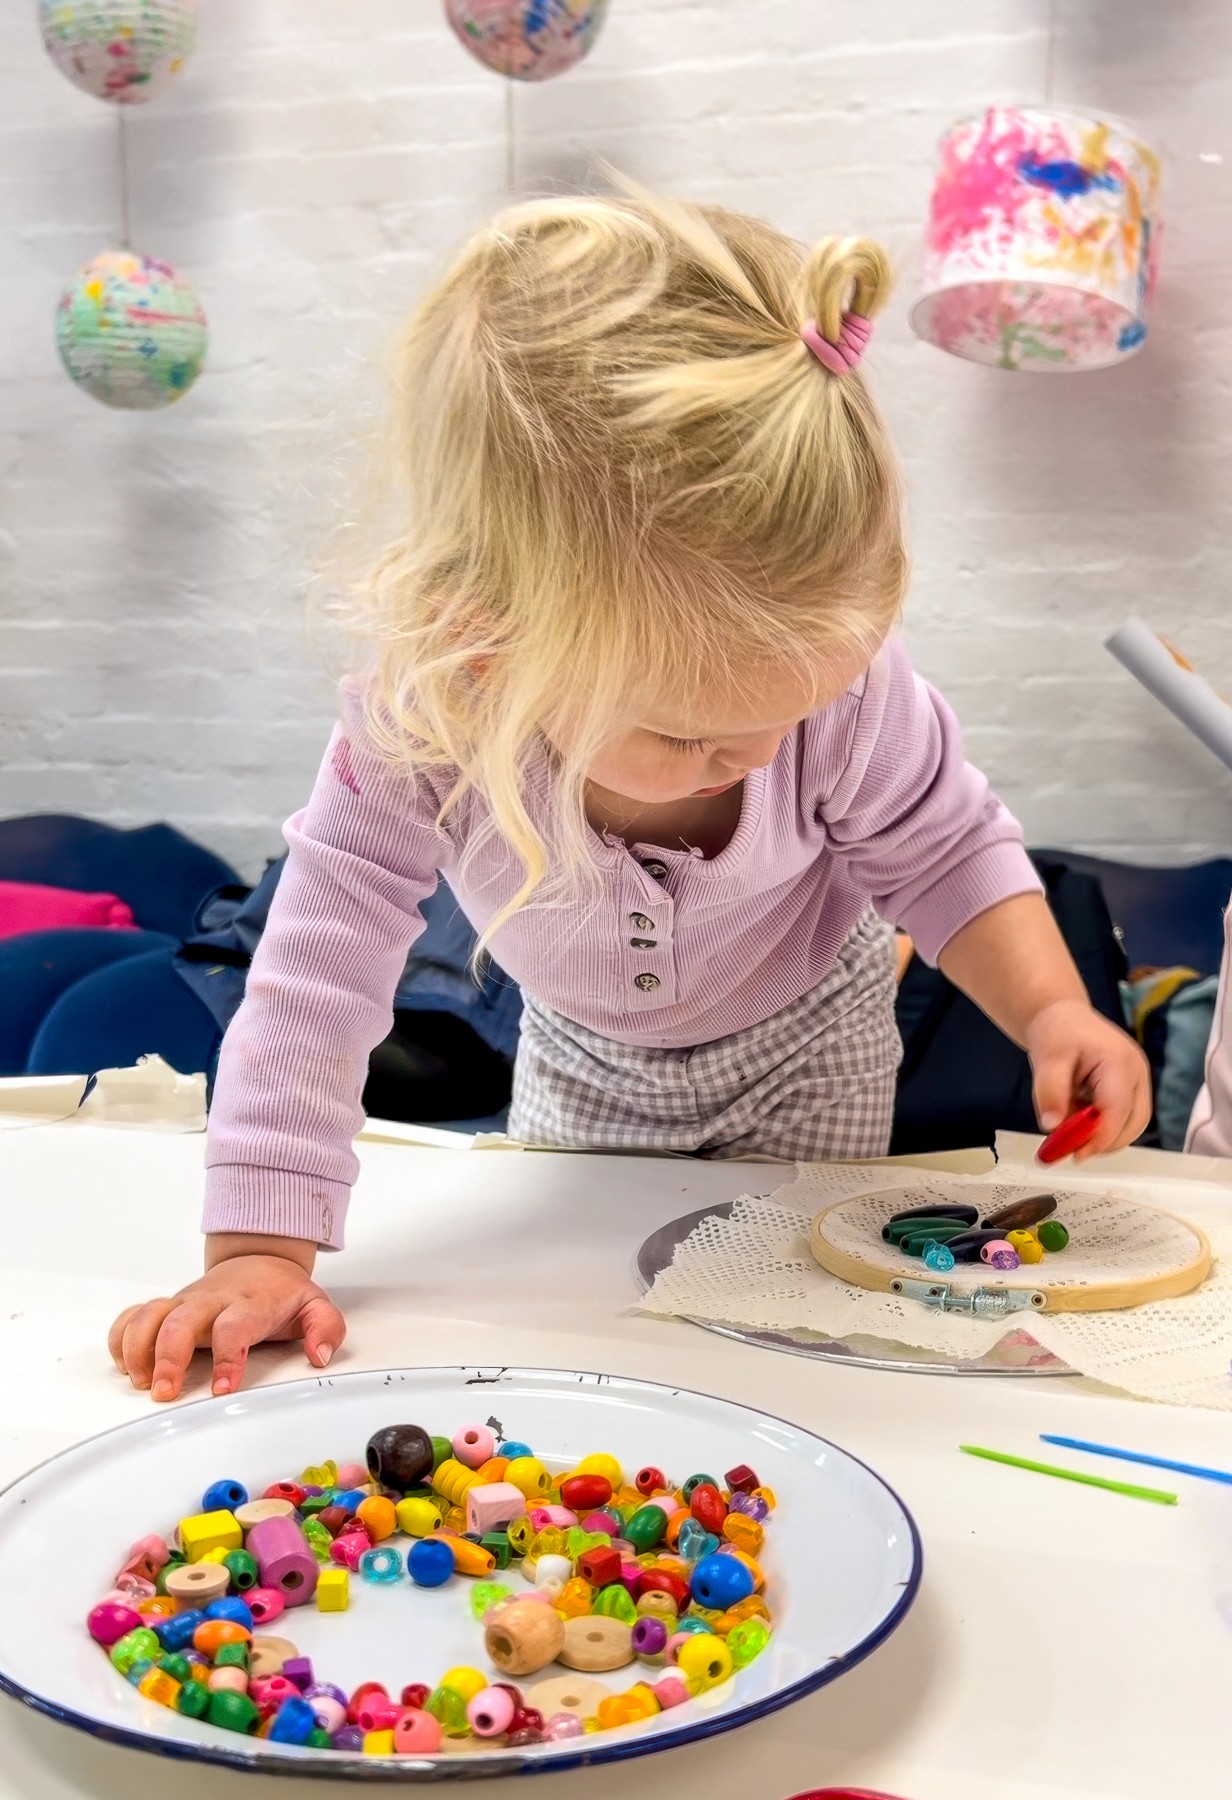
The Set Up
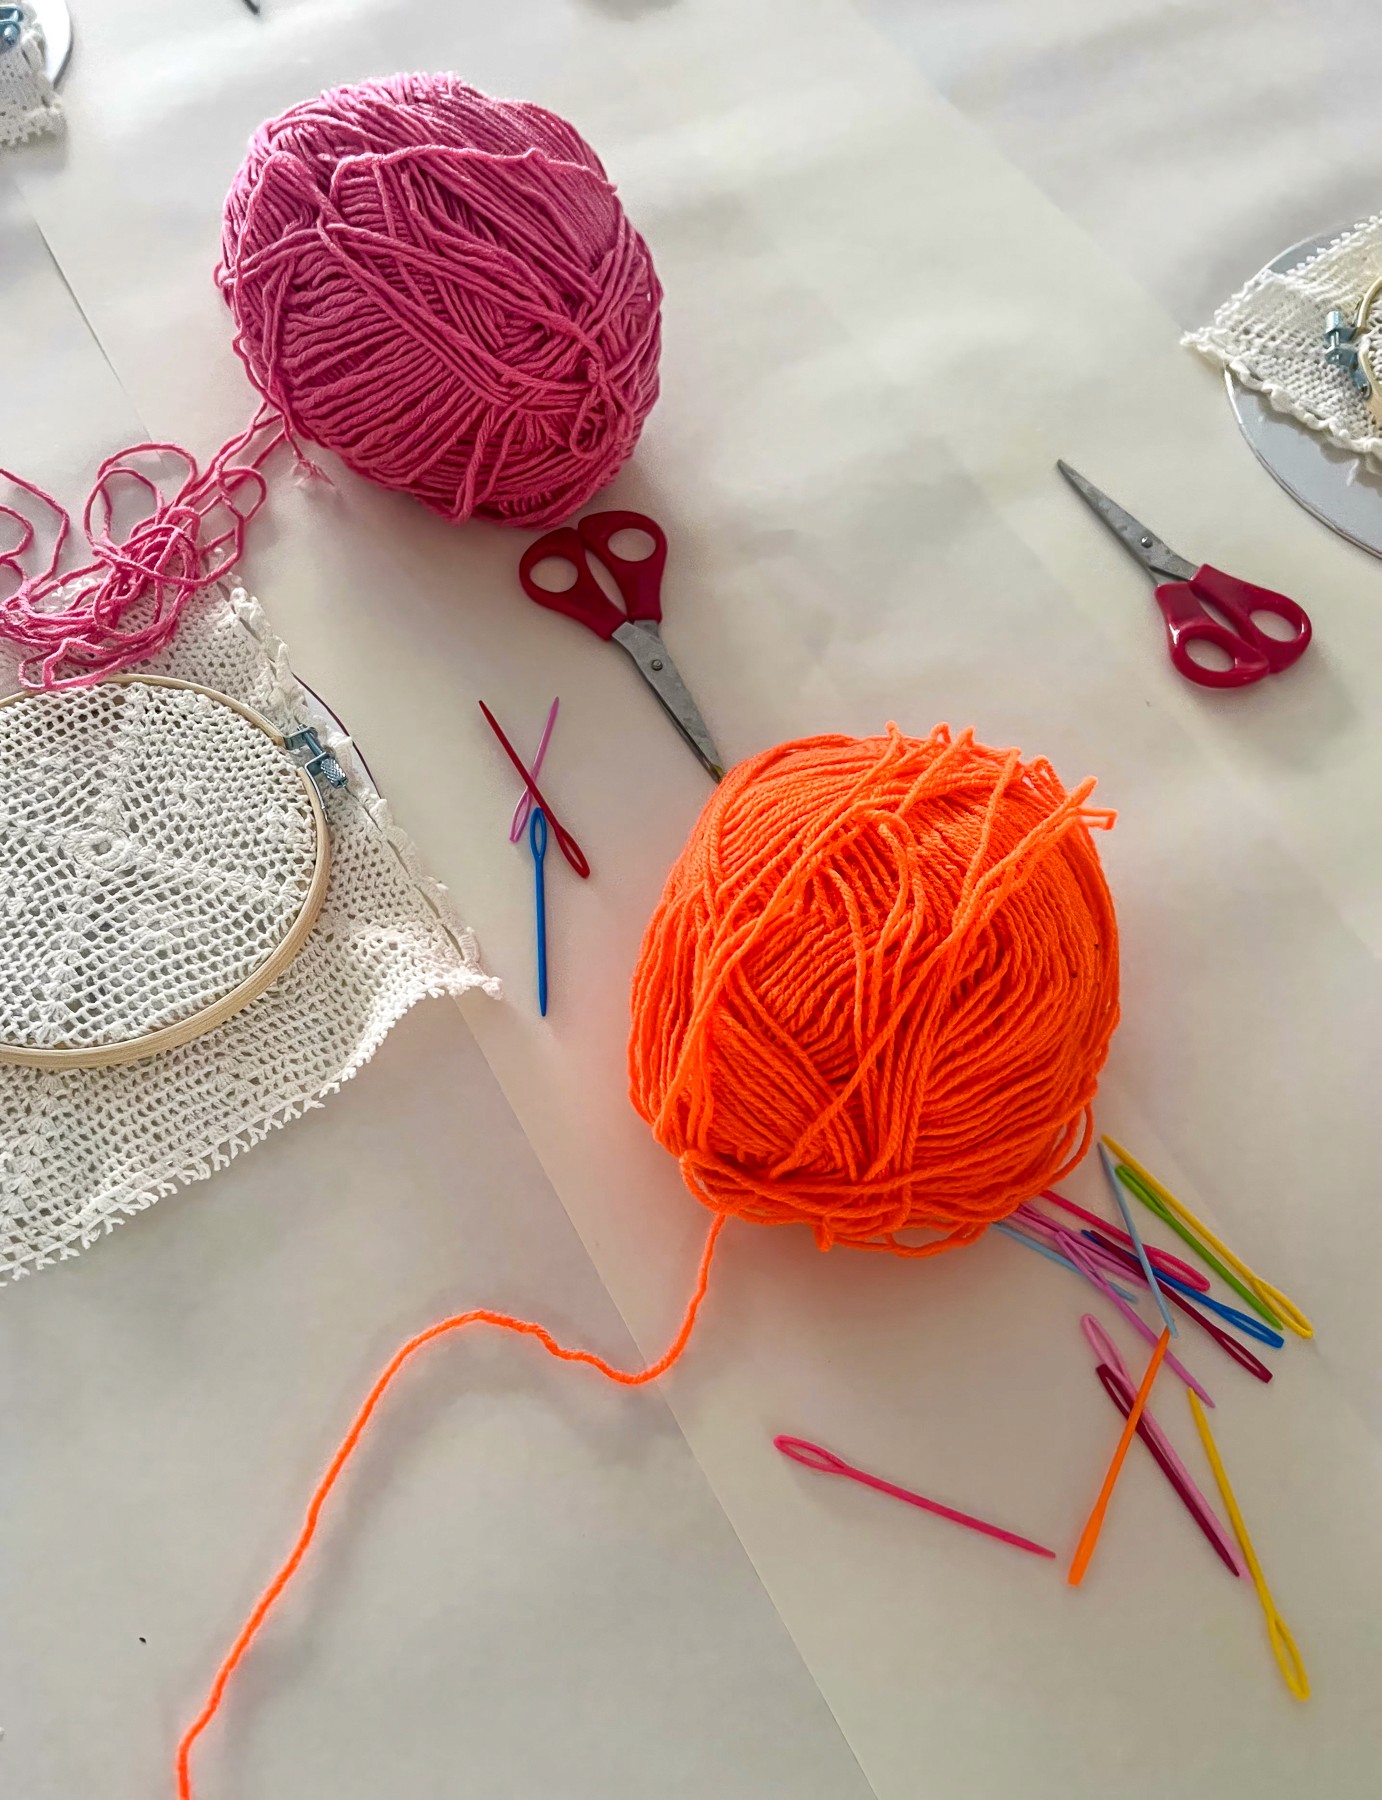
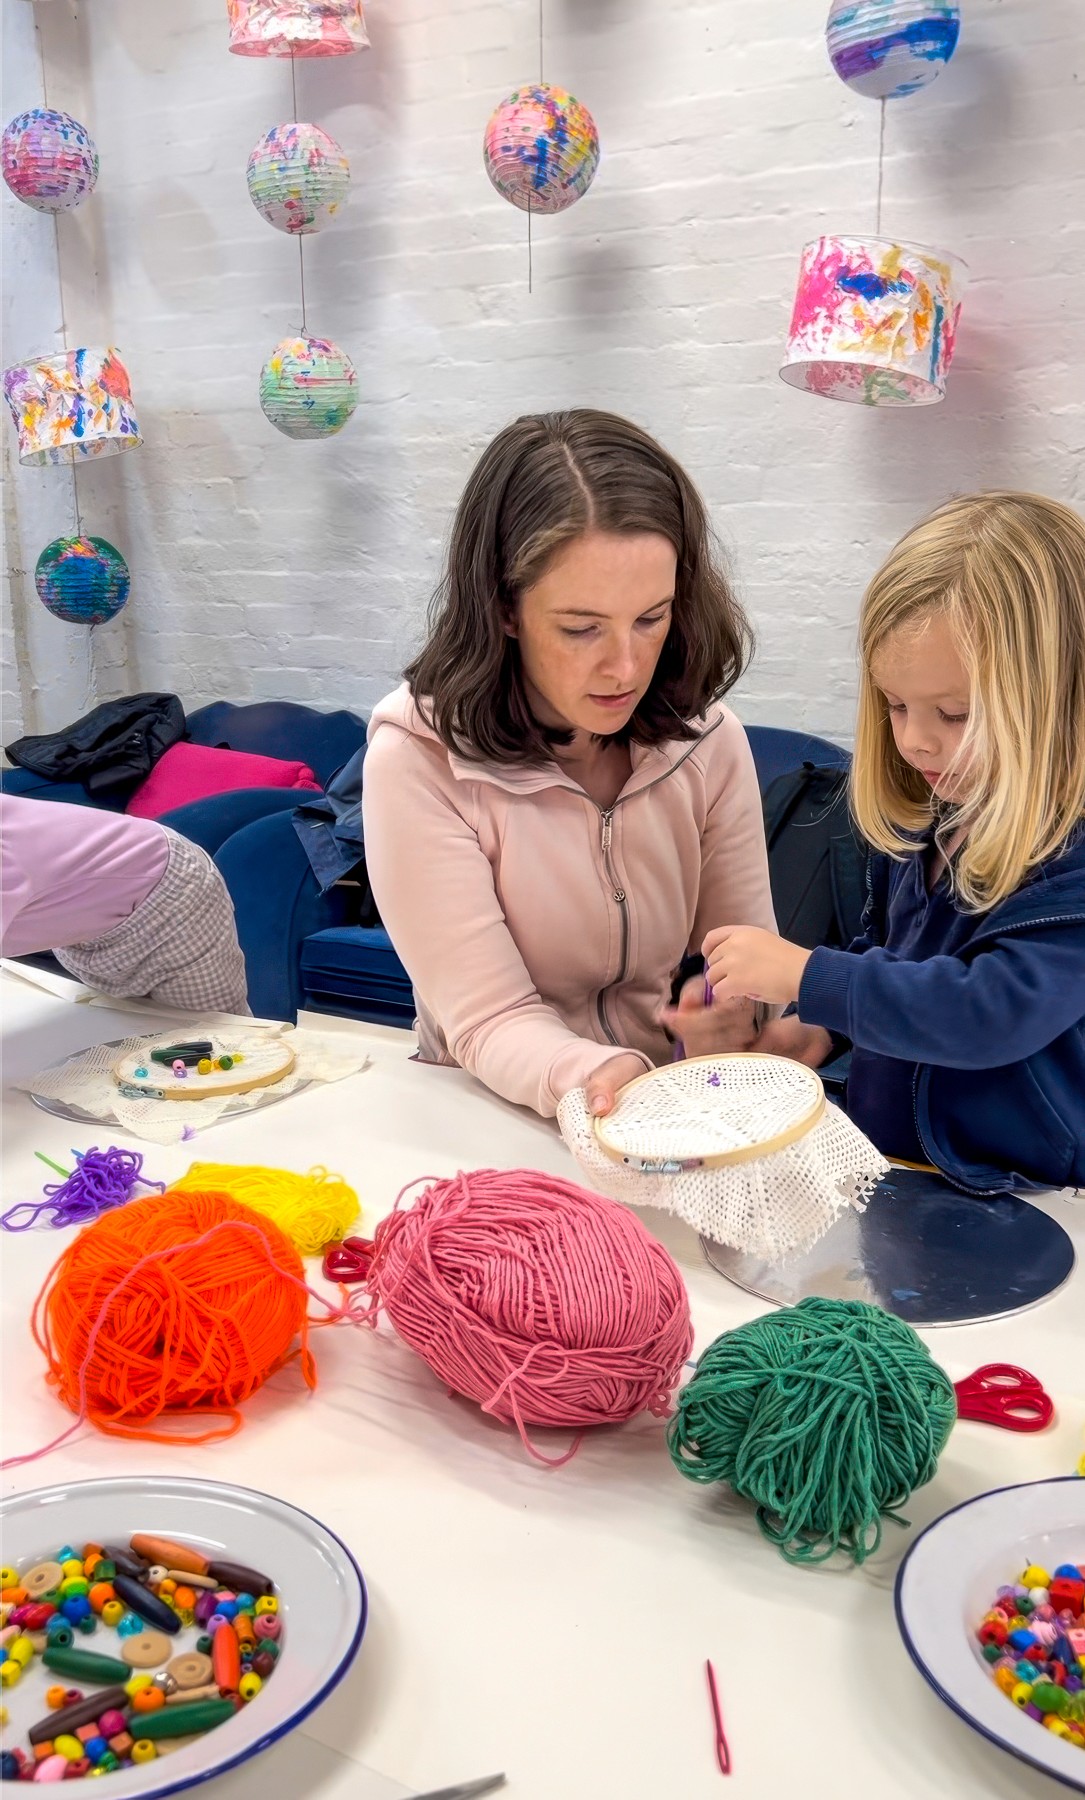
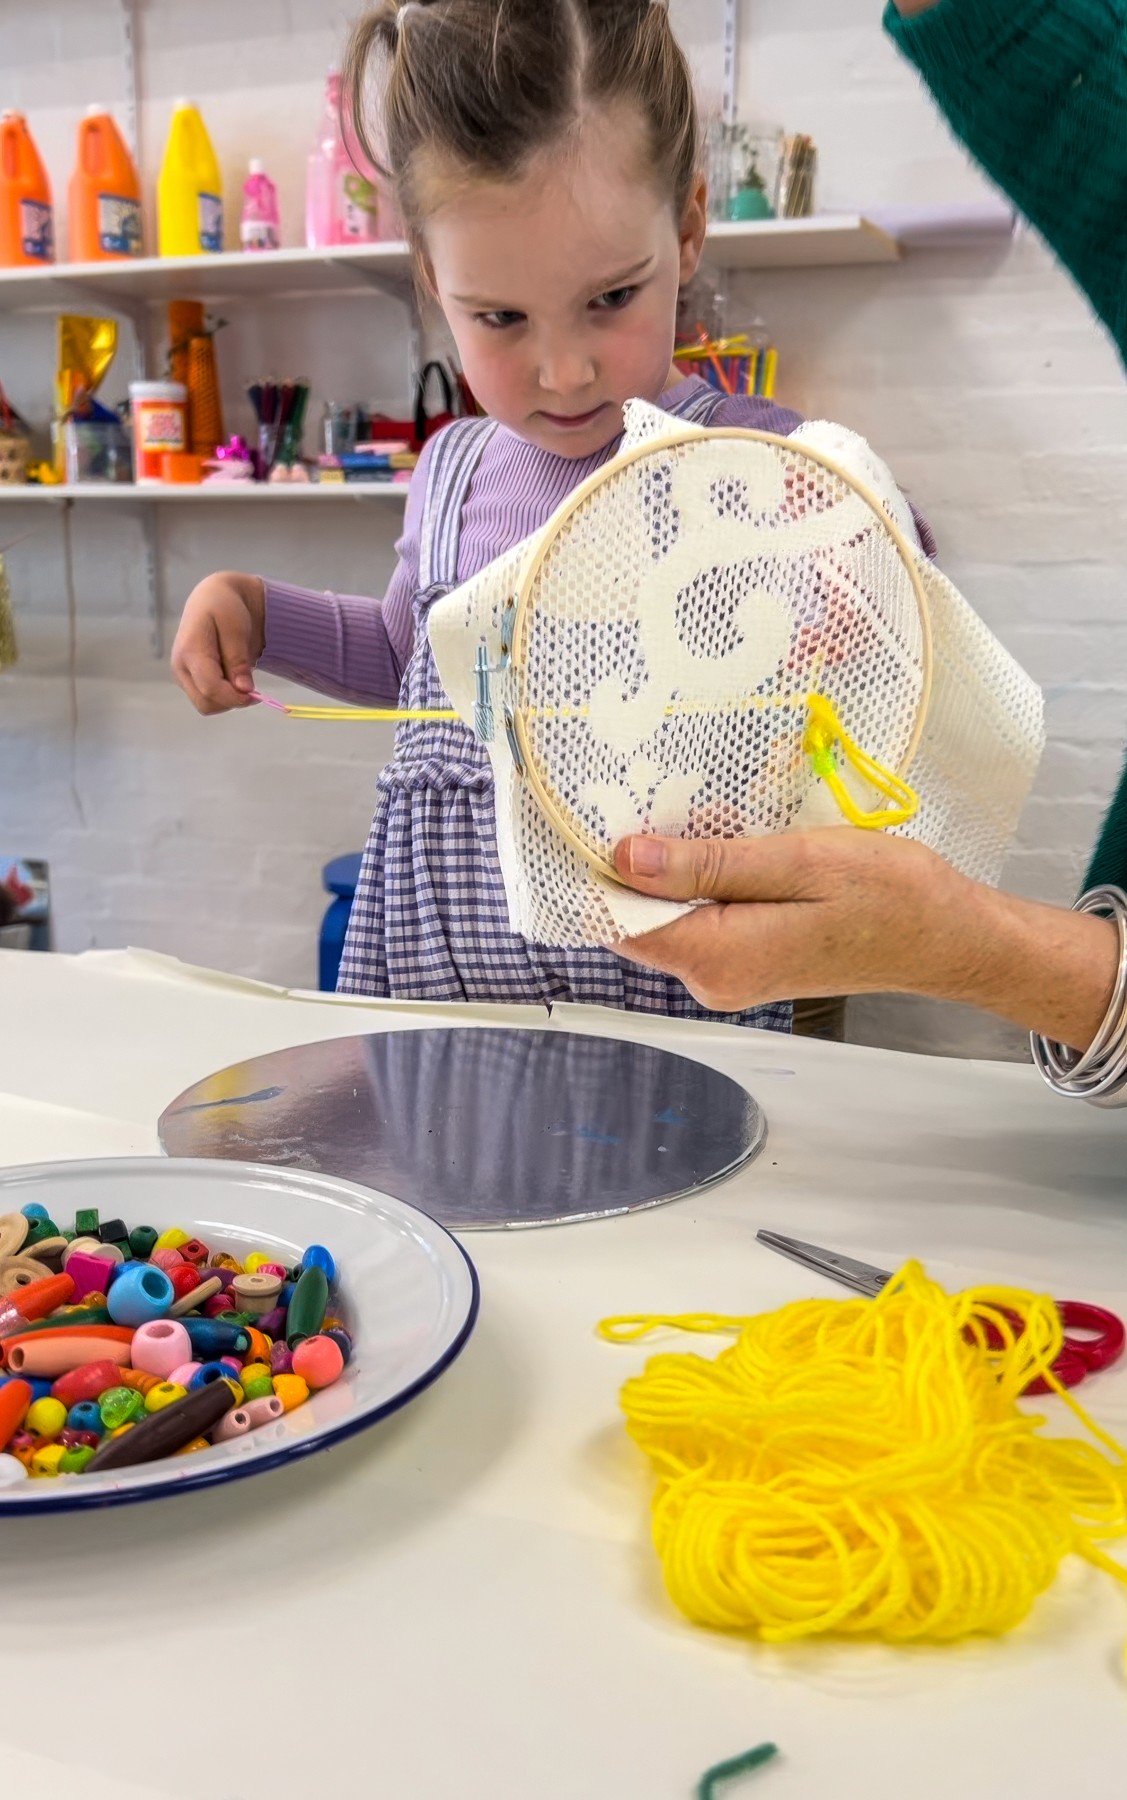
Embroidery hoops are brilliant for kids because they hold the fabric tight, which means far less frustration and far more flow. Choose thin cotton, calico, or any light fabric they can sew through with ease. Sprayed or painted fabric from past projects works beautifully too. Lace and old doilies from op shops are magic because the holes are already there waiting for thread.
Lay out pre-threaded needles (plastic for beginners, blunt metal tapestry needles for confident hands), embroidery threads in a mix of bright and soft tones, and a small tray of beads. Make sure the beads have holes big enough for the needle head. Shorter thread lengths are best for kids because long ones tangle fast. A handful of hoops, a pair of scissors, and you’re ready!
The Making
There is something grounding about sewing. Kids settle into it almost instantly. They find their own pace, their own rhythm. Encourage them to flip the hoop every few stitches to check for loops or tangles. It helps them feel in control of the process instead of getting stuck with a giant knot at the back.
Guide them to explore: straight lines, clusters of tiny stitches, loops, little zigzags, even rows of beads if they feel brave. You can invite them to try contrast too. Thick thread against thin thread. Bright colours paired with quiet ones. A handful of stitches that wander across the fabric or gather in a little burst of texture.
Smudge Tips to weave in as needed:
1. Pre-thread needles in advance
Game changer for younger makers. Have a little tray of pre-threaded needles with different colours so they can start immediately.
2. Anchor the thread so it won’t slip out
Tie a slightly larger knot at the end of the thread than you think you need. Kids pull with enthusiasm and tiny knots often pop straight through the weave.
3. Trim the thread shorter than adult length
Long threads tangle quickly. Thirty centimetres (ish) is perfect. Less frustration, more success.
4. Use fabric that’s already “punched”
Lace, mesh, or loosely woven cotton gives them instant wins because the needle glides through. It’s especially good for first-timers.
5. Hold the hoop steady for the first few stitches
Those first three stitches are the learning moment. After that, most kids settle straight into it.
6. Teach the “stop and check” habit
Encourage them to flip the hoop every few stitches to check for loops or tangles. It saves the dreaded giant knot on the back.
7. Swap needles if needed
Plastic needles are great for safety, but metal tapestry needles (blunt tip) with a big eye glide through fabric much more easily. Great for confident sewers.
8. Let them choose the thread thickness
They naturally experiment. Single strand, double strand, chunky yarn. All give different effects and help them understand texture.
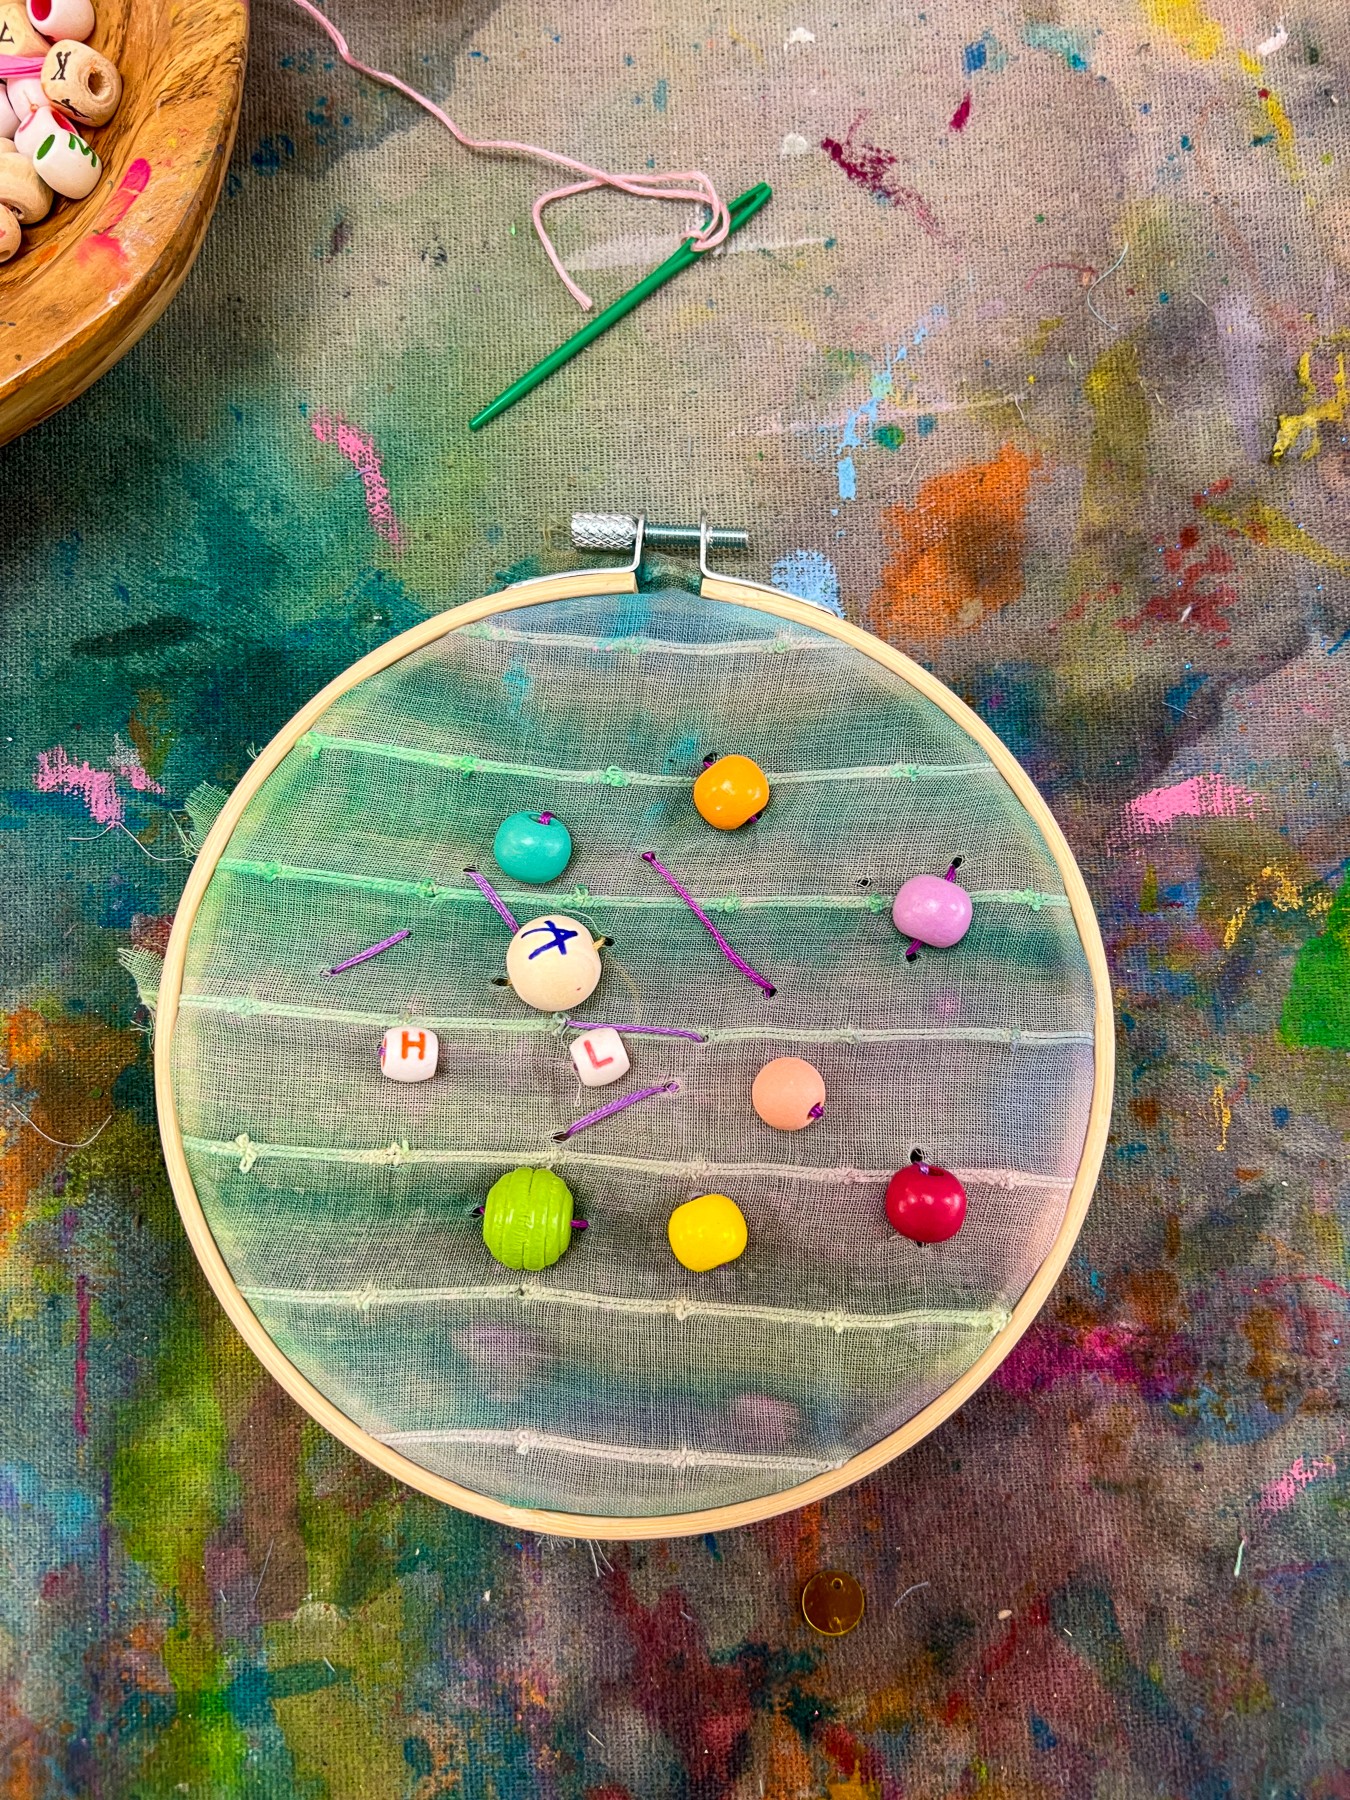
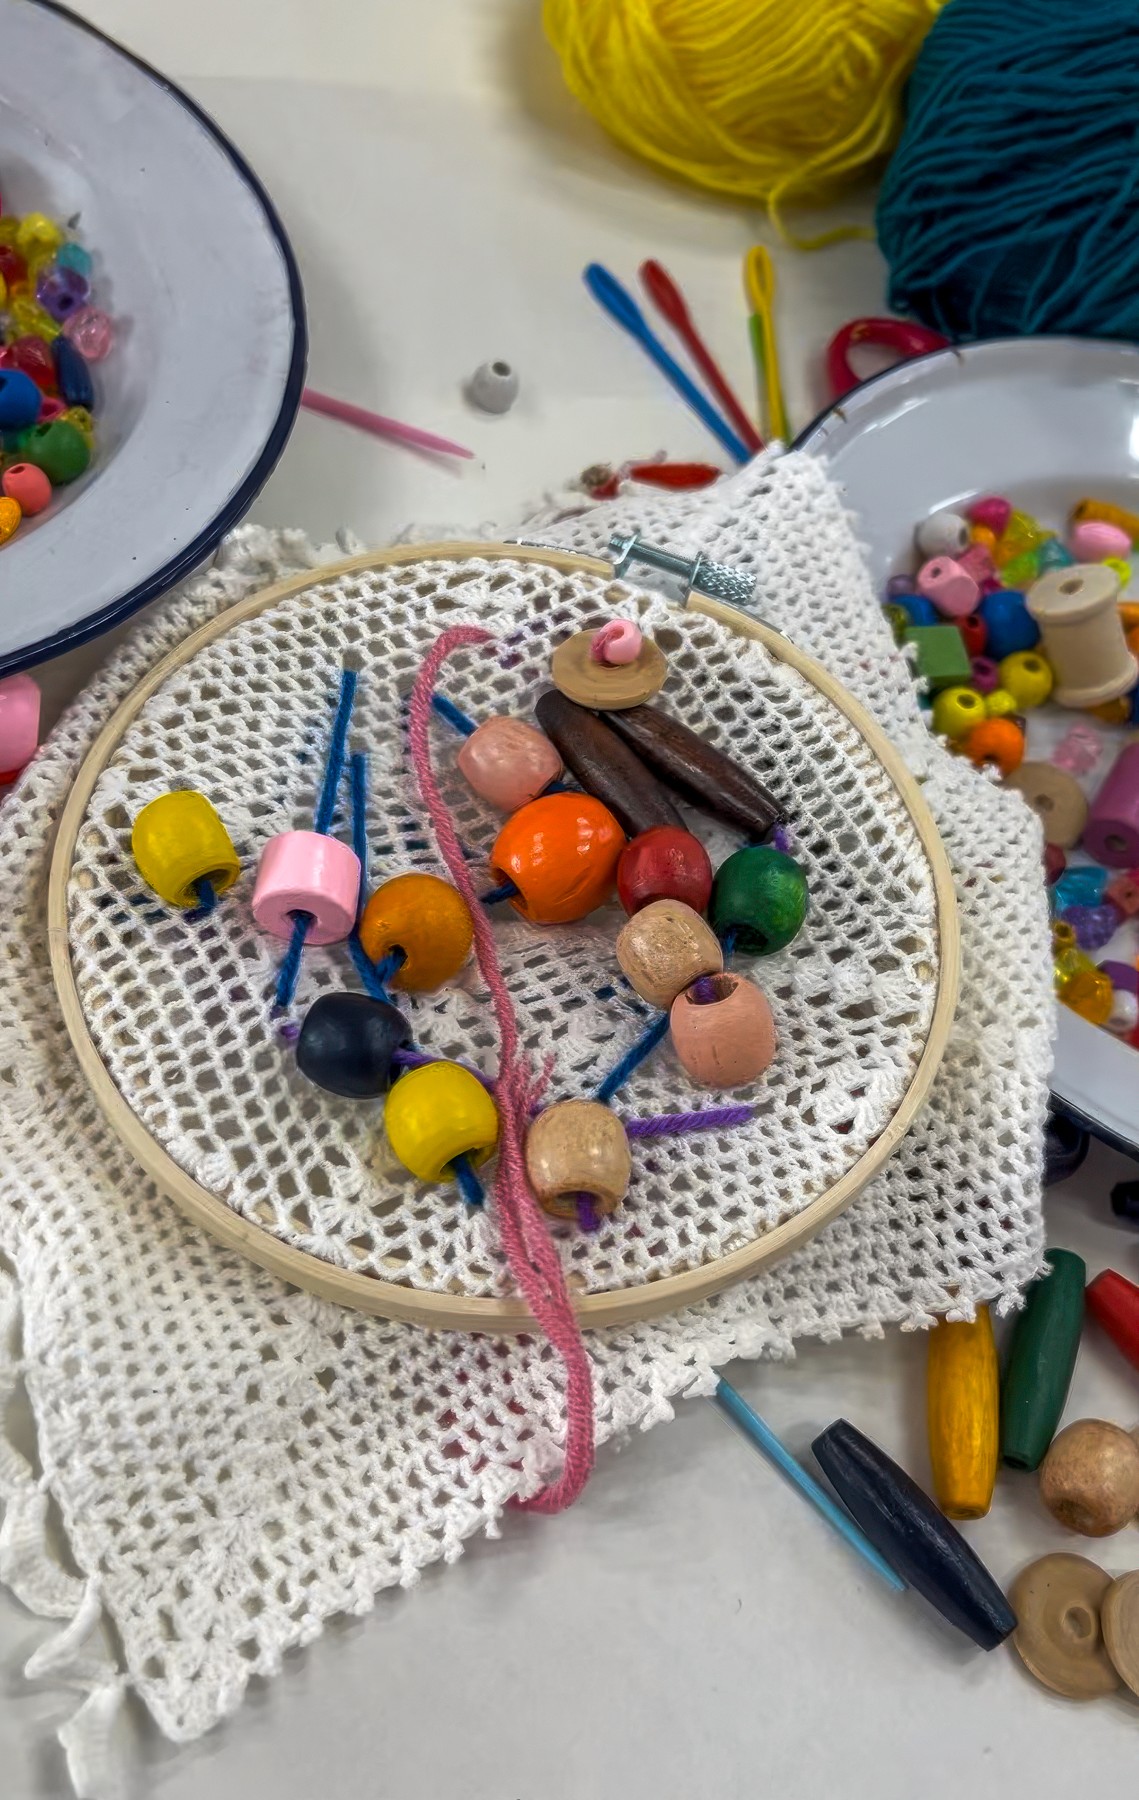
Materials
Embroidery hoops
Thin cotton, calico, lace or pre-painted fabric
Plastic or blunt metal tapestry needles
Embroidery threads
Fabric scissors
Beads with large holes
Optional: fabric markers, sequins or tiny loose parts for embellishing
Gallery
Back to Top
Embroidery Hoop Sewing
Threads and Textures
Bookmark
Sculpture
The Set Up
Embroidery hoops are brilliant for kids because they hold the fabric tight, which means far less frustration and far more flow. Choose thin cotton, calico, or any light fabric they can sew through with ease. Sprayed or painted fabric from past projects works beautifully too. Lace and old doilies from op shops are magic because the holes are already there waiting for thread.
Lay out pre-threaded needles (plastic for beginners, blunt metal tapestry needles for confident hands), embroidery threads in a mix of bright and soft tones, and a small tray of beads. Make sure the beads have holes big enough for the needle head. Shorter thread lengths are best for kids because long ones tangle fast. A handful of hoops, a pair of scissors, and you’re ready!
The Making
There is something grounding about sewing. Kids settle into it almost instantly. They find their own pace, their own rhythm. Encourage them to flip the hoop every few stitches to check for loops or tangles. It helps them feel in control of the process instead of getting stuck with a giant knot at the back.
Guide them to explore: straight lines, clusters of tiny stitches, loops, little zigzags, even rows of beads if they feel brave. You can invite them to try contrast too. Thick thread against thin thread. Bright colours paired with quiet ones. A handful of stitches that wander across the fabric or gather in a little burst of texture.
Smudge Tips to weave in as needed:
1. Pre-thread needles in advance
Game changer for younger makers. Have a little tray of pre-threaded needles with different colours so they can start immediately.
2. Anchor the thread so it won’t slip out
Tie a slightly larger knot at the end of the thread than you think you need. Kids pull with enthusiasm and tiny knots often pop straight through the weave.
3. Trim the thread shorter than adult length
Long threads tangle quickly. Thirty centimetres (ish) is perfect. Less frustration, more success.
4. Use fabric that’s already “punched”
Lace, mesh, or loosely woven cotton gives them instant wins because the needle glides through. It’s especially good for first-timers.
5. Hold the hoop steady for the first few stitches
Those first three stitches are the learning moment. After that, most kids settle straight into it.
6. Teach the “stop and check” habit
Encourage them to flip the hoop every few stitches to check for loops or tangles. It saves the dreaded giant knot on the back.
7. Swap needles if needed
Plastic needles are great for safety, but metal tapestry needles (blunt tip) with a big eye glide through fabric much more easily. Great for confident sewers.
8. Let them choose the thread thickness
They naturally experiment. Single strand, double strand, chunky yarn. All give different effects and help them understand texture.
Materials
Embroidery hoops
Thin cotton, calico, lace or pre-painted fabric
Plastic or blunt metal tapestry needles
Embroidery threads
Fabric scissors
Beads with large holes
Optional: fabric markers, sequins or tiny loose parts for embellishing
Gallery
Back to Top
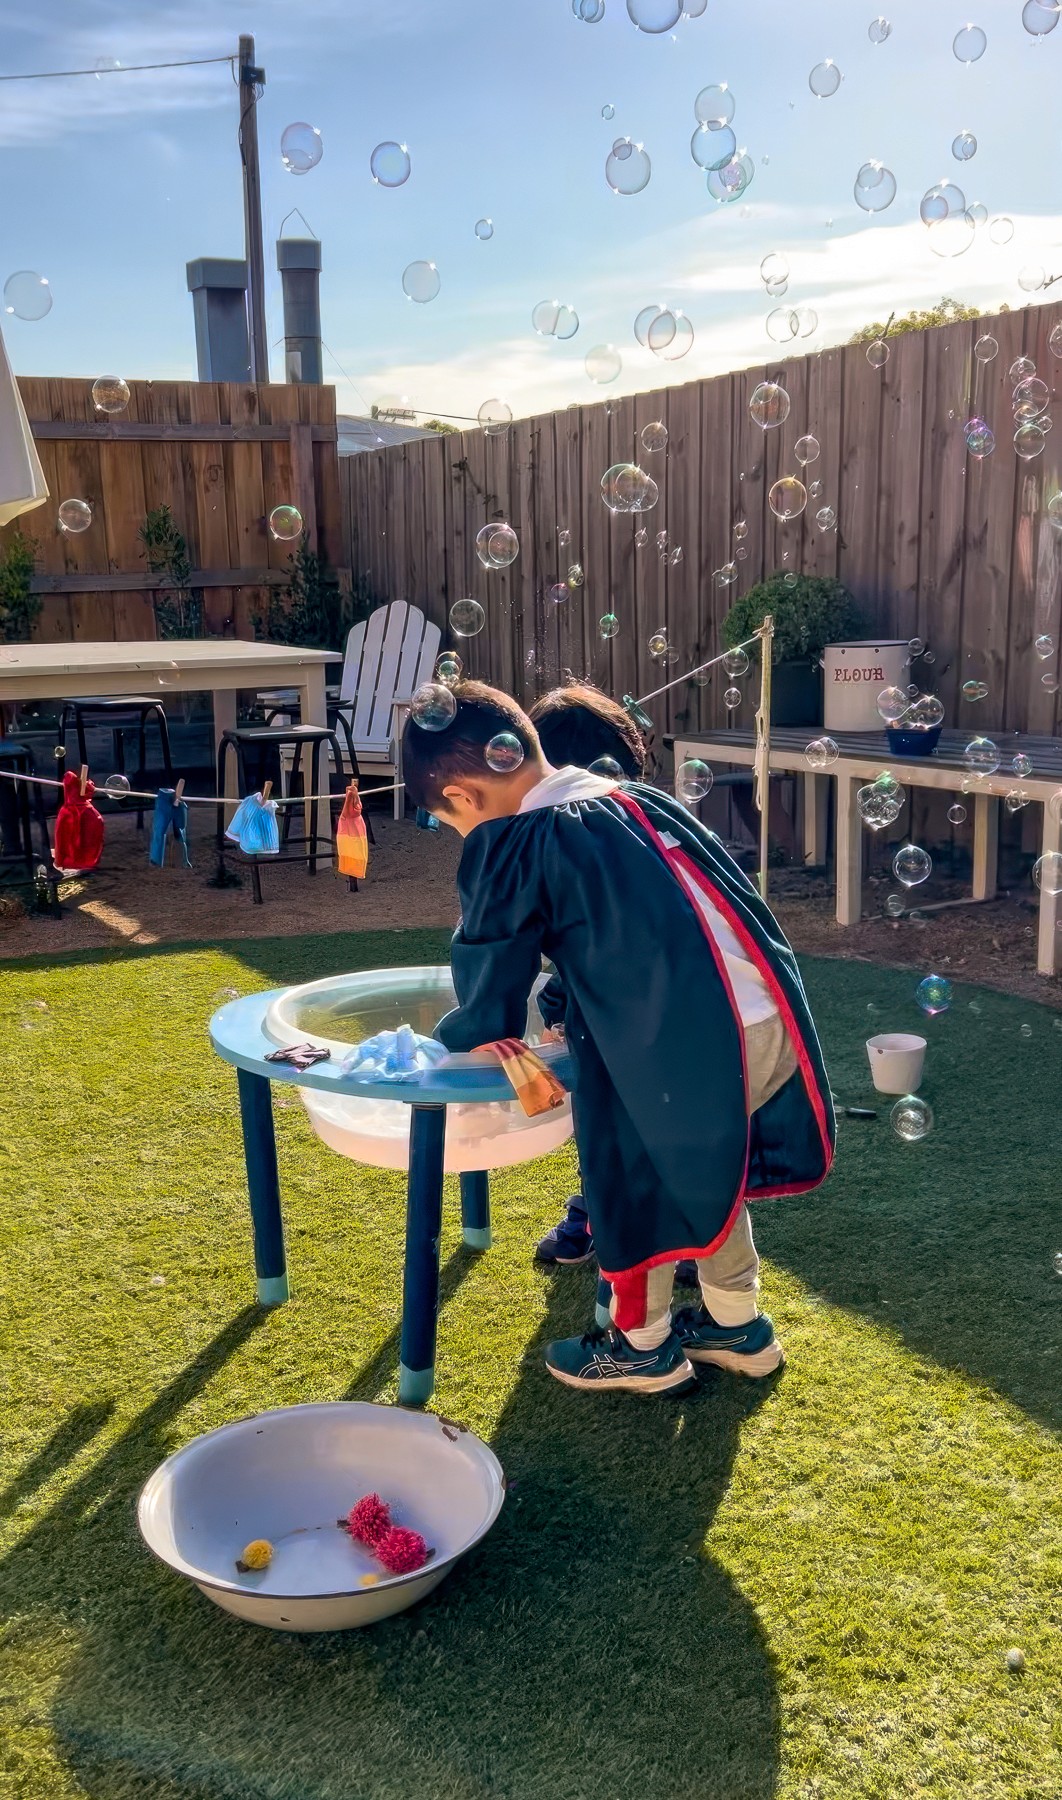
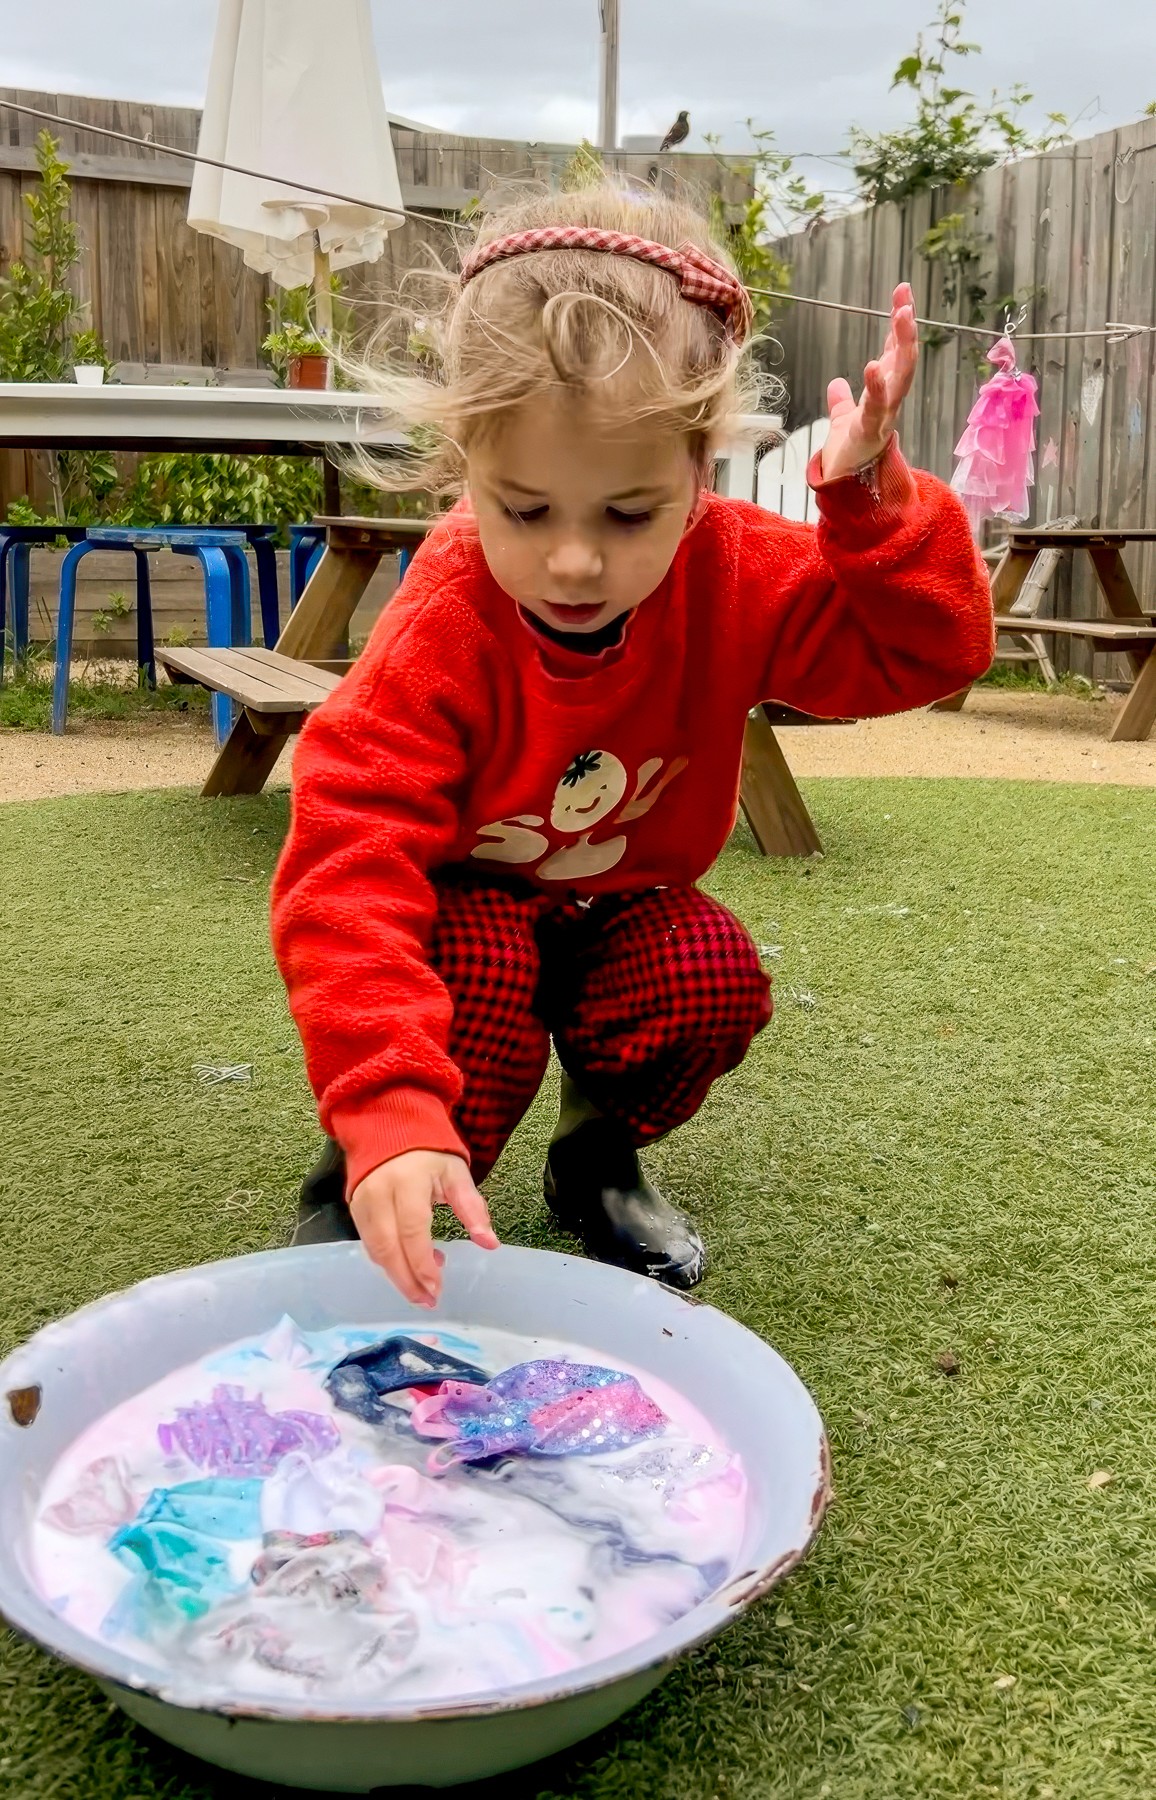
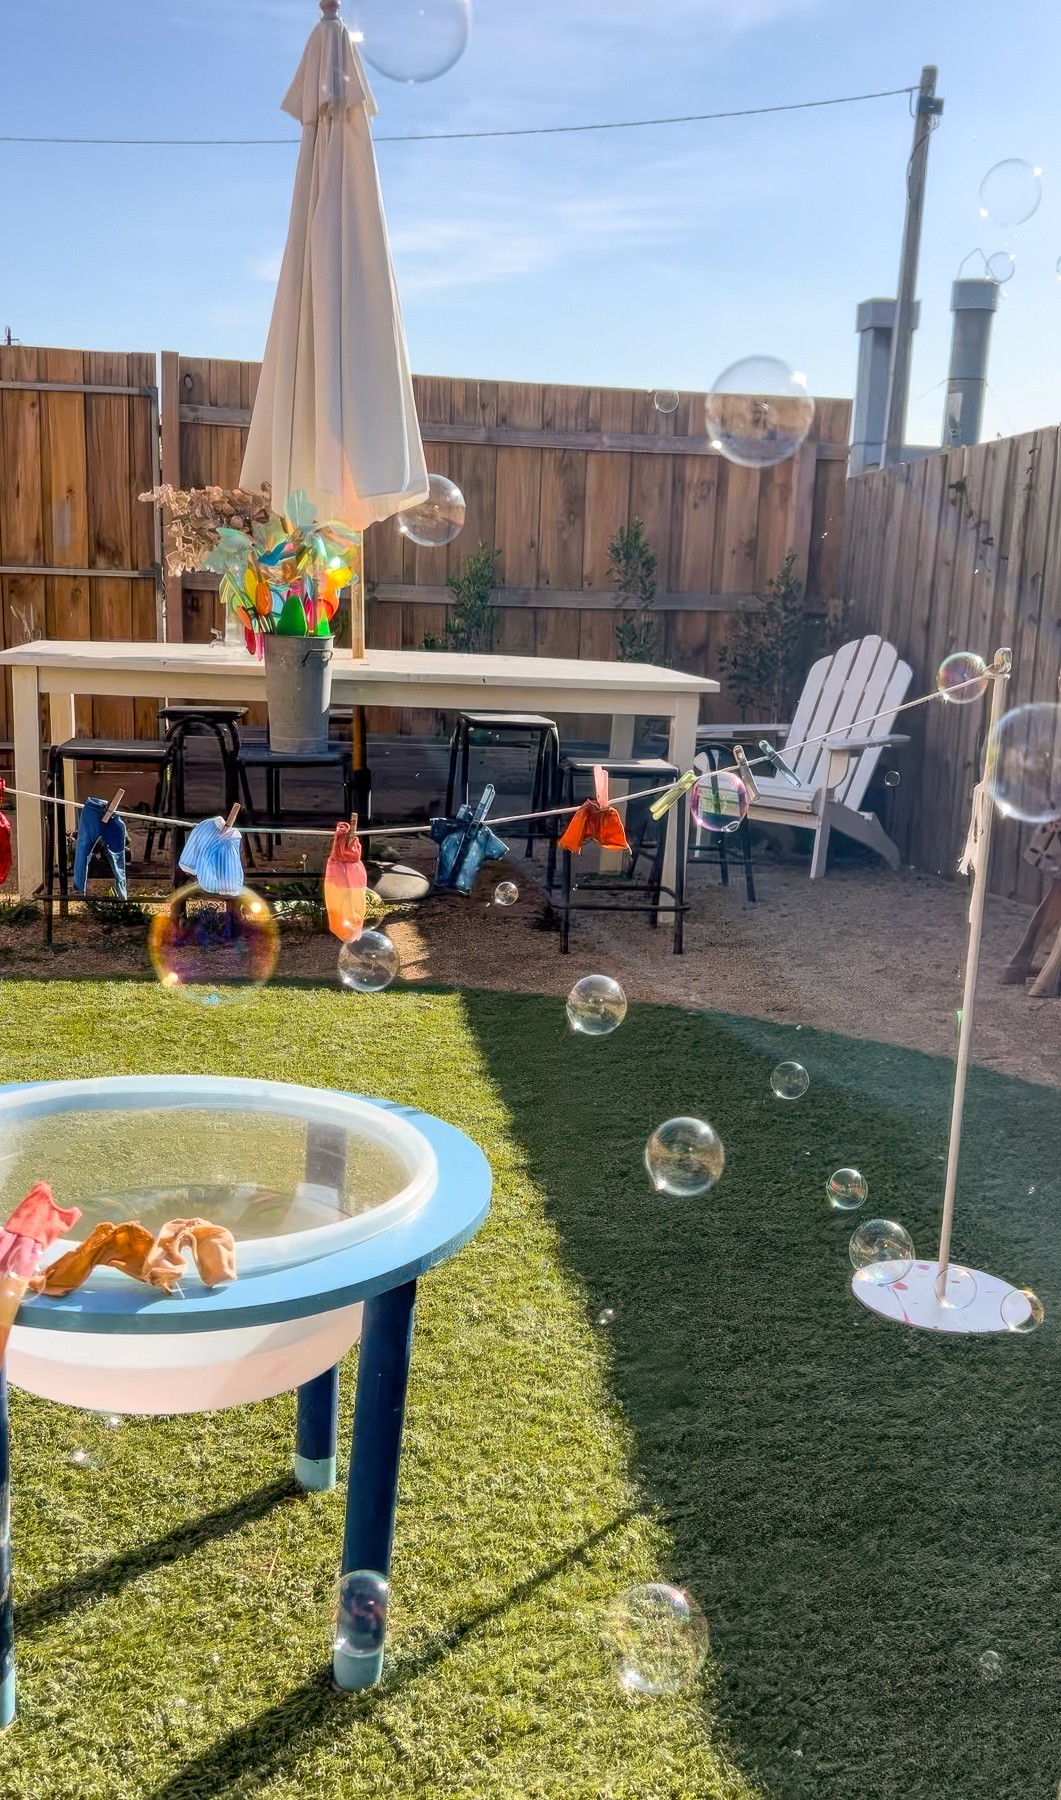
Petite Washing Line
Tiny clothes for big play
Bookmark
Sensory Play
The Set Up
Gather a pile of doll clothes and a couple of bowls of water. I love tinting the water with a drop or two of liquid watercolour and adding a little shaving foam. It softens the texture and gives tiny hands something extra to explore. Hang a washing line at child height using two metal stands, a length of cord and pegs within easy reach.
It always (pleasantly) surprises parents how absorbed kids become! The dipping, wringing, squeezing, hanging, rehanging. It’s endlessly satisfying and feels a little like play with purpose. Plus real-life skills and fine motor practice sneak in as added bonuses.
Variations
Add a second and third bowl for rinsing or a salad spinner and watch the systems kids create.
Offer wooden tongs for transferring clothes from bowl to line.
Materials
• Doll clothes in mixed fabrics
• Bowls or tubs of water
• Liquid watercolour
• Shaving foam (optional)
• Metal stands or hooks
• Cord or rope
• Pegs
• Salad Spinner (optional)
• Wooden tongs (optional)
Back to Top
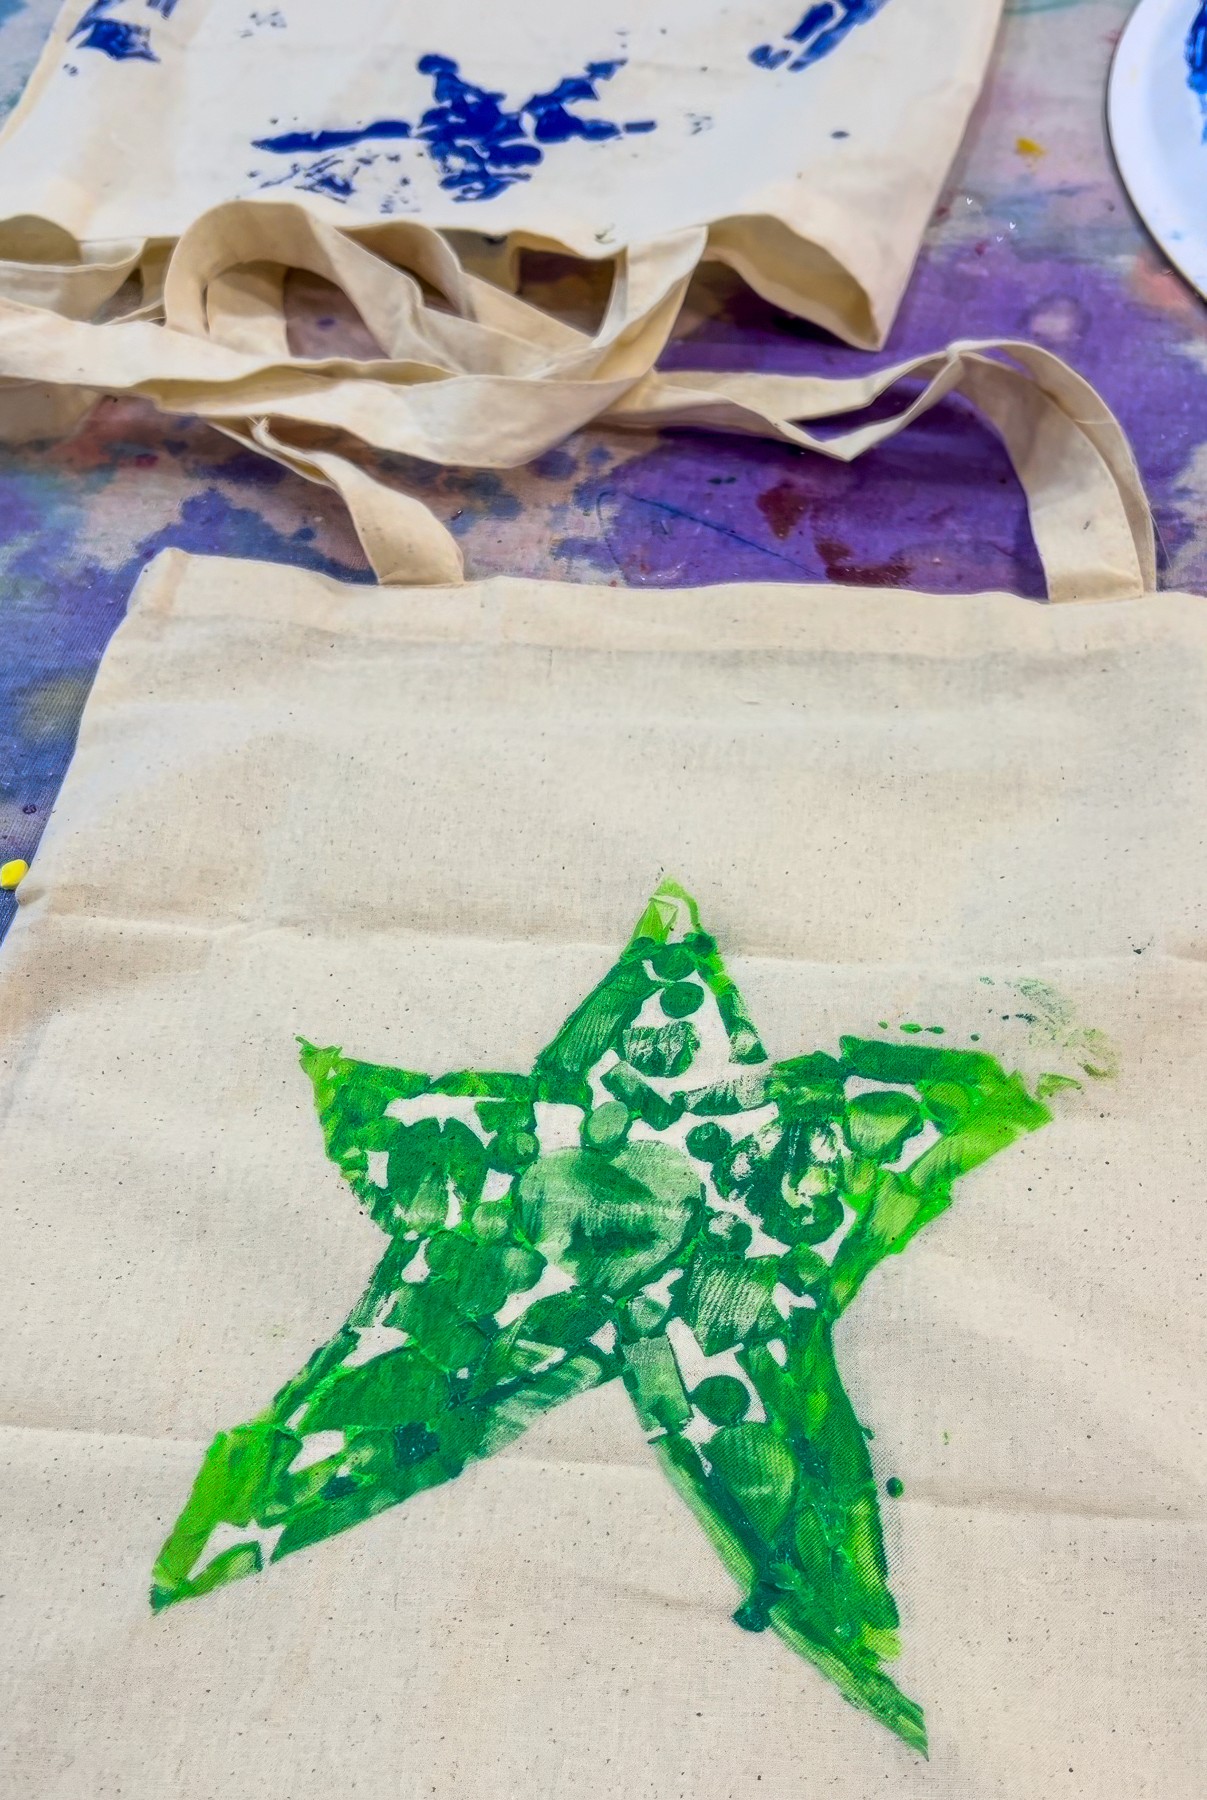
Custom Tote Printing
Fashion you can carry home.
Bookmark
Print Making
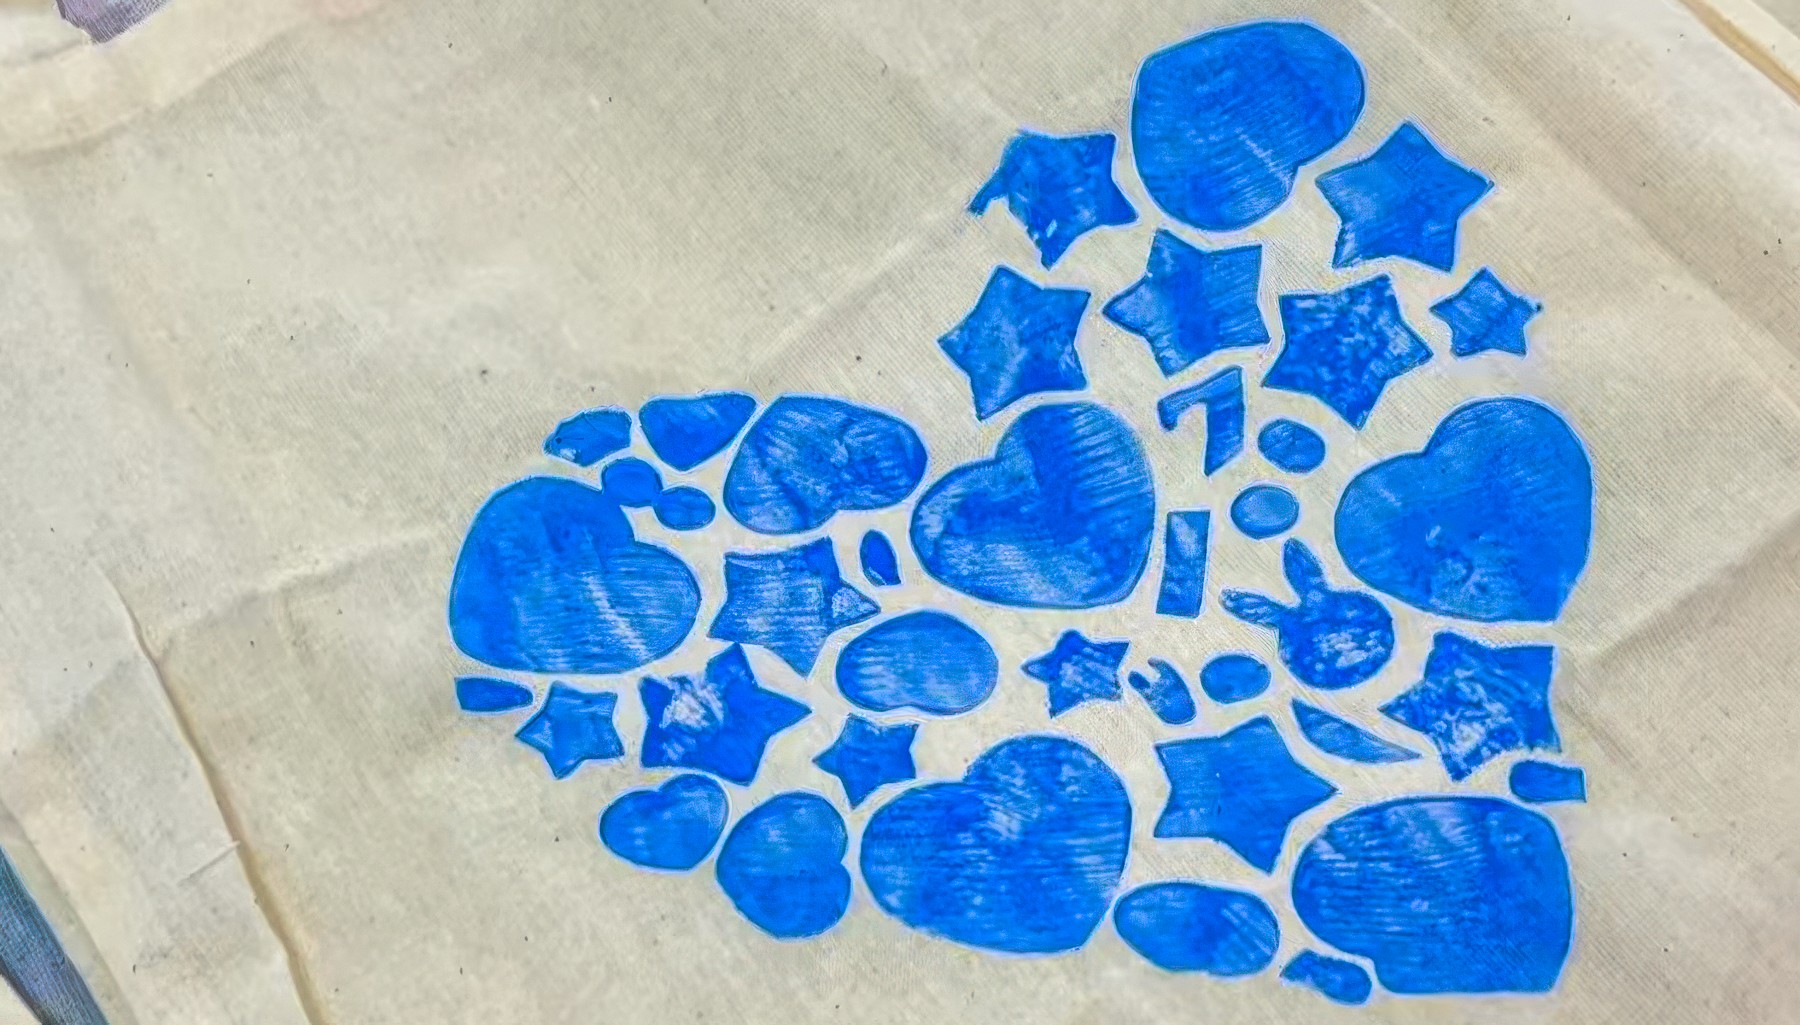
The Set Up
Fabric printing is one of those activities that looks complicated and is secretly so easy and satisfying. I love using plain white cotton tote bags or calico bags because the colour pops instantly. T-shirts work beautifully too.
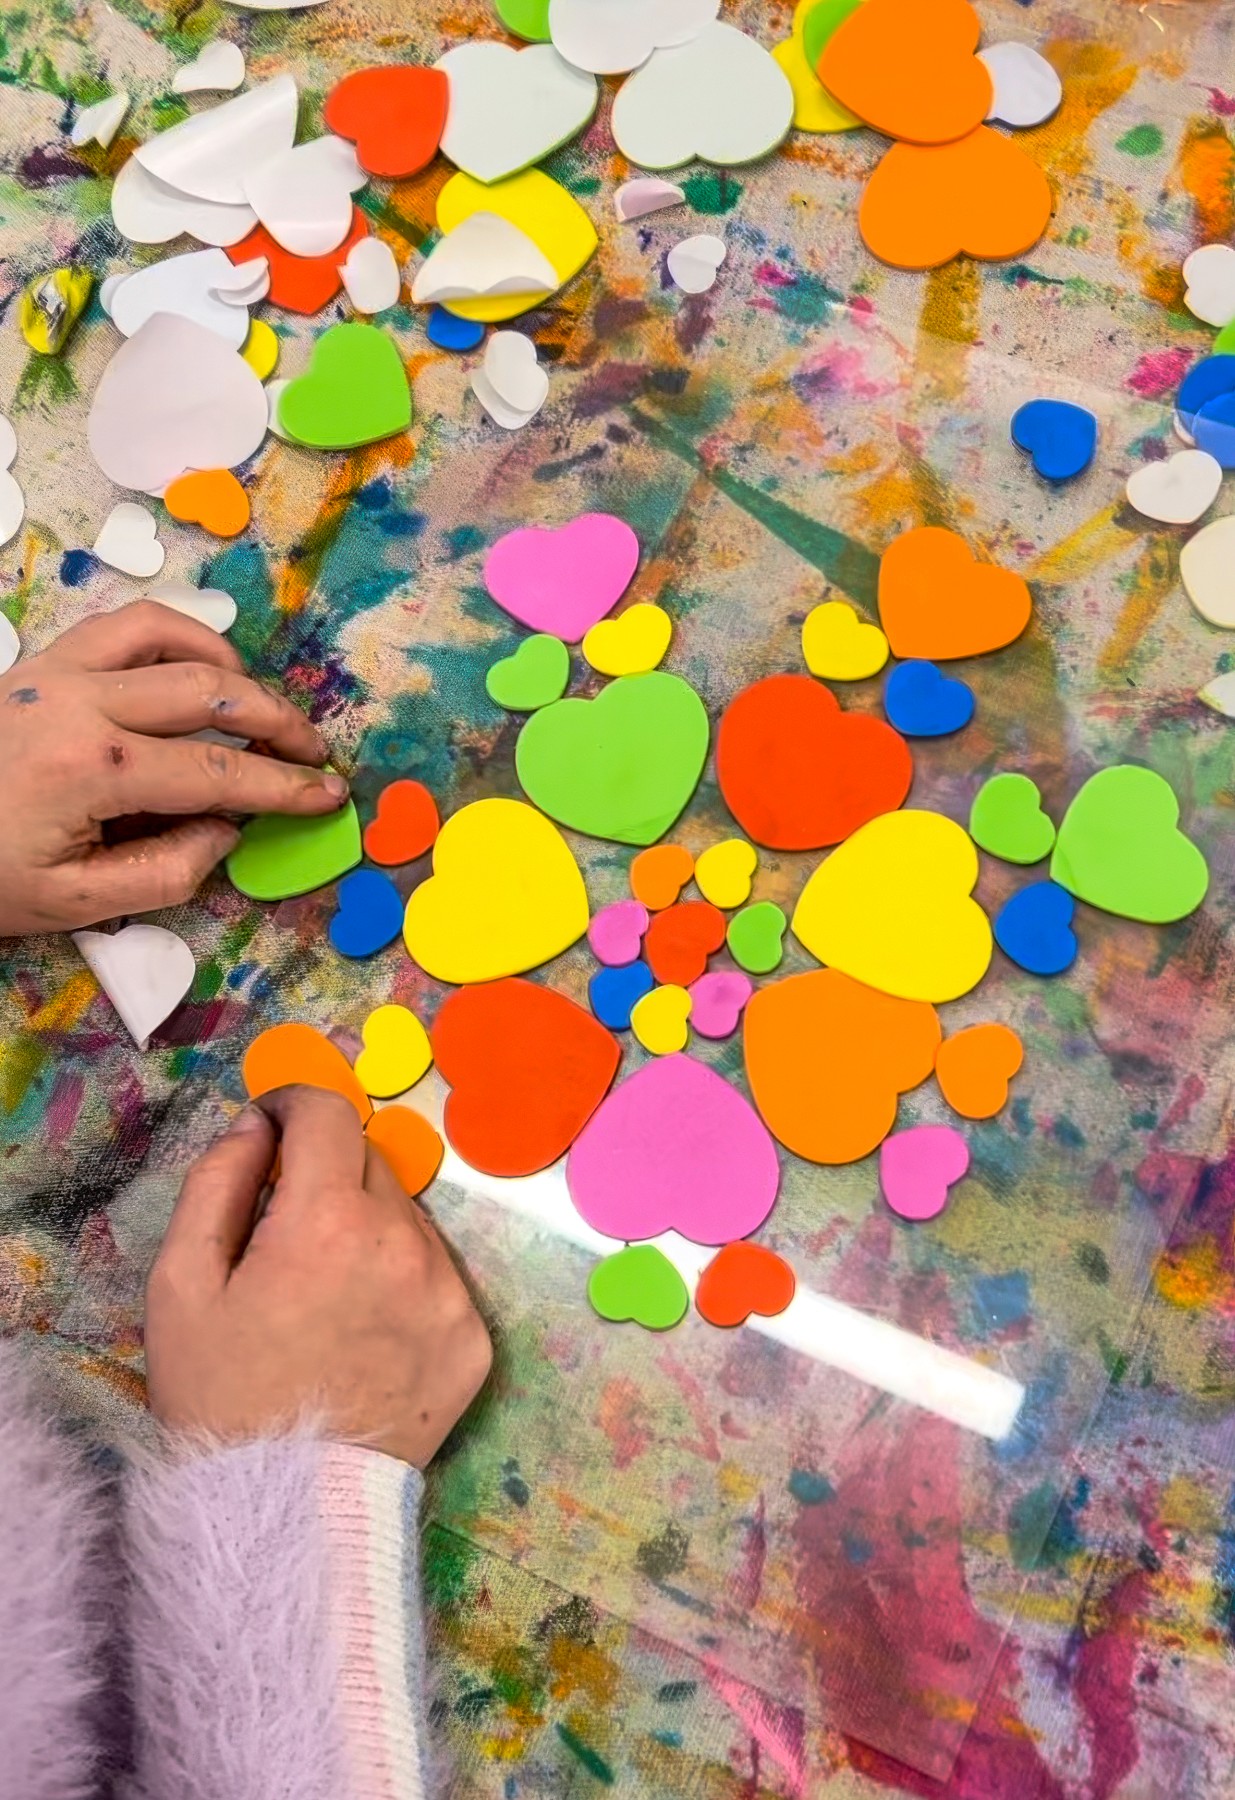
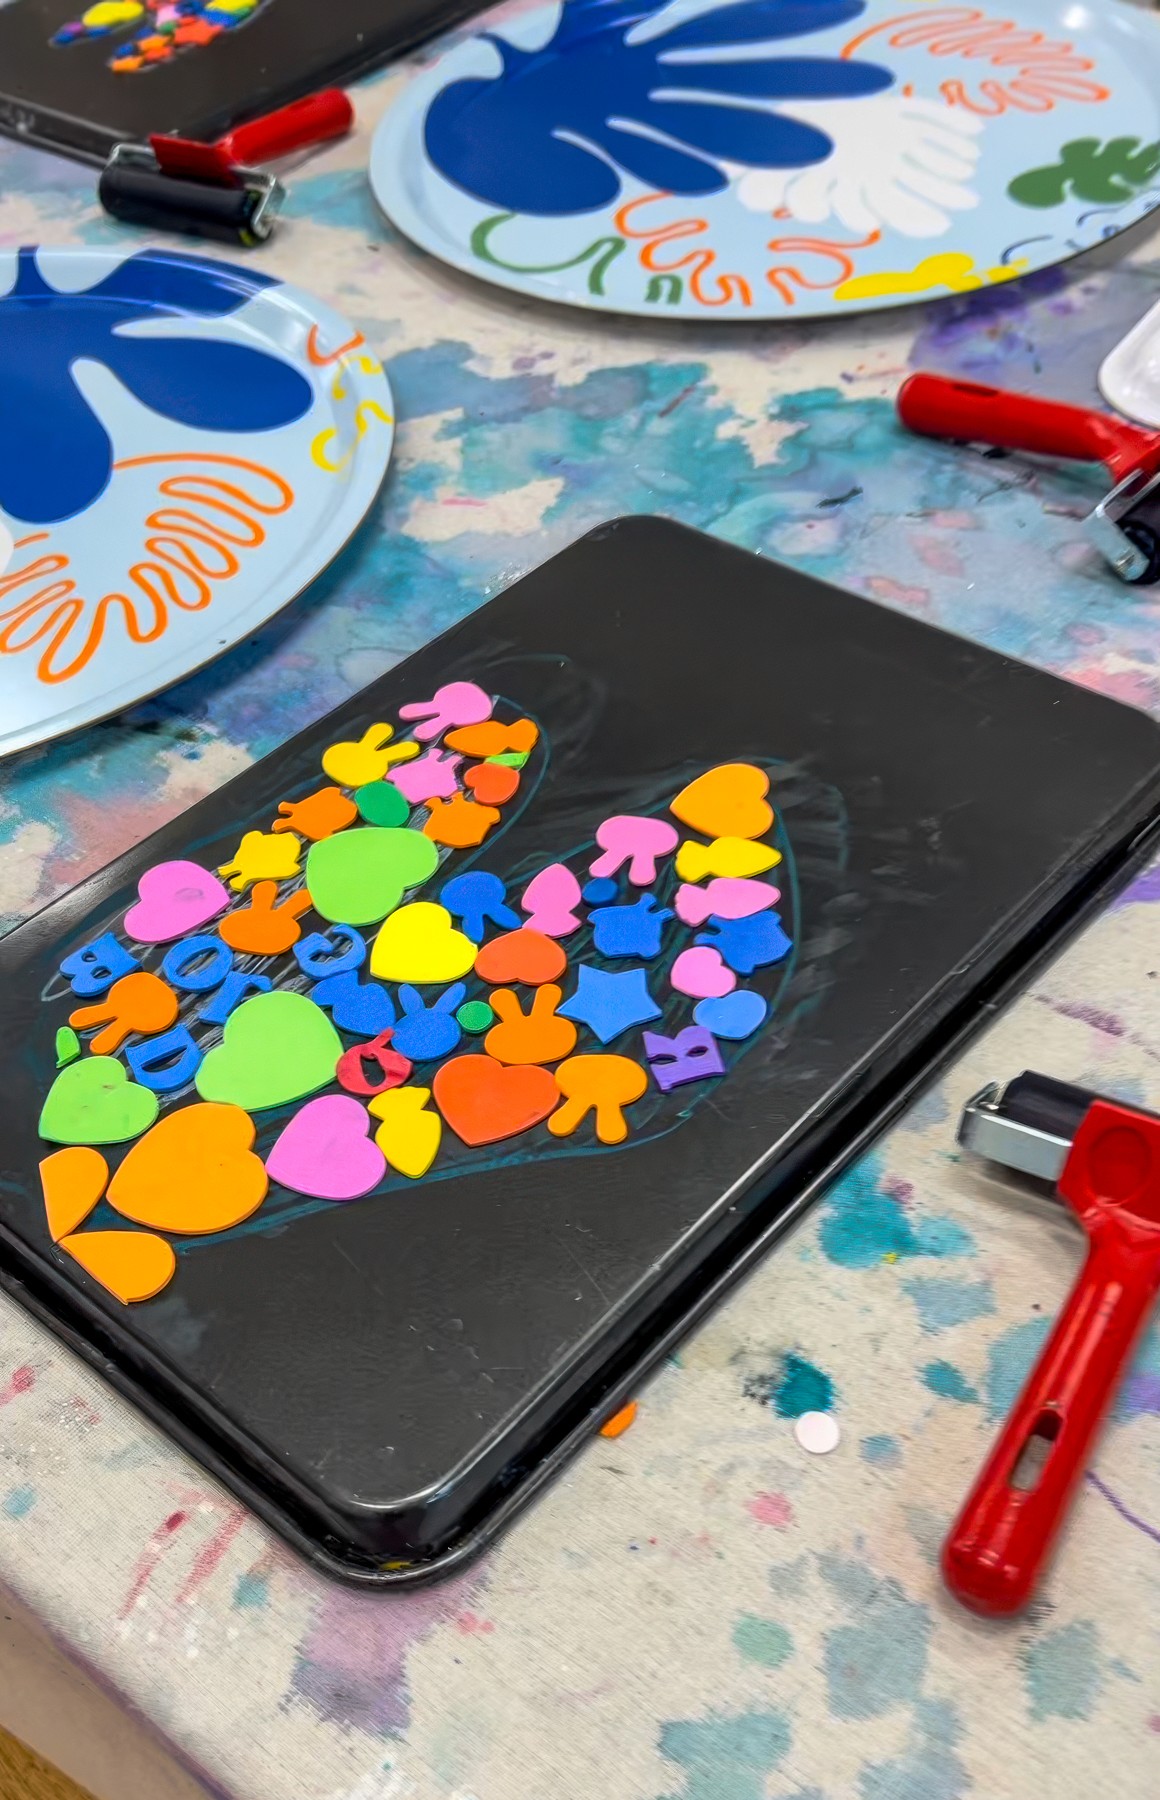
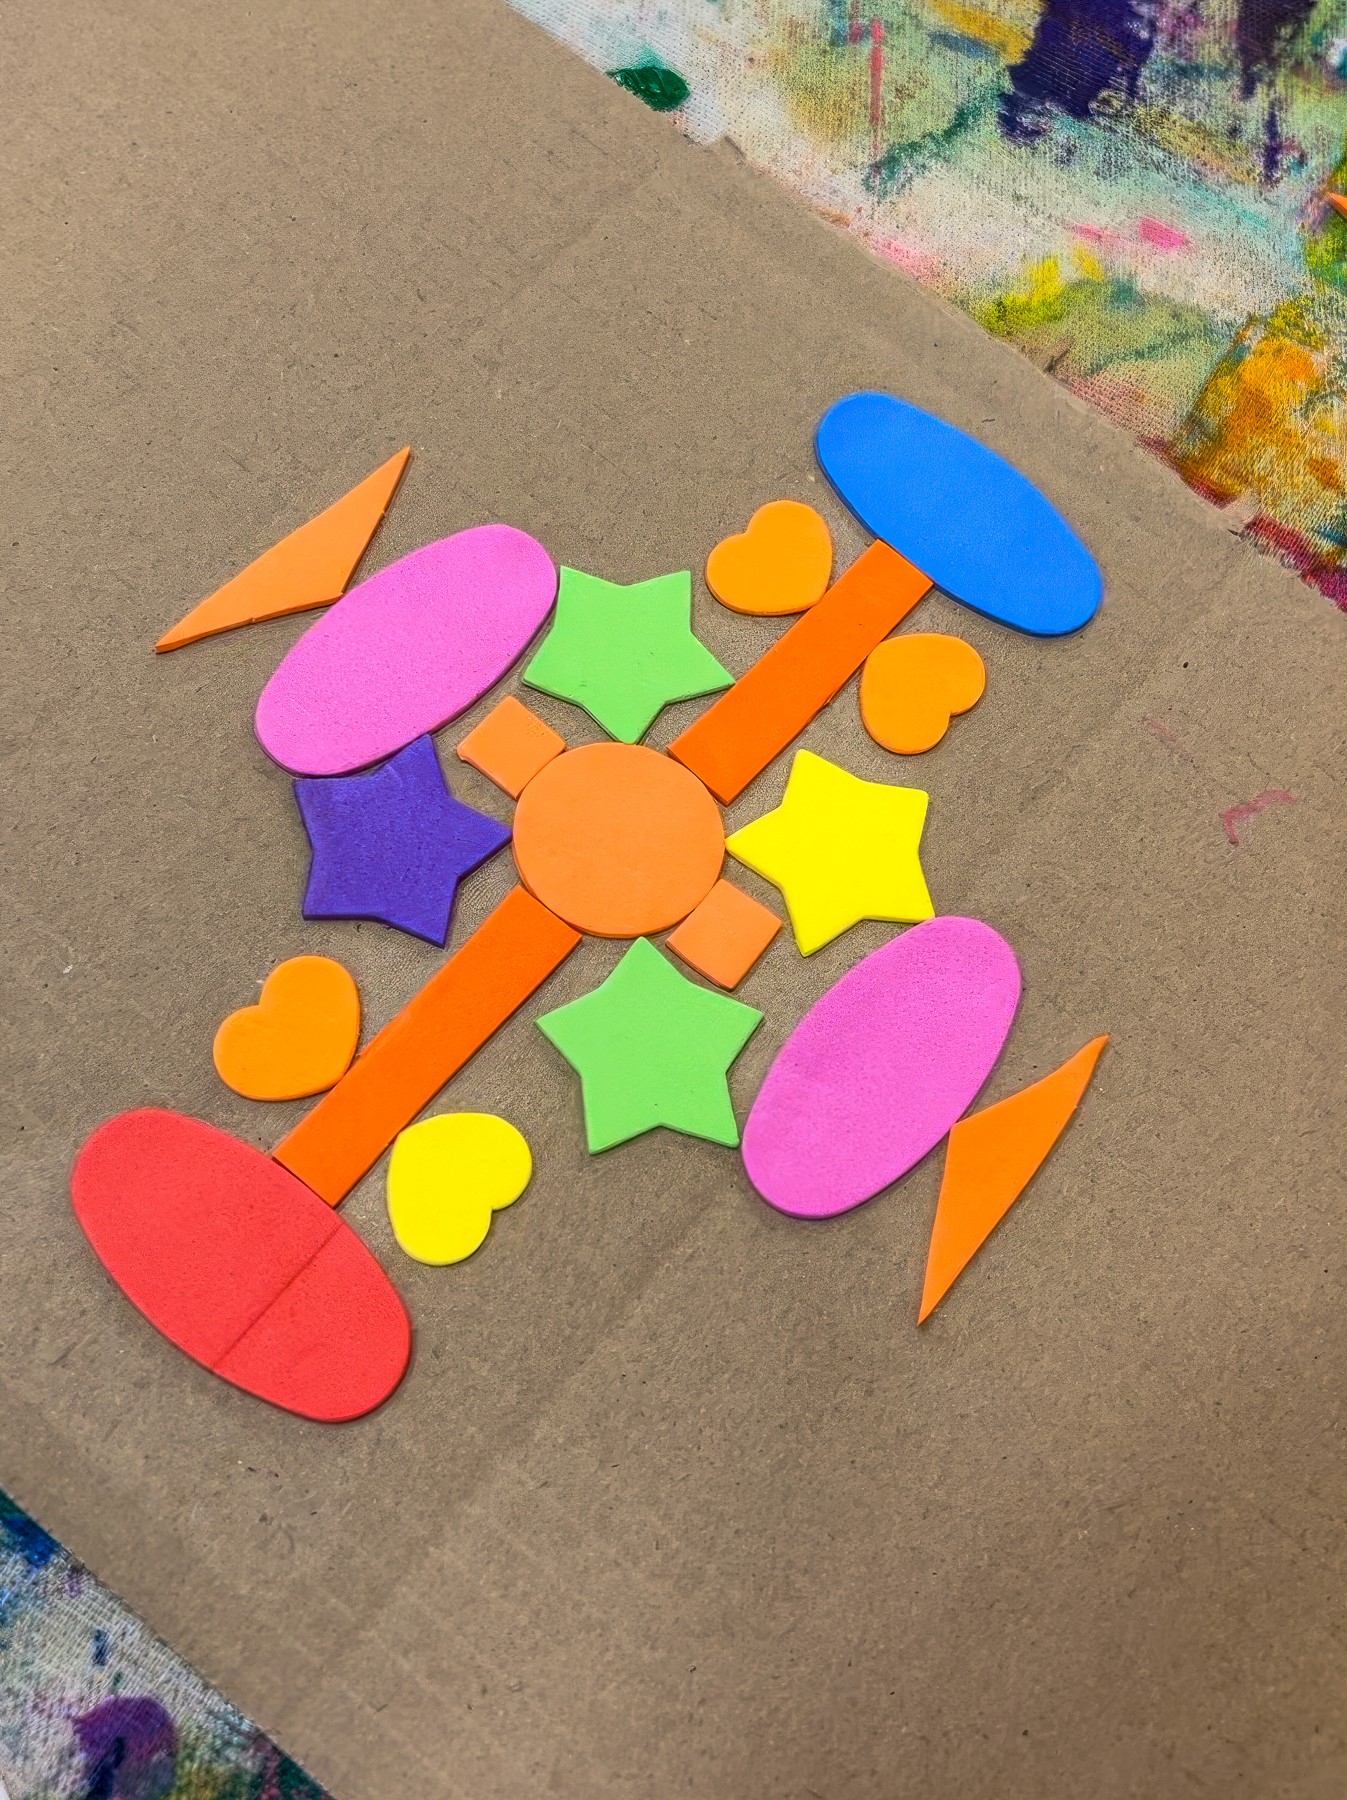
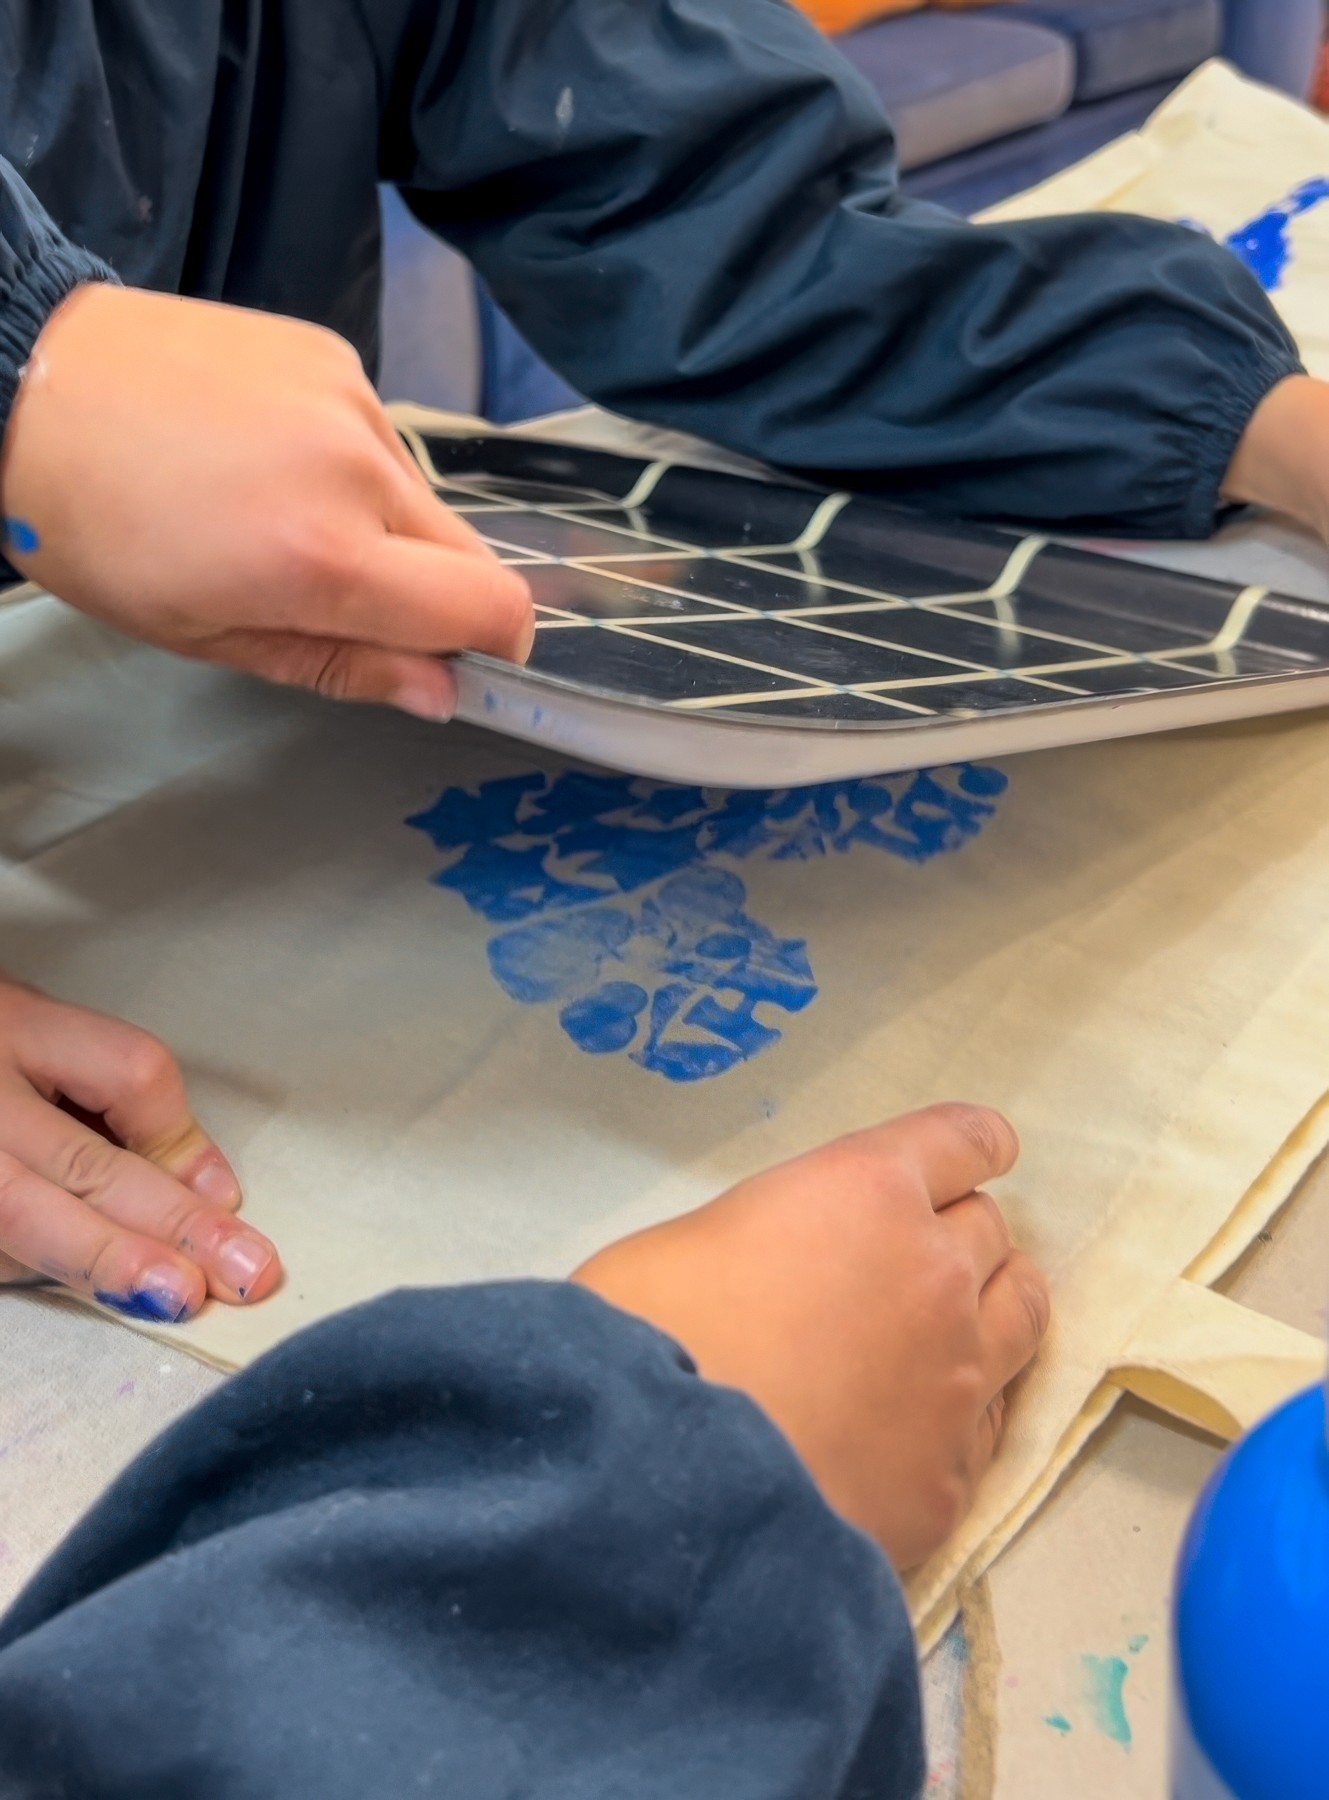
For the stamps, you’ve got options. Baking trays are incredible because they’re sturdy and won’t buckle under pressure. Thick cardboard works too and is great for sending the stamps home so kids can keep printing at the kitchen table later.
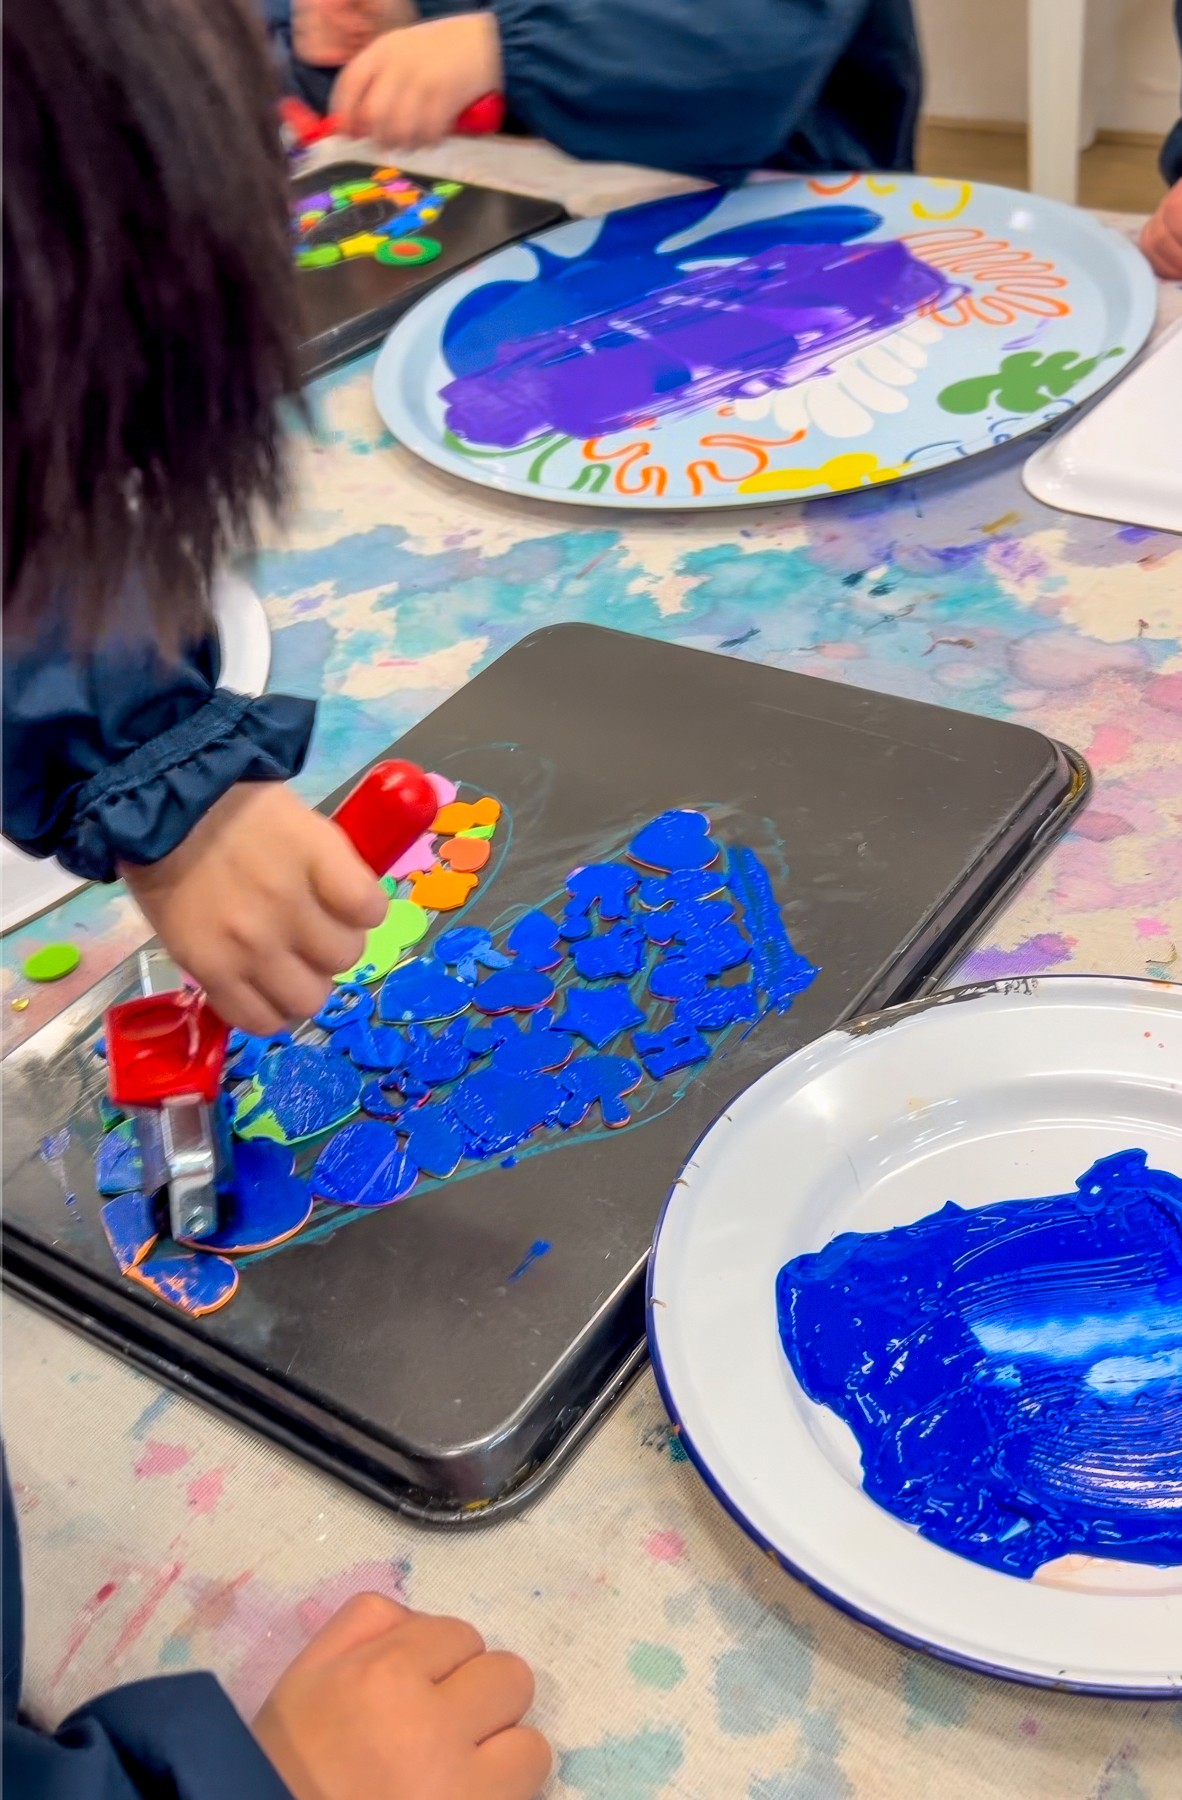
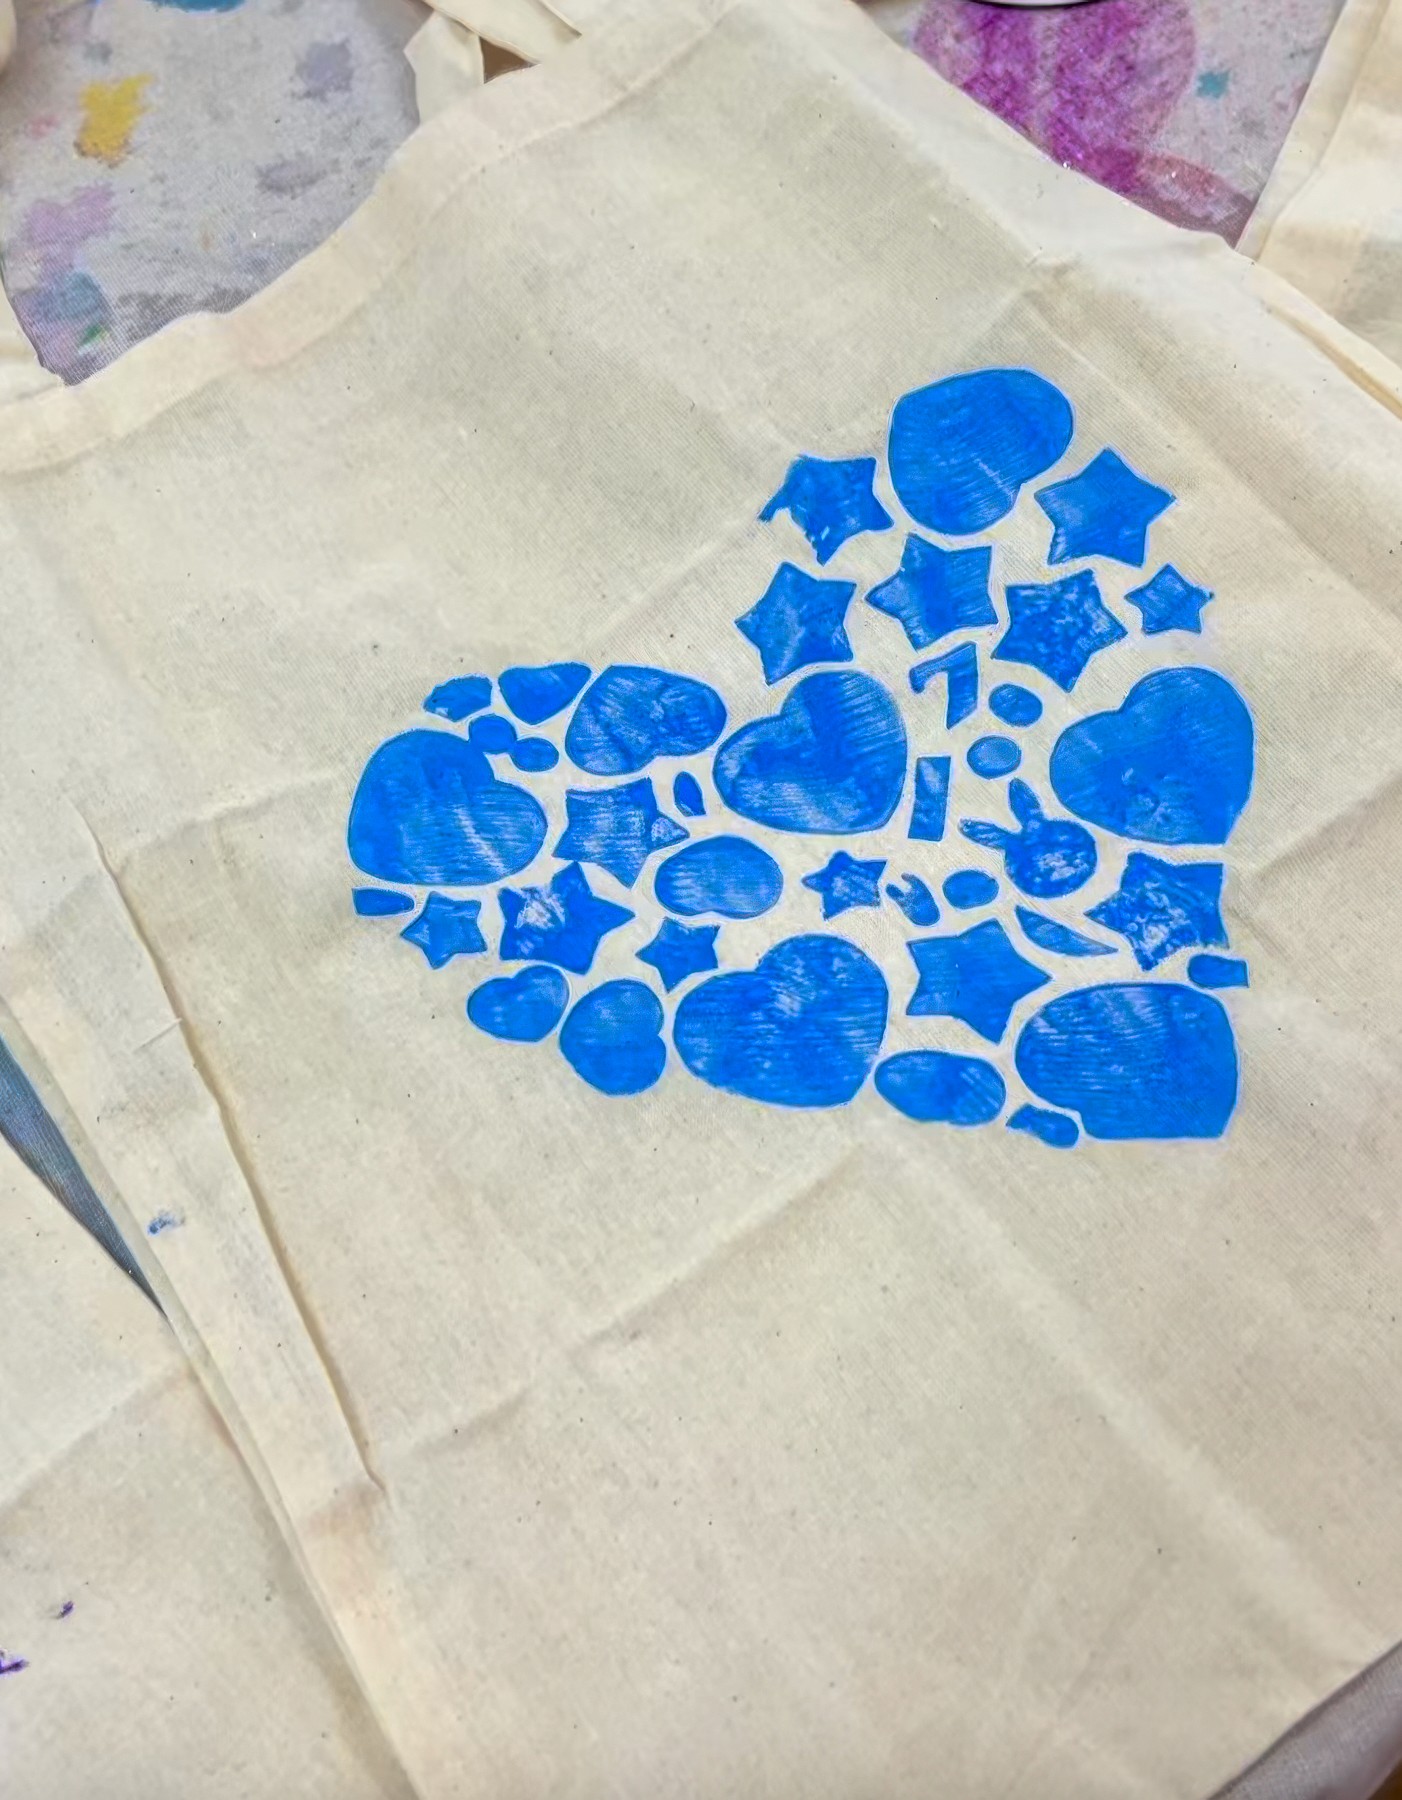
Ask each artist to draw one bold, simple shape (lightning bolt, giant flower, star, heart, sunglasses, a sneaker…). Inside that shape, they fill the space with foam stickers. Little ones, big ones, odd ones. It becomes this gorgeous jigsaw of raised edges and tiny gaps. The spacing is totally up to them. I usually go for “around a couple of centimetres apart”, but honestly, anything goes.
Set out fabric paint in a few strong colours. Poster paint works fine if you mix in a good squeeze of white so it covers the fabric nicely. And always slip a piece of cardboard inside the tote or tee first so the paint doesn’t bleed through.
The Making
Load the stamp however you like. Roll the paint on with a brayer for super-even coverage or brush it on with a sponge if you want more texture. You don’t need perfect precision here. Uneven edges make beautiful prints!
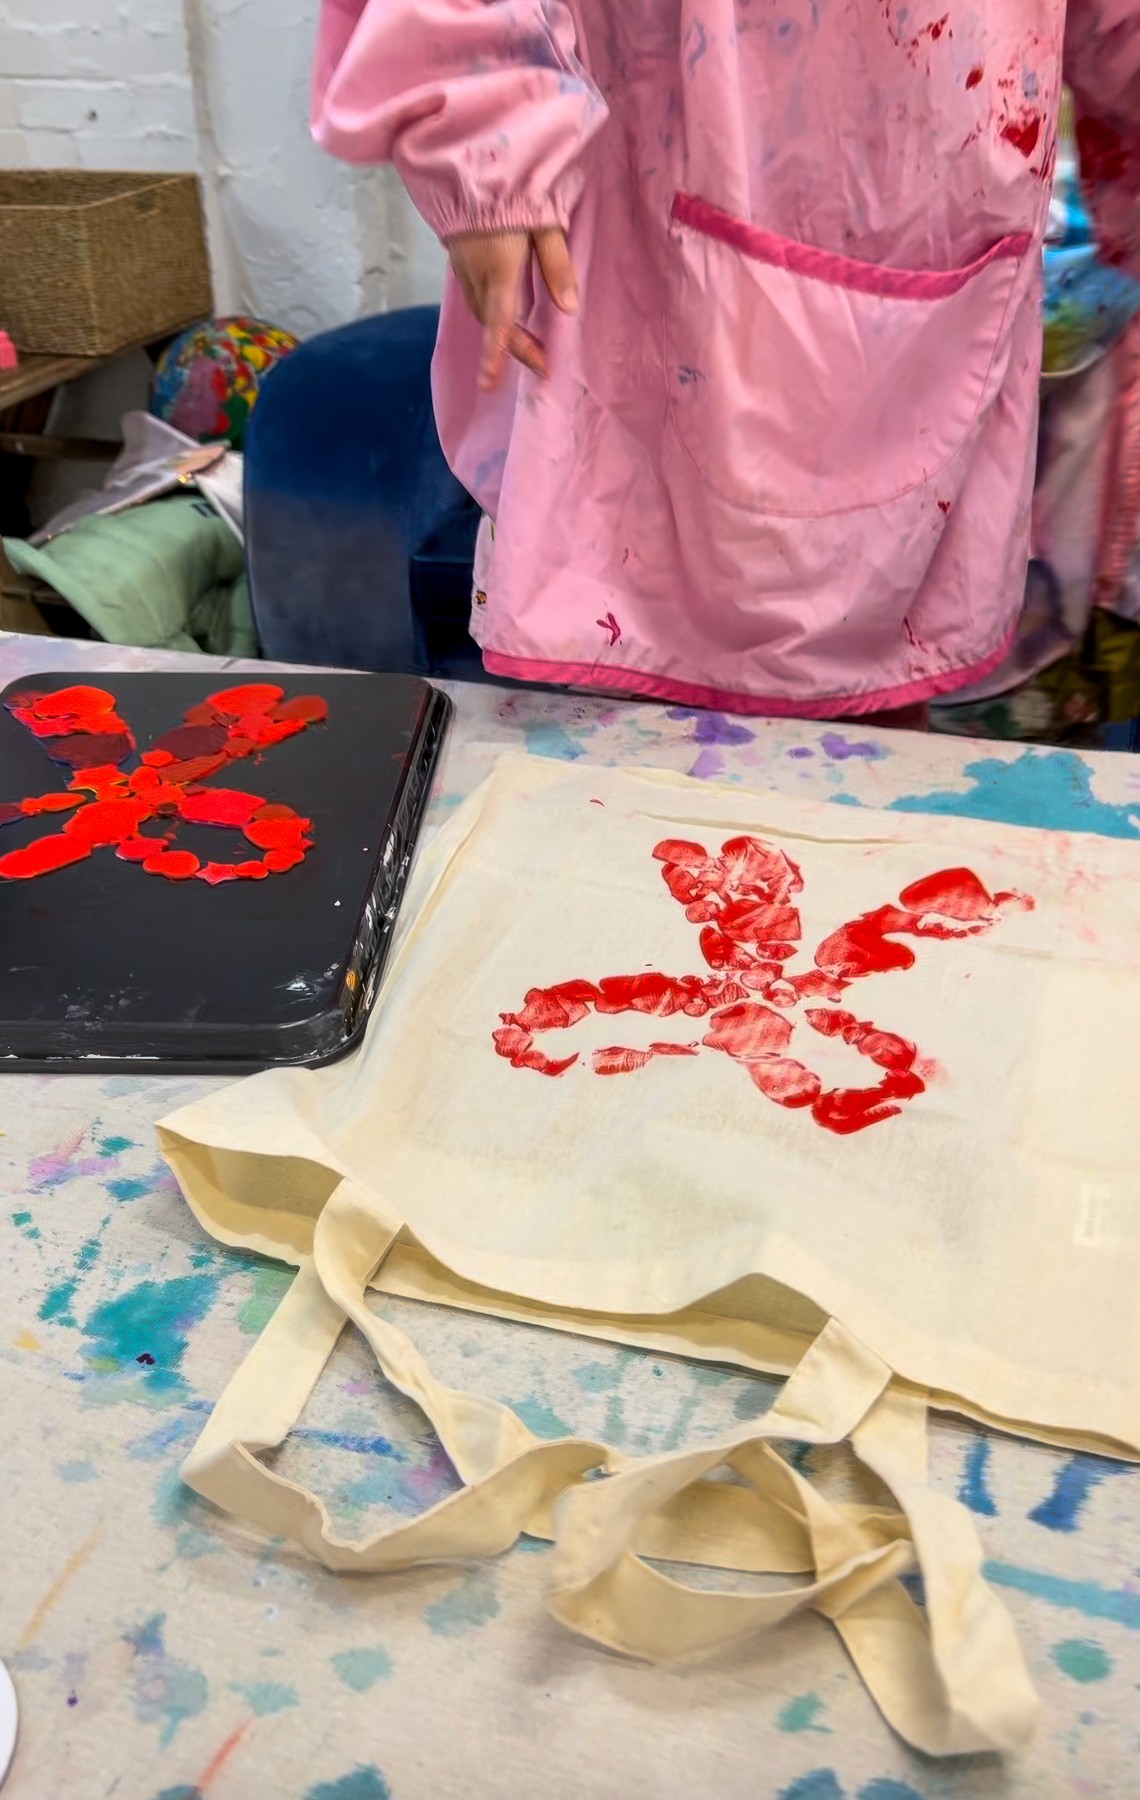
For printing, I find it easiest to place the stamp face-down on the fabric so the kids can position it exactly where they want it. Press firmly. If you’re using baking trays, you can do a gentle “step and press” for a full-body transfer. Kids love this! And it gives a beautifully crisp print.
Lift the stamp slowly to reveal the shape..
If you’re using fabric paint, let the design dry fully then iron with baking paper on top to heat-set it. Poster paint dries matte and soft and is perfect for bags that won’t be washed.
Variations
Build a whole pattern by repeating the same stamp at different angles.
Offer metallic or neon paint for a runway moment.
Use alphabet foam stickers to write names, slogans or tiny “fashion labels.” But remember that these will be printed as a mirror image, so you’ll need to reverse them.
Materials
• Cotton tote bags or t-shirts
• Baking trays or thick cardboard
• Foam stickers
• Fabric paint or poster paint + white
• Brayers, sponge brushes, wide brushes
• Scrap cardboard for inside the bag
• Pencils for sketching outlines
• Baking paper and iron for heat setting (optional)
Back to Top
Custom Tote Printing
Fashion you can carry home.
Bookmark
Print Making
The Set Up
Fabric printing is one of those activities that looks complicated and is secretly so easy and satisfying. I love using plain white cotton tote bags or calico bags because the colour pops instantly. T-shirts work beautifully too.
For the stamps, you’ve got options. Baking trays are incredible because they’re sturdy and won’t buckle under pressure. Thick cardboard works too and is great for sending the stamps home so kids can keep printing at the kitchen table later.
Ask each artist to draw one bold, simple shape (lightning bolt, giant flower, star, heart, sunglasses, a sneaker…). Inside that shape, they fill the space with foam stickers. Little ones, big ones, odd ones. It becomes this gorgeous jigsaw of raised edges and tiny gaps. The spacing is totally up to them. I usually go for “around a couple of centimetres apart”, but honestly, anything goes.
Set out fabric paint in a few strong colours. Poster paint works fine if you mix in a good squeeze of white so it covers the fabric nicely. And always slip a piece of cardboard inside the tote or tee first so the paint doesn’t bleed through.
The Making
Load the stamp however you like. Roll the paint on with a brayer for super-even coverage or brush it on with a sponge if you want more texture. You don’t need perfect precision here. Uneven edges make beautiful prints!
For printing, I find it easiest to place the stamp face-down on the fabric so the kids can position it exactly where they want it. Press firmly. If you’re using baking trays, you can do a gentle “step and press” for a full-body transfer. Kids love this! And it gives a beautifully crisp print.
Lift the stamp slowly to reveal the shape..
If you’re using fabric paint, let the design dry fully then iron with baking paper on top to heat-set it. Poster paint dries matte and soft and is perfect for bags that won’t be washed.
Variations
Build a whole pattern by repeating the same stamp at different angles.
Offer metallic or neon paint for a runway moment.
Use alphabet foam stickers to write names, slogans or tiny “fashion labels.” But remember that these will be printed as a mirror image, so you’ll need to reverse them.
Materials
• Cotton tote bags or t-shirts
• Baking trays or thick cardboard
• Foam stickers
• Fabric paint or poster paint + white
• Brayers, sponge brushes, wide brushes
• Scrap cardboard for inside the bag
• Pencils for sketching outlines
• Baking paper and iron for heat setting (optional)
Back to Top
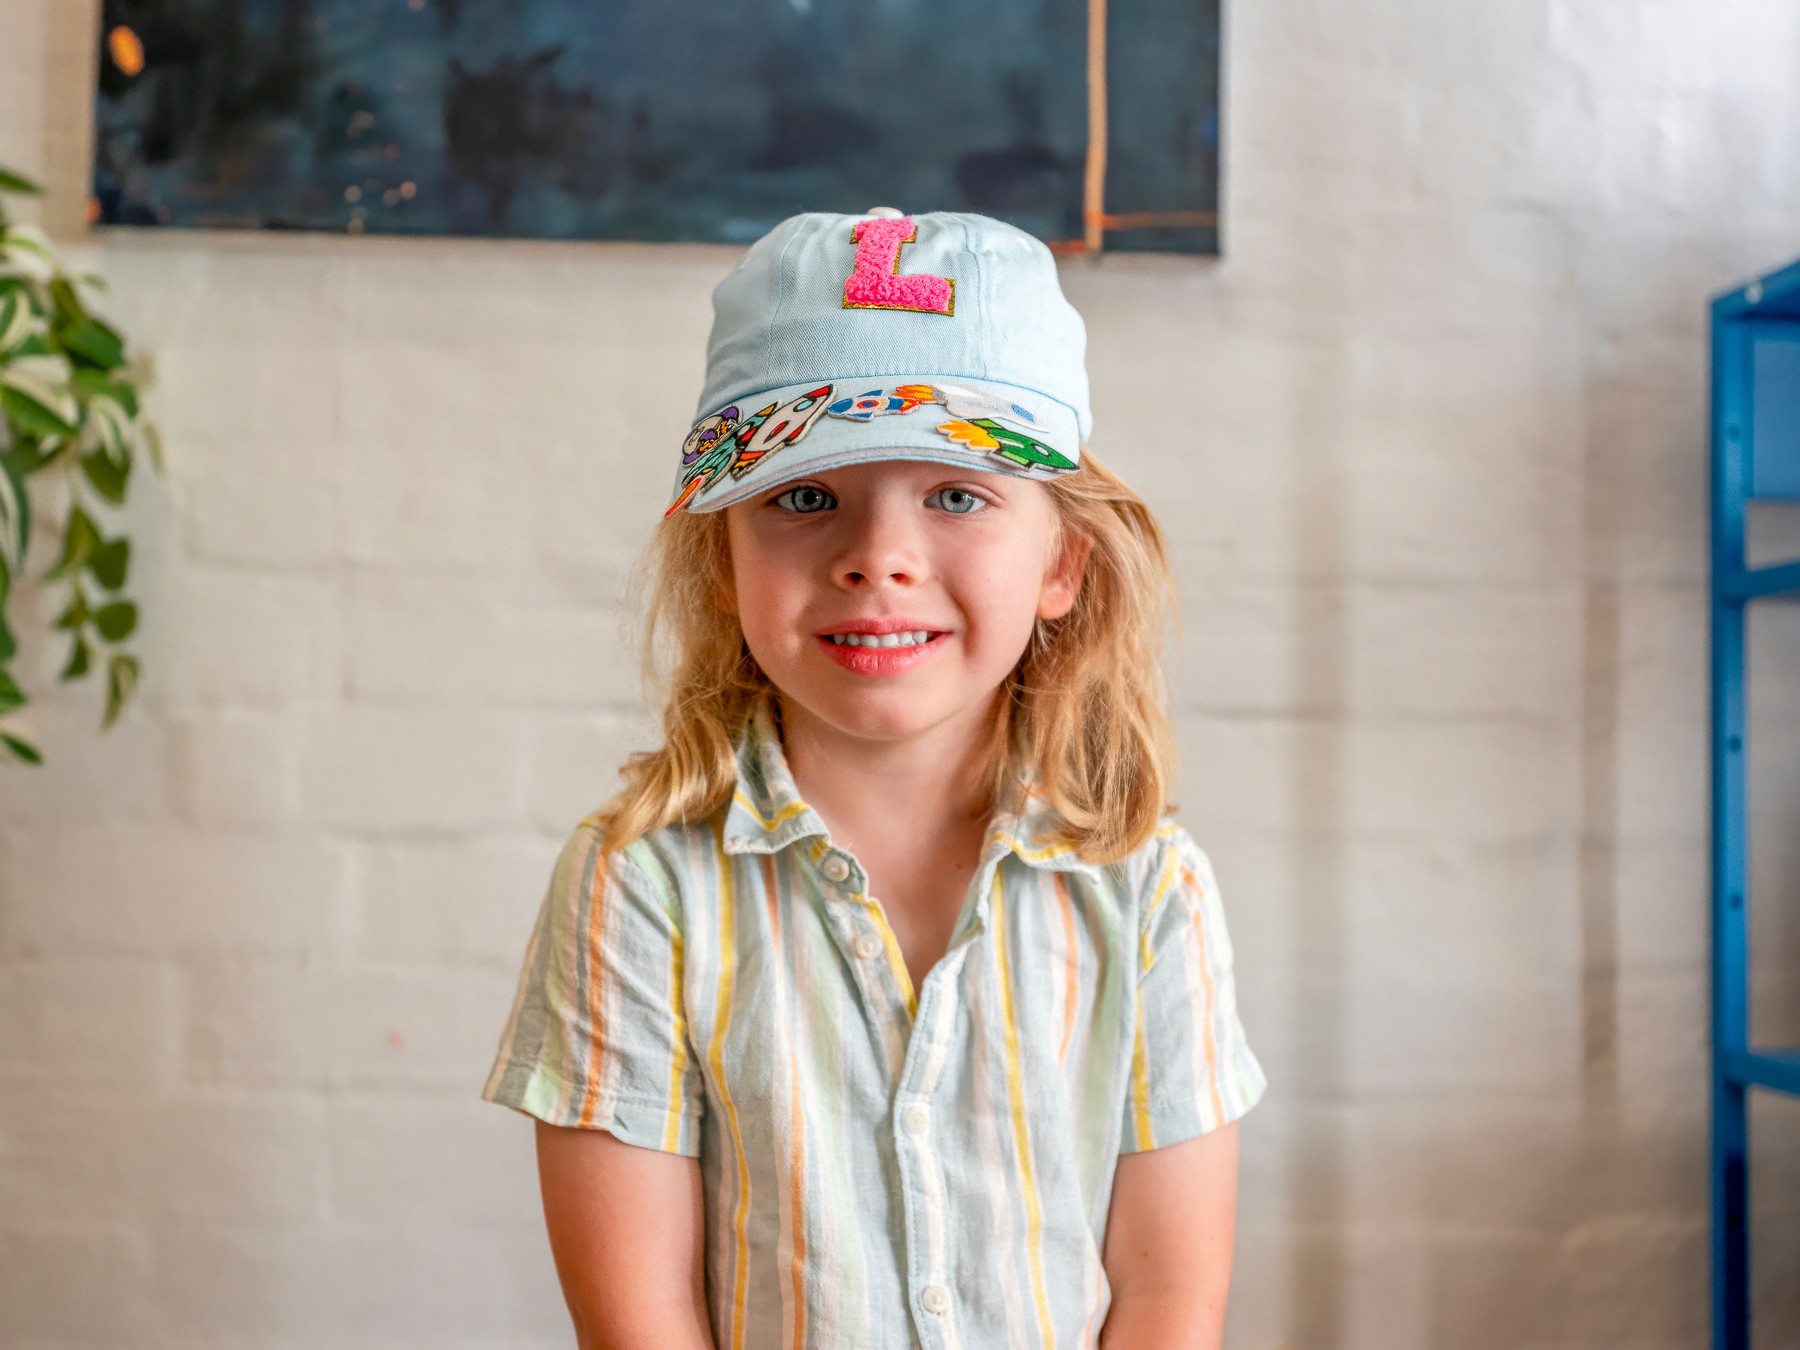
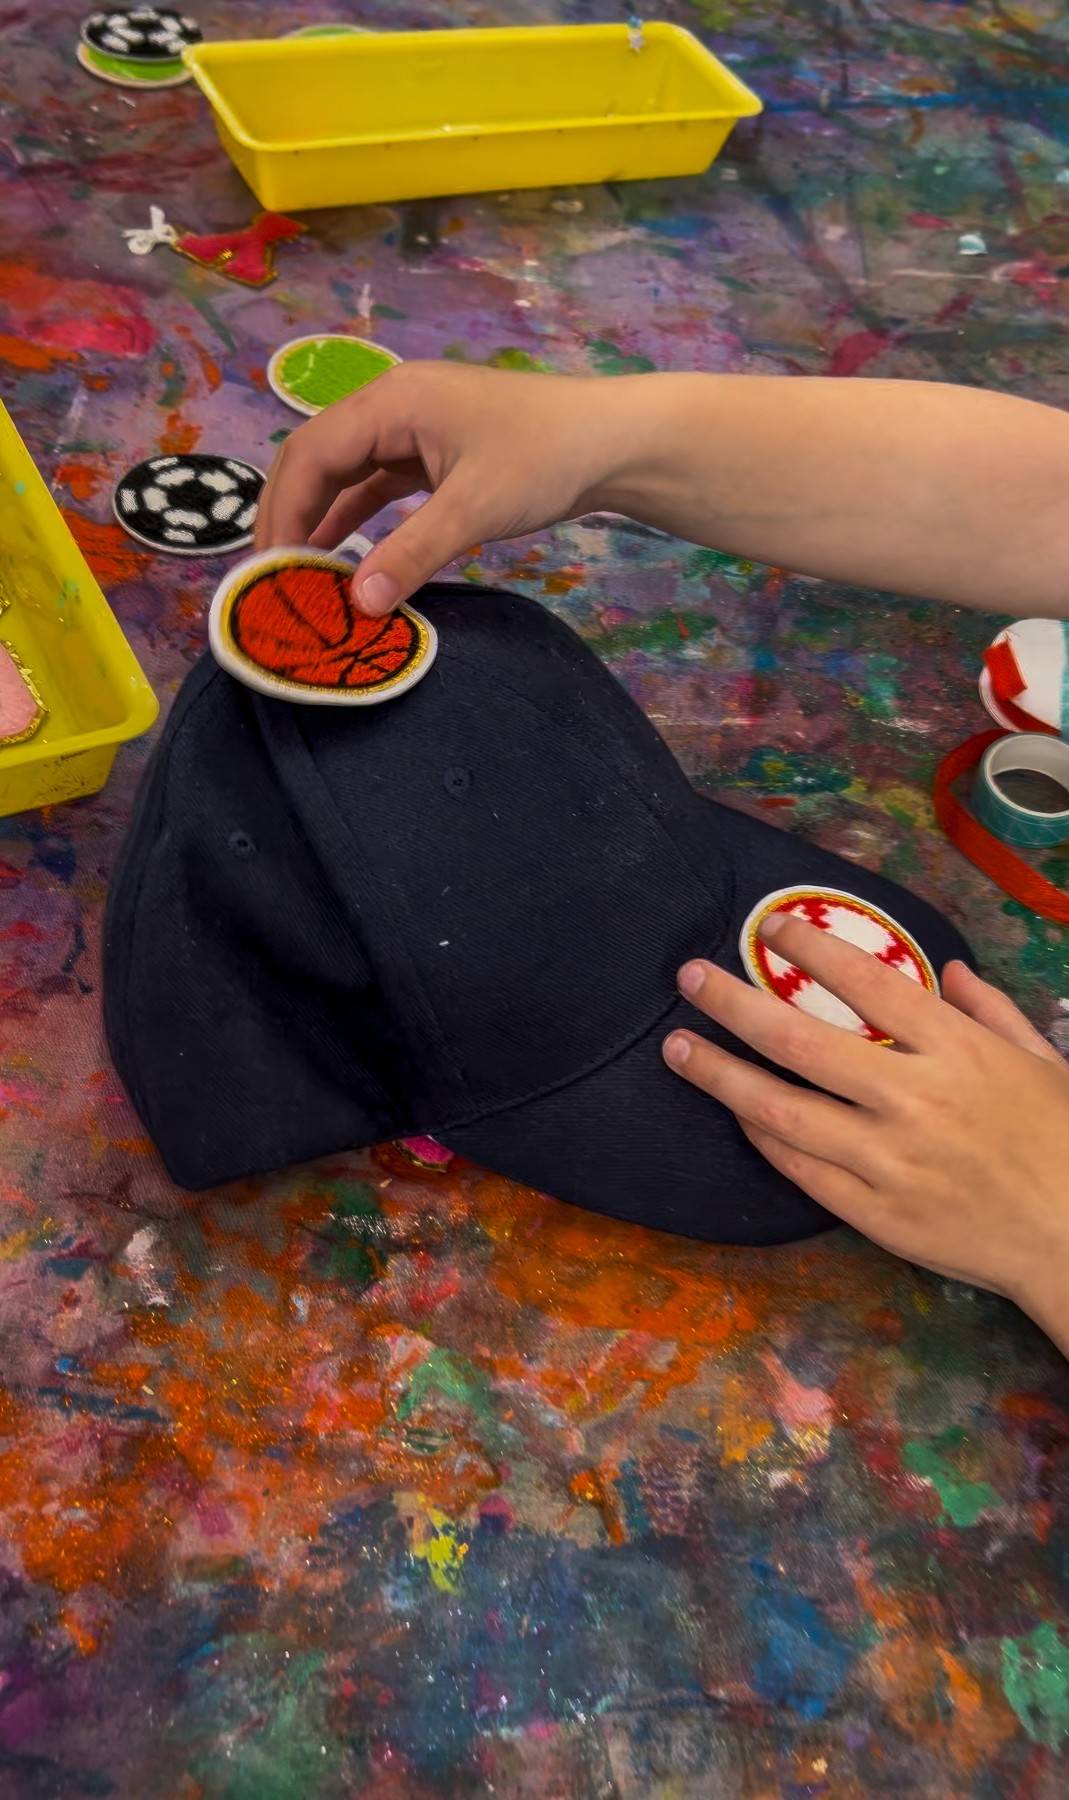
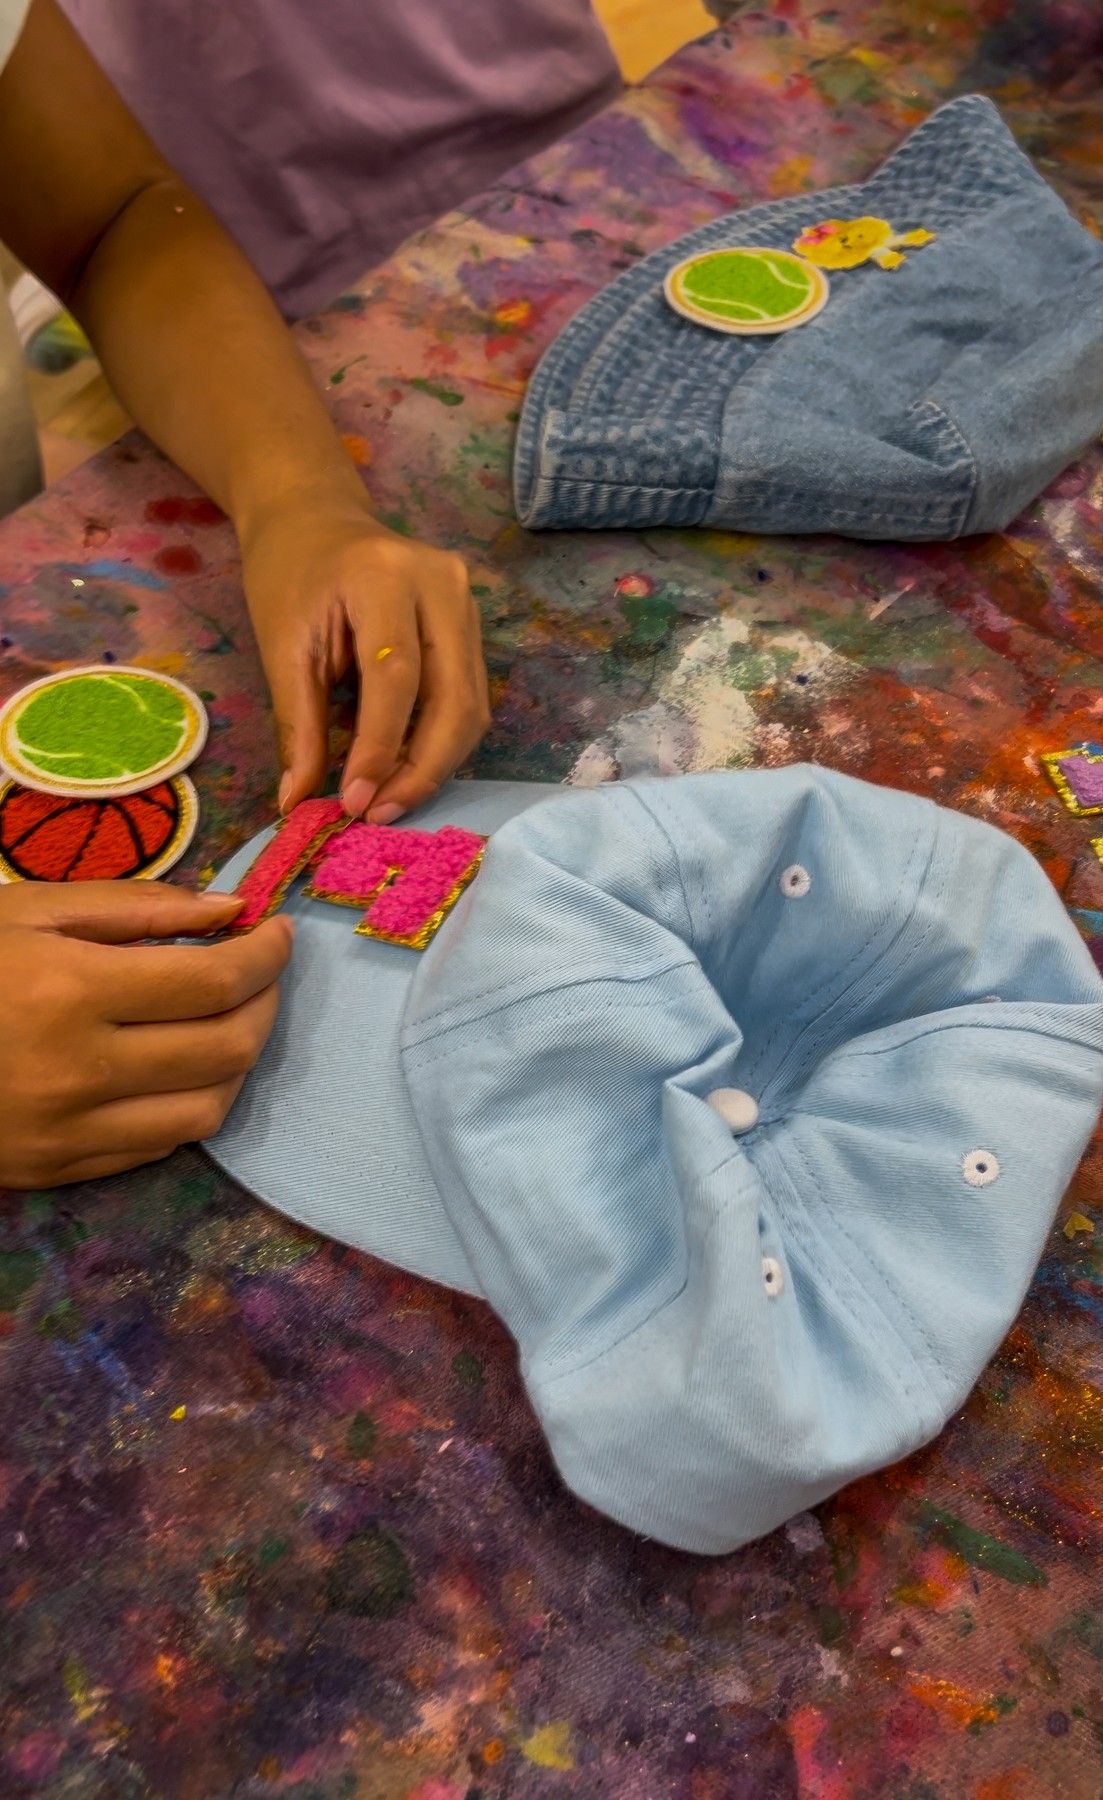
Hats and Millinery
Wearable art with serious personality.
Bookmark
Sculpture
The Set Up
Grab any hats you have on hand. Baseball caps, bucket hats, soft felt shapes, even the plain kids’ sun hats from the supermarket. Anything becomes a canvas.
I love sticky-backed fashion patches for this one. They feel retro in the best way and bring all the 90s kid nostalgia straight back! You can also offer felt scraps, sequins, pom poms, ribbons and glue if you want more sculptural magic.
Lay out a table of patches and textures, plus a few mirrors if you have them. Kids get a little spark when they can see themselves trying things on, and the whole process becomes part fashion design, part dress-up.
The Making
Treat this like a mini fashion studio. The goal isn’t to decorate a hat neatly, it’s to explore how materials change the mood and personality of something wearable. Invite the children to test placement before committing. Tilt a patch, layer two textures, hold the hat at different angles and notice how the shape shifts.
Encourage them to make decisions based on feeling rather than “getting it right”. Does it feel bold? Balanced? Fun? Does adding one more detail change the whole vibe?
Variations
Introduce fabric markers for hand-drawn details or signatures.
Run a mini fashion parade at the end so each hat has its moment.
Offer felt sheets so kids can cut and design their own custom patches.
Try a themed studio: disco hats, adventure hats, garden hats, superhero hats.
Materials
• Hats of any kind (cotton, canvas, felt, thrifted)
• Sticky-backed patches
• Felt scraps and fabric offcuts
• Sequins, pom poms, ribbons
• PVA or fabric glue
• Mirrors (optional but wonderful)
Back to Top
Dressing The Mannequins
Costume a tiny person! Strike a pose! Tell a story!
Bookmark
Creative Exploration

The Set Up
Lay out wooden artist mannequins and surround them with loose parts: playdough, fabric scraps, wool, sequins, buttons, beads, pipe cleaners, anything that feels like it belongs in a teeny costume trunk!
The more unexpected the mix, the better. Thrifted fabric and old costume scraps are especially brilliant because they already carry a bit of history and character.


The Making
Start adding bits and pieces until the mannequin has a whole new personality.
Maybe it ends up in a cape, maybe it sprouts a crown of feathers, maybe its arms get wrapped in coils of playdough. Bend the mannequins into poses and suddenly they feel like performers, superheroes, dancers, or statues. The best bit is that nothing is fixed. You can strip it back, swap it around, pass it to someone else, and the character shifts again (and again!).


Variations
Use the dressed mannequin as the subject for a drawing session. Pose it, light it, and sketch what you see.
Materials
Wooden artist mannequins
Playdough or plasticine
Fabric scraps, ribbons, wool (thrifted pieces are wonderful)
Sequins, buttons, beads, feathers, pipe cleaners
Any other loose parts you love

Back to Top
Dressing The Mannequins
Costume a tiny person! Strike a pose! Tell a story!
Bookmark
Creative Exploration
The Set Up
Lay out wooden artist mannequins and surround them with loose parts: playdough, fabric scraps, wool, sequins, buttons, beads, pipe cleaners, anything that feels like it belongs in a teeny costume trunk!
The more unexpected the mix, the better. Thrifted fabric and old costume scraps are especially brilliant because they already carry a bit of history and character.
The Making
Start adding bits and pieces until the mannequin has a whole new personality.
Maybe it ends up in a cape, maybe it sprouts a crown of feathers, maybe its arms get wrapped in coils of playdough. Bend the mannequins into poses and suddenly they feel like performers, superheroes, dancers, or statues. The best bit is that nothing is fixed. You can strip it back, swap it around, pass it to someone else, and the character shifts again (and again!).
Variations
Use the dressed mannequin as the subject for a drawing session. Pose it, light it, and sketch what you see.
Materials
Wooden artist mannequins
Playdough or plasticine
Fabric scraps, ribbons, wool (thrifted pieces are wonderful)
Sequins, buttons, beads, feathers, pipe cleaners
Any other loose parts you love
Back to Top
