
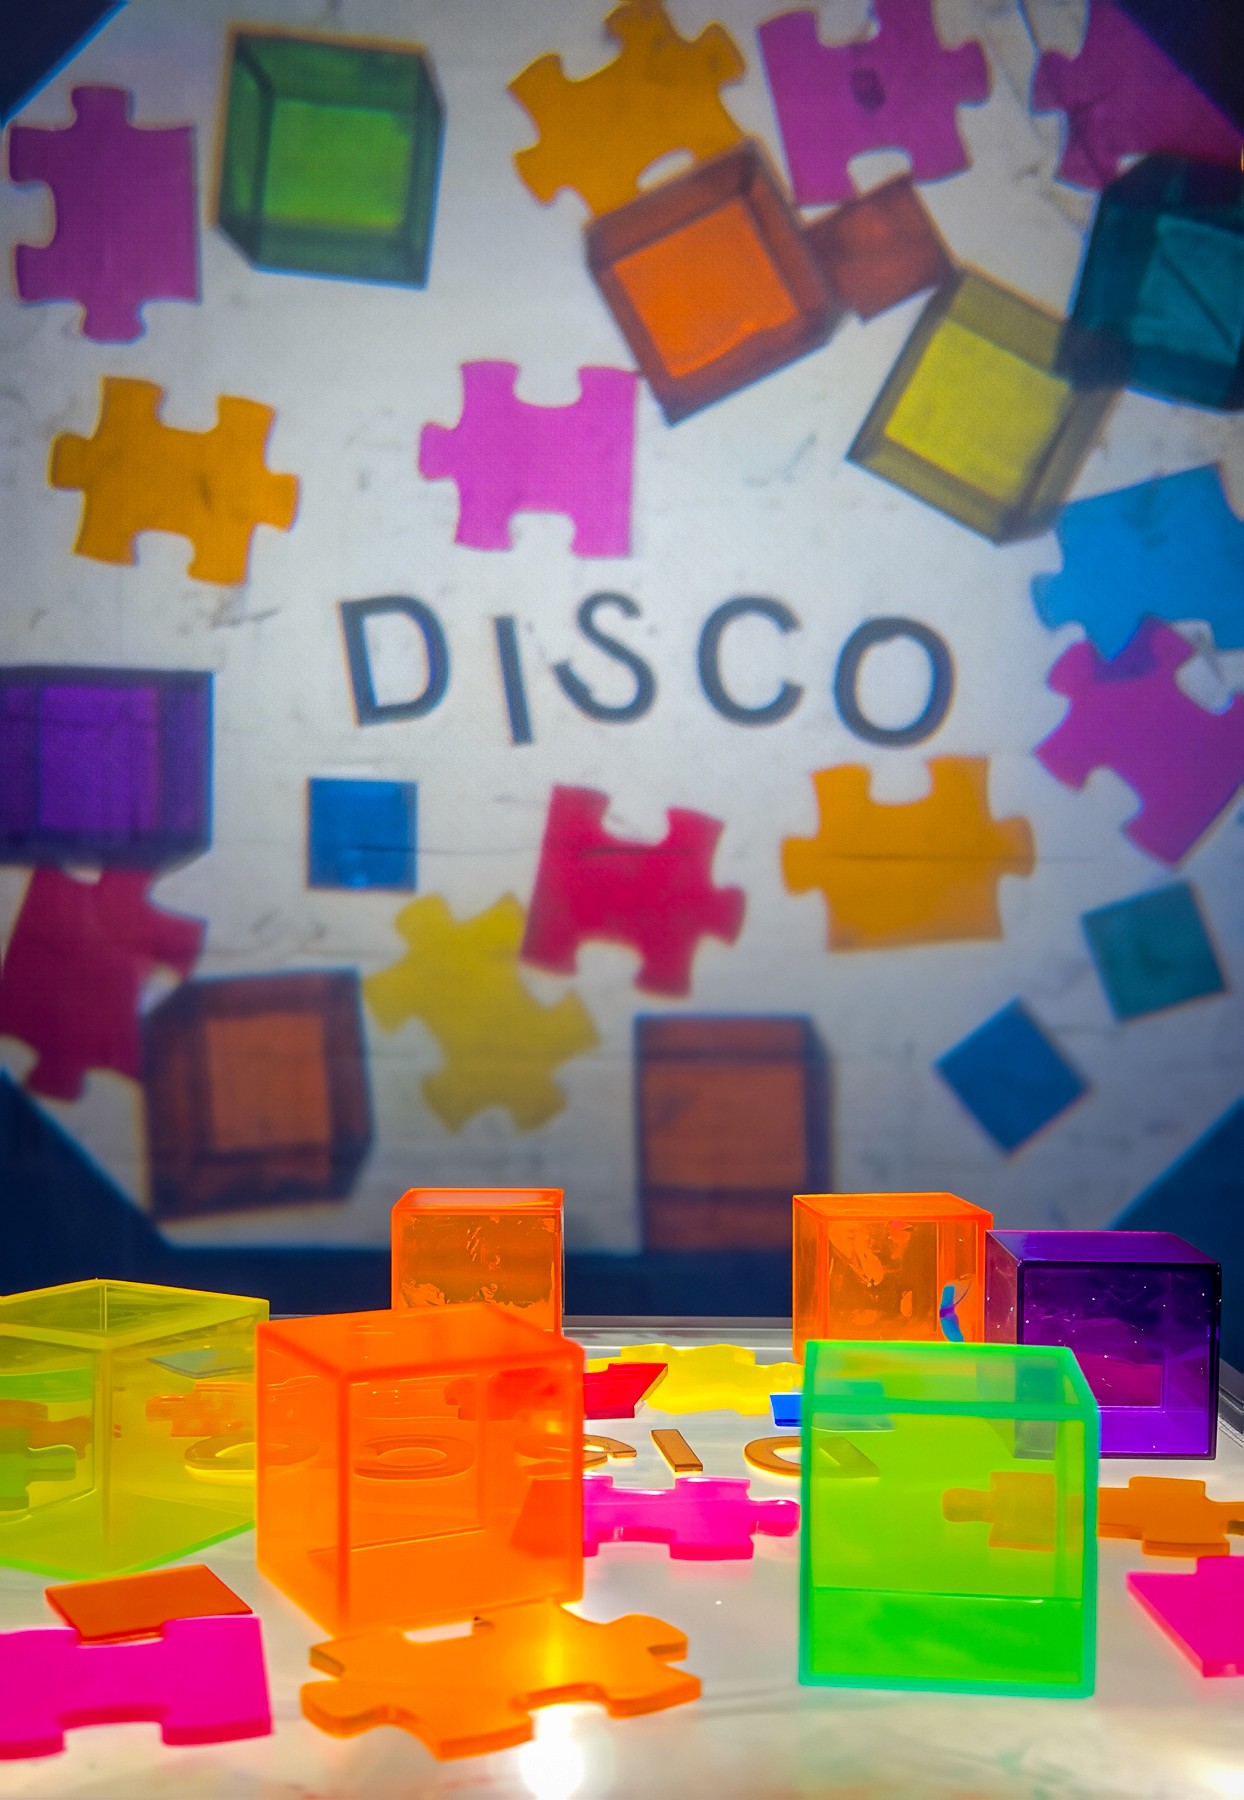
ARTFUL EXPERIENCES
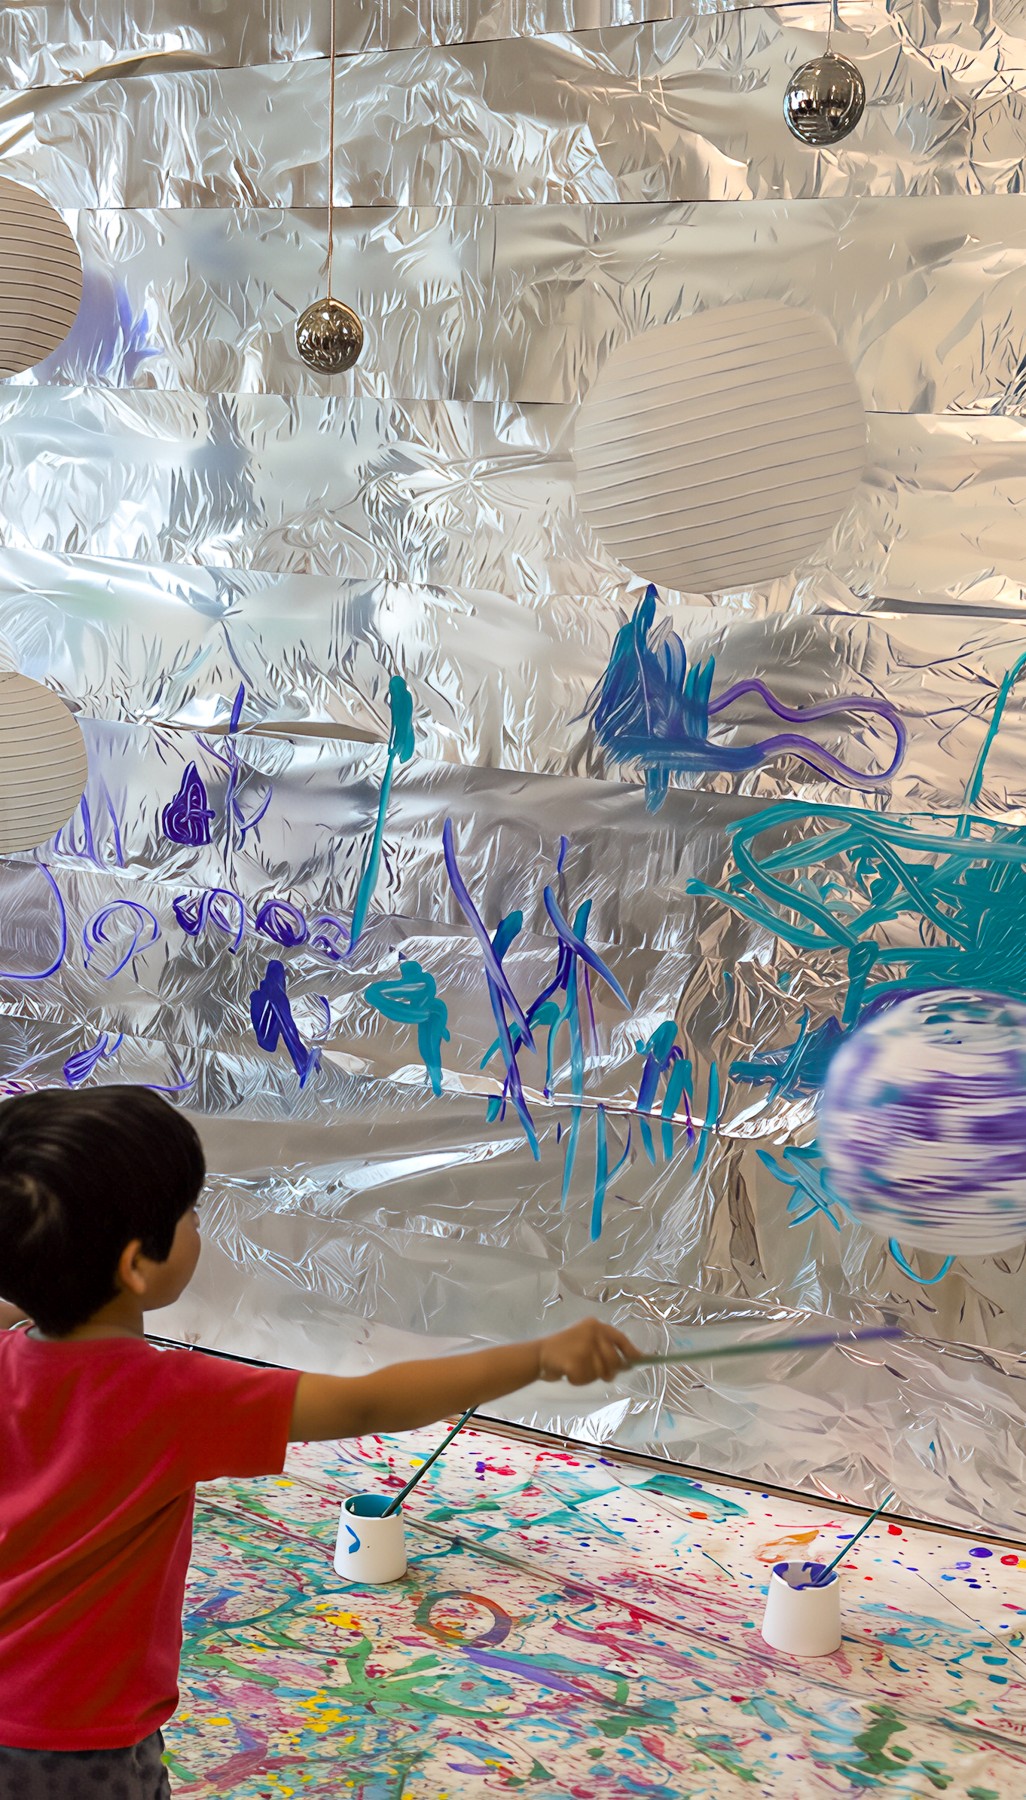
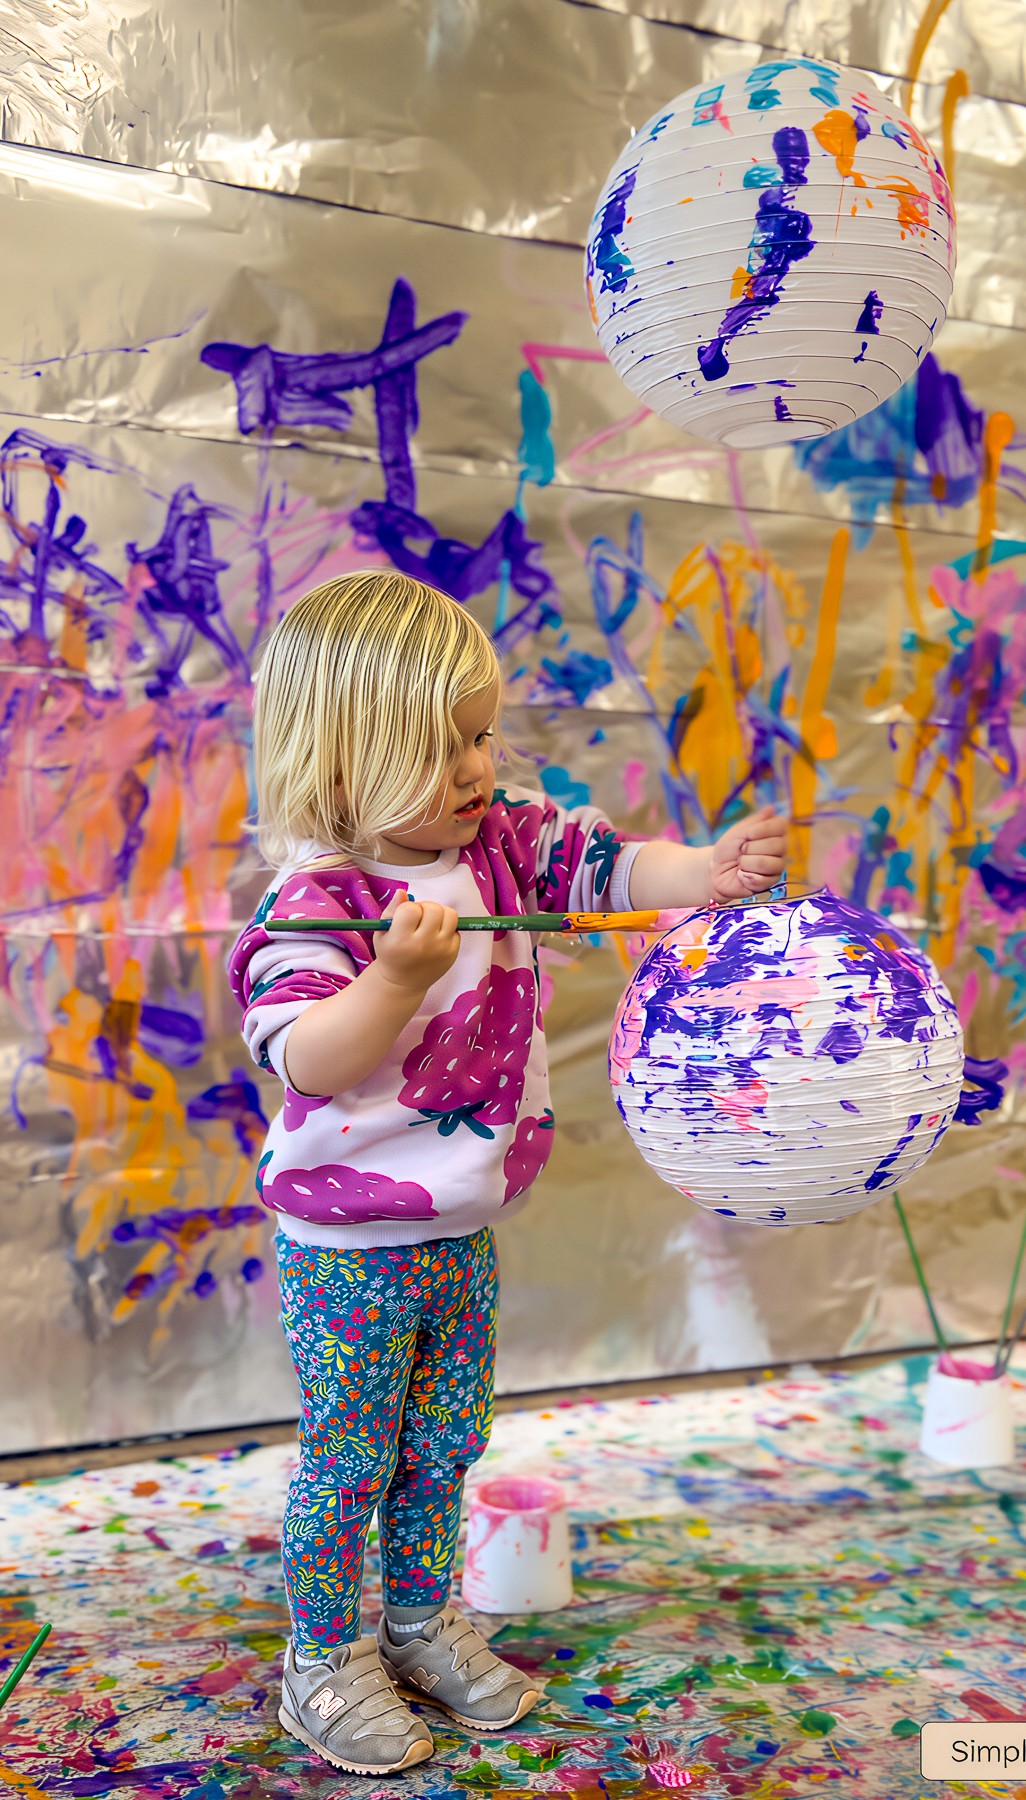
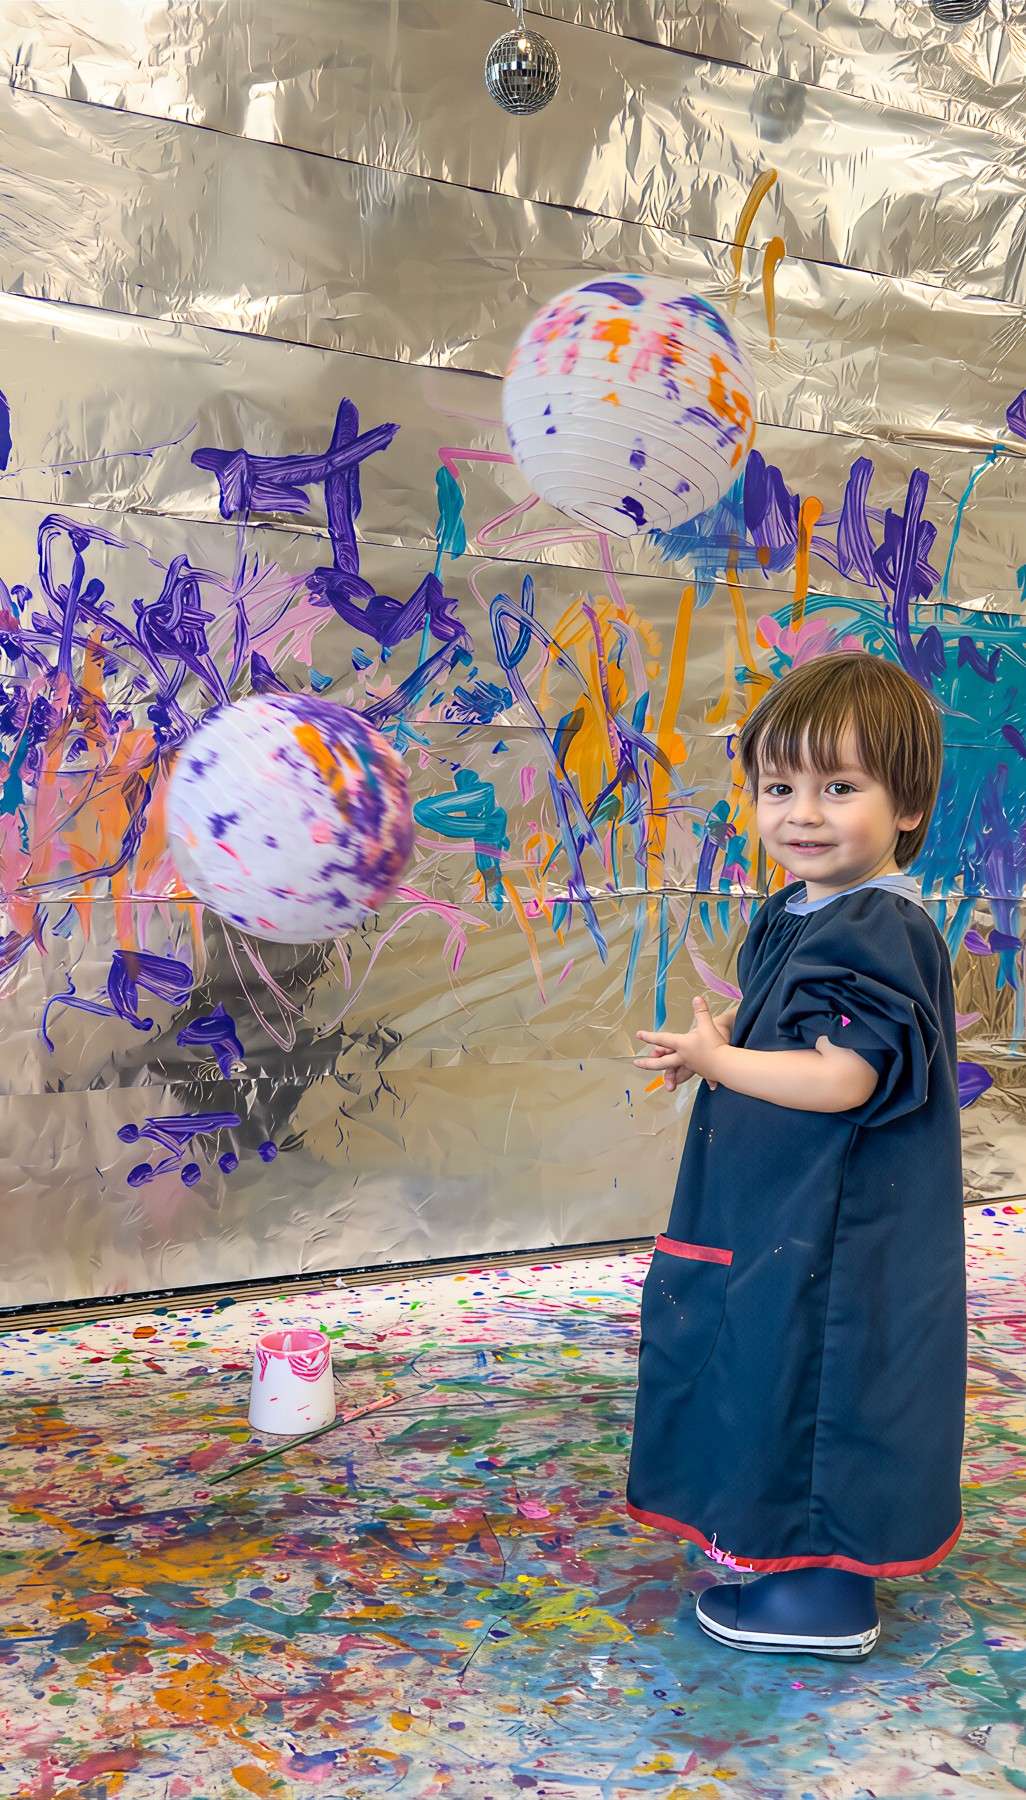
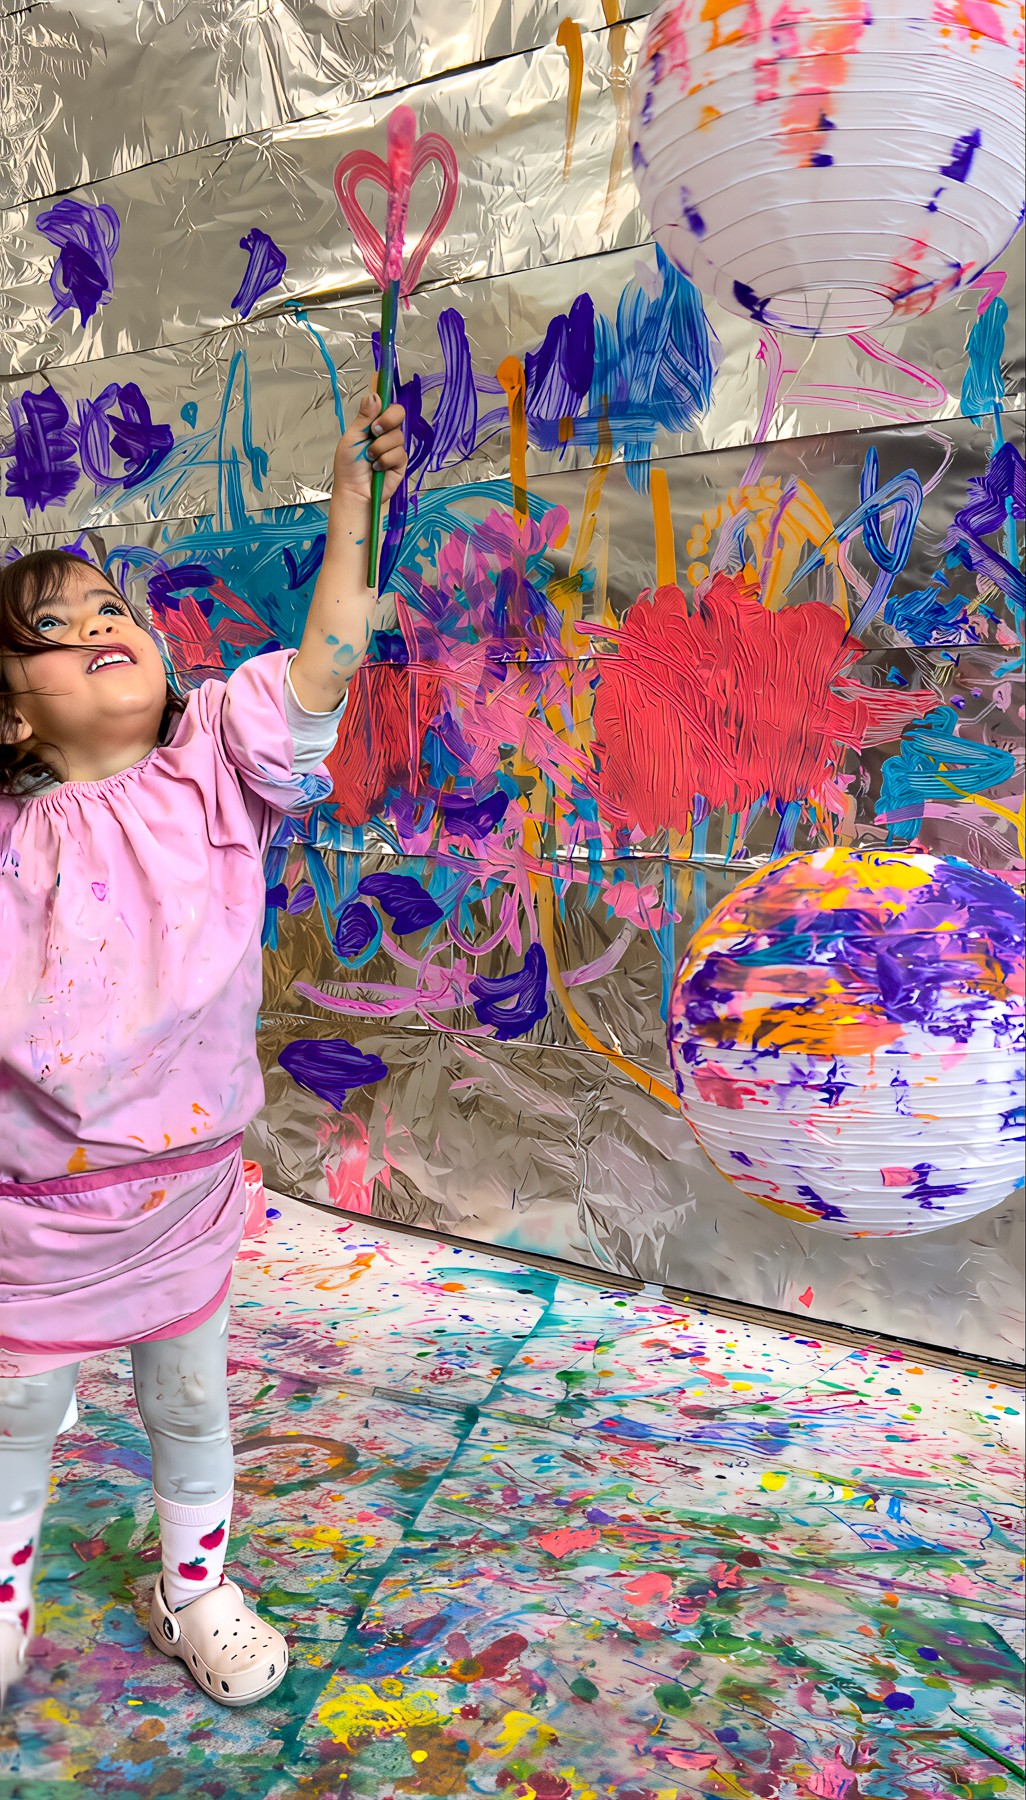
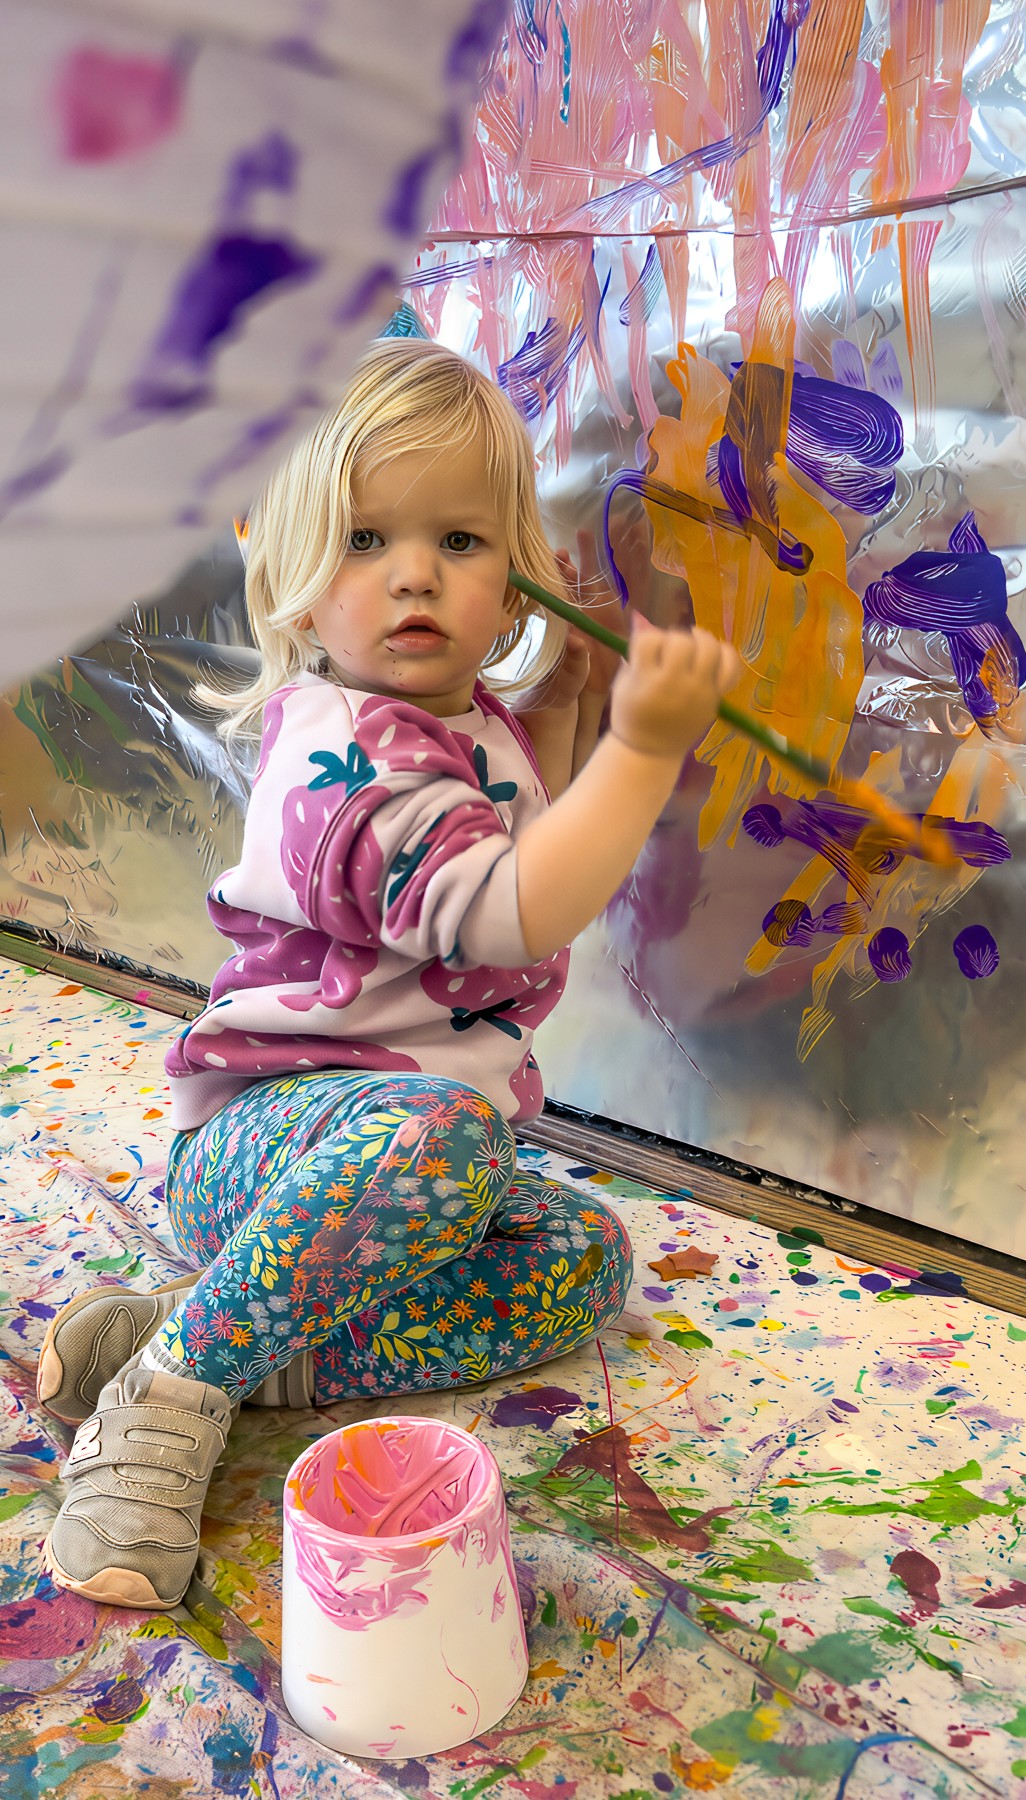
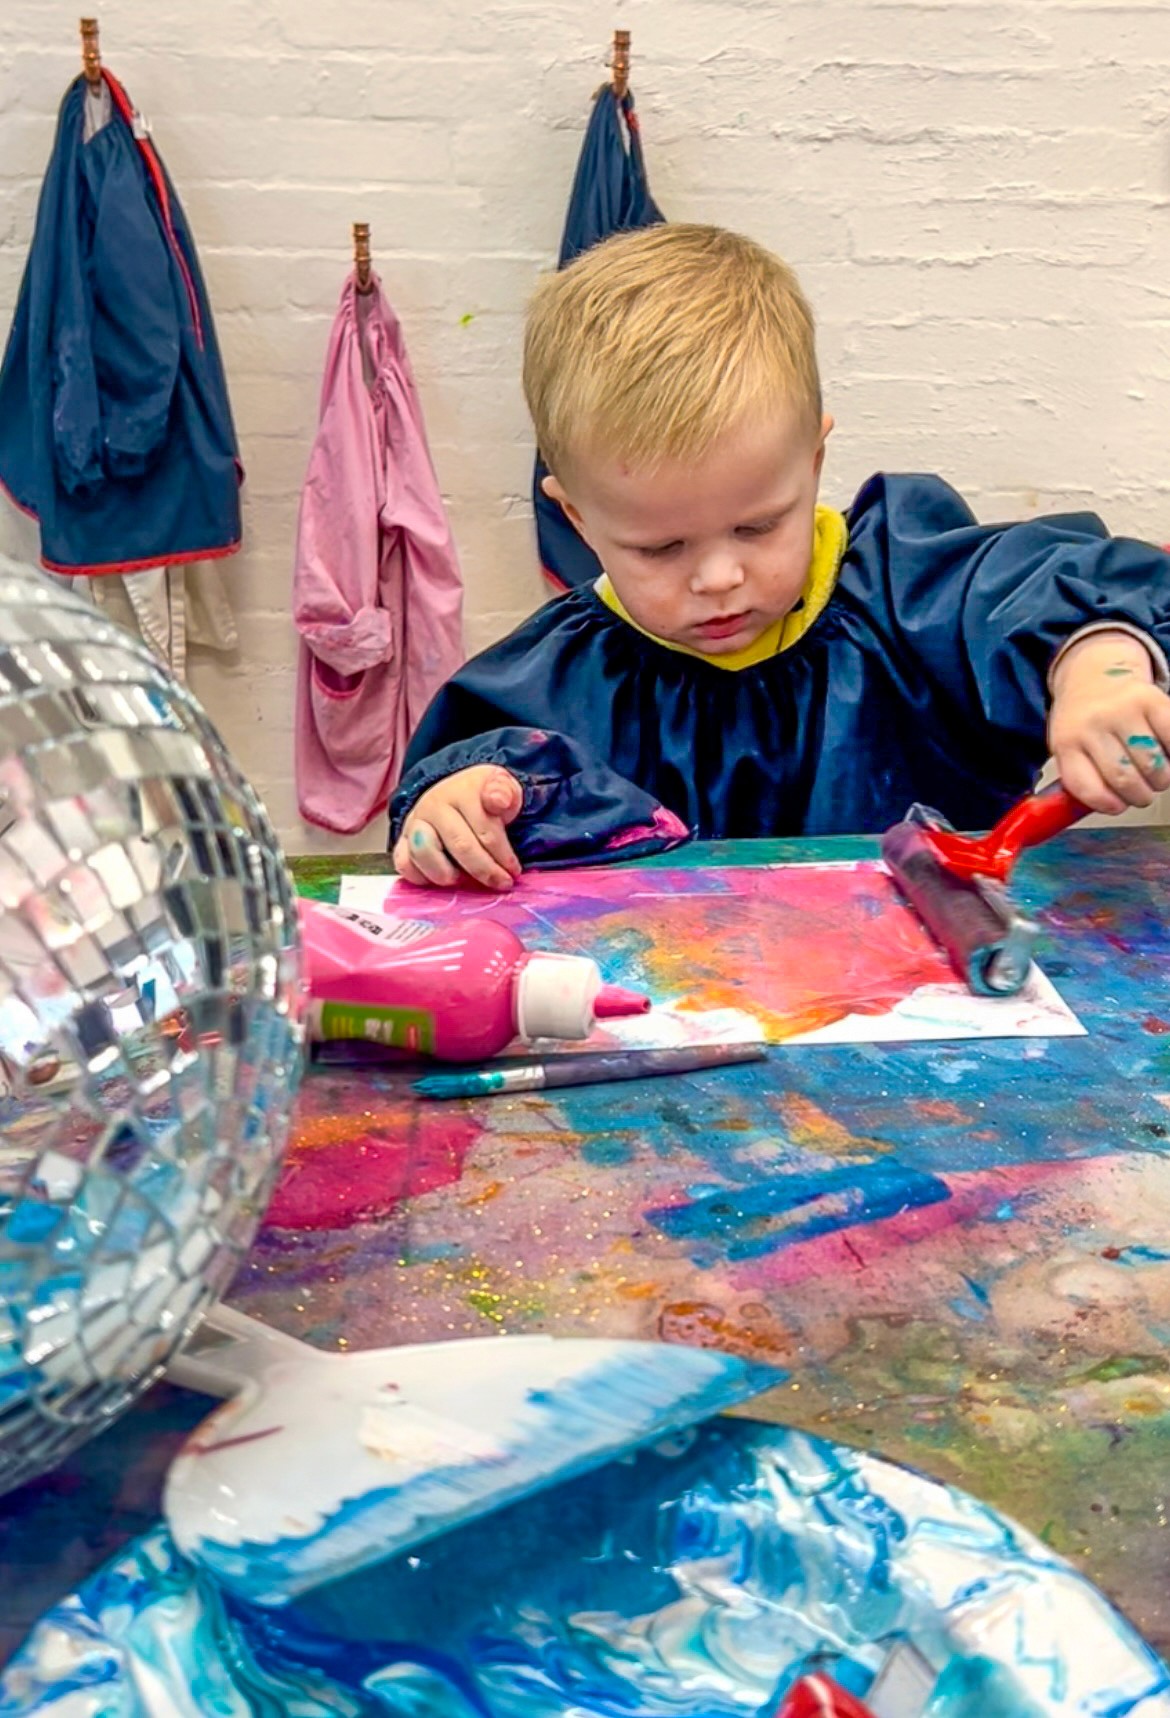
The Disco Room
Light, sound, and colour that move together.
Bookmark
Installations
The Set Up
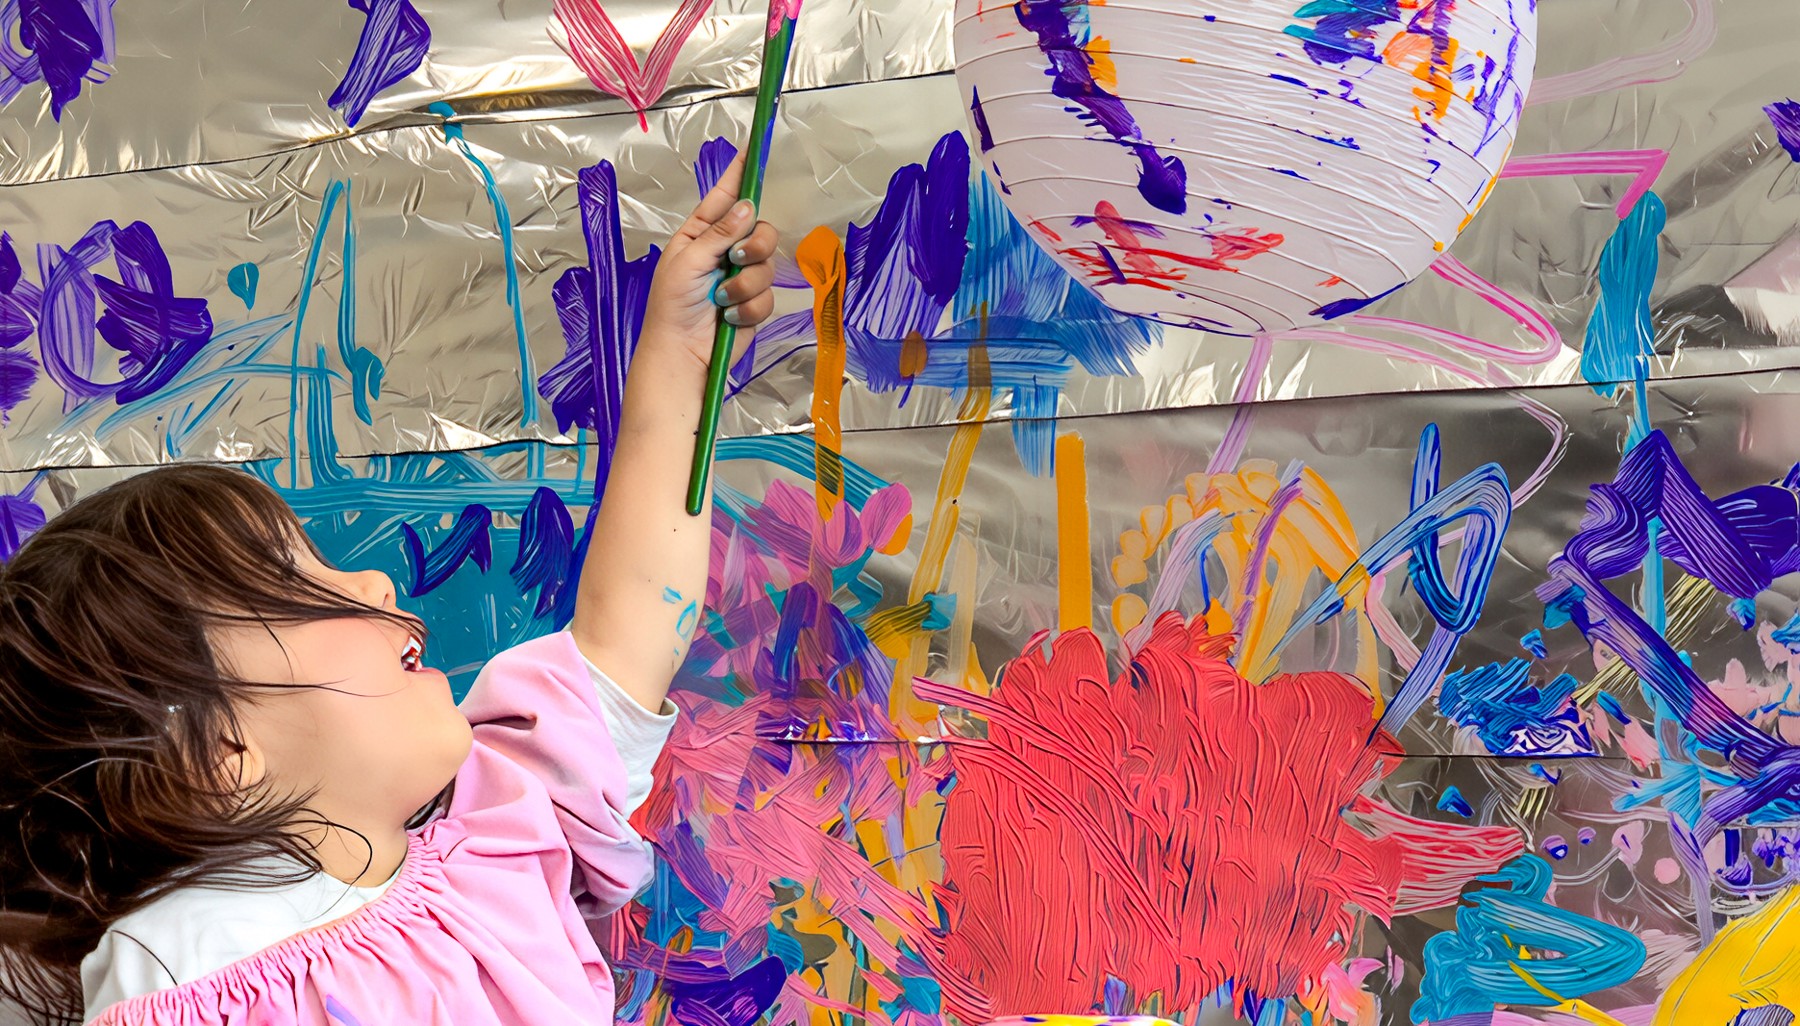
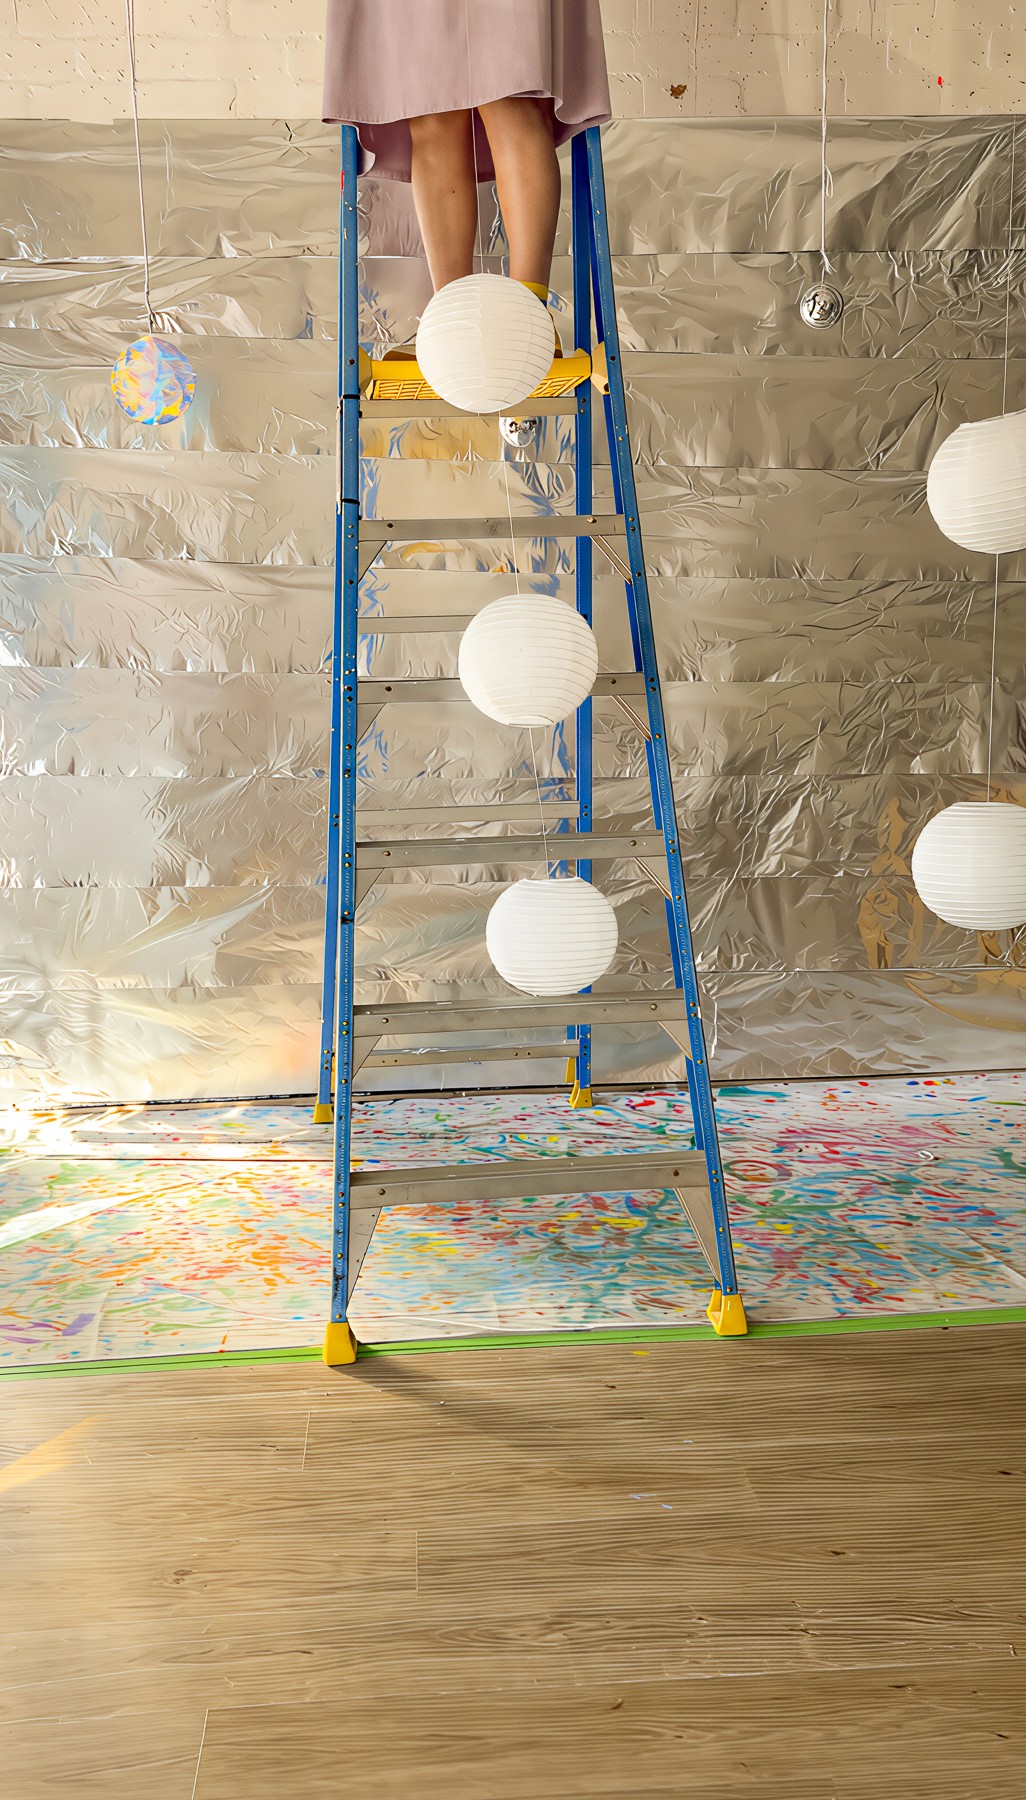
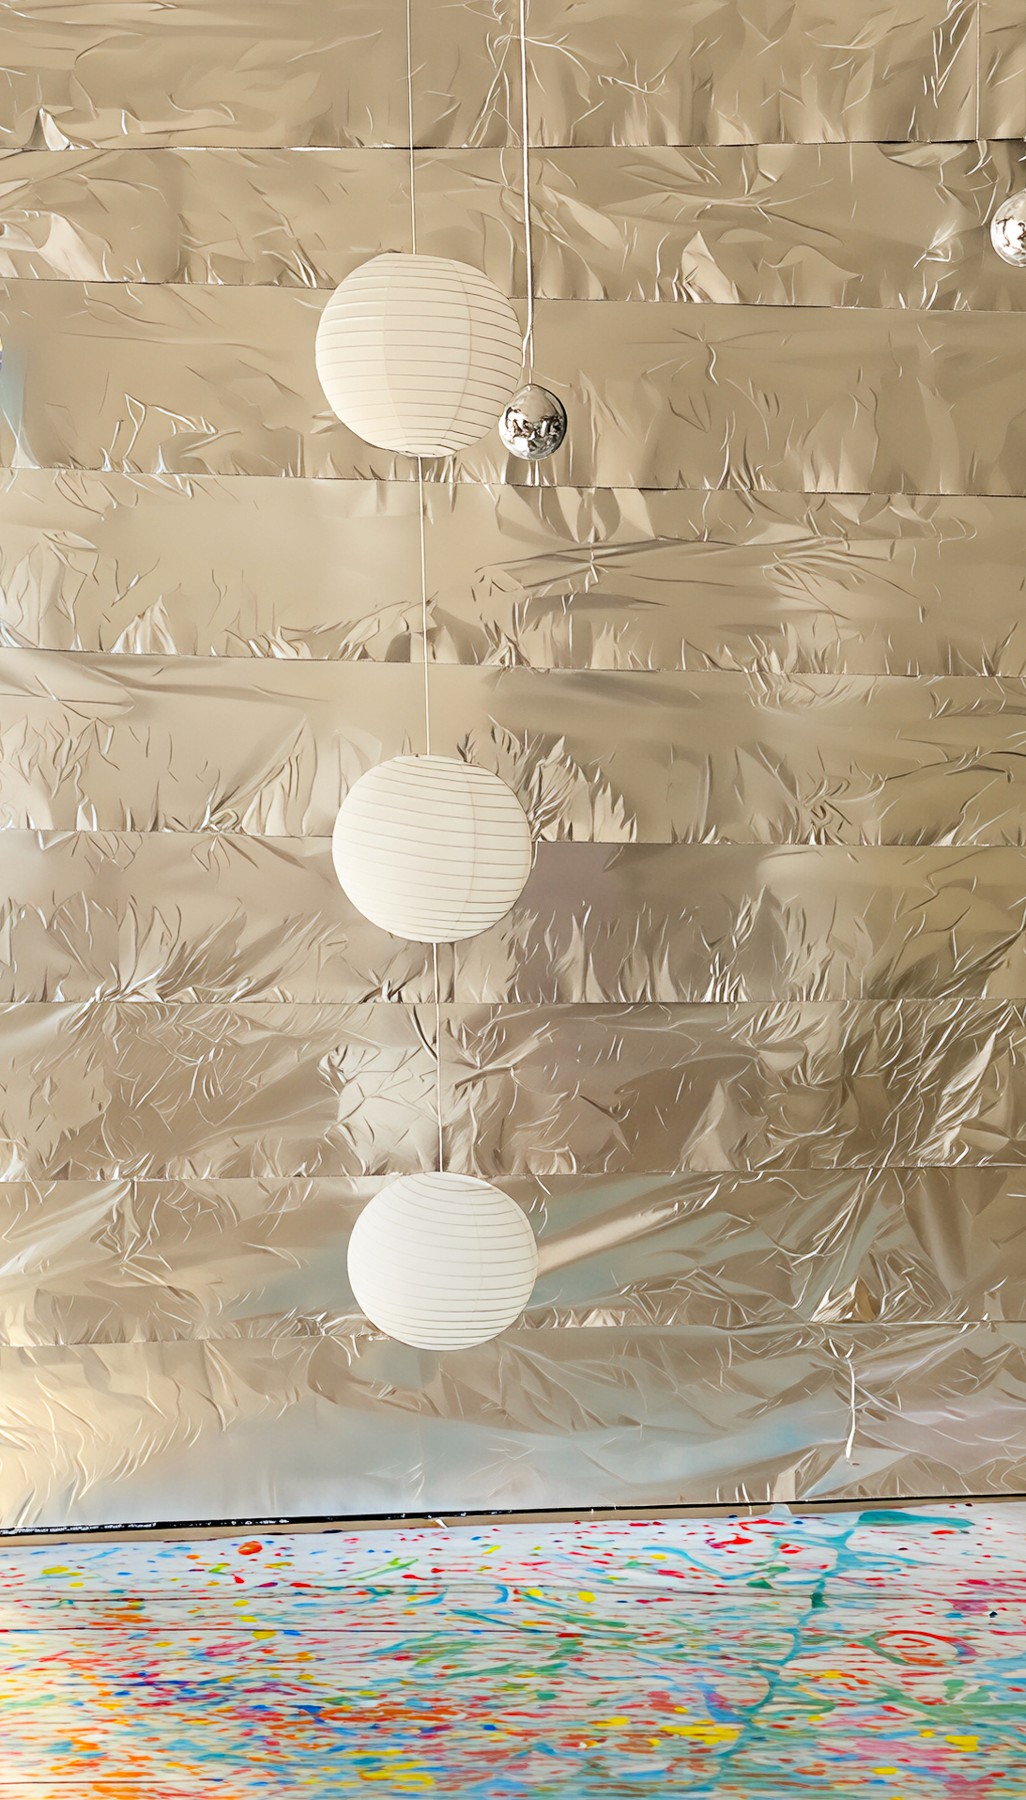
Turn your studio (or creative corner) into a living rhythm. Hang paper lanterns and let them become glowing disco balls with neon paints. Tape rows of foil to the walls so every brushstroke rustles and reflects.
Like with lots of our installations, the trick is movement. Hang the lanterns at different heights so kids can walk through, duck, twirl, and spin. It’s a painting and a dance party all at once!
We always (always) have music playing while we’re creating at Smudge, and it’s especially important this week! Playing a mix of songs while kids paint with different tempos and styles might change their gestures. Long, sweeping strokes for slow songs; quick bursts of colour when the beat drops.
Smudge Tip: Add a bubble machine or disco lights to bounce light across the foil. The space becomes kinetic, almost electric, with energy you can hear and feel.
The Making
Once the brushes hit paint, kids find their own rhythm and start responding to the music: it’s process art you can dance to! The best part? No one’s watching. Everyone’s too busy creating to worry about being neat. Liquid watercolours in spray bottles would also be gorgeous fun here if you wanted to create different sounds and textures as they spray vs paint.
Variations
Hang shiny ribbons, CDs, or tinsel curtains to add shimmer.
Try a glow-in-the-dark version with fluorescent paint.
Project coloured light onto the walls for an instant mood shift.
Materials
Paper lanterns or large cardboard spheres
Foil sheets
Washable poster paints (always with a glug of white!)
String, tape, scissors
Brushes, rollers, sponges
Optional: bubble machine, disco lights, or speaker
Back to Top
The Disco Room
Light, sound, and colour that move together.
Bookmark
Installations
The Set Up
Turn your studio (or creative corner) into a living rhythm. Hang paper lanterns and let them become glowing disco balls with neon paints. Tape rows of foil to the walls so every brushstroke rustles and reflects.
Like with lots of our installations, the trick is movement. Hang the lanterns at different heights so kids can walk through, duck, twirl, and spin. It’s a painting and a dance party all at once!
We always (always) have music playing while we’re creating at Smudge, and it’s especially important this week! Playing a mix of songs while kids paint with different tempos and styles might change their gestures. Long, sweeping strokes for slow songs; quick bursts of colour when the beat drops.
Smudge Tip: Add a bubble machine or disco lights to bounce light across the foil. The space becomes kinetic, almost electric, with energy you can hear and feel.
The Making
Once the brushes hit paint, kids find their own rhythm and start responding to the music: it’s process art you can dance to! The best part? No one’s watching. Everyone’s too busy creating to worry about being neat. Liquid watercolours in spray bottles would also be gorgeous fun here if you wanted to create different sounds and textures as they spray vs paint.
Variations
Hang shiny ribbons, CDs, or tinsel curtains to add shimmer.
Try a glow-in-the-dark version with fluorescent paint.
Project coloured light onto the walls for an instant mood shift.
Materials
Paper lanterns or large cardboard spheres
Foil sheets
Washable poster paints (always with a glug of white!)
String, tape, scissors
Brushes, rollers, sponges
Optional: bubble machine, disco lights, or speaker
Back to Top
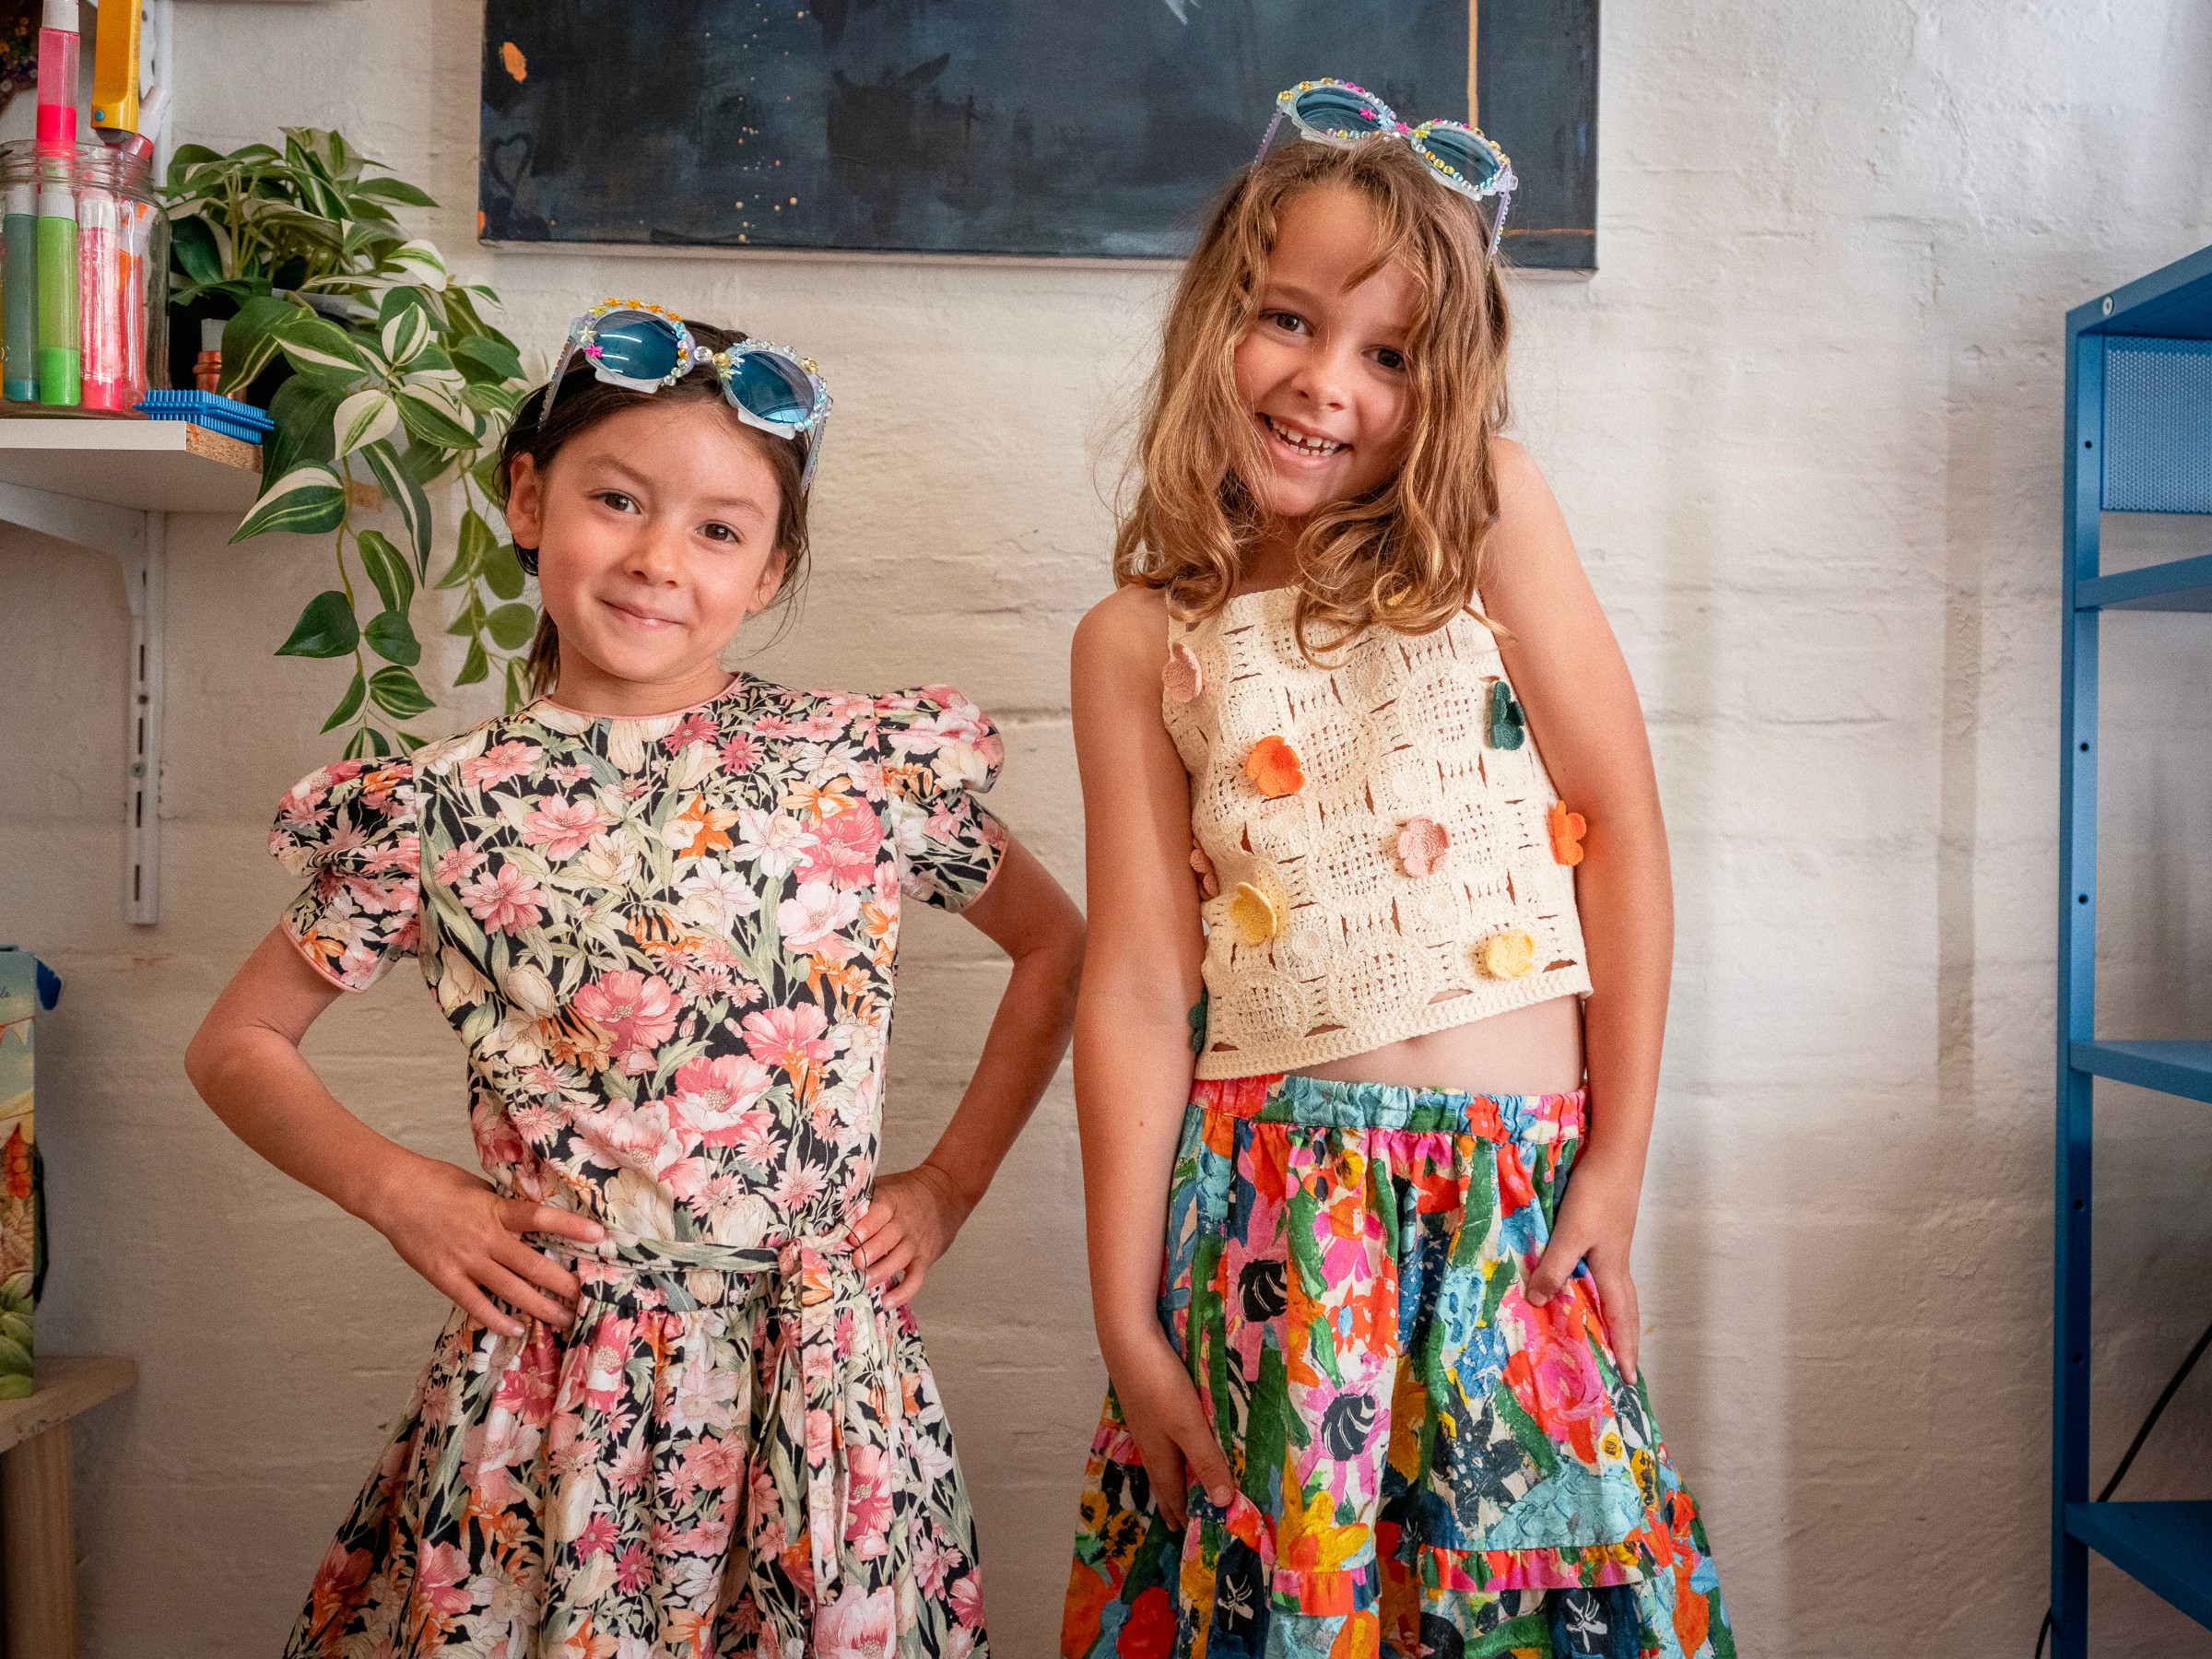
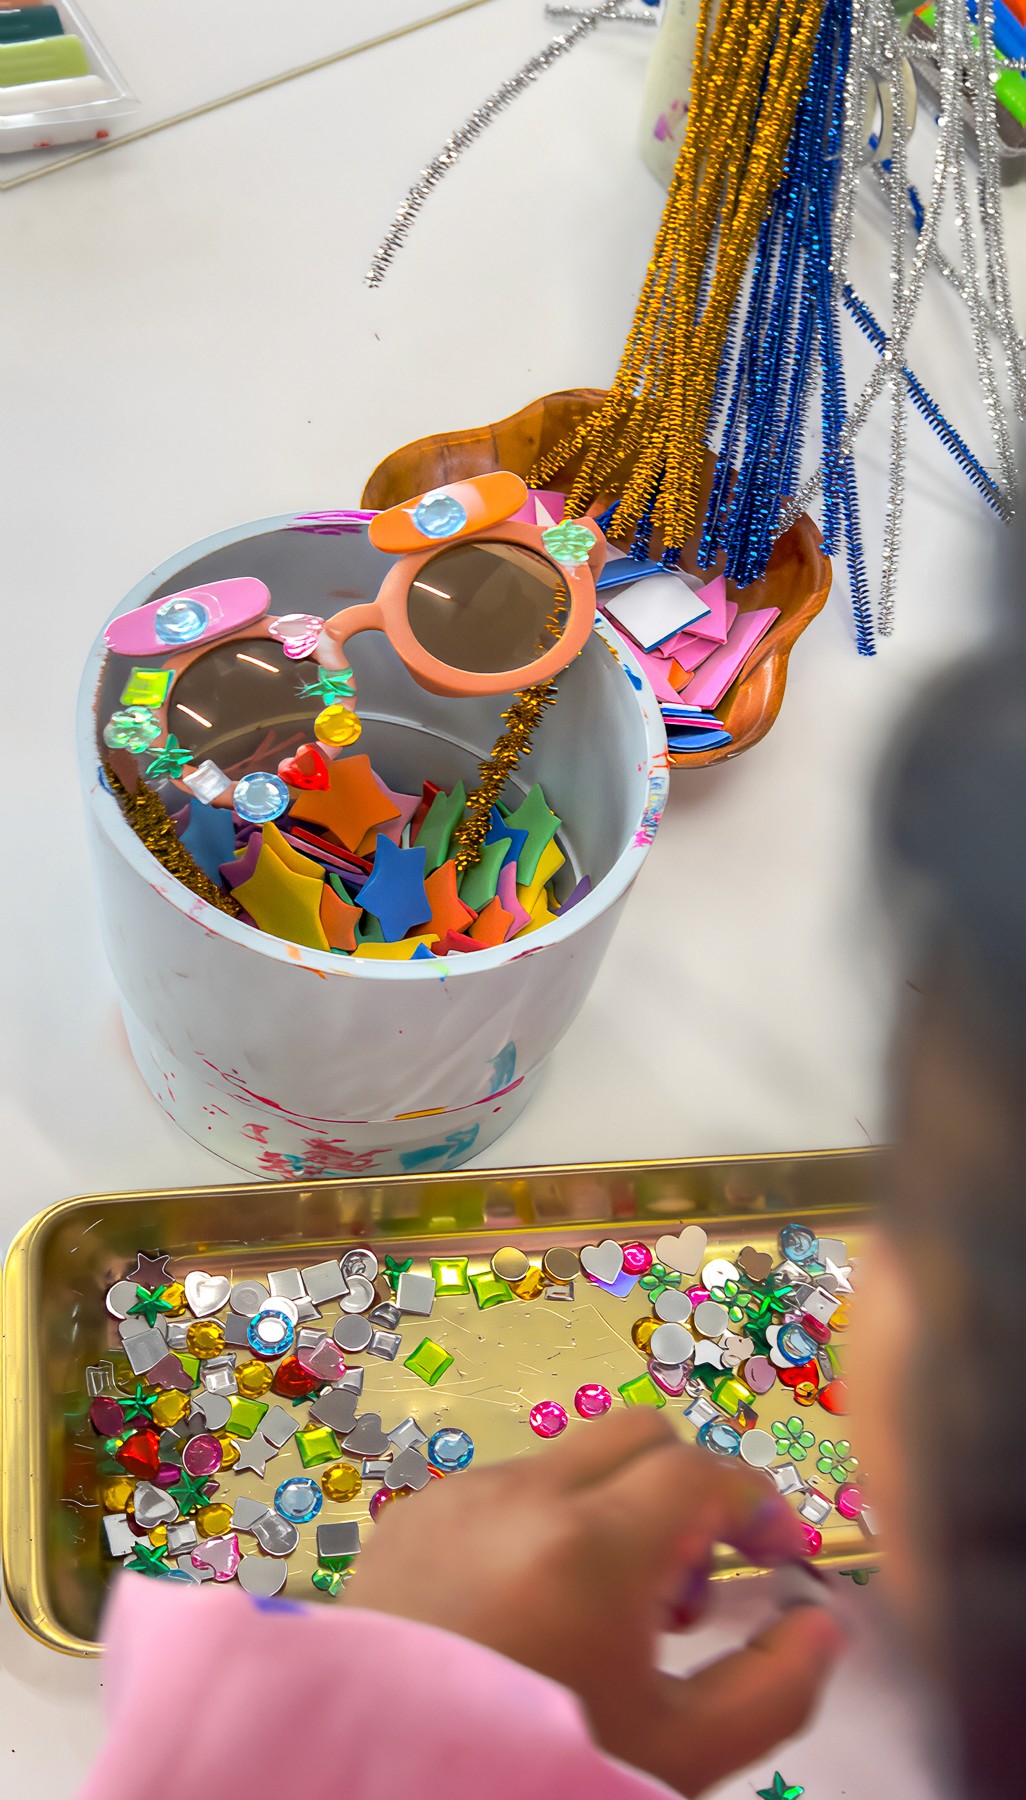
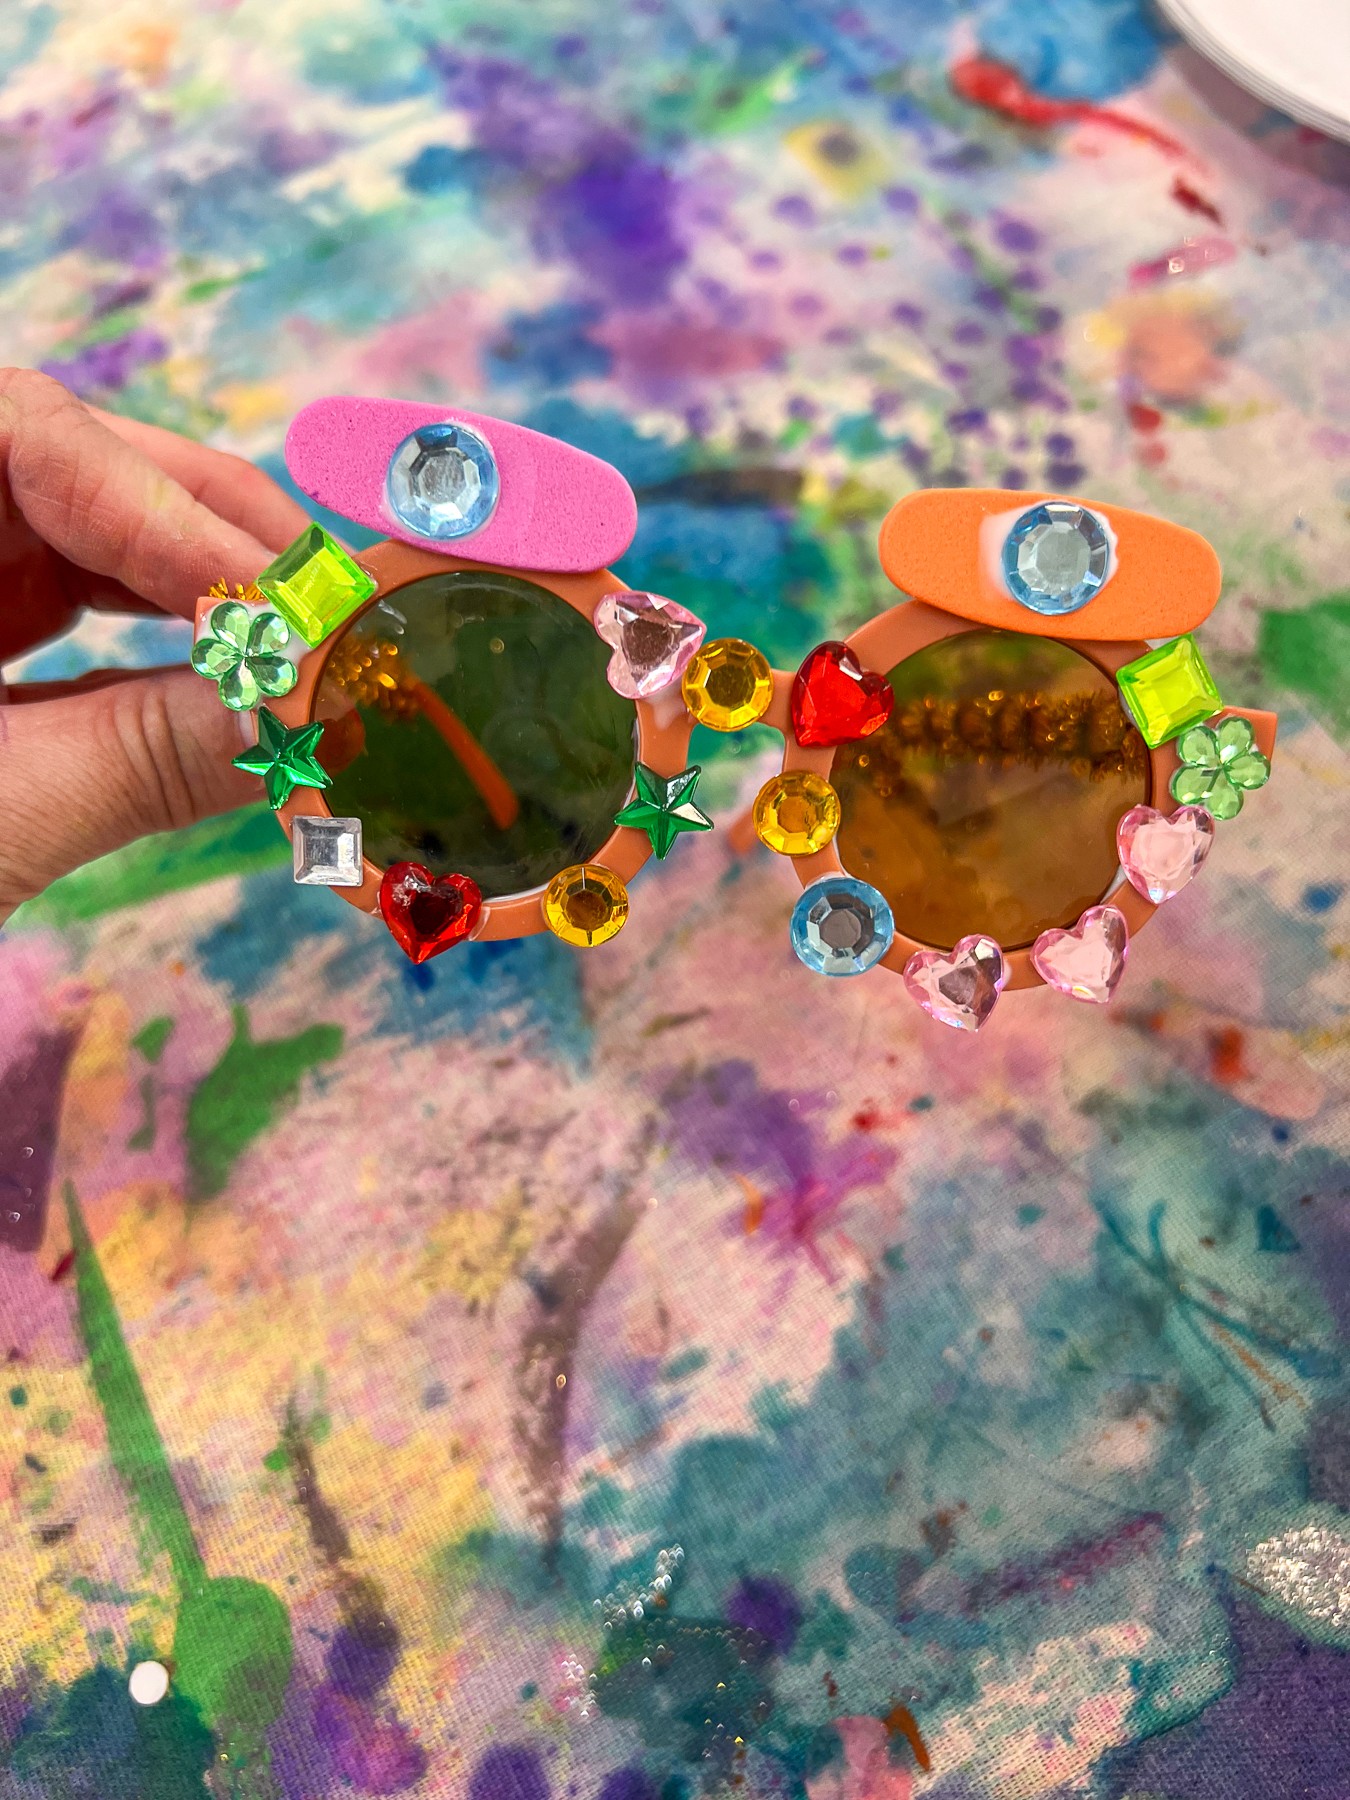
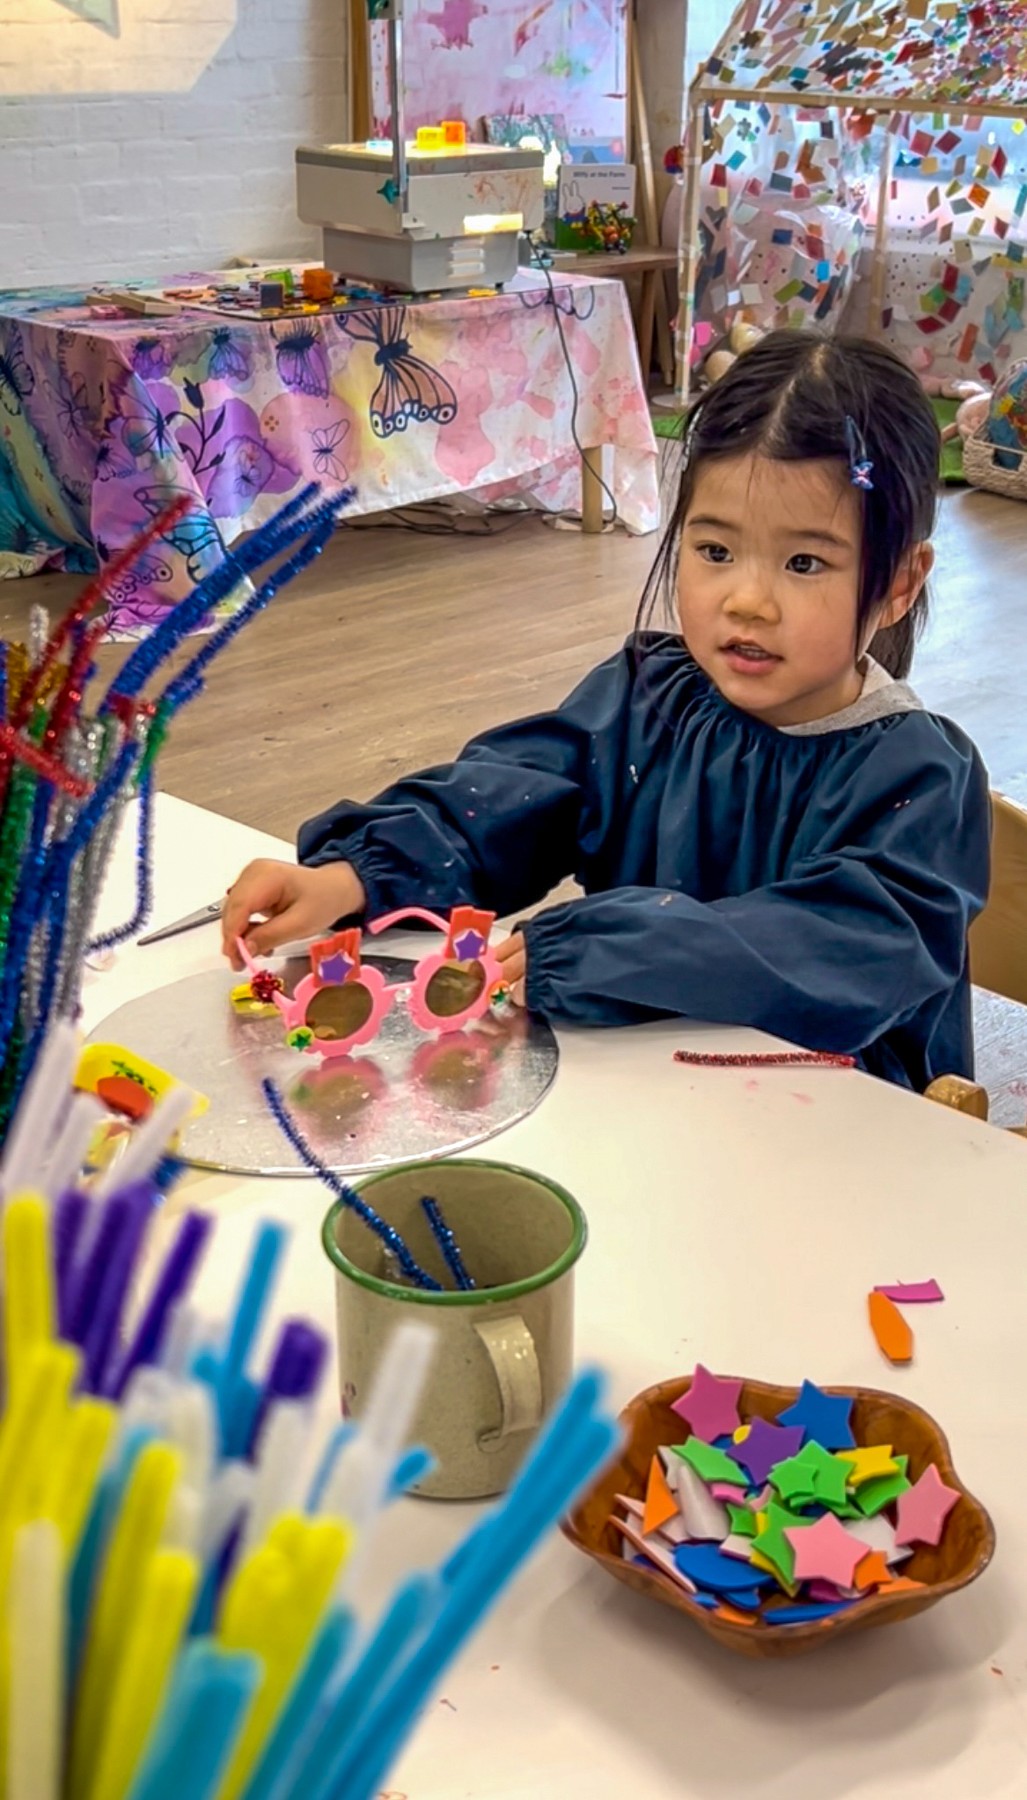
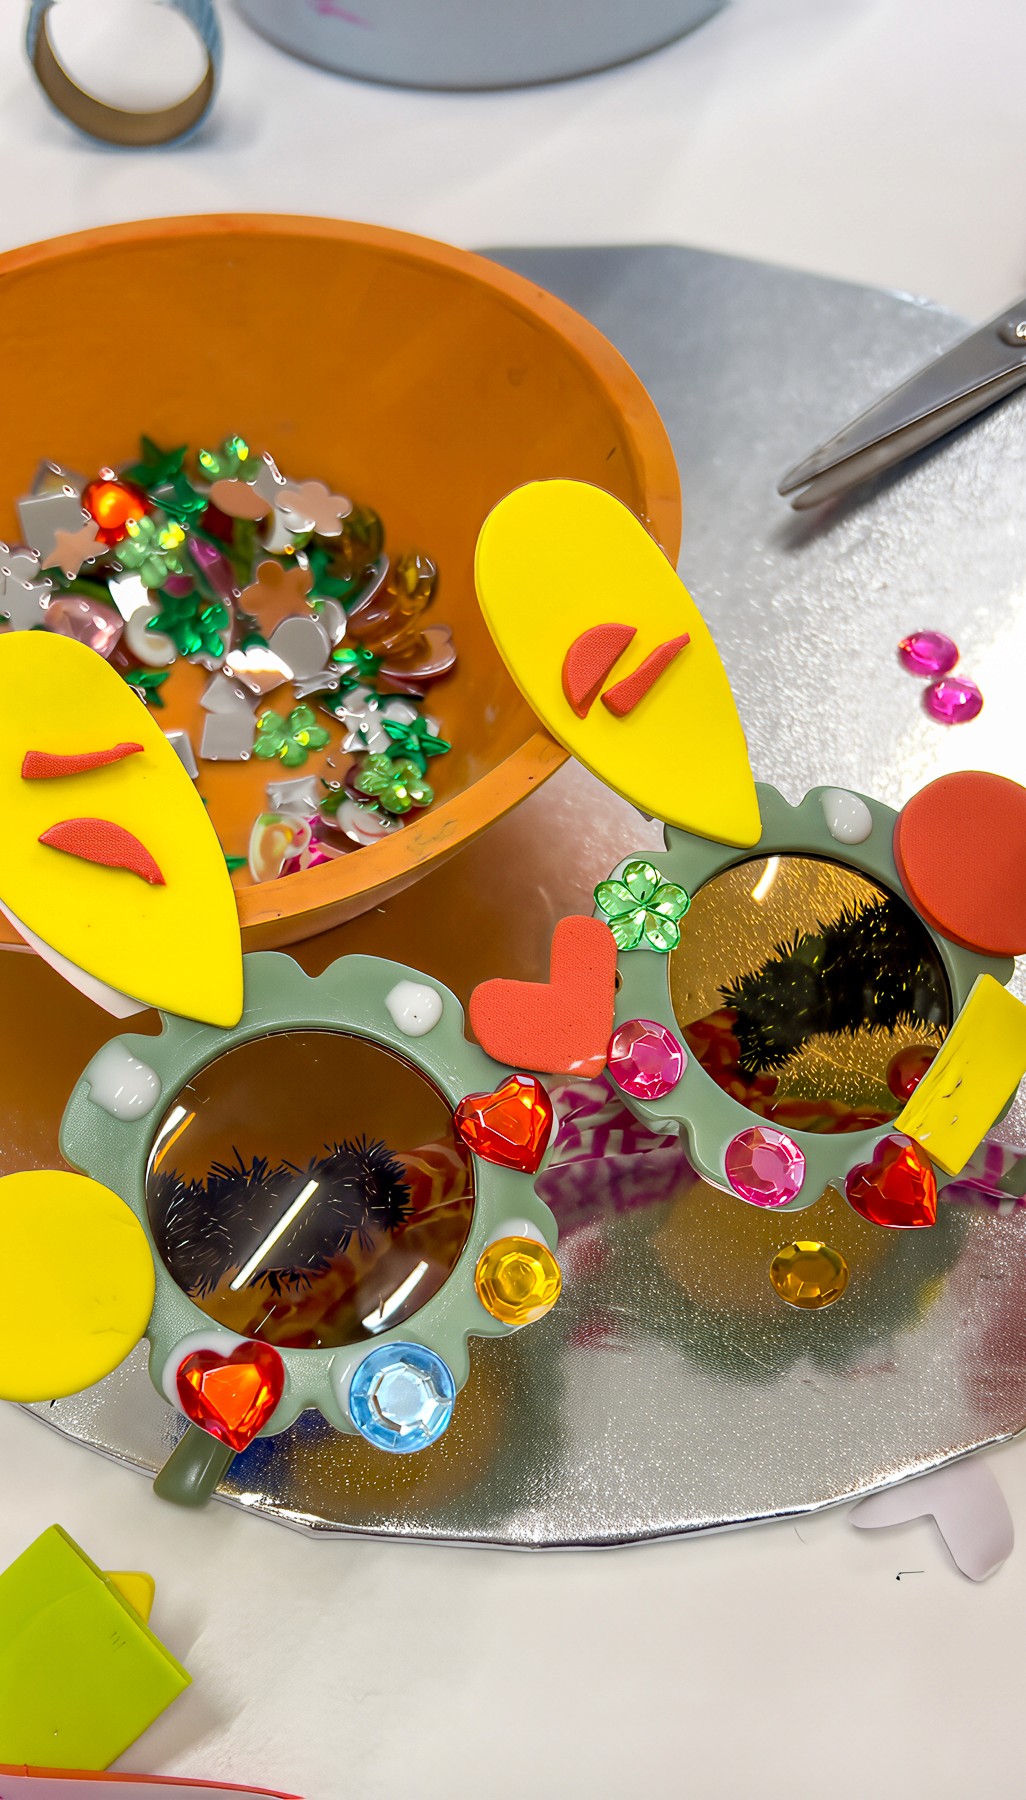
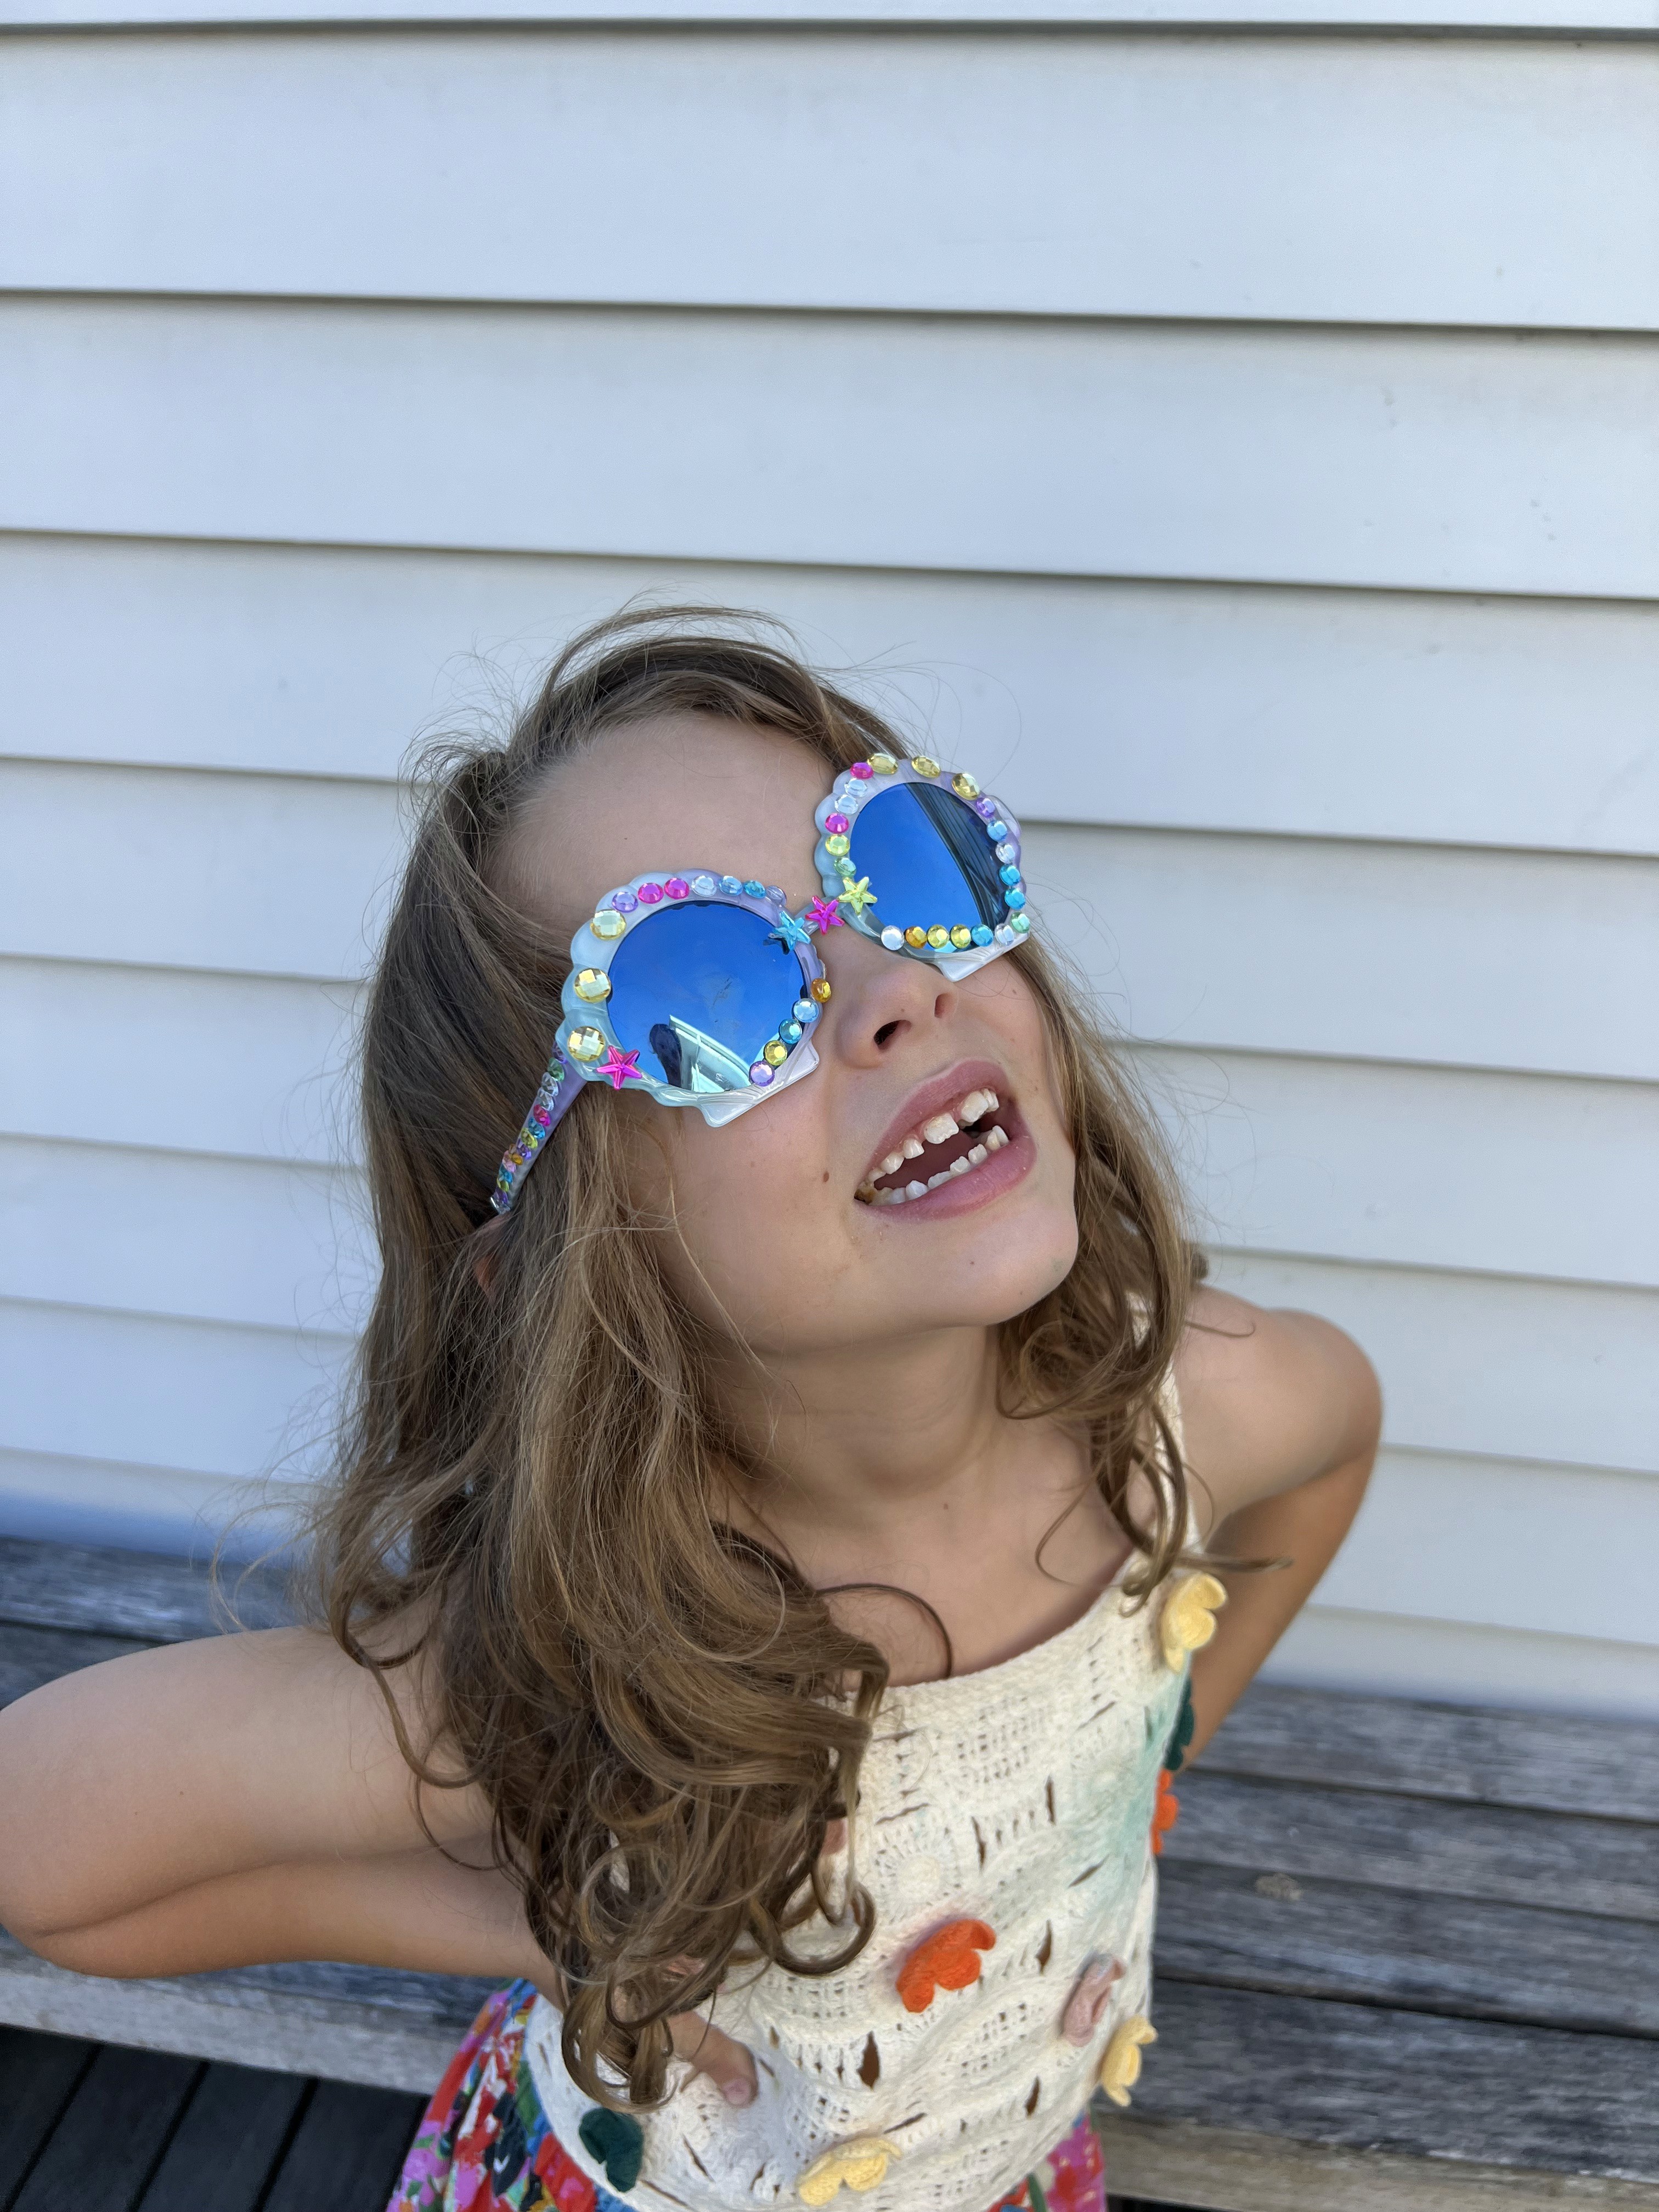
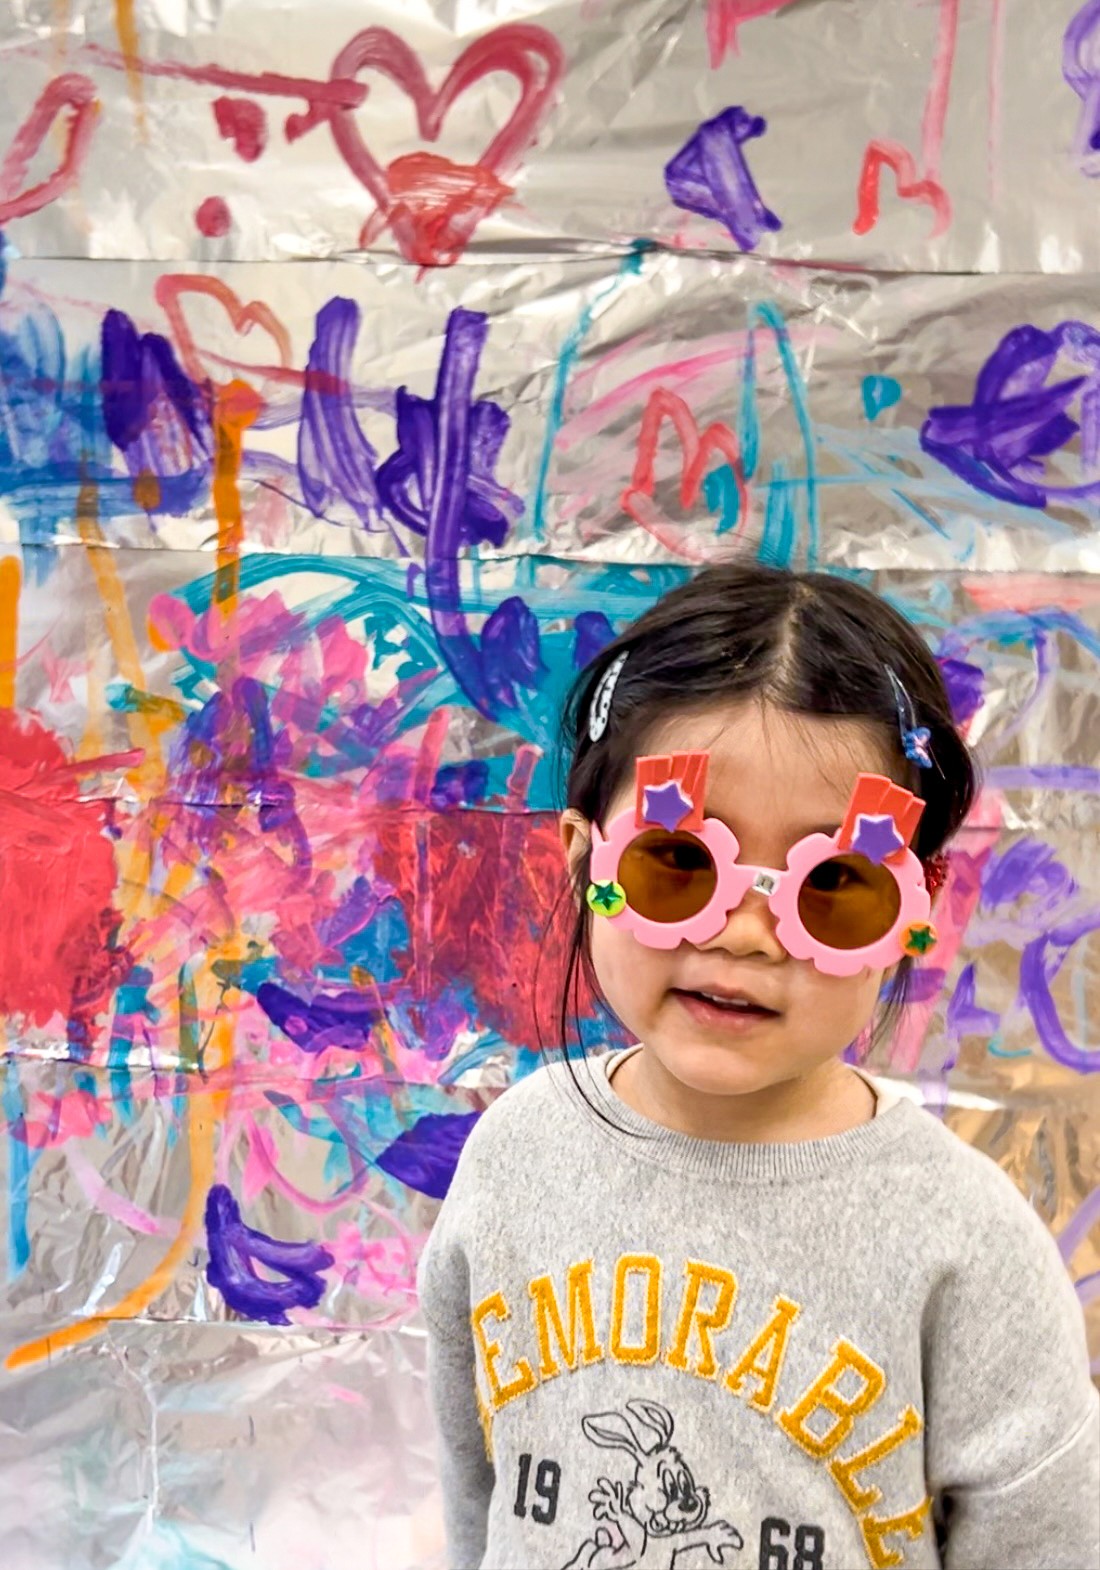
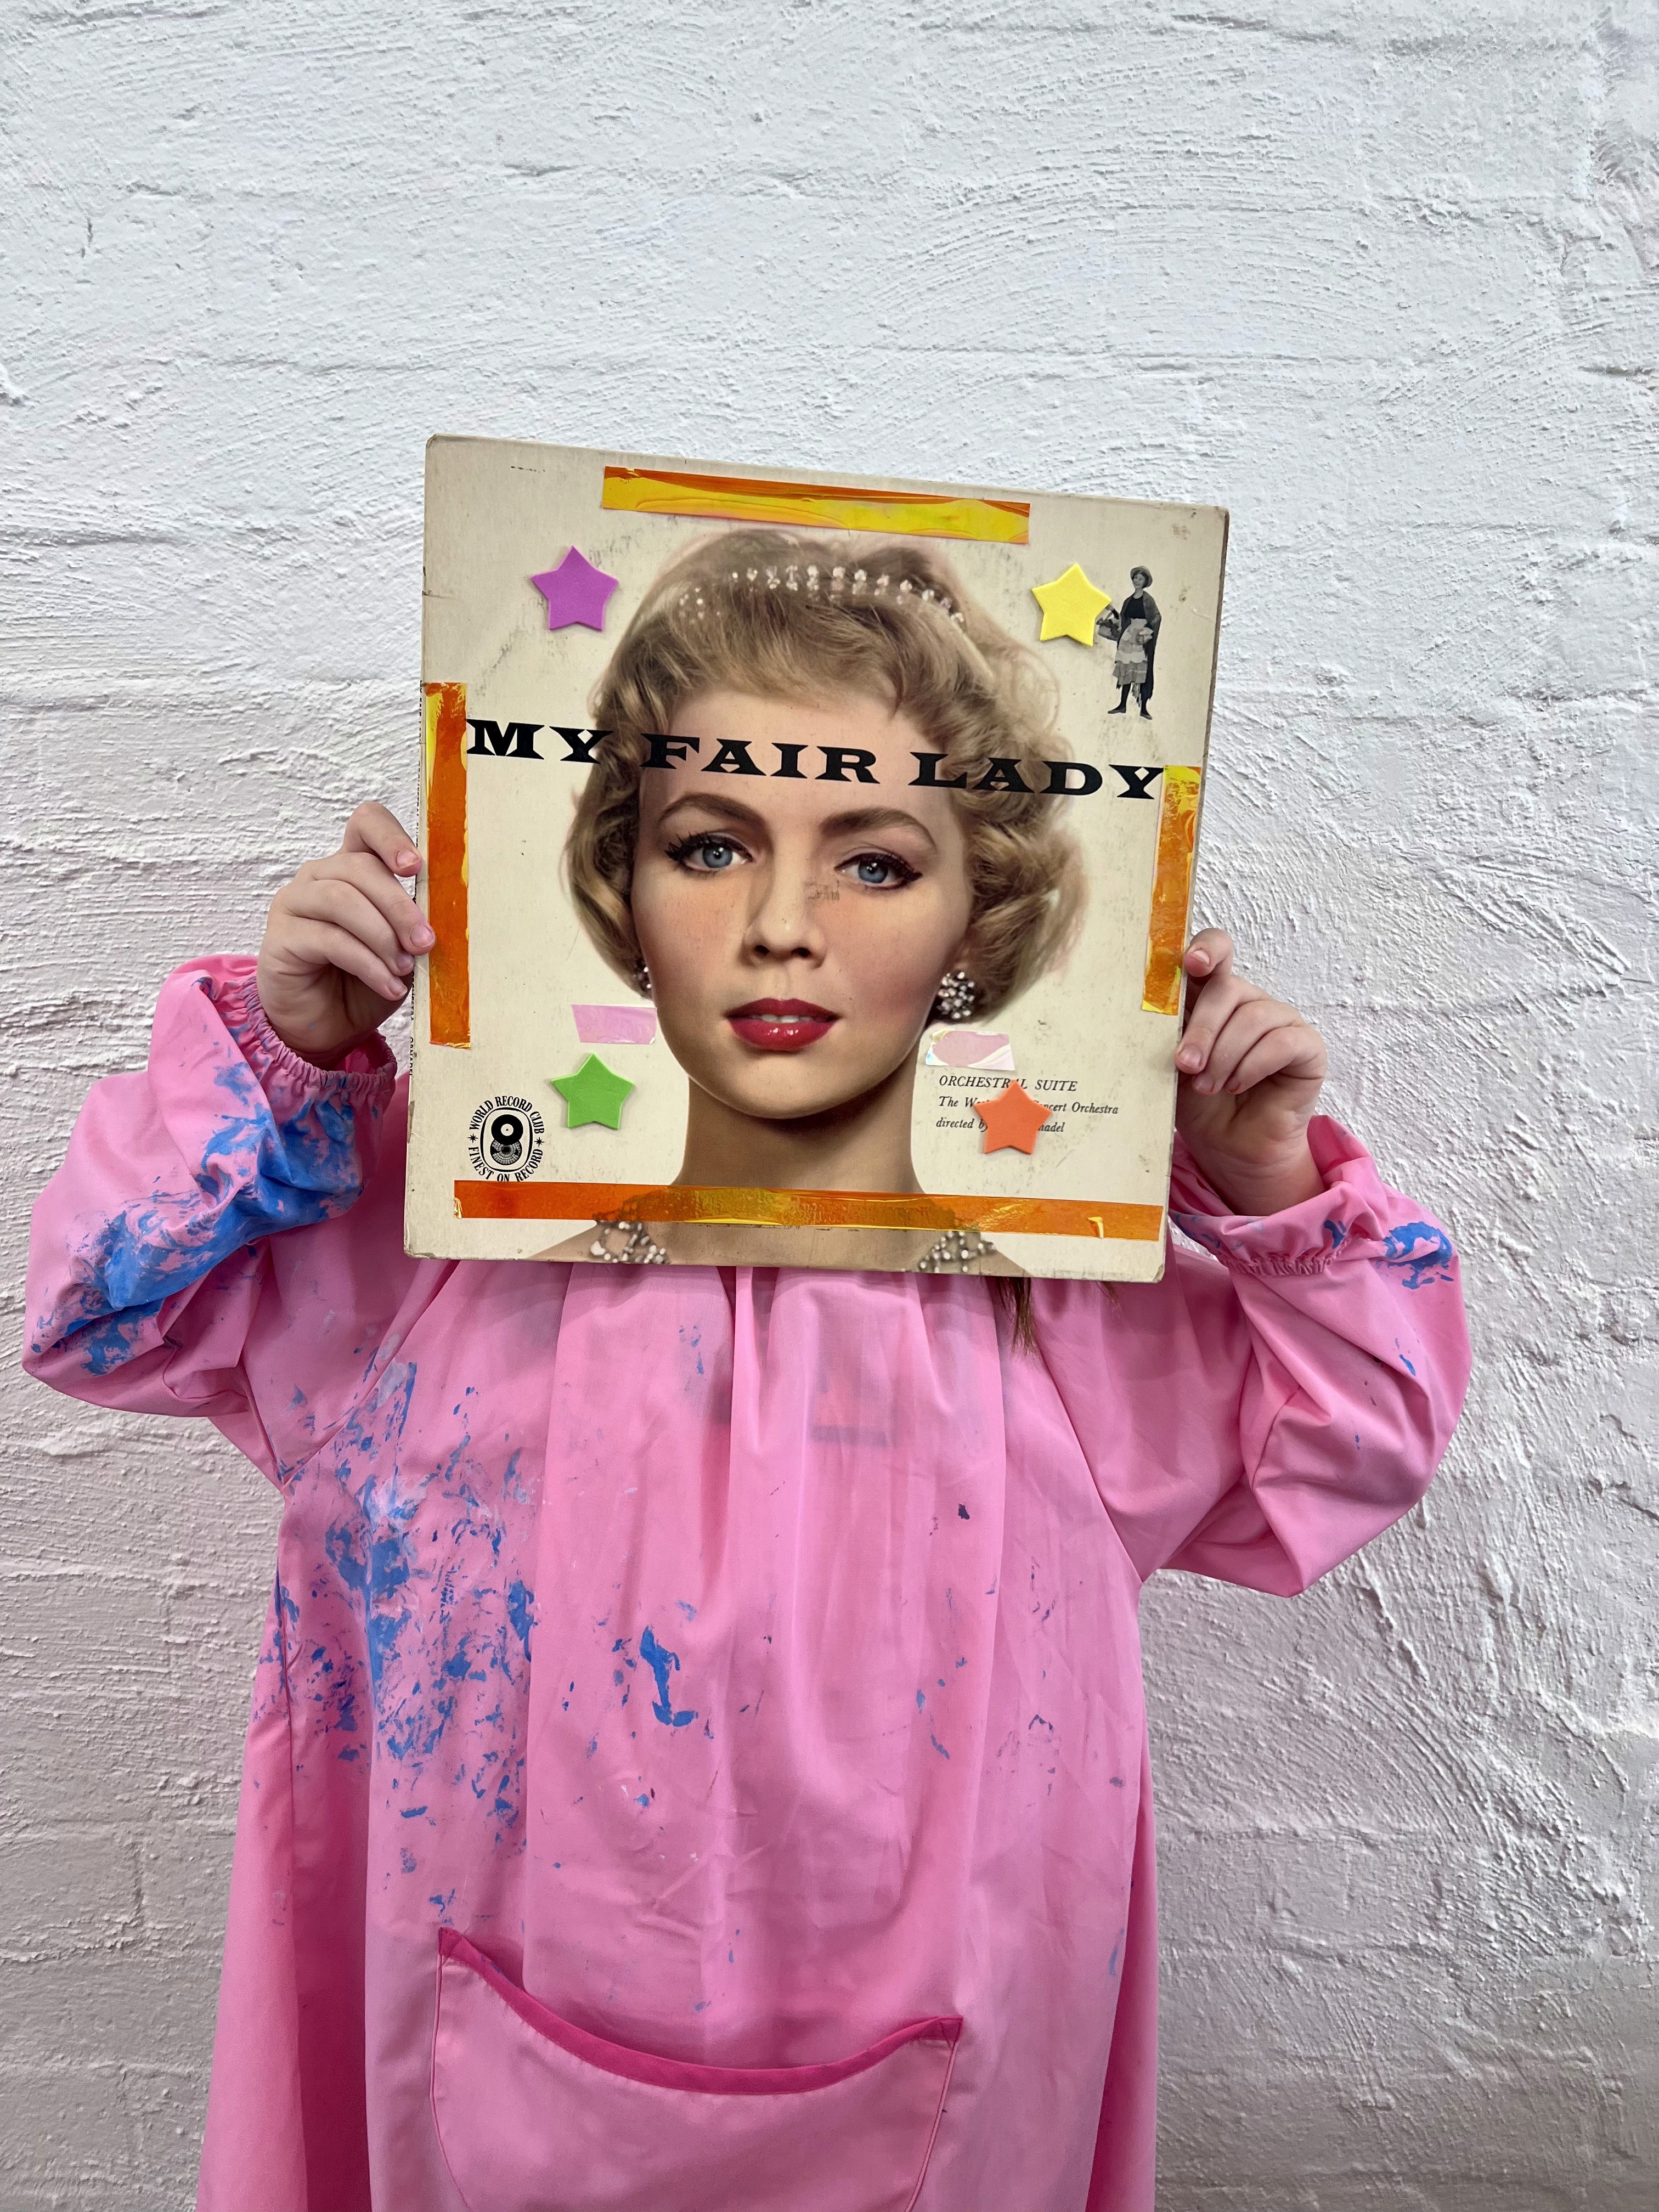
Pop Star Glasses
Inspired by Rachel Burke (imakestagram)
Ages 3 - 12
Bookmark
Sculpture
Artist Study
Rachel Burke is craft royalty here in Australia: her world is joy, tinsel, and unapologetic colour. She reminds us that art doesn’t need to whisper. It can sparkle and sing and shine (all at the same time!).
The Set Up
Set the table like a dressing room before a big show. Sunglasses in all different shapes and colours, trays of self-adhesive jewels, sequins, and foam ready to be cut and transformed.
Little desk mirrors help too because once kids see themselves mid-creation, their confidence skyrockets and the giggles start flowing.

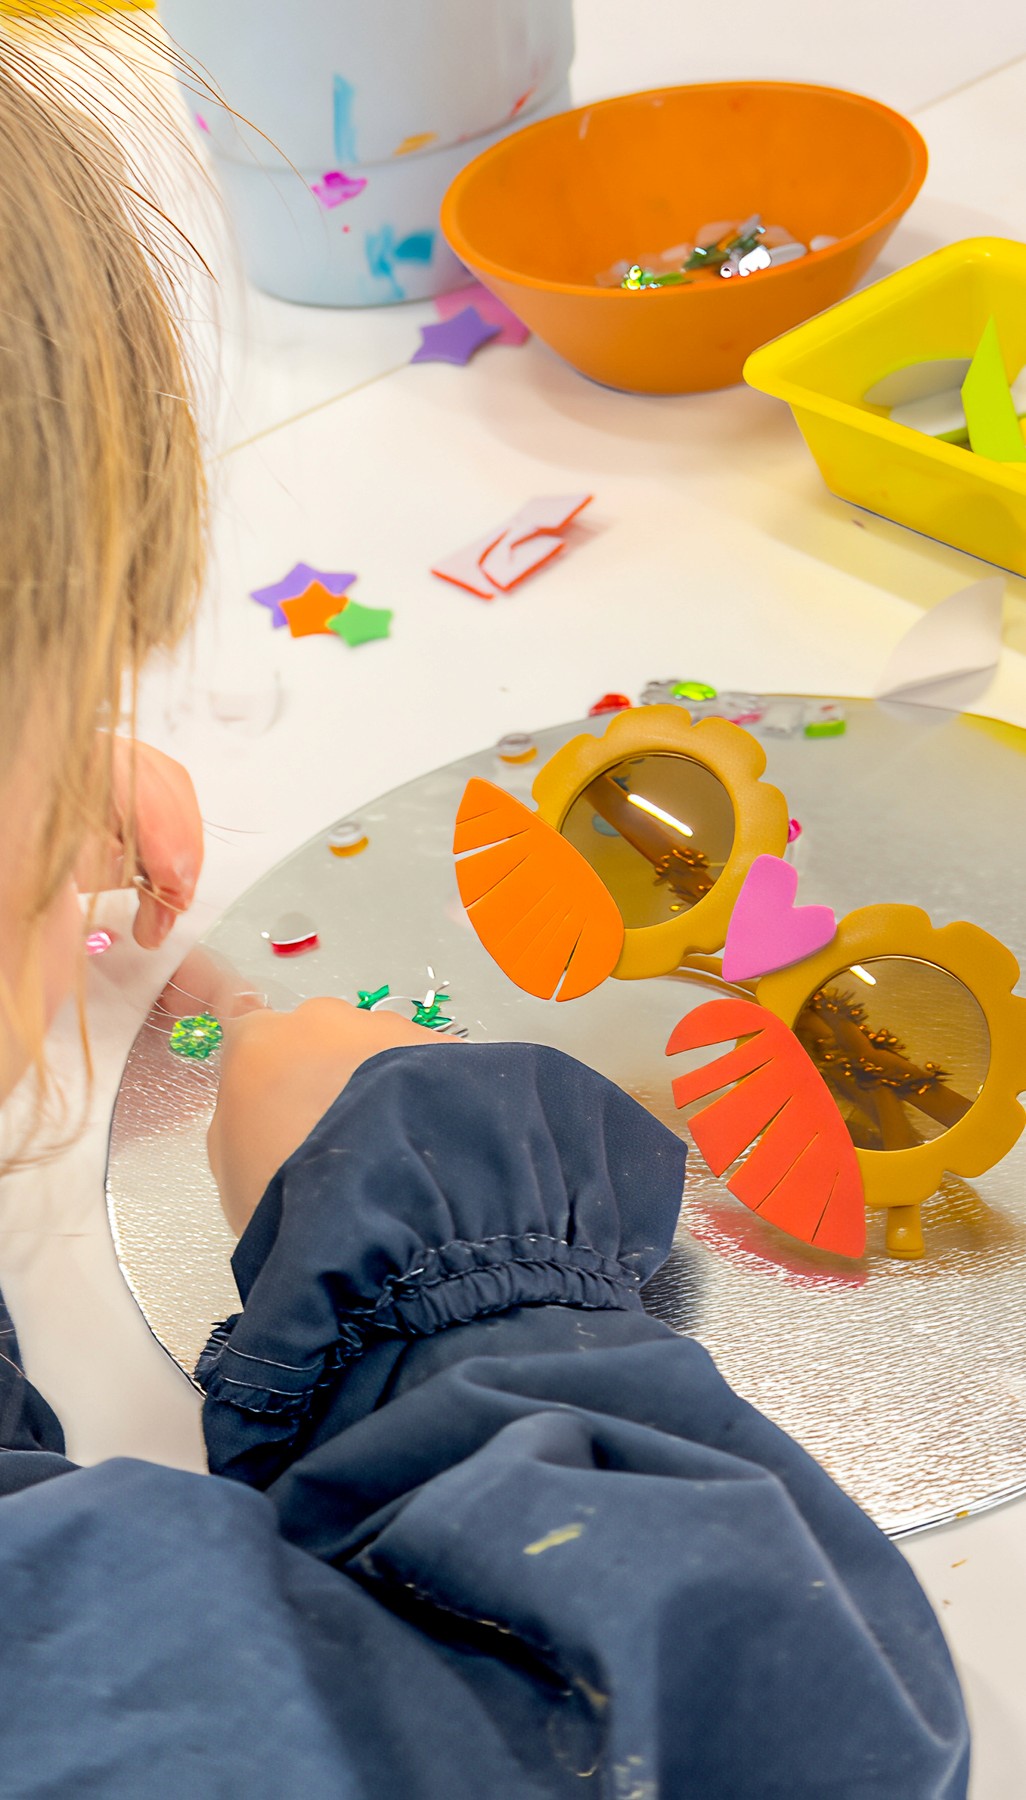
The Making
Encourage the kids to design their own pop-star persona; glitter, gems, lightning bolts, the works. It’s wearable art meets performance art. The process itself feels like rehearsing for a concert, full of laughter and swagger.
Smudge Tip: For an extra layer of play, film a “press conference” or photo booth moment once they’re done. It turns the whole table into a stage.
Variations
Try headbands, crowns, or microphones instead of glasses.
Set up a mini “red carpet” with a roll of paper for their debut.

Materials
Sunglasses (bulk packs or thrifted finds)
Self-adhesive jewels, sequins, foam sheets, glitter
Scissors, glue, felt or paper scraps
Mirrors or a camera for photos
Back to Top
Pop Star Glasses
Inspired by Rachel Burke (imakestagram)
Bookmark
Sculpture
Artist Study
Rachel Burke is craft royalty here in Australia: her world is joy, tinsel, and unapologetic colour. She reminds us that art doesn’t need to whisper. It can sparkle and sing and shine (all at the same time!).
The Set Up
Set the table like a dressing room before a big show. Sunglasses in all different shapes and colours, trays of self-adhesive jewels, sequins, and foam ready to be cut and transformed.
Little desk mirrors help too because once kids see themselves mid-creation, their confidence skyrockets and the giggles start flowing.
The Making
Encourage the kids to design their own pop-star persona; glitter, gems, lightning bolts, the works. It’s wearable art meets performance art. The process itself feels like rehearsing for a concert, full of laughter and swagger.
Smudge Tip: For an extra layer of play, film a “press conference” or photo booth moment once they’re done. It turns the whole table into a stage.
Variations
Try headbands, crowns, or microphones instead of glasses.
Set up a mini “red carpet” with a roll of paper for their debut.
Materials
Sunglasses (bulk packs or thrifted finds)
Self-adhesive jewels, sequins, foam sheets, glitter
Scissors, glue, felt or paper scraps
Mirrors or a camera for photos
Back to Top
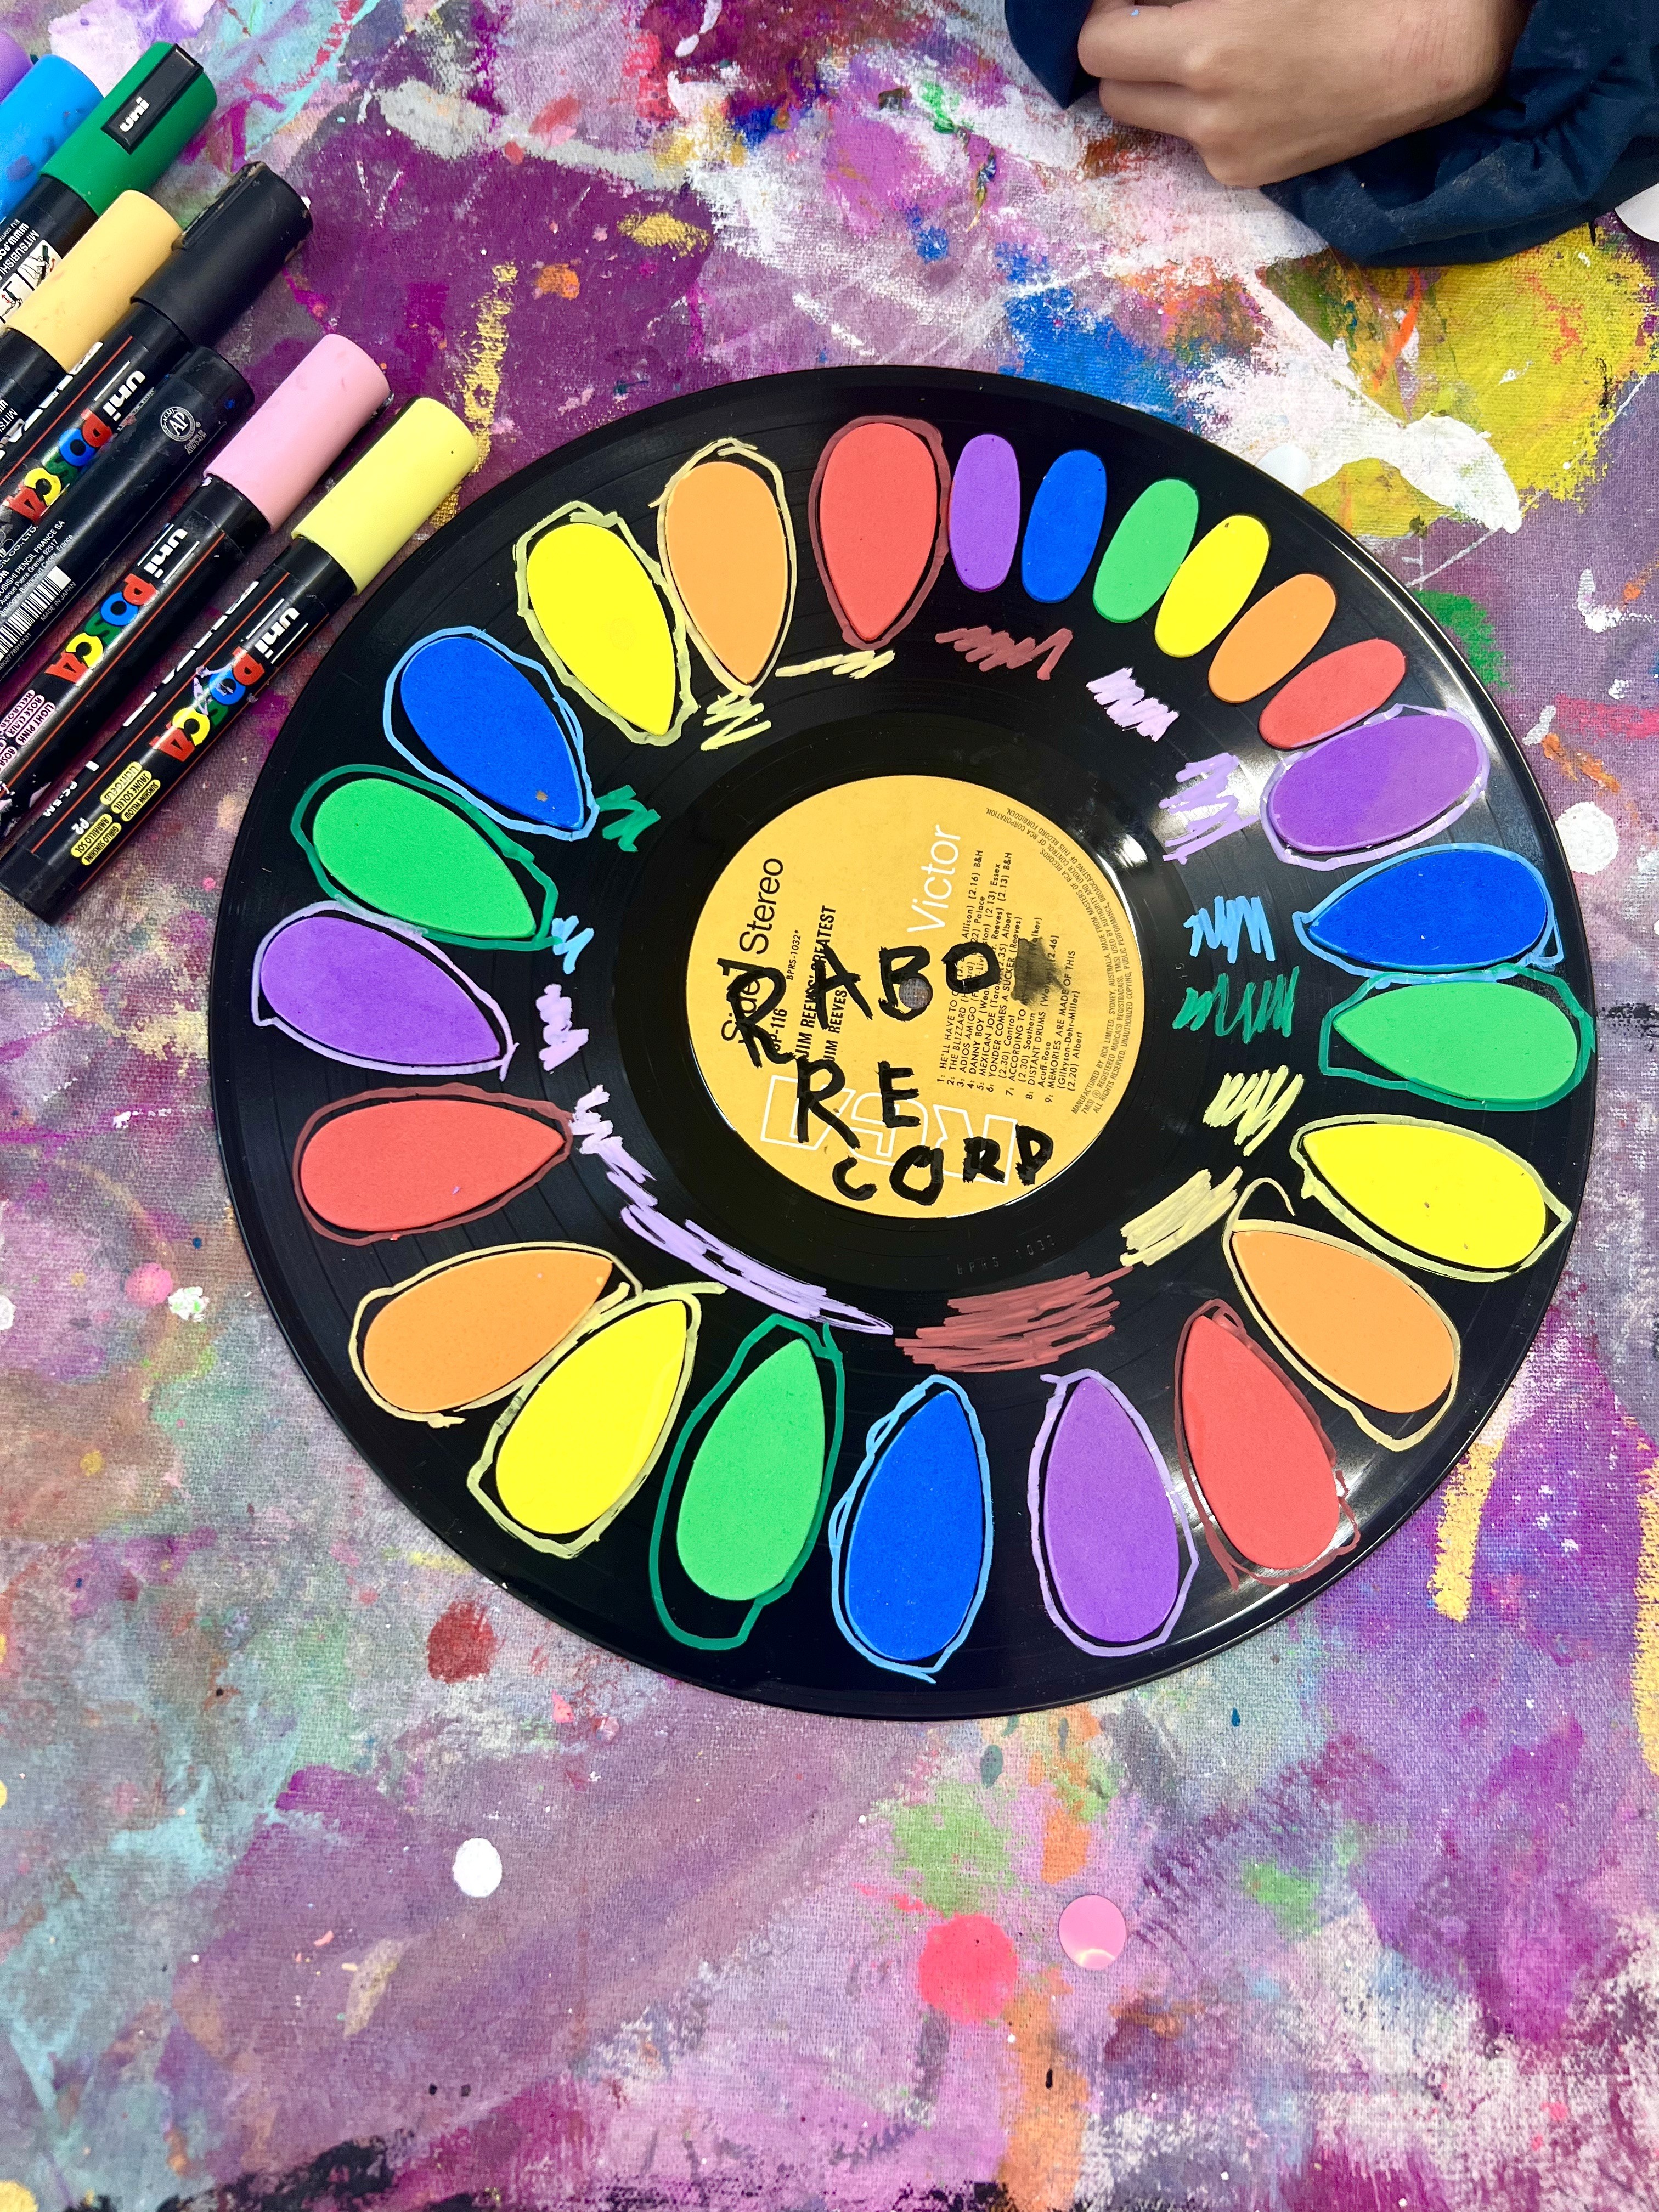
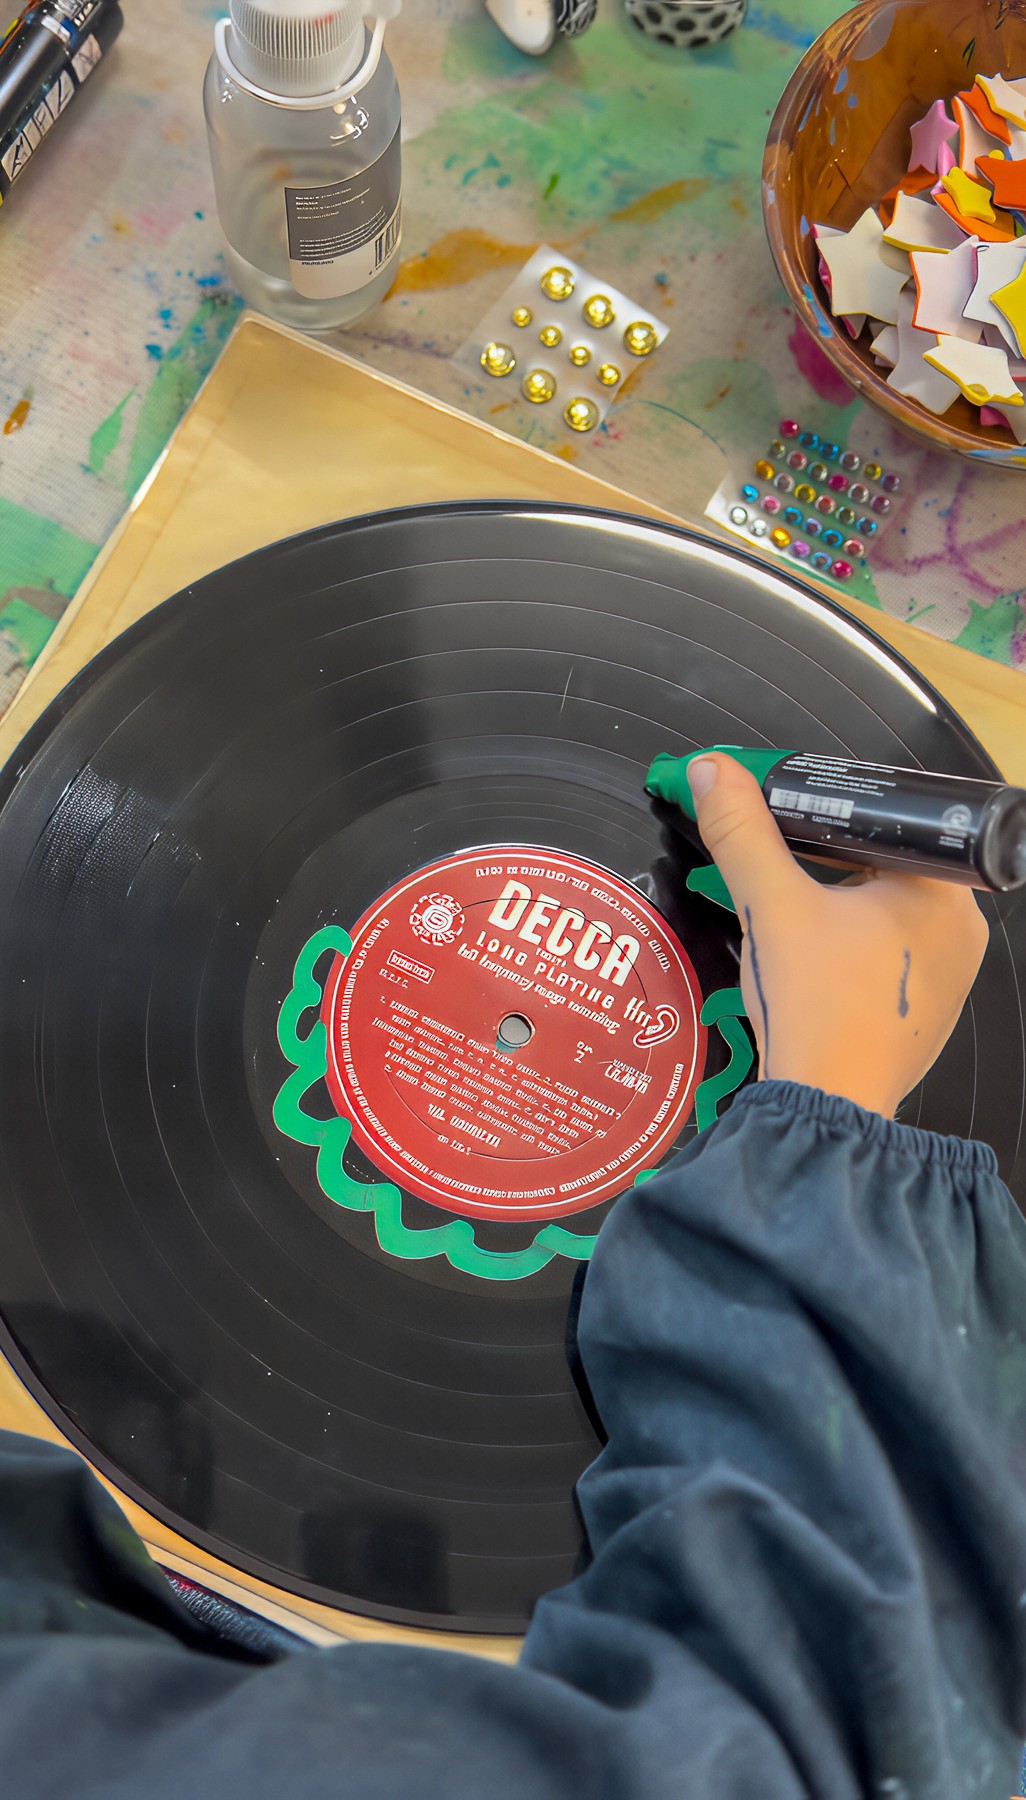
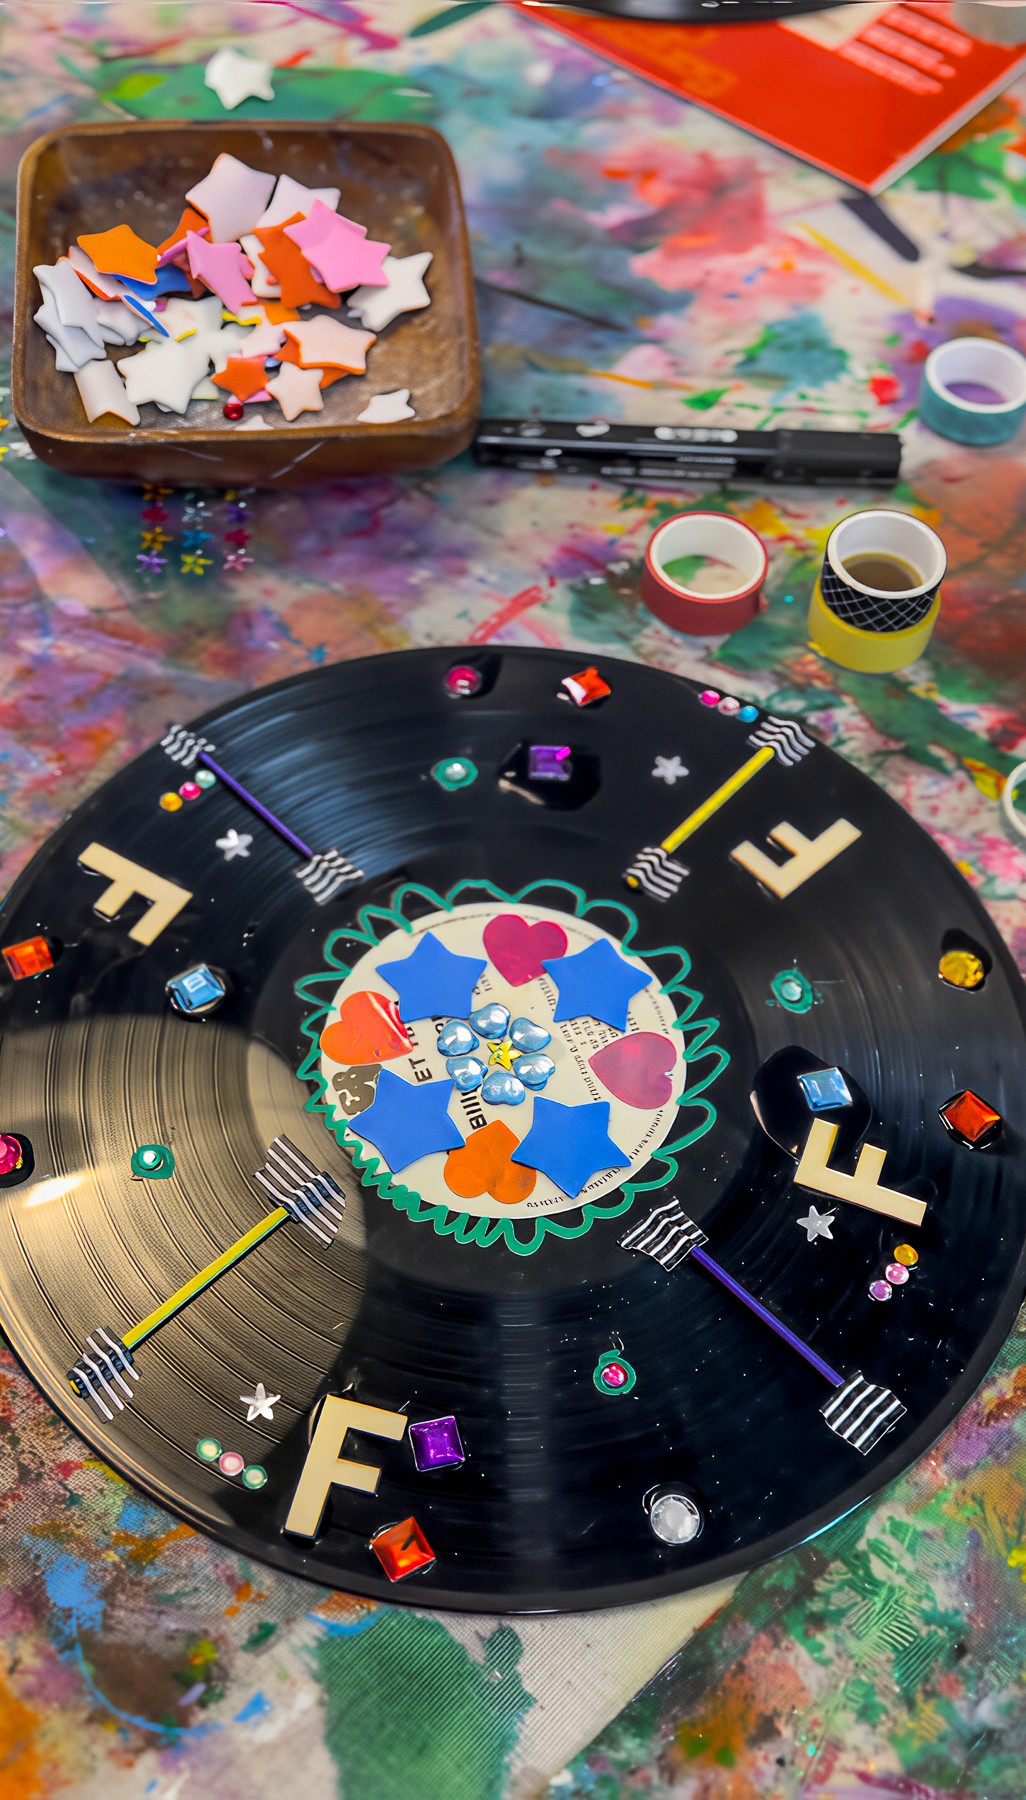
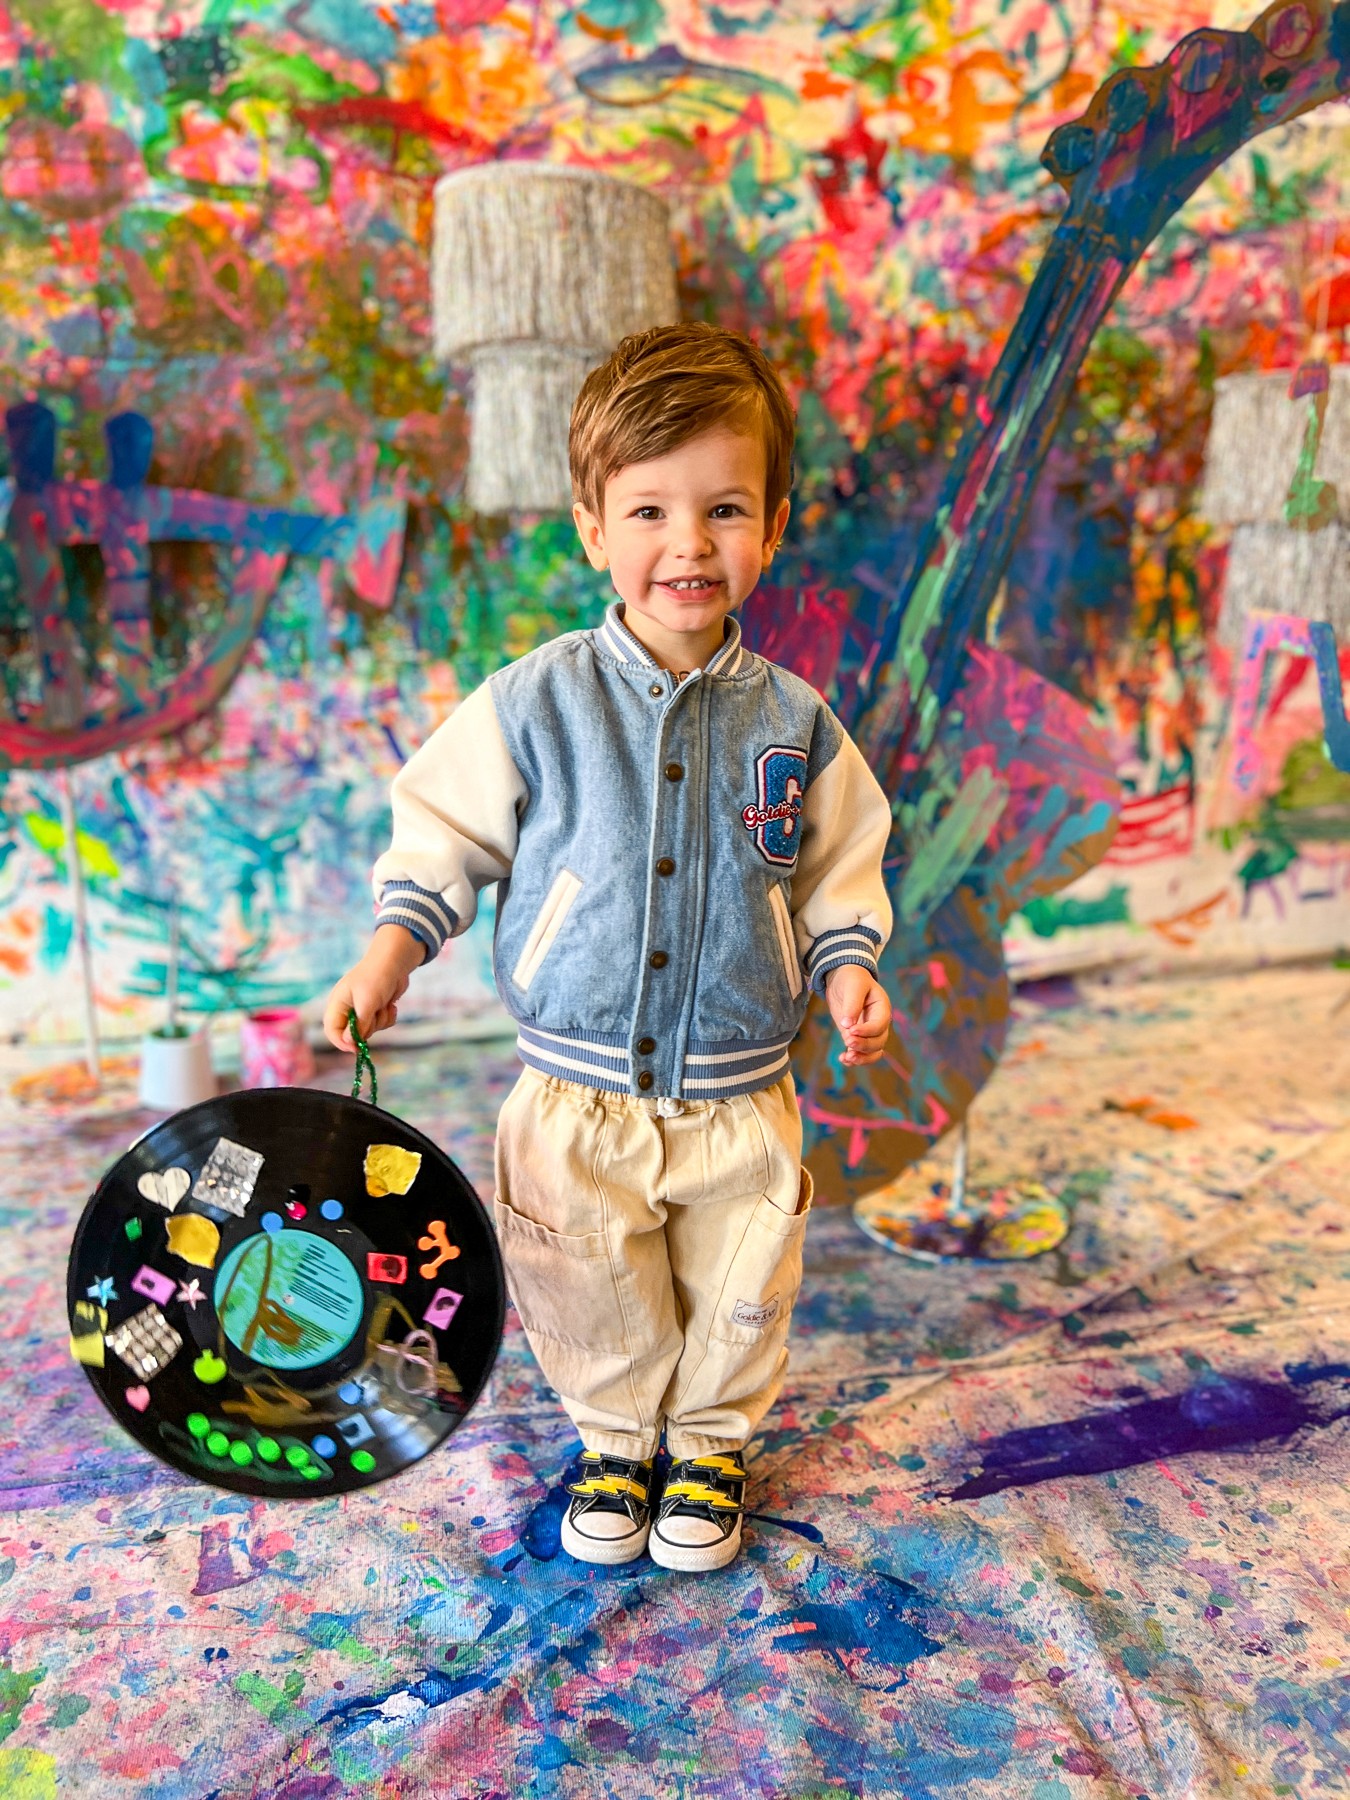
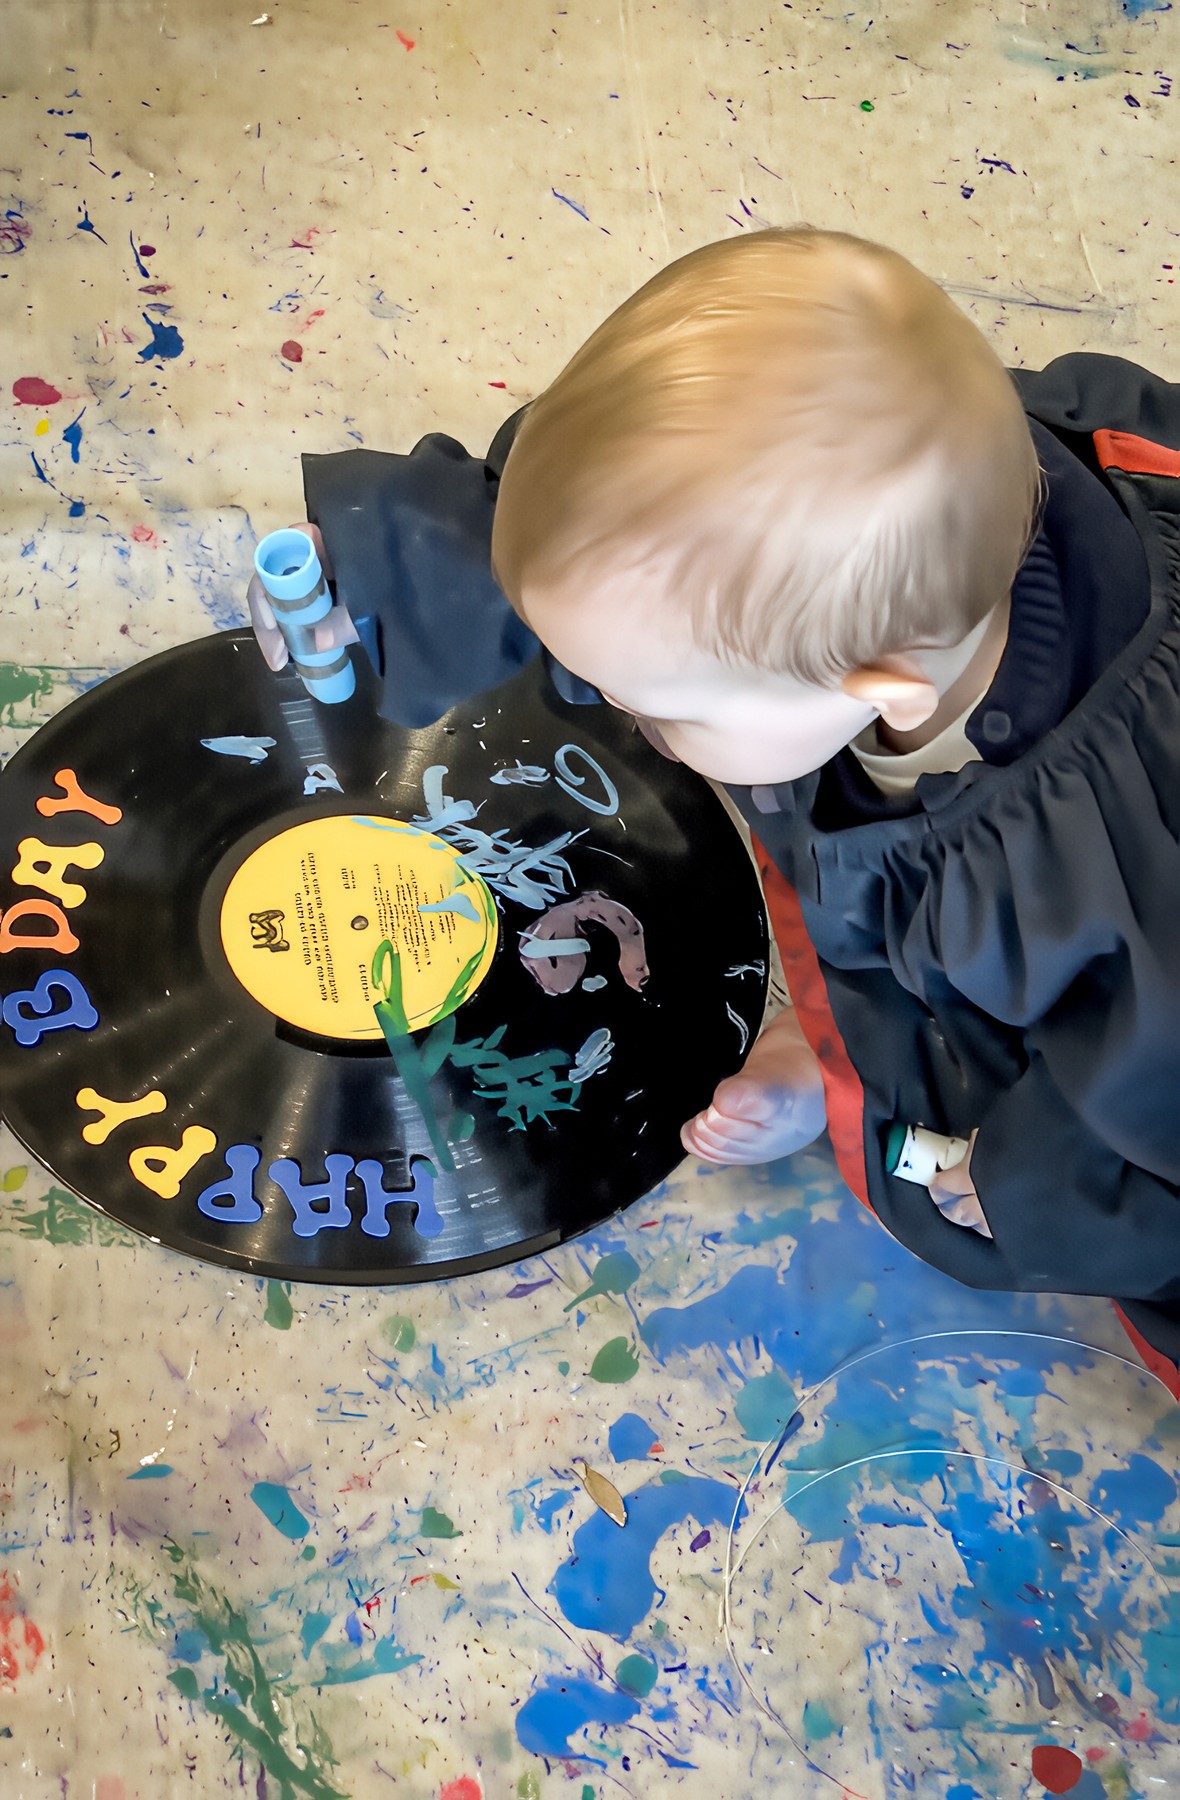
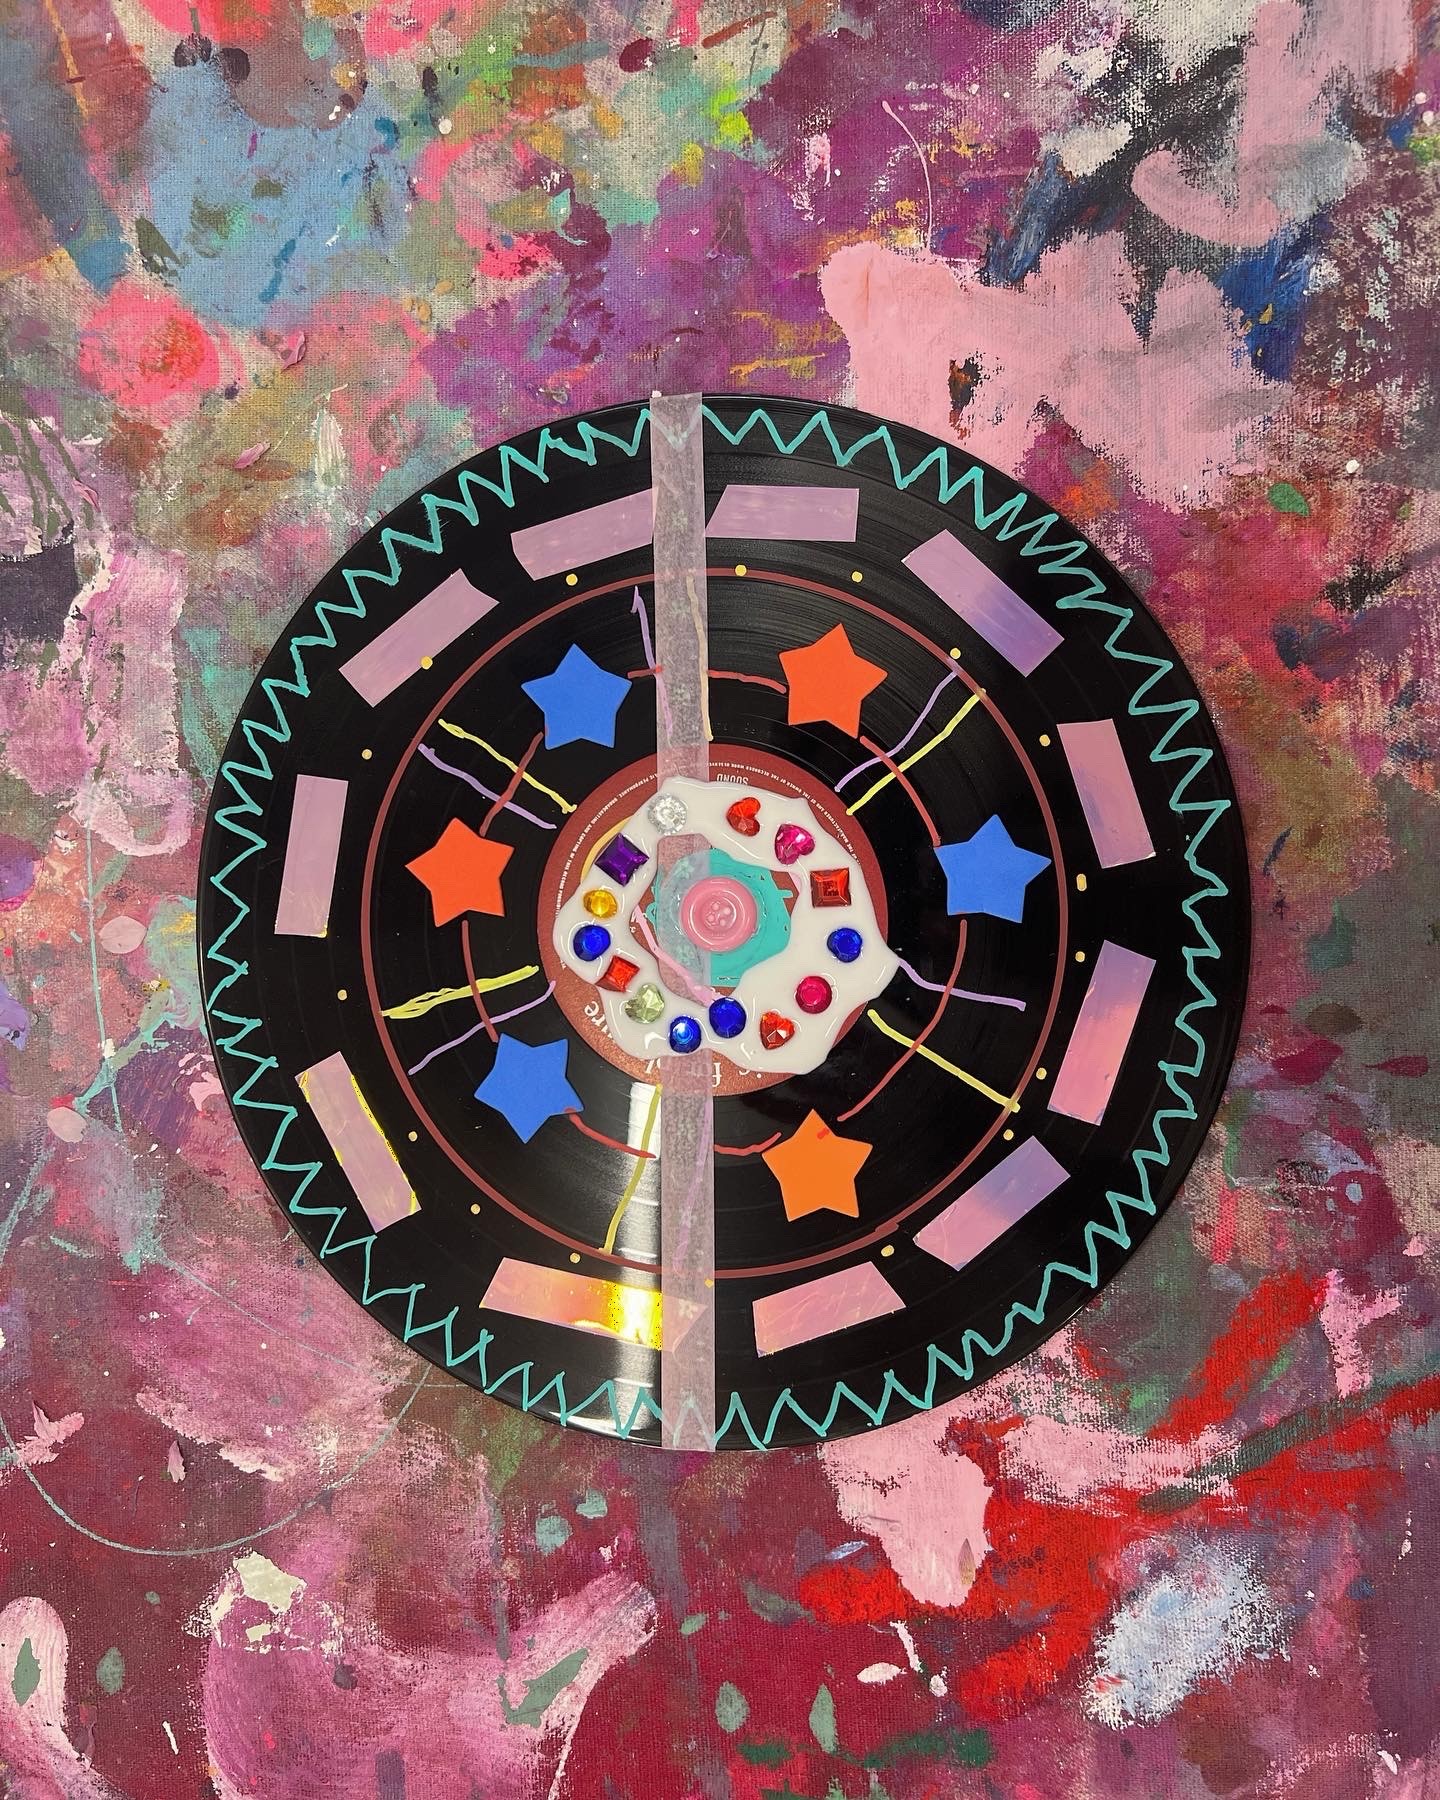
Record Remix
Old records, new rhythms.
Bookmark
Collage
The Set Up
Lay out vinyl records and album covers as the canvas. A little musical history is always a great place to start as well! Discuss how they work and how sound lives in those tiny grooves. Let kids touch the surface, feel the ridges, and imagine the music inside.
As they create, I jump onto Spotify and play a song from each of the albums, or at least from the same artist if the record isn’t available. It’s always incredible to hear the mix that follows: Bowie? Stevie Wonder? Etta James? Santana? That blend of genres and eras makes for the best connections.
We talk about how vinyl works, running fingers along the grooves and noticing the A and B sides. In a world where music streams instantly and playlists are built by algorithms, there’s something special about slowing down and hearing songs chosen by hand. It can spark the best conversations and sometimes a brand-new favourite artist.
🎵 How Records Work
Music is hidden in the grooves!
Each tiny line on a vinyl record is a wave of sound carved into the surface. When a needle glides through the grooves, it wiggles and those vibrations travel through the player and turn back into music.
You’re literally seeing sound you can touch.
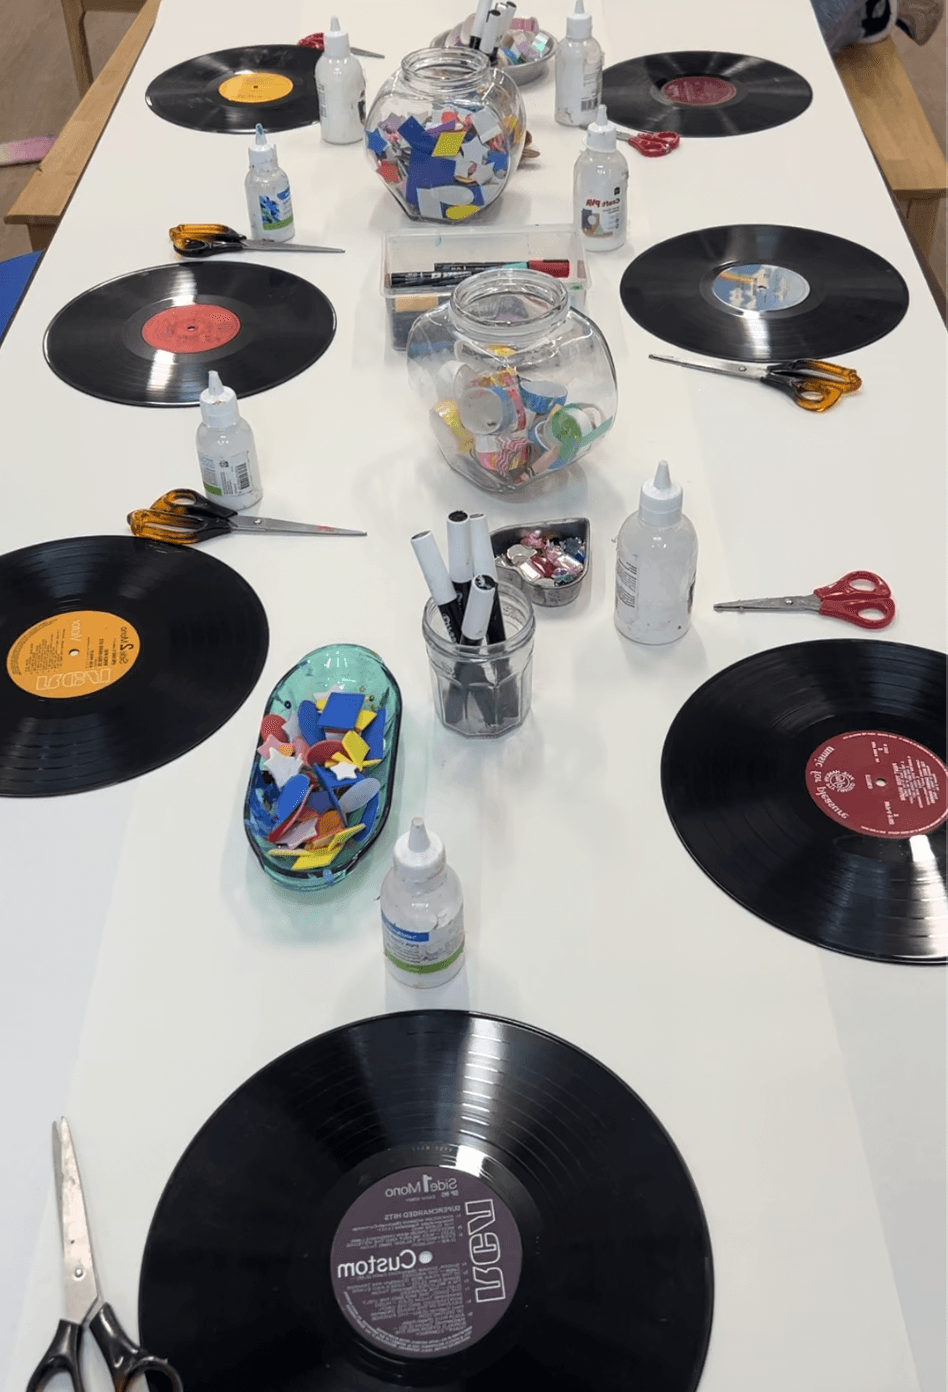
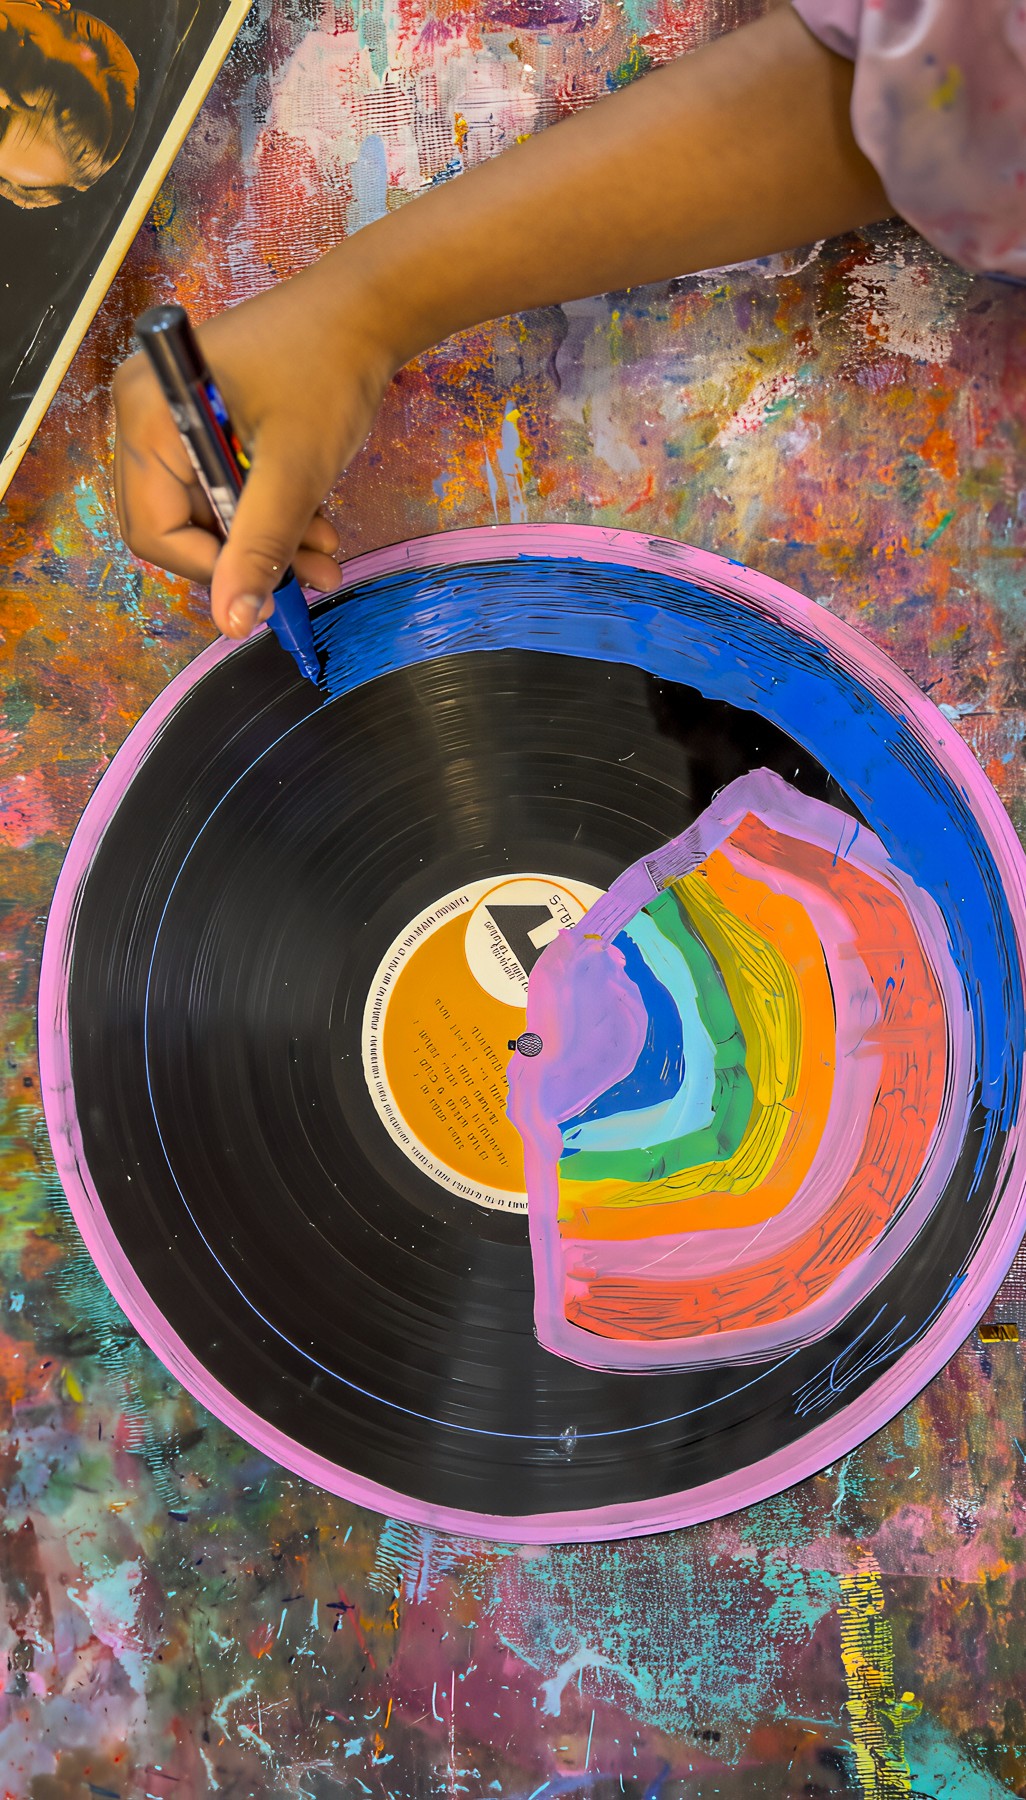
The Making
Paint pens and foam stickers are our go-to because they glide perfectly across the shiny surface. Encourage bold lines and patterns that sound like music might look: spirals, bursts, zigzags, loops.
It’s collage as rhythm, remixing as art.
Don’t skip the sound element! Even a short playlist connects the process to the feeling behind it.
Variations
Build a “record wall” where each piece becomes a track in a bigger visual album.
Try working on the sleeves instead for an easier glue base.
Younger artists can use paint sticks for easier coverage.
Materials
Vinyl records or covers (thrift stores are goldmines)
Posca markers, paint pens, or paint sticks
Foam stickers, collage scraps, wooden letters, glue
Scissors
Back to Top
Record Remix
Old records, new rhythms.
Bookmark
Collage
The Set Up
Lay out vinyl records and album covers as the canvas. A little musical history is always a great place to start as well! Discuss how they work and how sound lives in those tiny grooves. Let kids touch the surface, feel the ridges, and imagine the music inside.
As they create, I jump onto Spotify and play a song from each of the albums, or at least from the same artist if the record isn’t available. It’s always incredible to hear the mix that follows: Bowie? Stevie Wonder? Etta James? Santana? That blend of genres and eras makes for the best connections.
We talk about how vinyl works, running fingers along the grooves and noticing the A and B sides. In a world where music streams instantly and playlists are built by algorithms, there’s something special about slowing down and hearing songs chosen by hand. It can spark the best conversations and sometimes a brand-new favourite artist.
🎵 How Records Work
Music is hidden in the grooves!
Each tiny line on a vinyl record is a wave of sound carved into the surface. When a needle glides through the grooves, it wiggles and those vibrations travel through the player and turn back into music.
You’re literally seeing sound you can touch.
The Making
Paint pens and foam stickers are our go-to because they glide perfectly across the shiny surface. Encourage bold lines and patterns that sound like music might look: spirals, bursts, zigzags, loops.
It’s collage as rhythm, remixing as art.
Don’t skip the sound element! Even a short playlist connects the process to the feeling behind it.
Variations
Build a “record wall” where each piece becomes a track in a bigger visual album.
Try working on the sleeves instead for an easier glue base.
Younger artists can use paint sticks for easier coverage.
Materials
Vinyl records or covers (thrift stores are goldmines)
Posca markers, paint pens, or paint sticks
Foam stickers, collage scraps, wooden letters, glue
Scissors
Back to Top
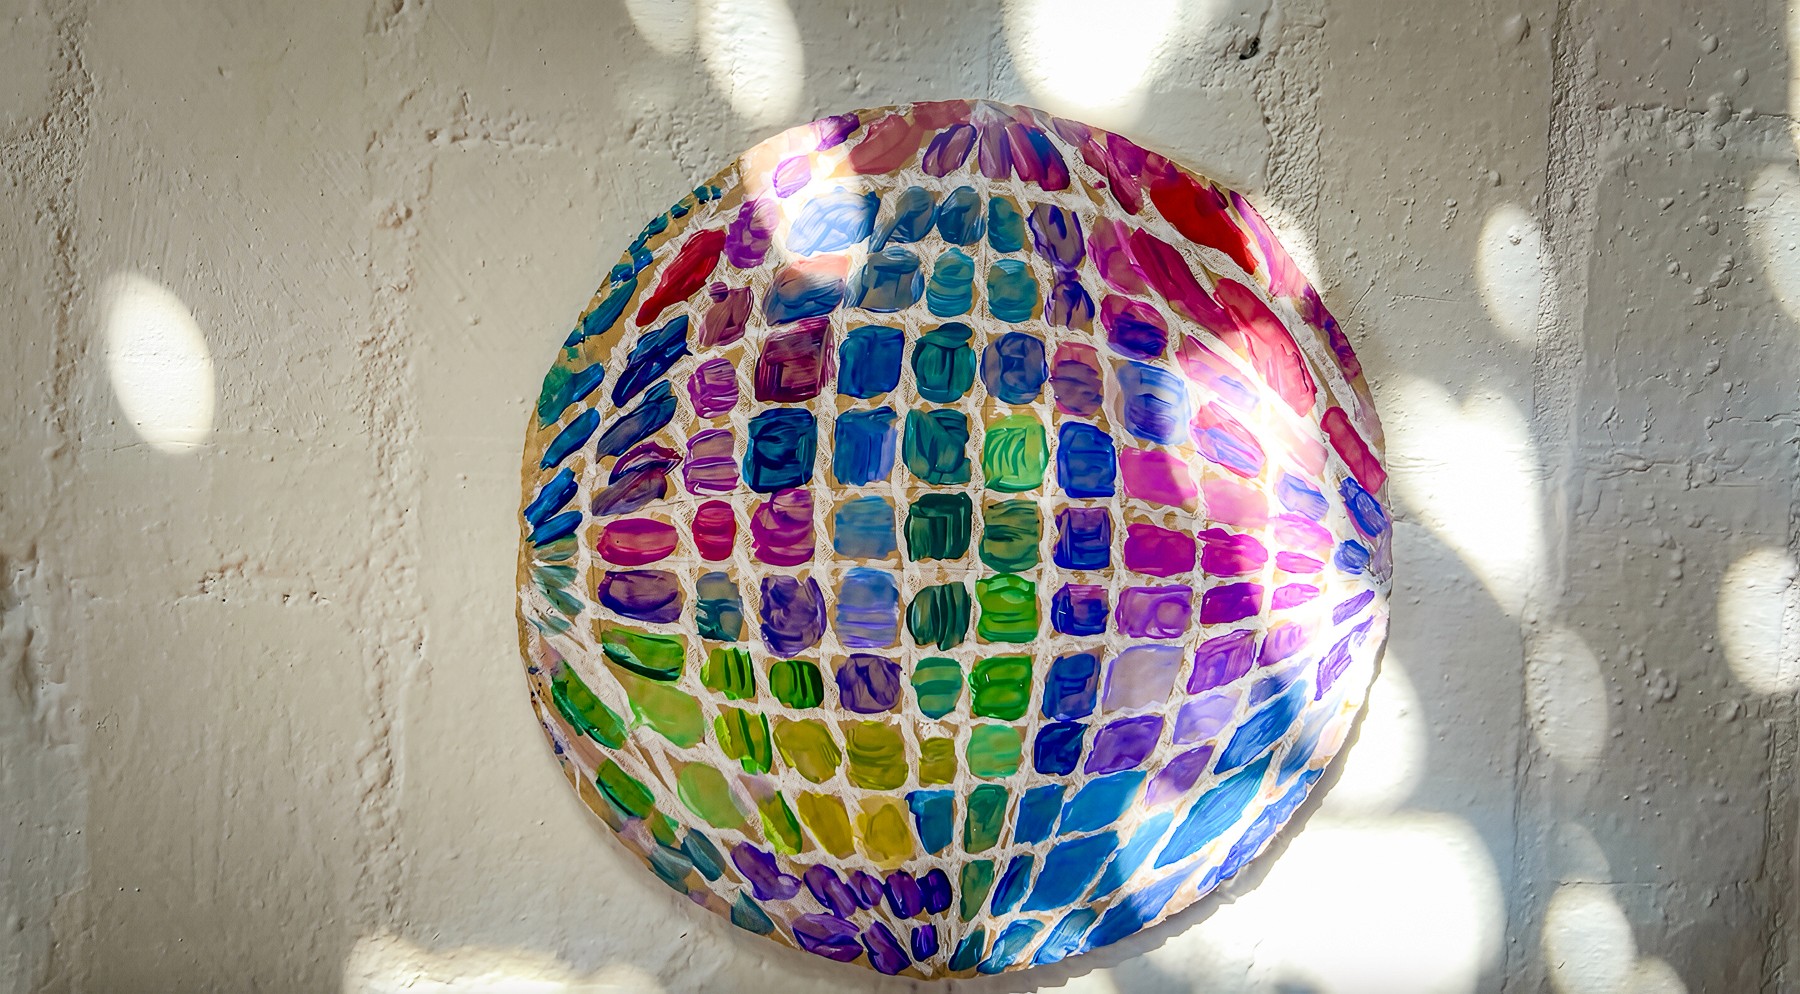
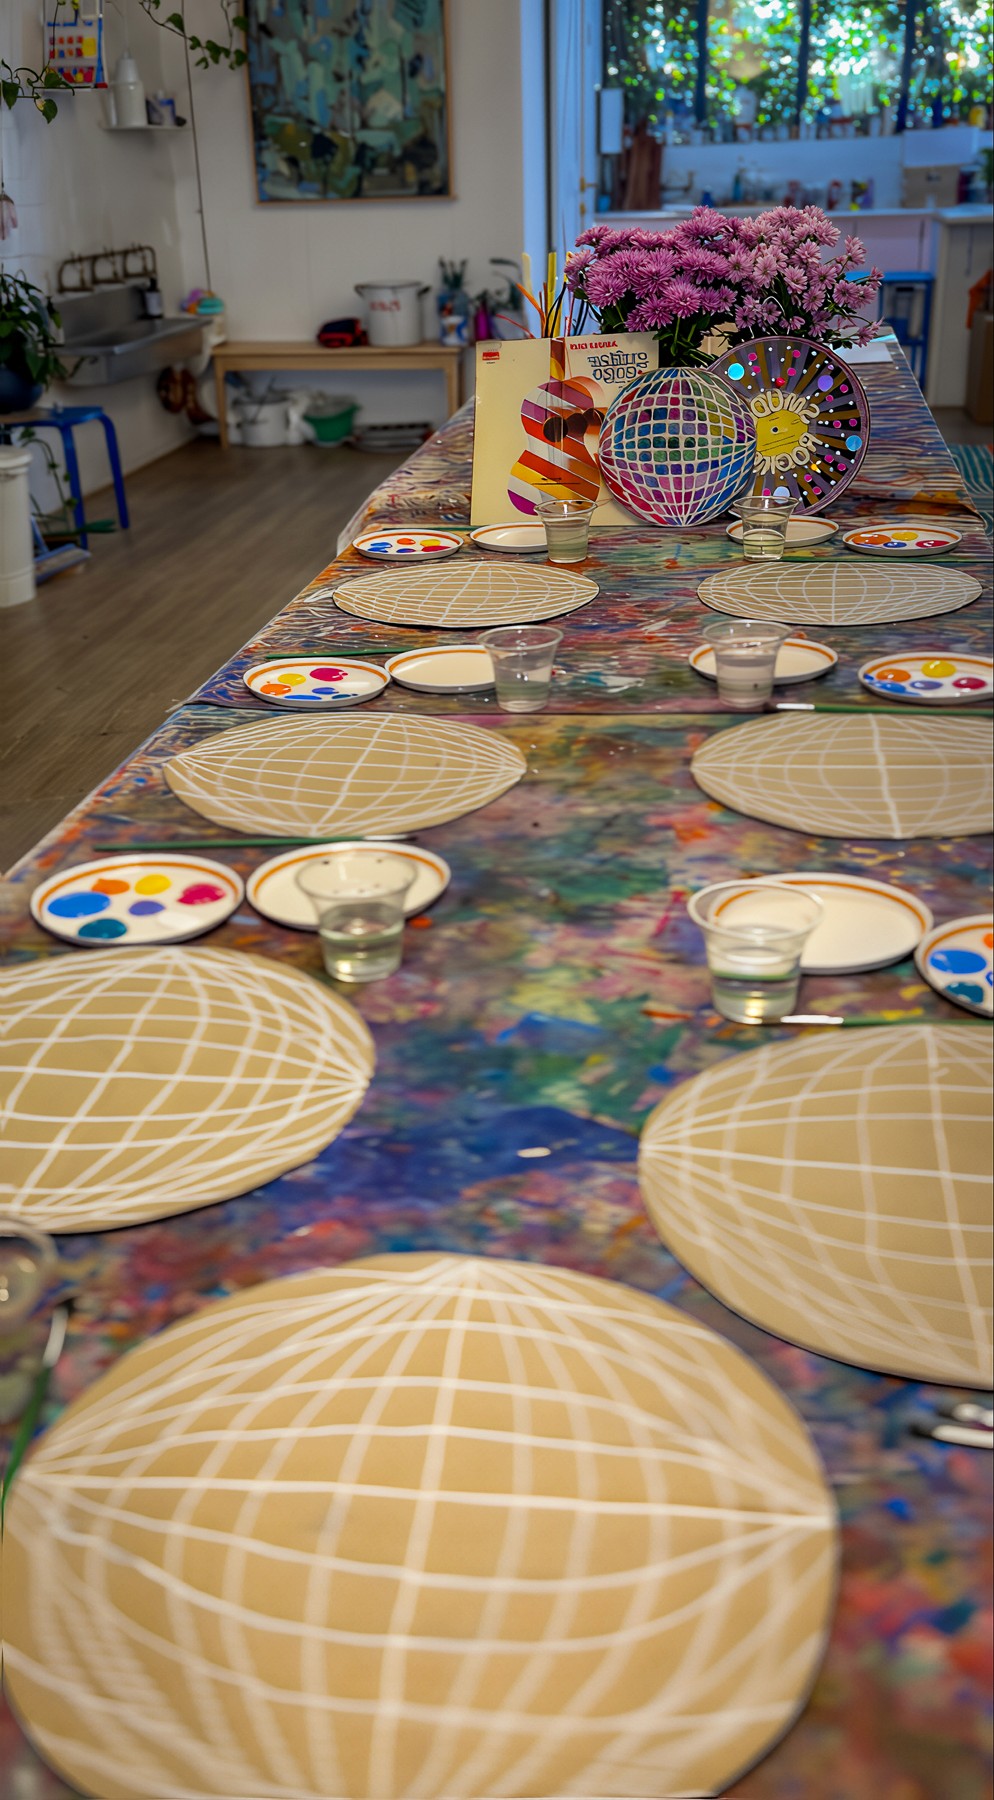
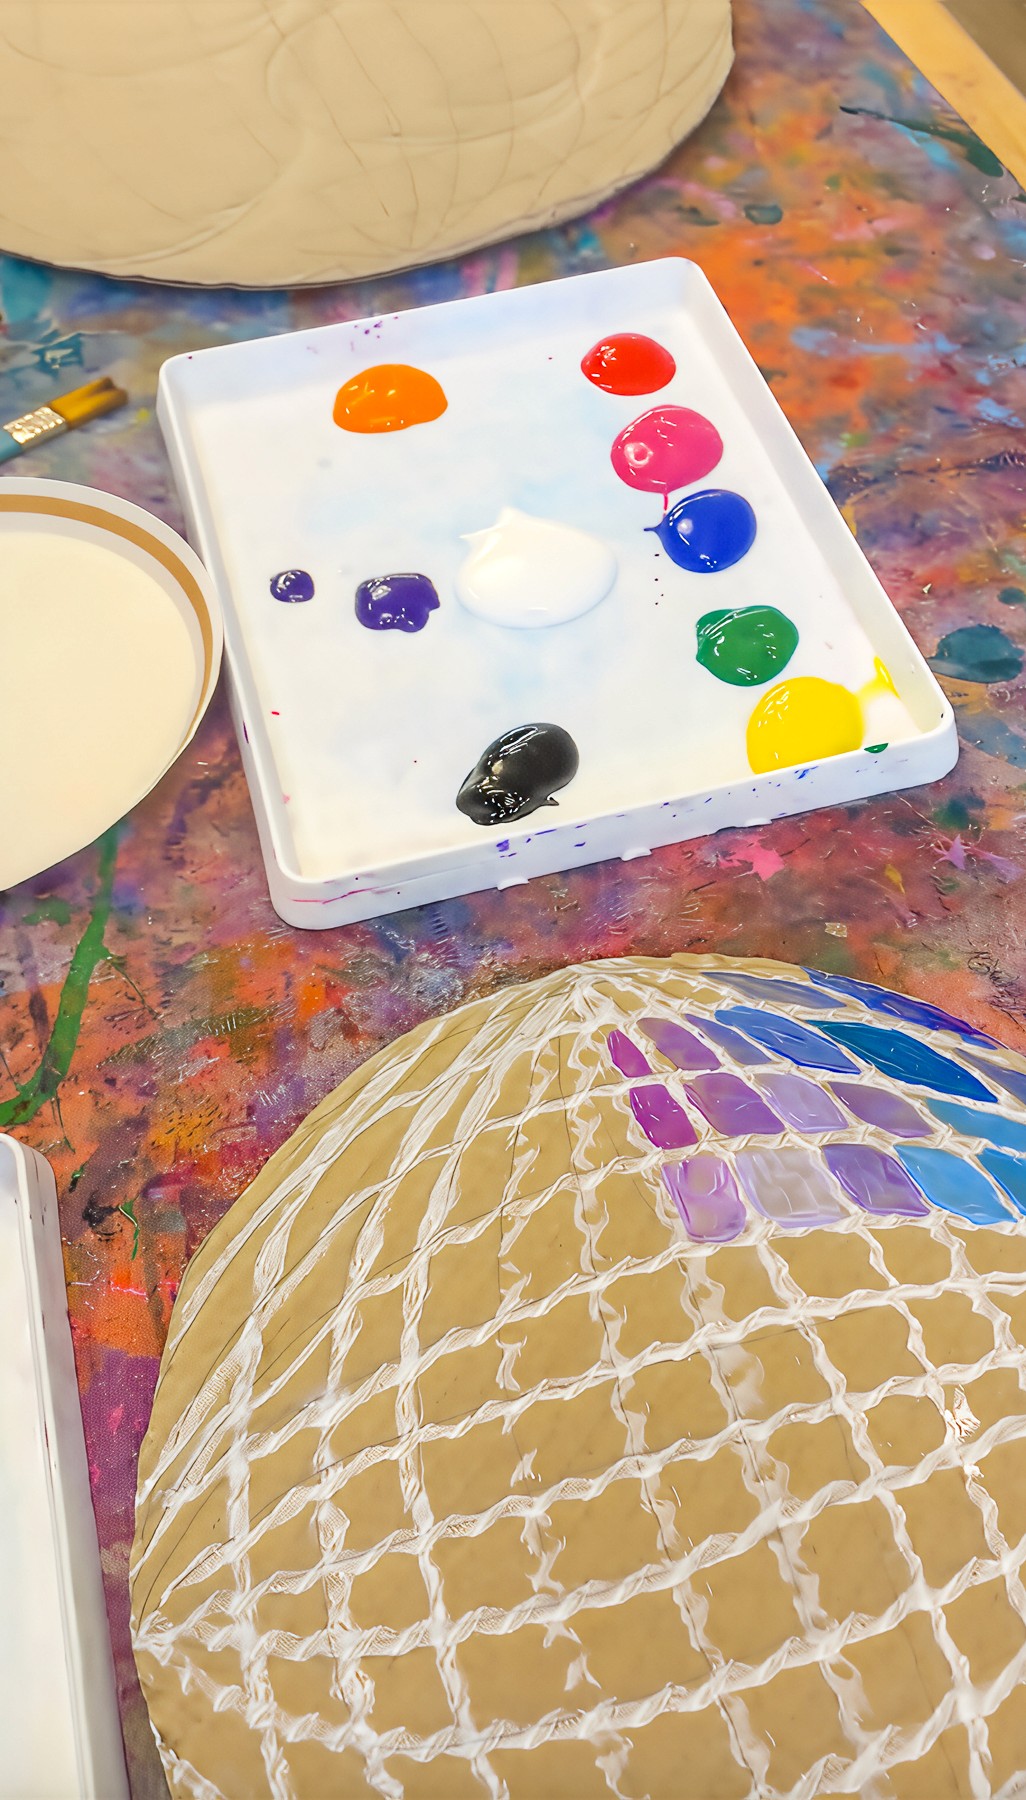
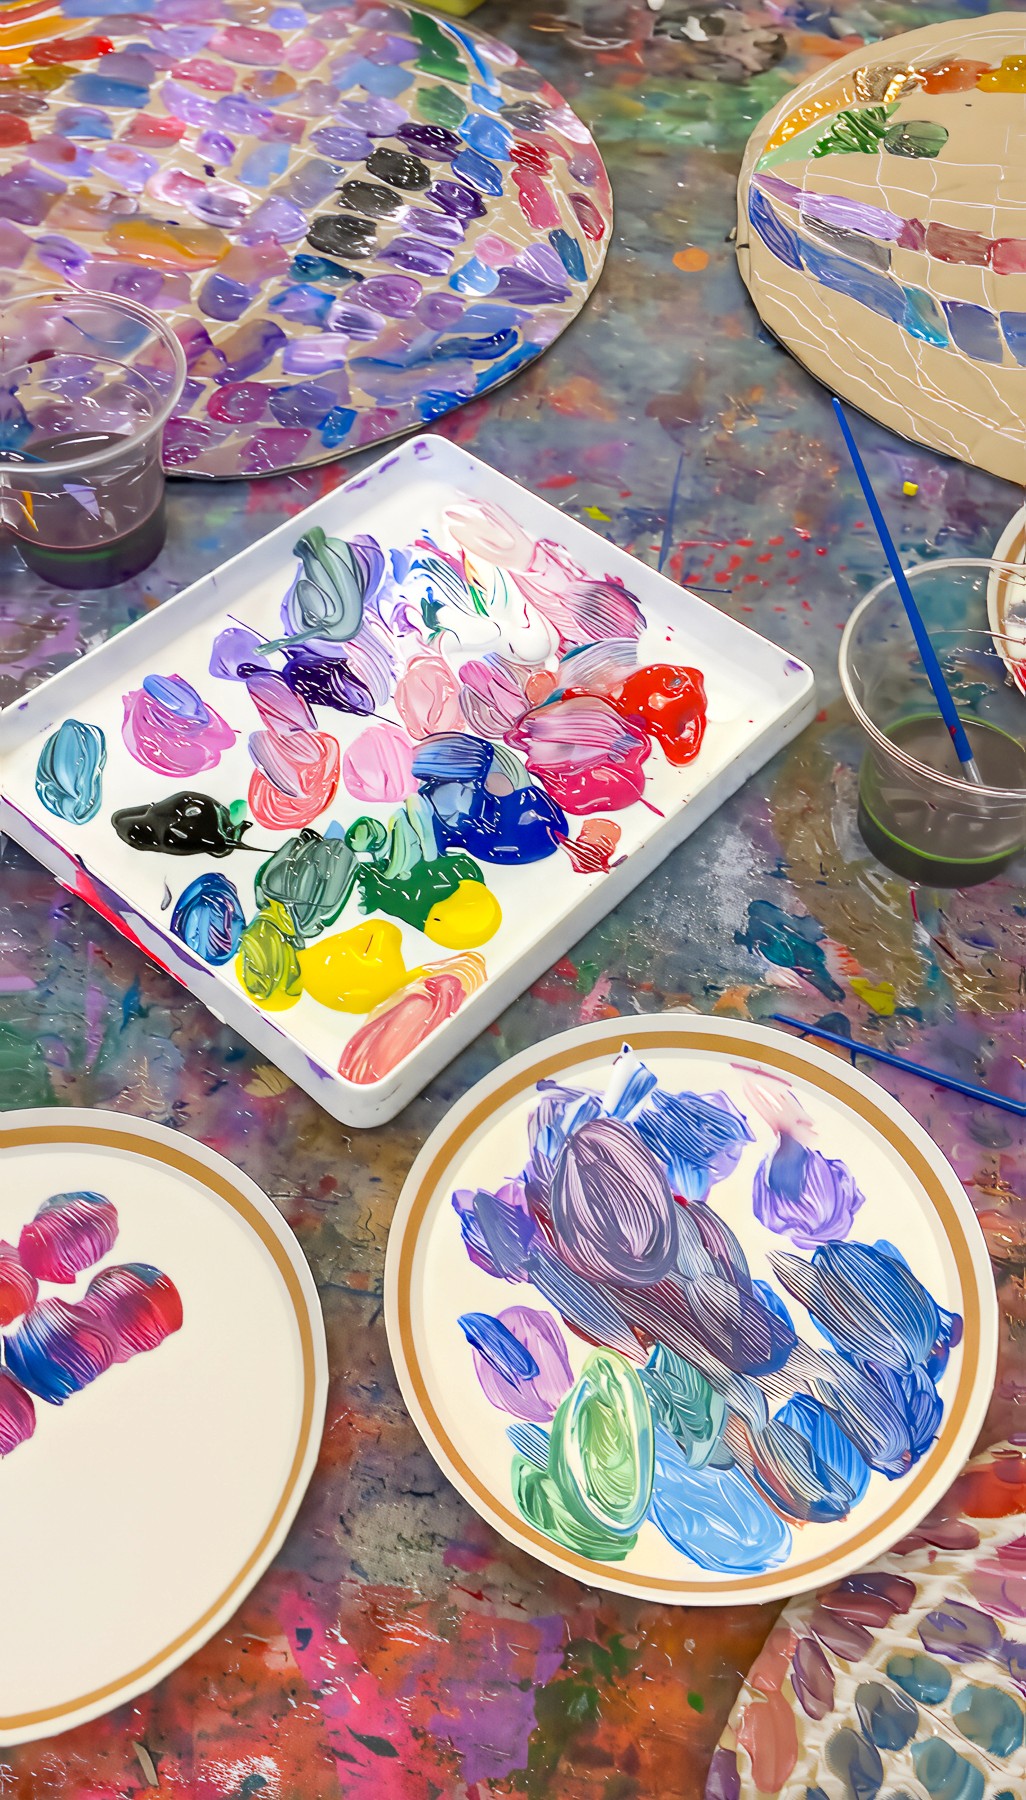
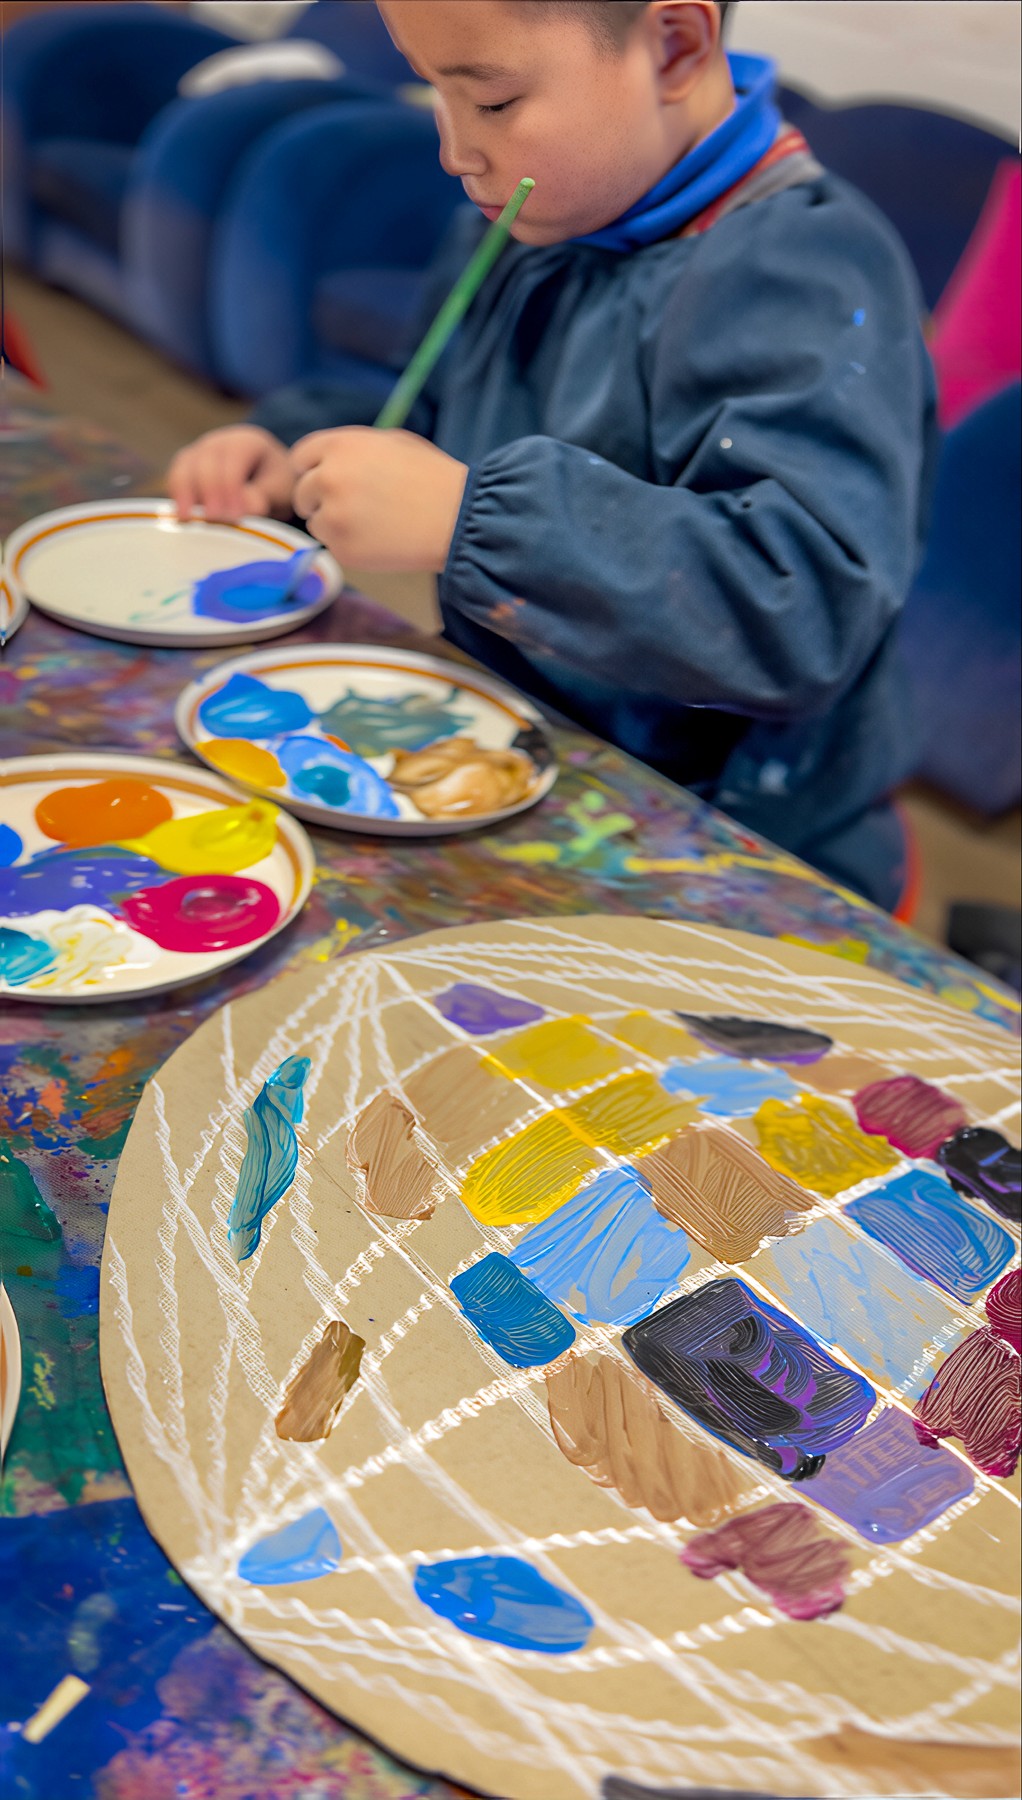
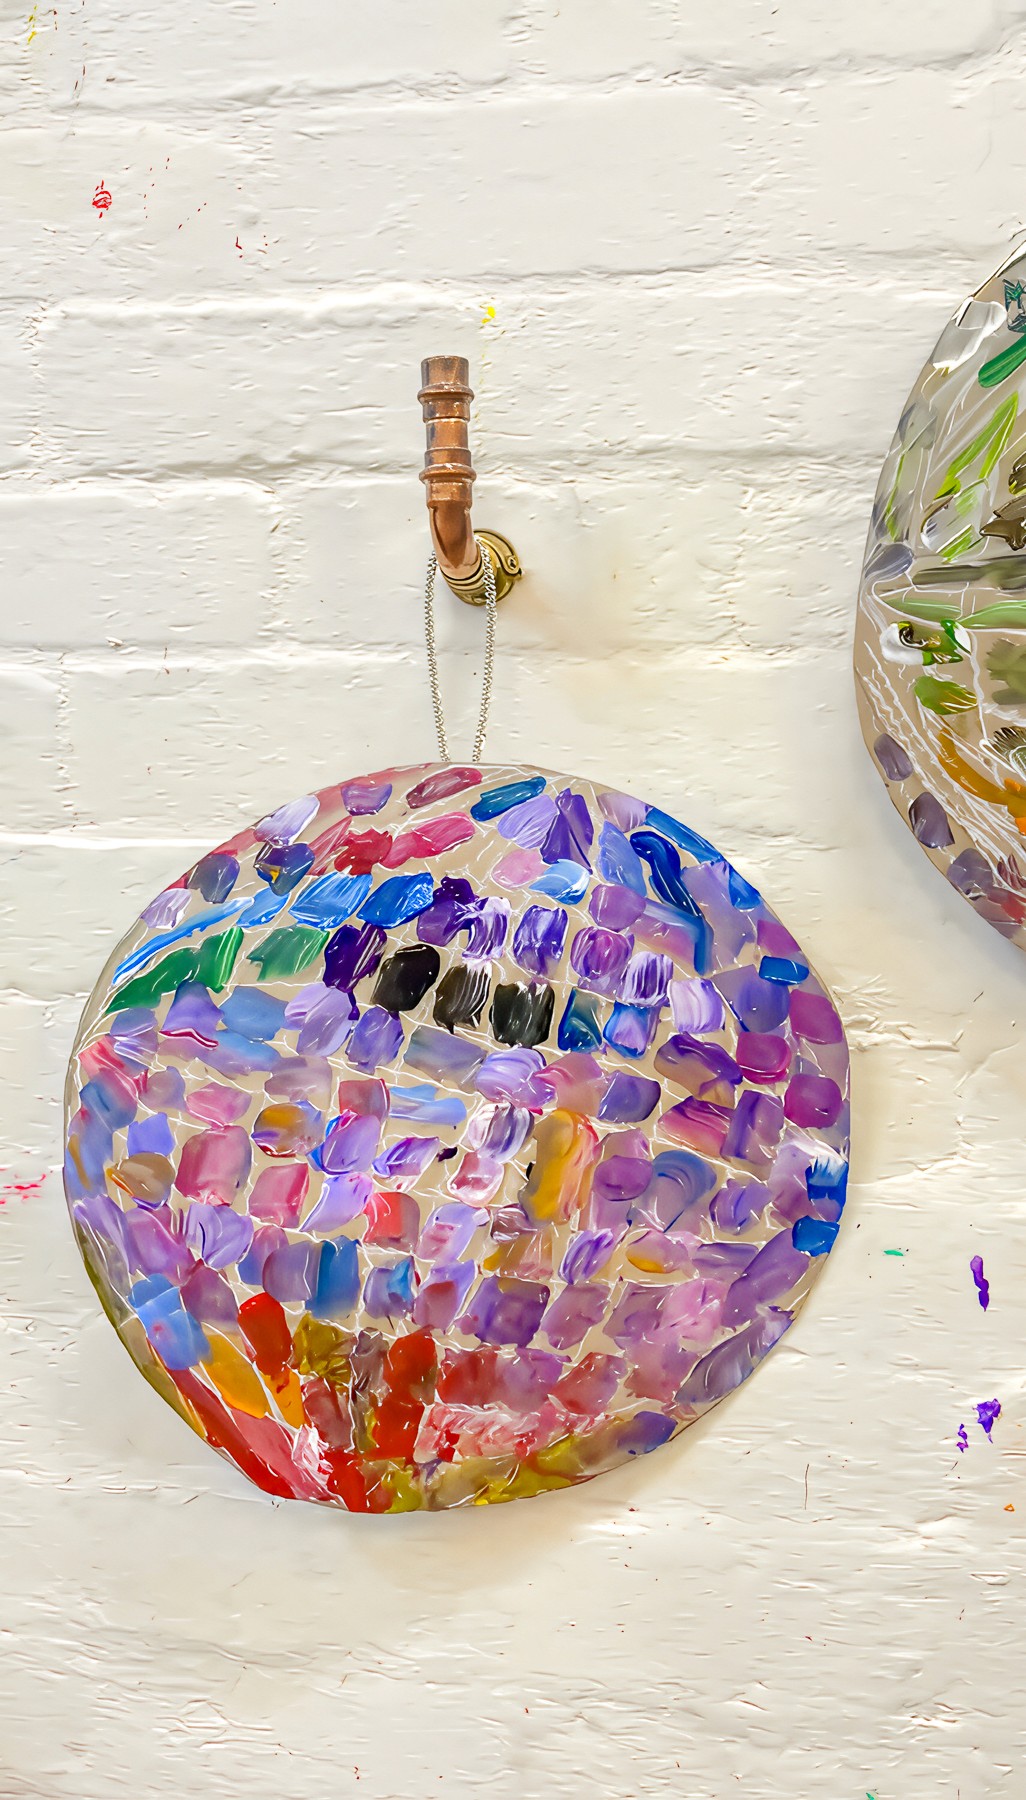
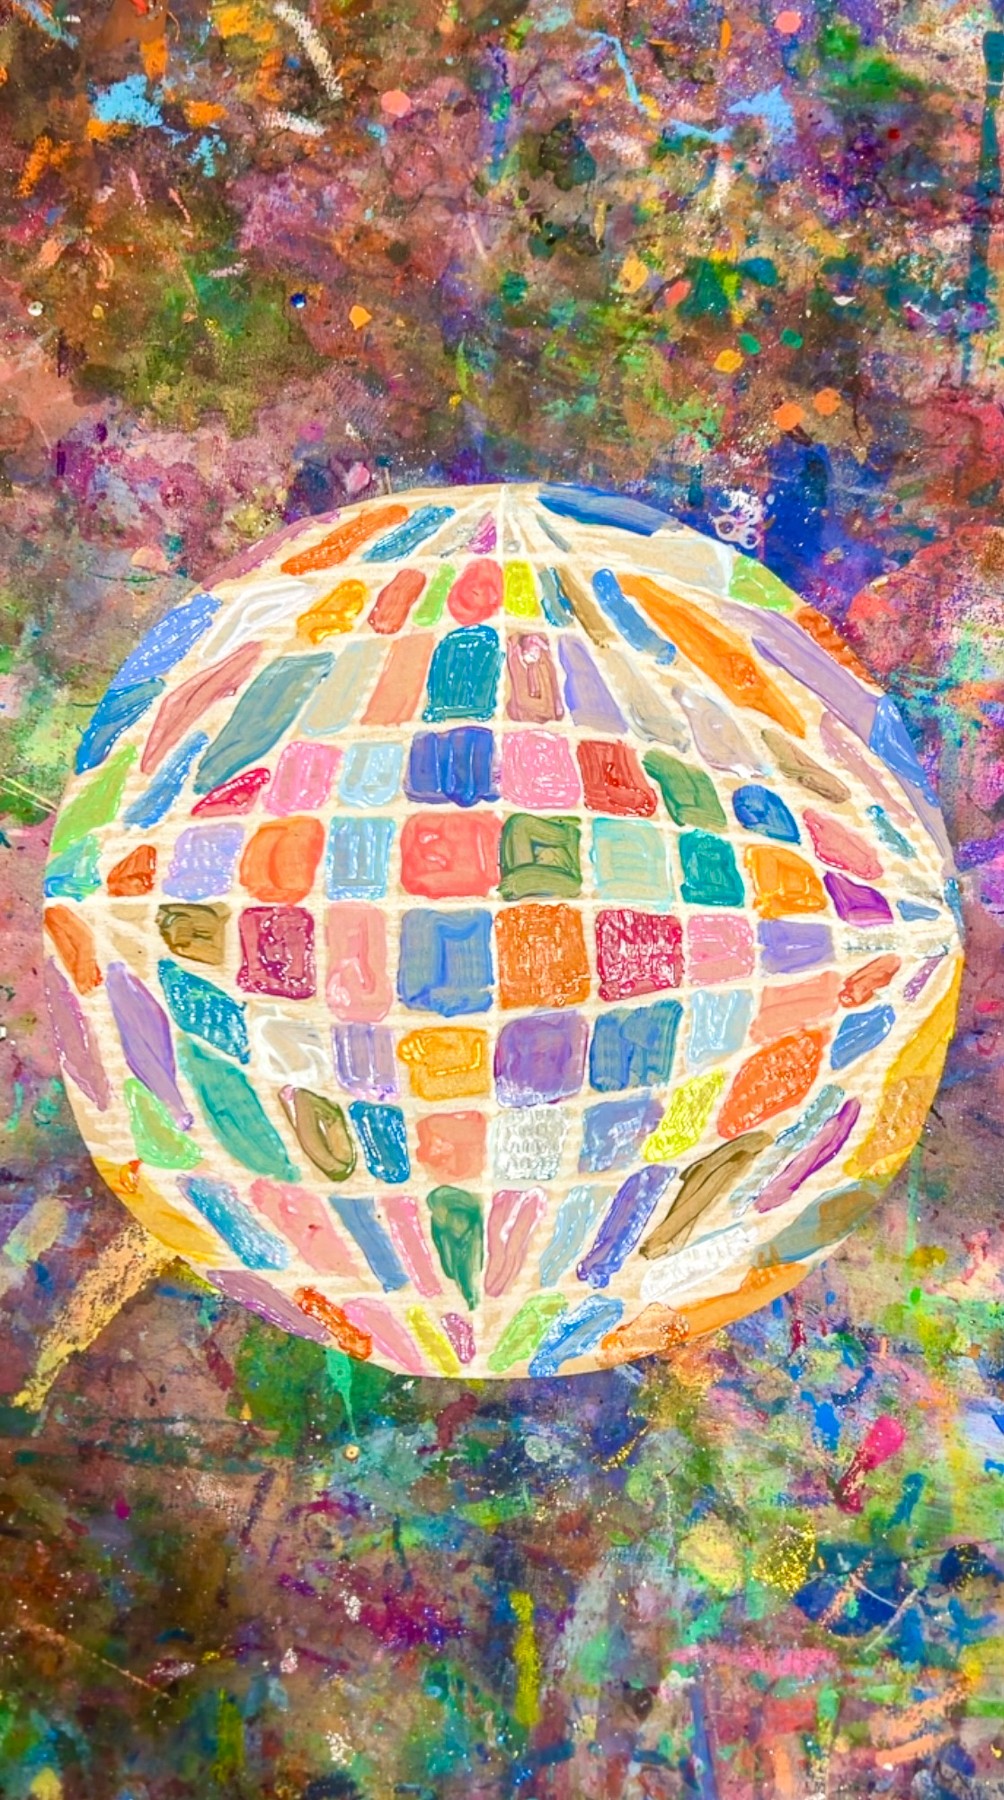
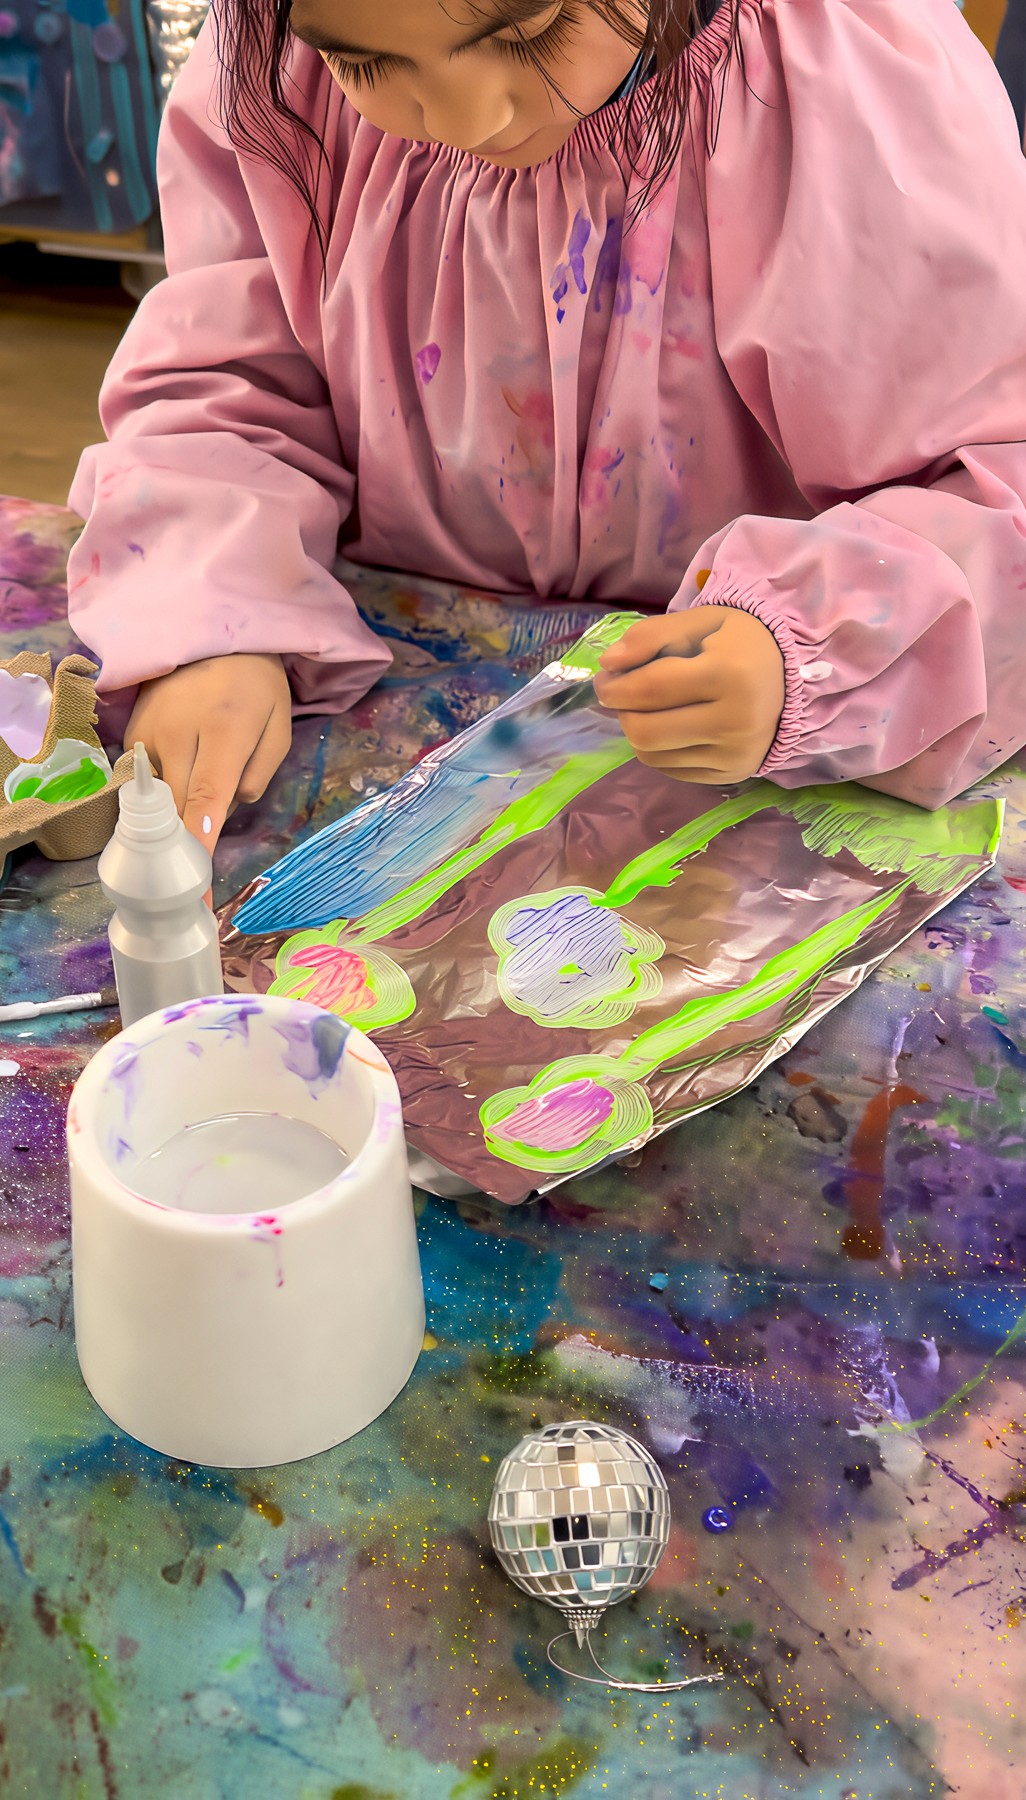
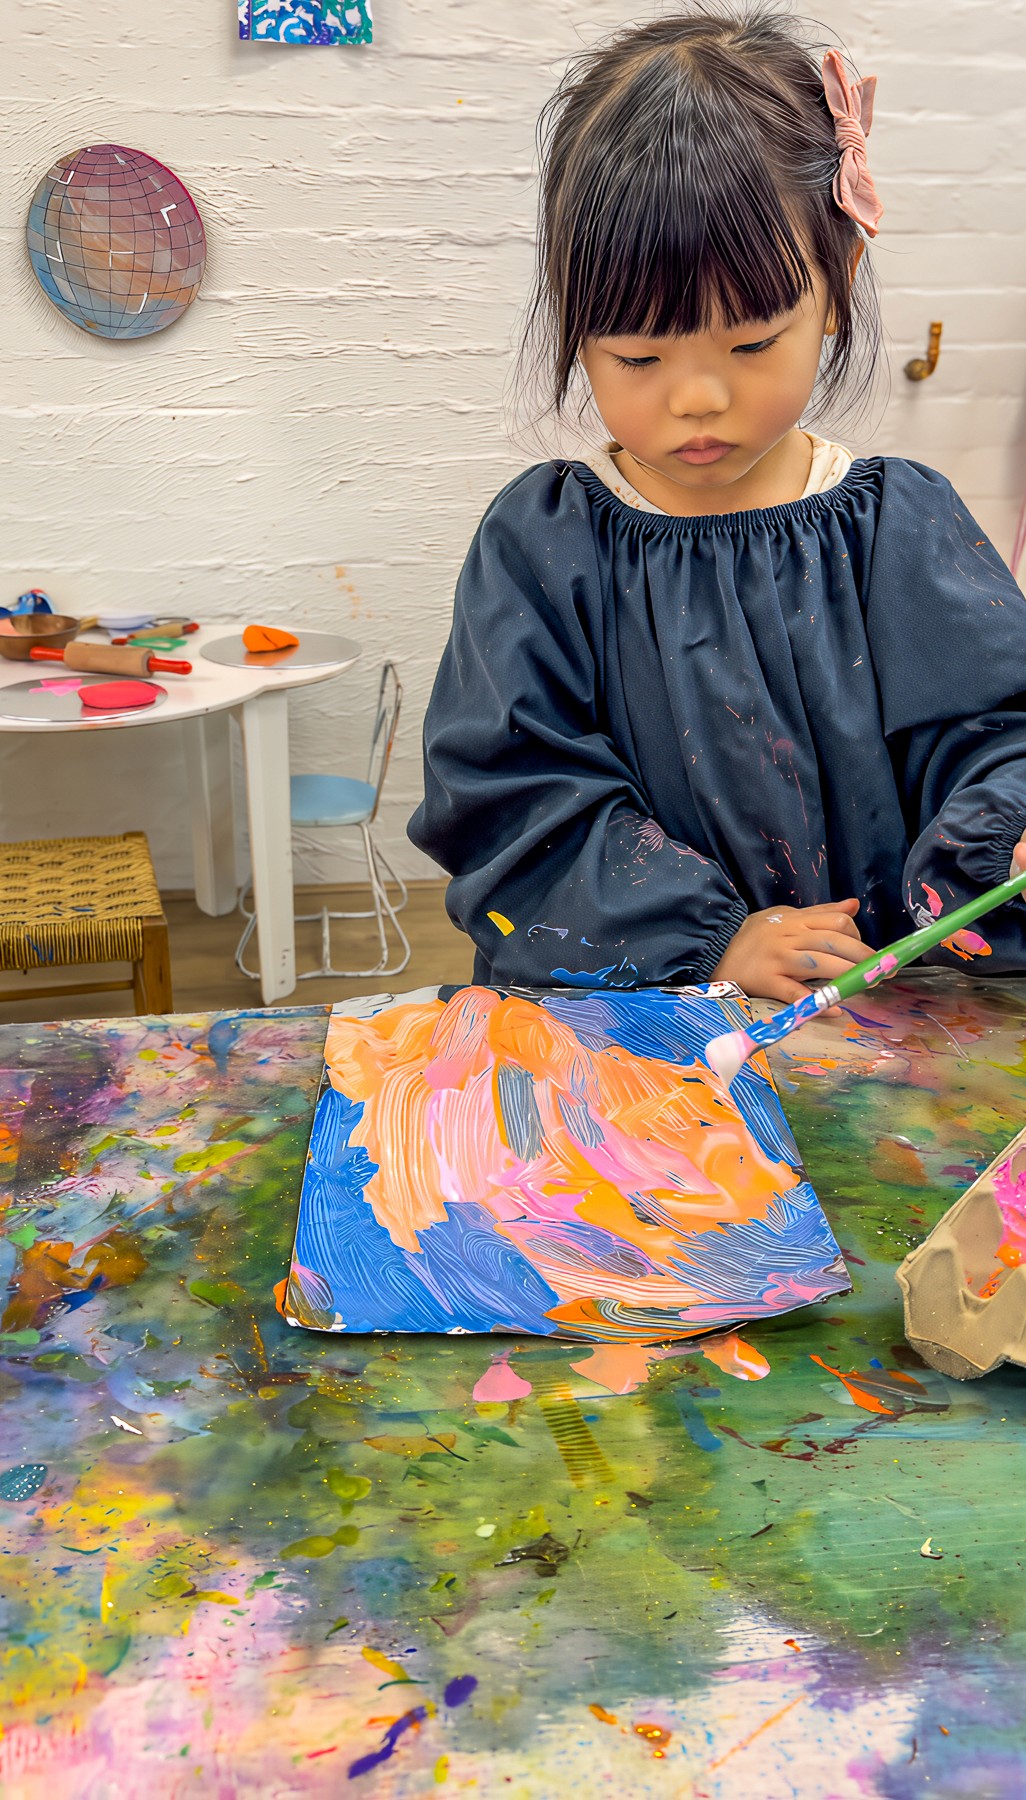
Shiny Disco Balls
Colour mixing reflections!
Bookmark
Painting & Drawing
The Set Up
Start with the real thing! You can just imagine how engaged the kids will be from the start with a disco ball catching sunlight and scattering hundreds of tiny reflections across the walls. Watch how the light moves and talk about how every tiny mirror reflects something different.
Give each artist a large cardboard circle (around 30 cm wide). Trace a bowl or plate if you need to. Draw faint pencil lines starting with a vertical and horizontal cross, and then add slightly curved lines to mimic the ball’s 3D shape. Depending on the age of the artists, I either draw the pencil lines for them and then they trace over twitch white oil pastel, or they do the whole lot themselves.Now for the colour! Each artist will need their own palette or paper plate for mixing. Ask them to choose three colours they love, plus plenty of white and a small blob of black for exploring tone, hue, and shade. You can guide them toward a single colour family for a softer look, or embrace the wild muddiness that happens when curiosity takes over.
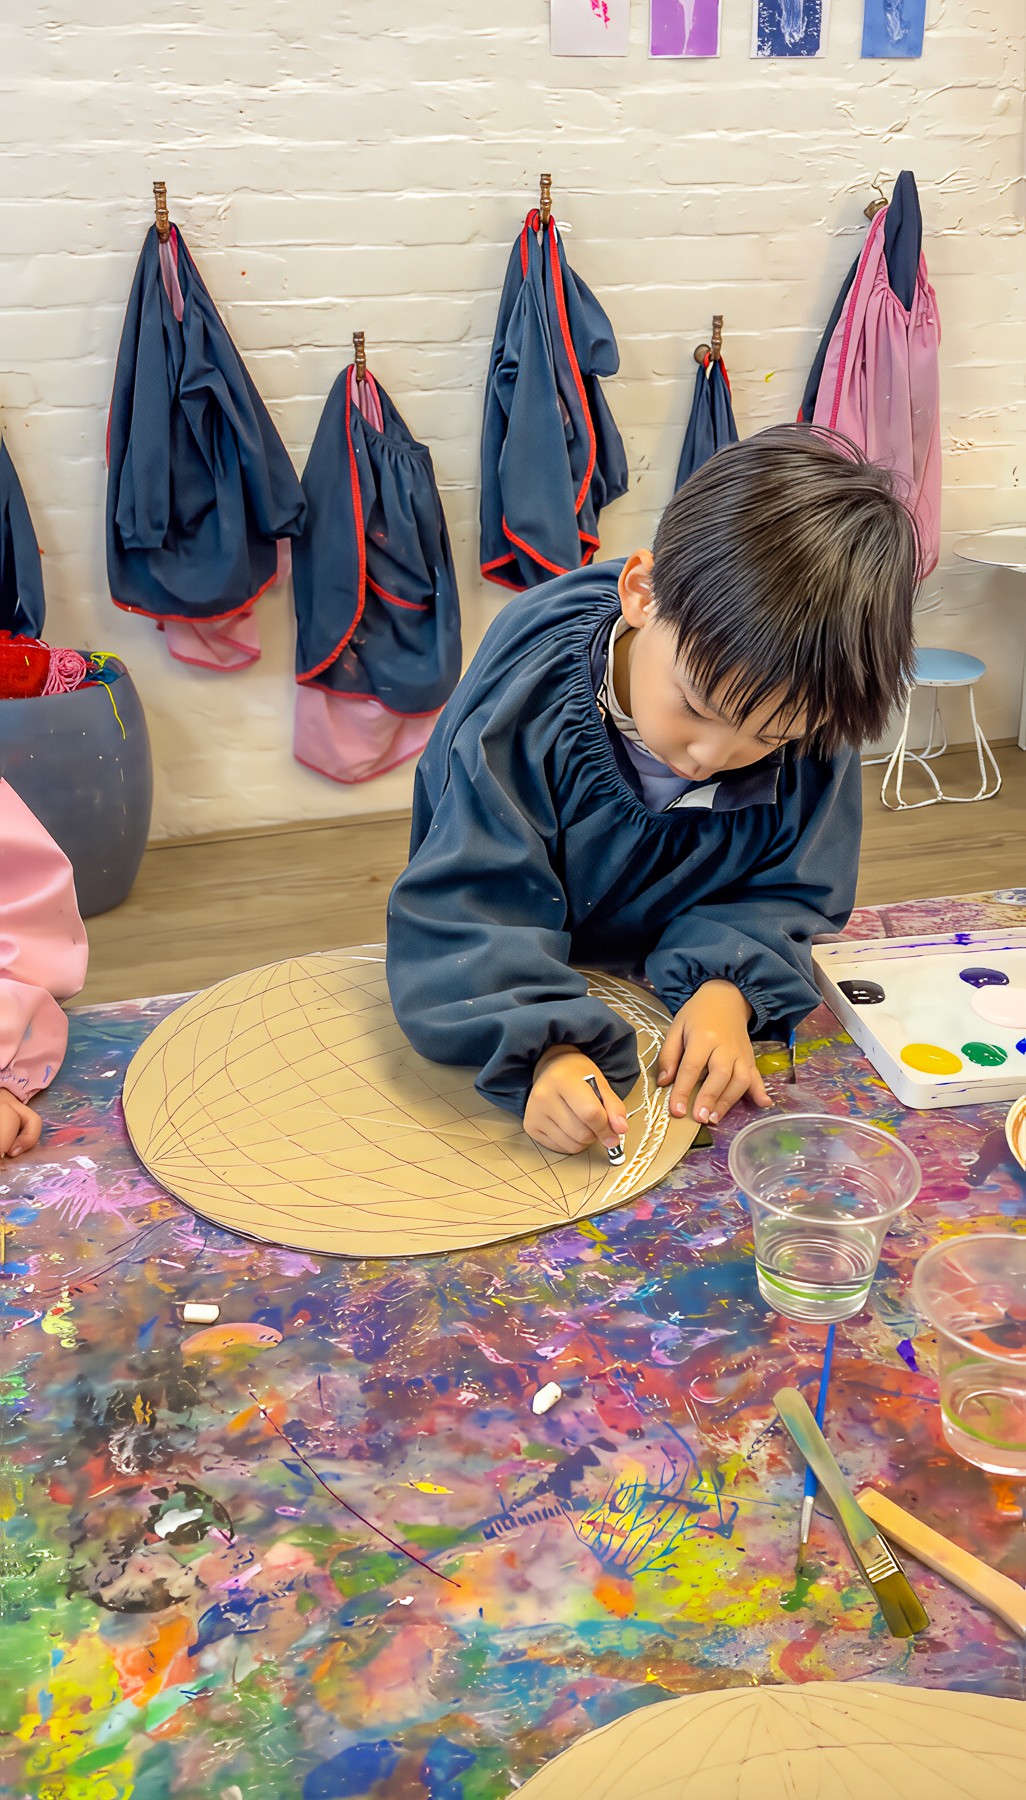
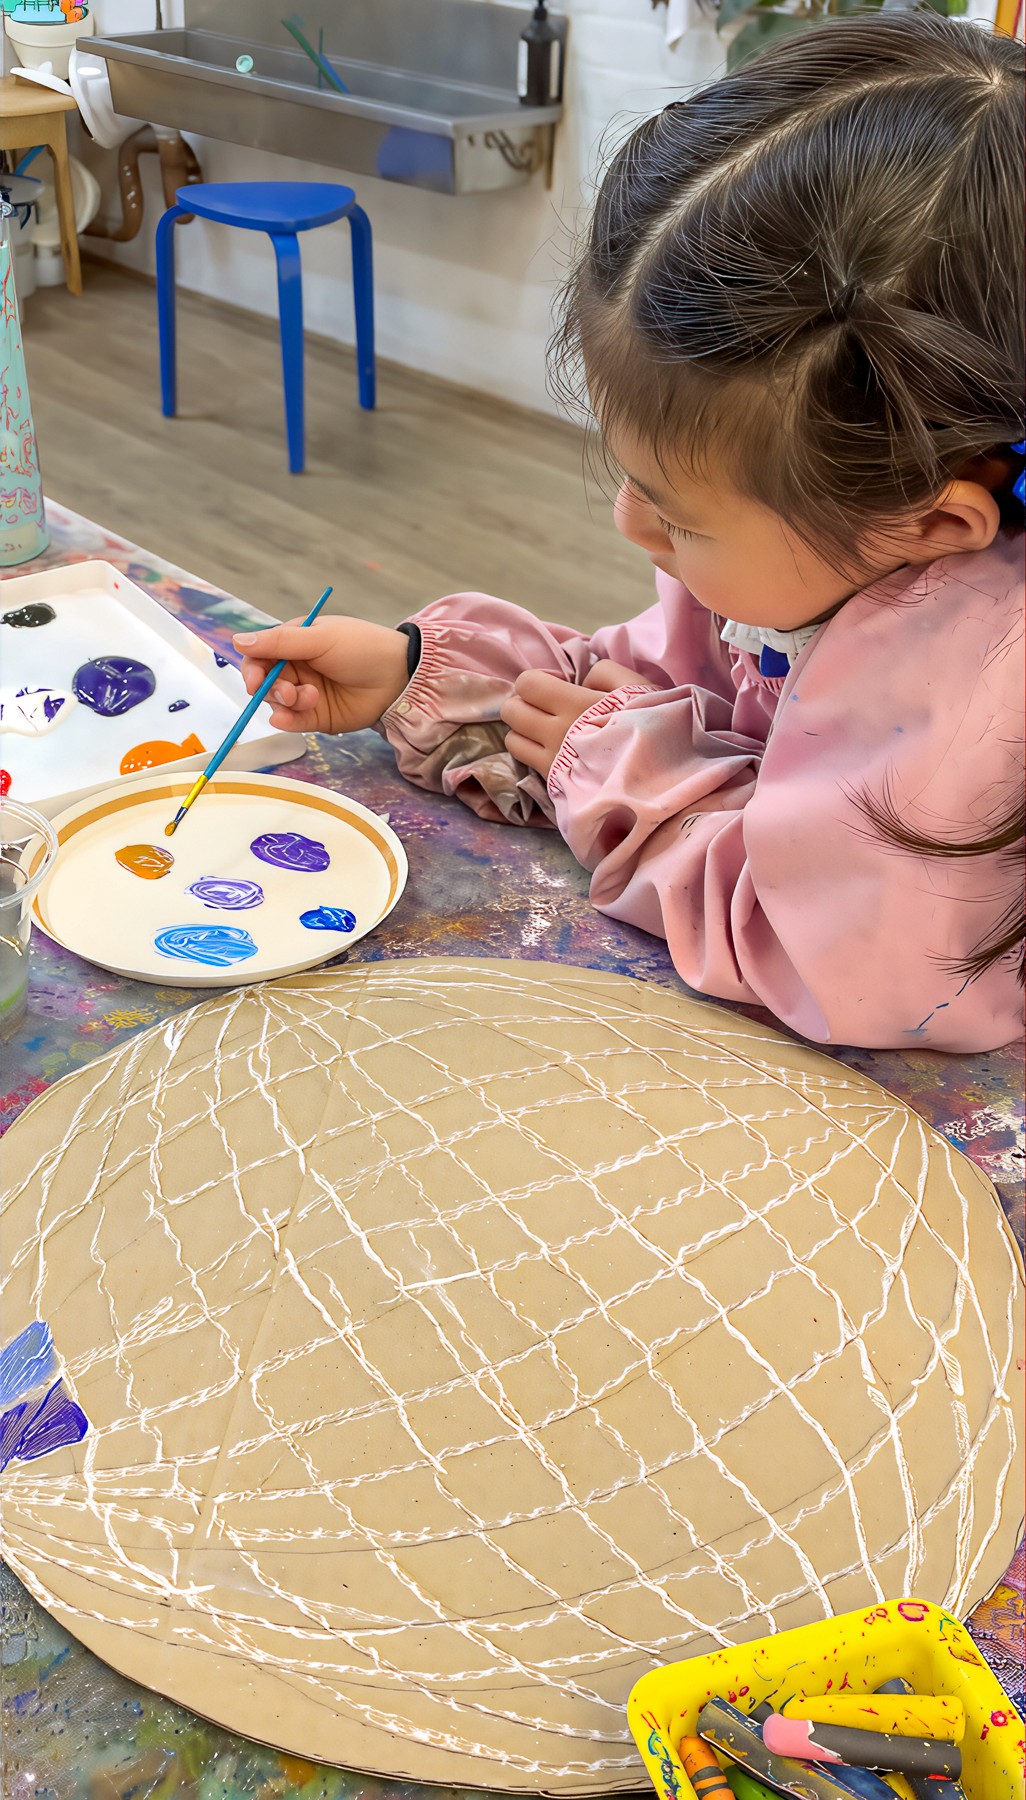
The Making
Let the mixing begin! Every time they discover a new shade, they can use it to fill one of the tiny shapes inside their disco ball. Some paint from top to bottom, others side to side, there’s no single “right” direction. Watch how their movements shift with the music or conversation around them.
Add silver, gold, or dots of white in a few corners to catch the light. Hang with a sparkly pipe-cleaner or piece of wire if you like.
Smudge Tip: Pause throughout the colour mixing and talk about how colour behaves. Ask open questions, and the artists might come to explain how white can lift and soften, how a touch of black deepens everything around it. The science of colour is just the best.
Variations
Collage foil or mirrored paper over sections for extra sparkle.
Use a metallic Sharpie or sparkly paint for detail lines once the paint dries.
Materials
Cardboard circles or heavy paper
Poster paint (plus black and white for mixing)
Paintbrushes, water jars
Metallic paint or pens (optional)
Music playlist
Back to Top
Shiny Disco Balls
Colour mixing reflections!
Bookmark
Painting & Drawing
The Set Up
Start with the real thing! You can just imagine how engaged the kids will be from the start with a disco ball catching sunlight and scattering hundreds of tiny reflections across the walls. Watch how the light moves and talk about how every tiny mirror reflects something different.
Give each artist a large cardboard circle (around 30 cm wide). Trace a bowl or plate if you need to. Draw faint pencil lines starting with a vertical and horizontal cross, and then add slightly curved lines to mimic the ball’s 3D shape. Depending on the age of the artists, I either draw the pencil lines for them and then they trace over twitch white oil pastel, or they do the whole lot themselves.Now for the colour! Each artist will need their own palette or paper plate for mixing. Ask them to choose three colours they love, plus plenty of white and a small blob of black for exploring tone, hue, and shade. You can guide them toward a single colour family for a softer look, or embrace the wild muddiness that happens when curiosity takes over.
The Making
Let the mixing begin! Every time they discover a new shade, they can use it to fill one of the tiny shapes inside their disco ball. Some paint from top to bottom, others side to side, there’s no single “right” direction. Watch how their movements shift with the music or conversation around them.
Add silver, gold, or dots of white in a few corners to catch the light. Hang with a sparkly pipe-cleaner or piece of wire if you like.
Smudge Tip: Pause throughout the colour mixing and talk about how colour behaves. Ask open questions, and the artists might come to explain how white can lift and soften, how a touch of black deepens everything around it. The science of colour is just the best.
Variations
Collage foil or mirrored paper over sections for extra sparkle.
Use a metallic Sharpie or sparkly paint for detail lines once the paint dries.
Materials
Cardboard circles or heavy paper
Poster paint (plus black and white for mixing)
Paintbrushes, water jars
Metallic paint or pens (optional)
Music playlist
Back to Top
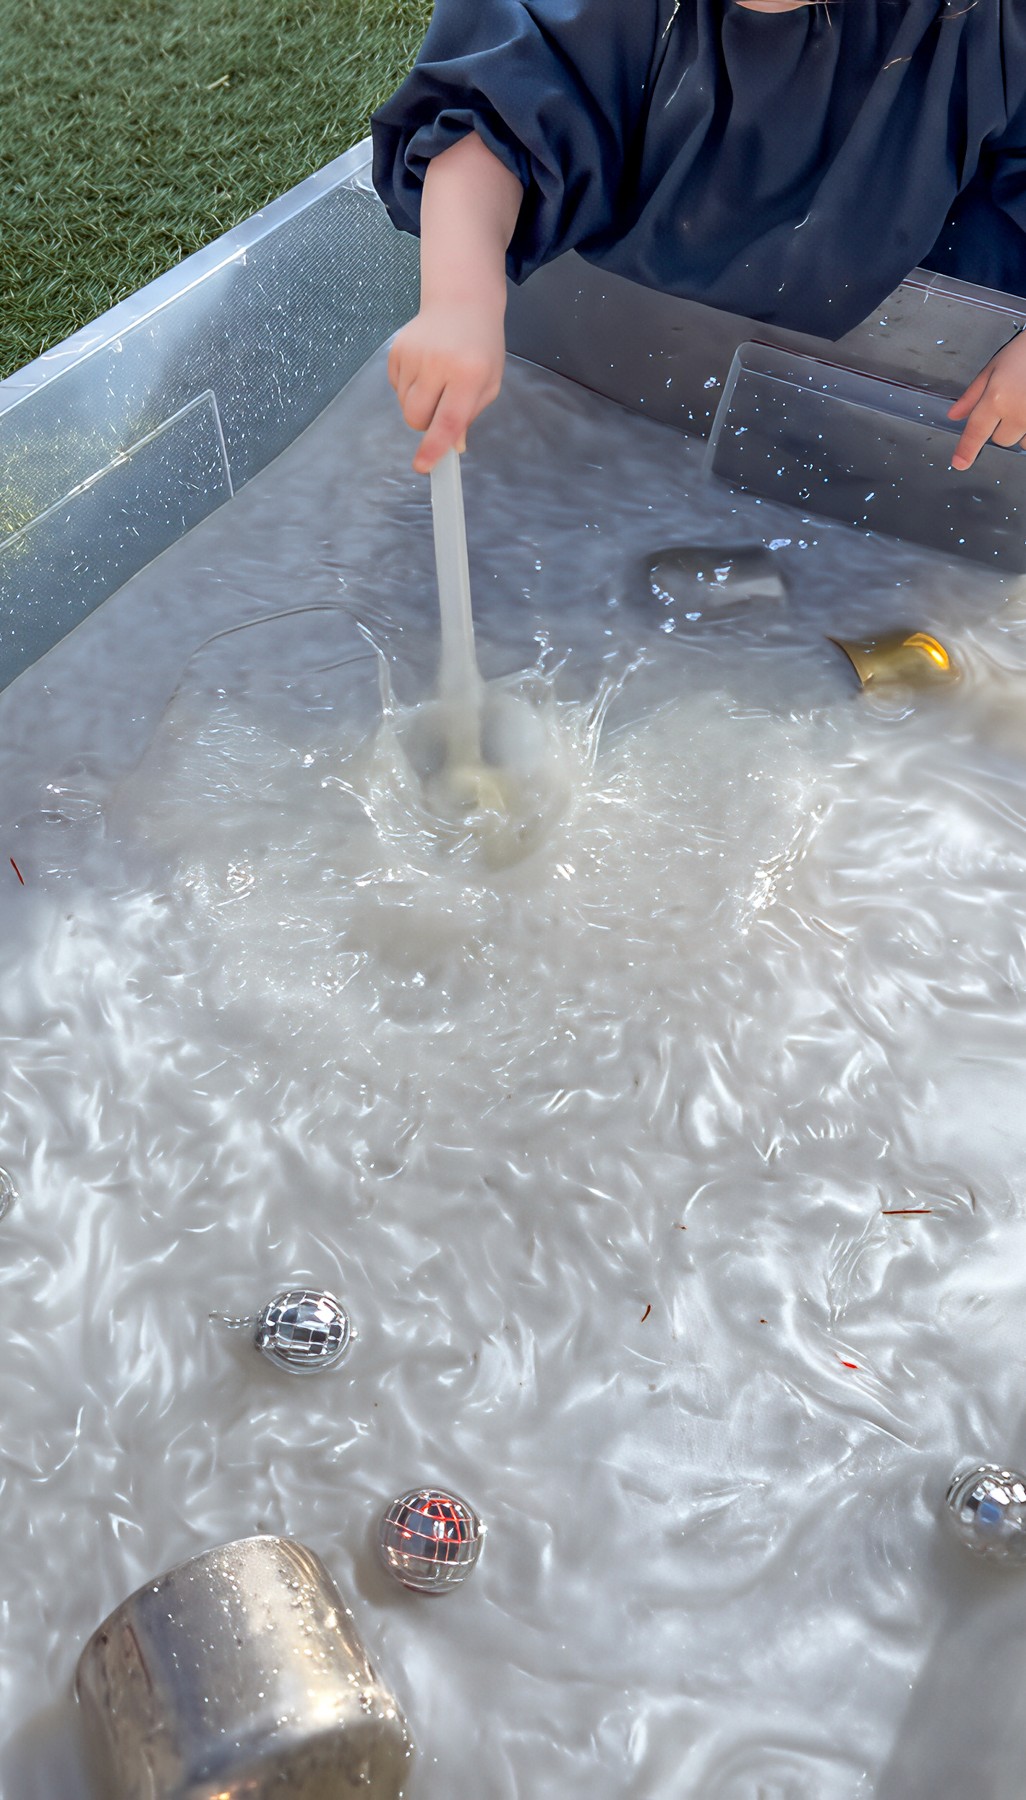
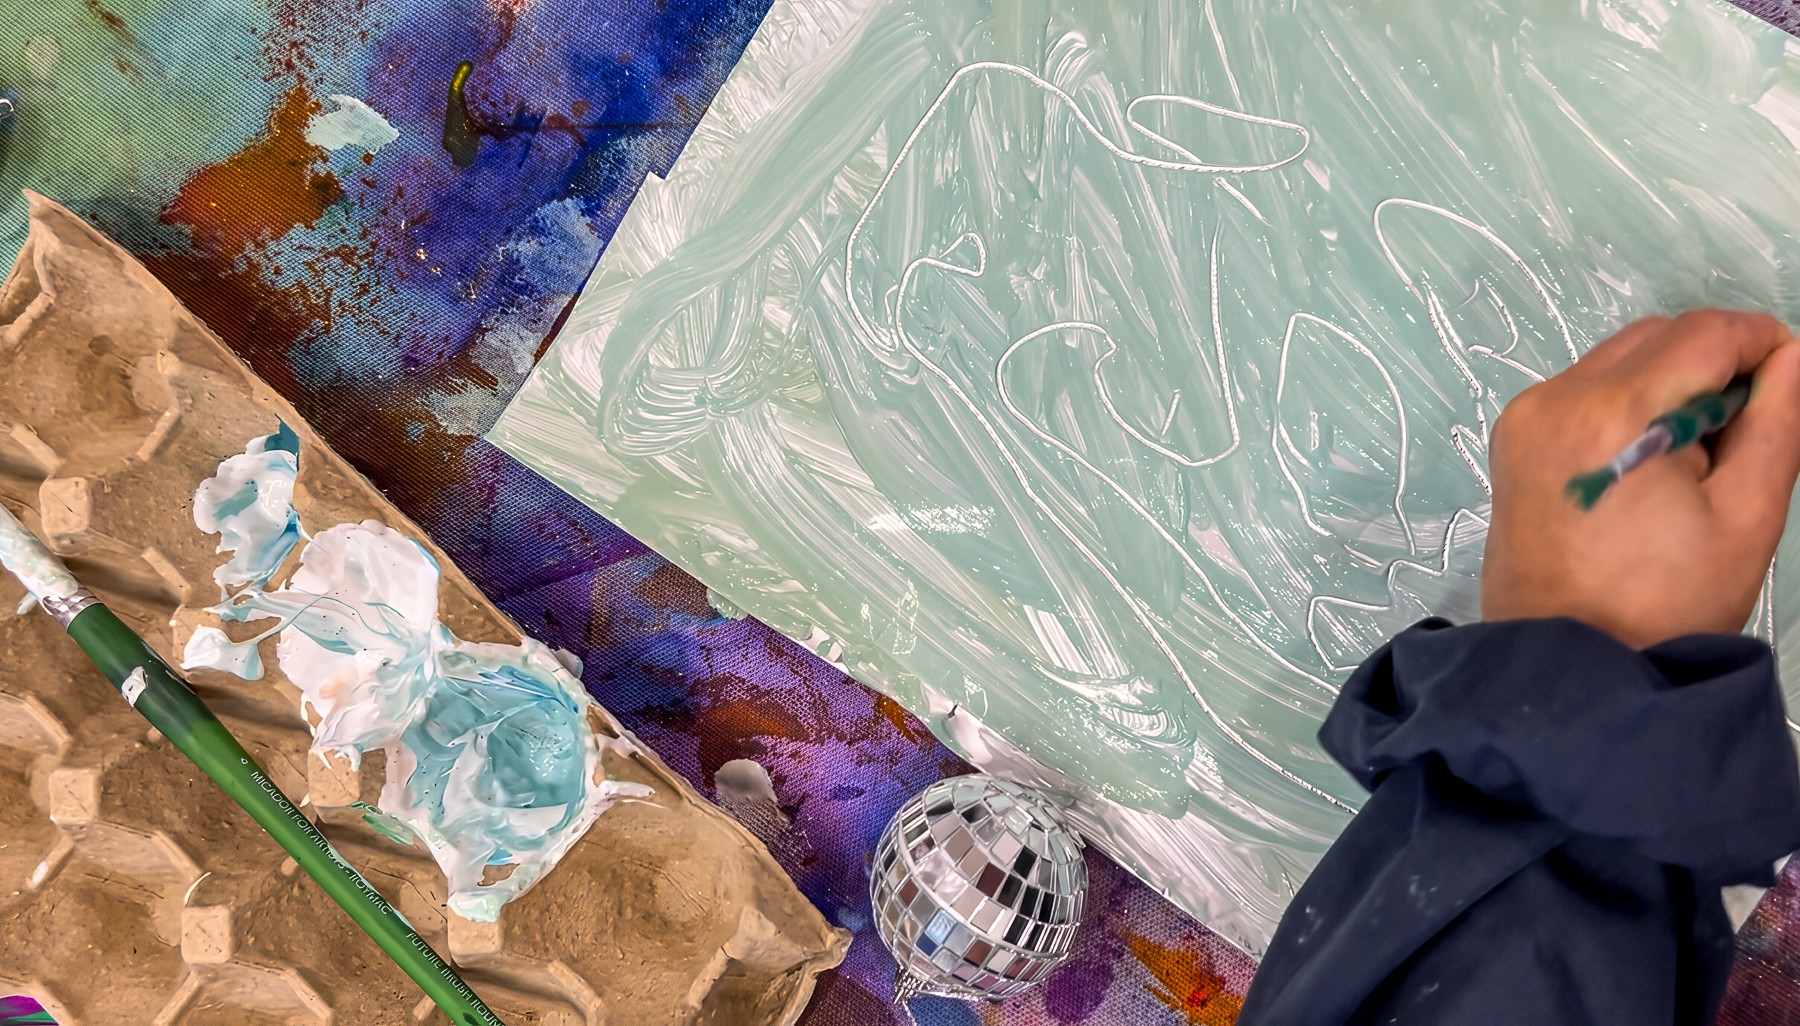
Metallic Water
Pour and swirl in this sparkly world
Bookmark
Sensory Play
The Set Up
Fill tubs with water and add metallic paint until the surface gleams. Stir slowly and watch the swirl. The trick is finding the right ratio; too much paint, and it’s thick; too little, and the shine disappears.
Drop in tiny disco balls, sequins, glow-stars (anything that floats and catches light is perfect!).
The Making
Let the kids scoop, pour, and stir. Water play builds focus and flow in a really gentle way. It helps children slow down, observe change, and share space while exploring cause and effect through movement and reflection.
Variations
Add glow sticks for night-concert vibes.
Materials
Large tub or tray
Metallic paint (silver, gold, copper)
Water
Sequins, mini disco balls, stars
Cups, spoons, strainers
Back to Top
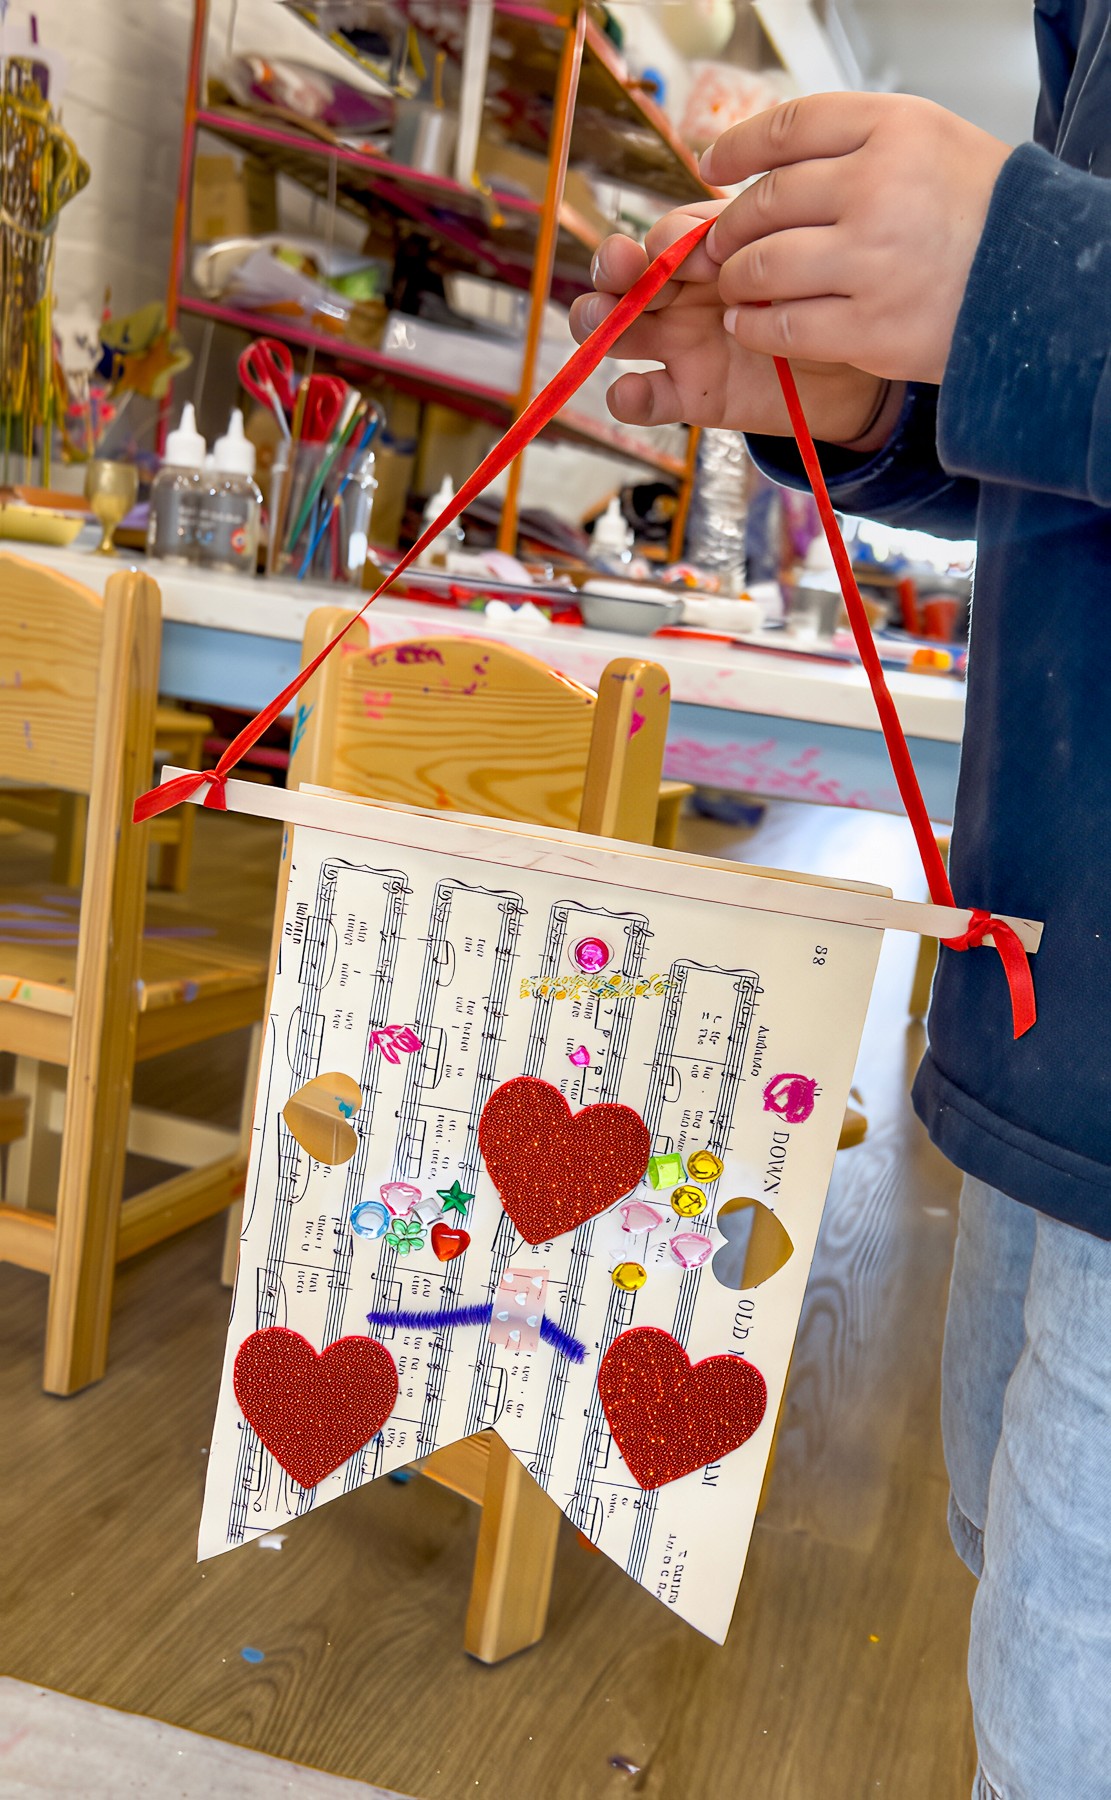
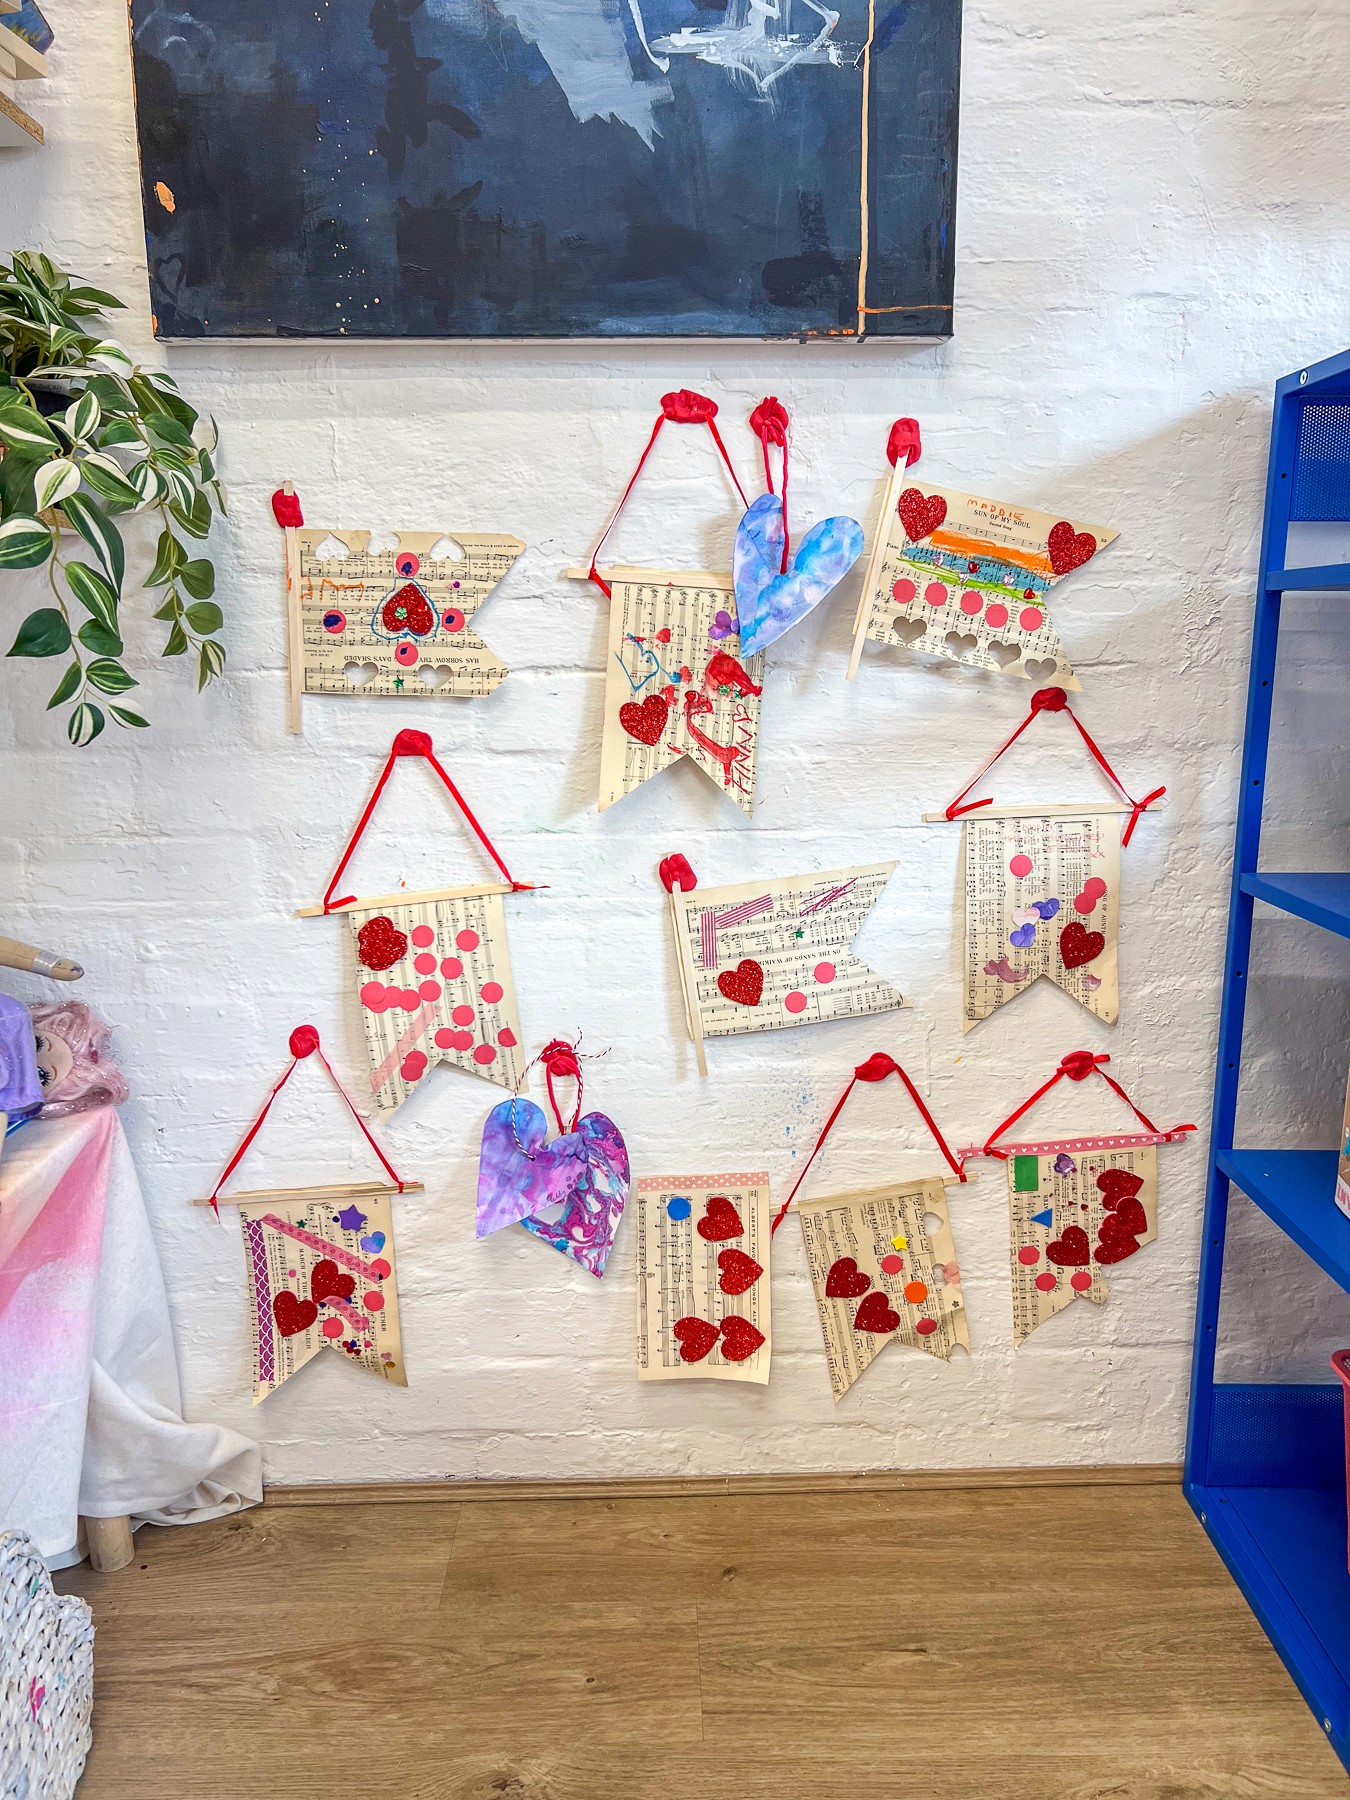
Sheet Music Banners
Notes that turn into colour!
Bookmark
Collage
The Set Up
Spread out old sheet music pages. My personal preference is for the ones already yellowed with time! Offer oil pastels, watercolours, and collage trays filled with bits and pieces: washi tape, foam stickers, sequins, scraps of painted paper.
Talk about rhythm in a visual way. How could the patterns of the notes turn into colour, line, or texture? What might a song look like?
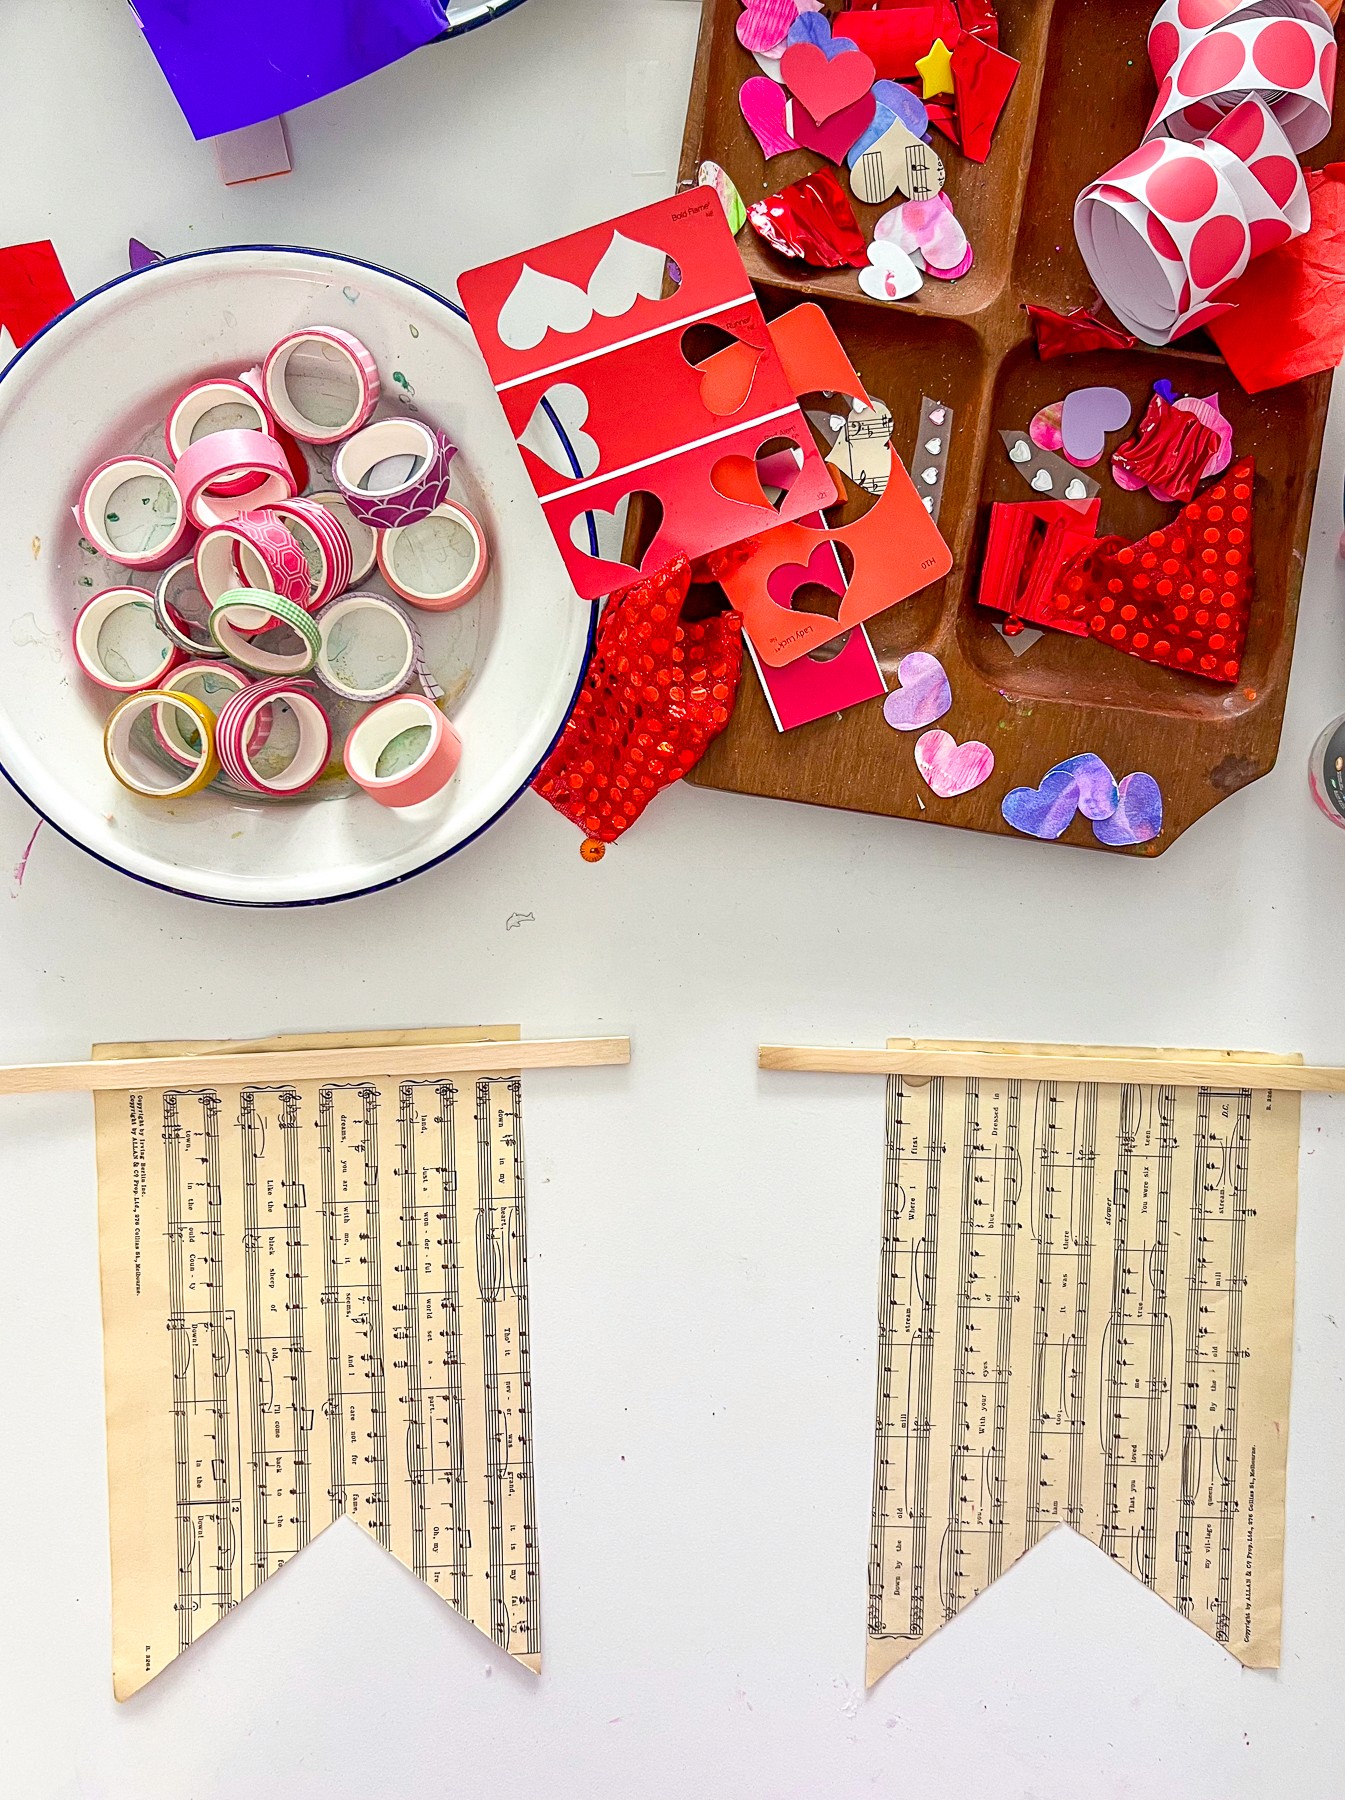
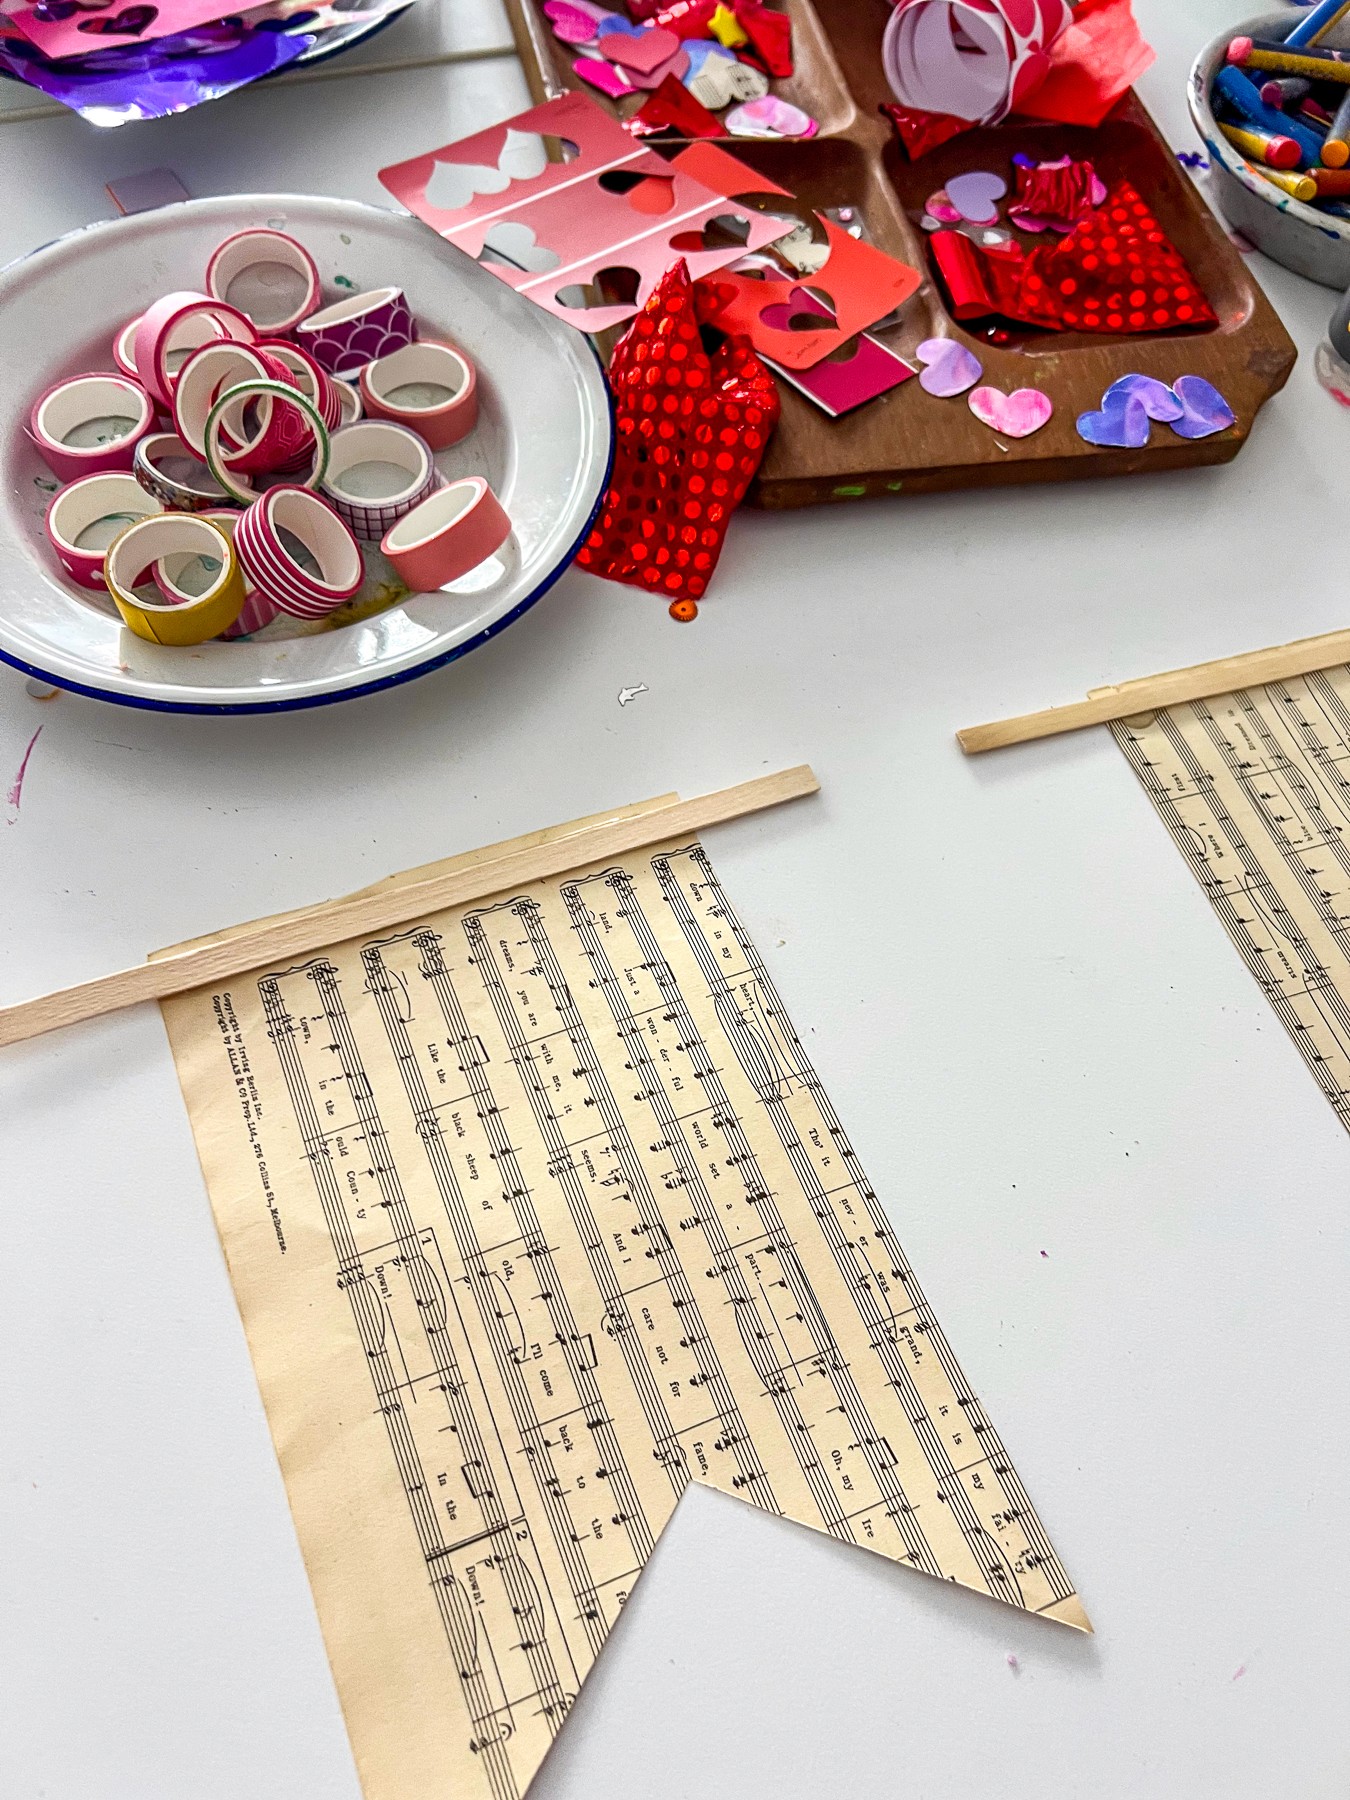
The Making
Let the watercolour wash glide over the printed notes or layer pastel or collage on top. Kids frame, punch, sprinkle and compose on top of the notes. Finish with two holes for string or tape the top edge to a bamboo chopstick or twig and hang!
Variations
Add song lyrics or invented titles with markers.
Paint both sides for a banner that moves beautifully when it spins.
Materials
Old sheet music
Watercolours, brushes, oil pastels
Collage scraps, washi tape, sequins, stickers
Hole punch, string or twigs for hanging
Back to Top
Sheet Music Banners
Notes that turn into colour!
Bookmark
Collage
The Set Up
Spread out old sheet music pages. My personal preference is for the ones already yellowed with time! Offer oil pastels, watercolours, and collage trays filled with bits and pieces: washi tape, foam stickers, sequins, scraps of painted paper.
Talk about rhythm in a visual way. How could the patterns of the notes turn into colour, line, or texture? What might a song look like?
The Making
Let the watercolour wash glide over the printed notes or layer pastel or collage on top. Kids frame, punch, sprinkle and compose on top of the notes. Finish with two holes for string or tape the top edge to a bamboo chopstick or twig and hang!
Variations
Add song lyrics or invented titles with markers.
Paint both sides for a banner that moves beautifully when it spins.
Materials
Old sheet music
Watercolours, brushes, oil pastels
Collage scraps, washi tape, sequins, stickers
Hole punch, string or twigs for hanging
Back to Top
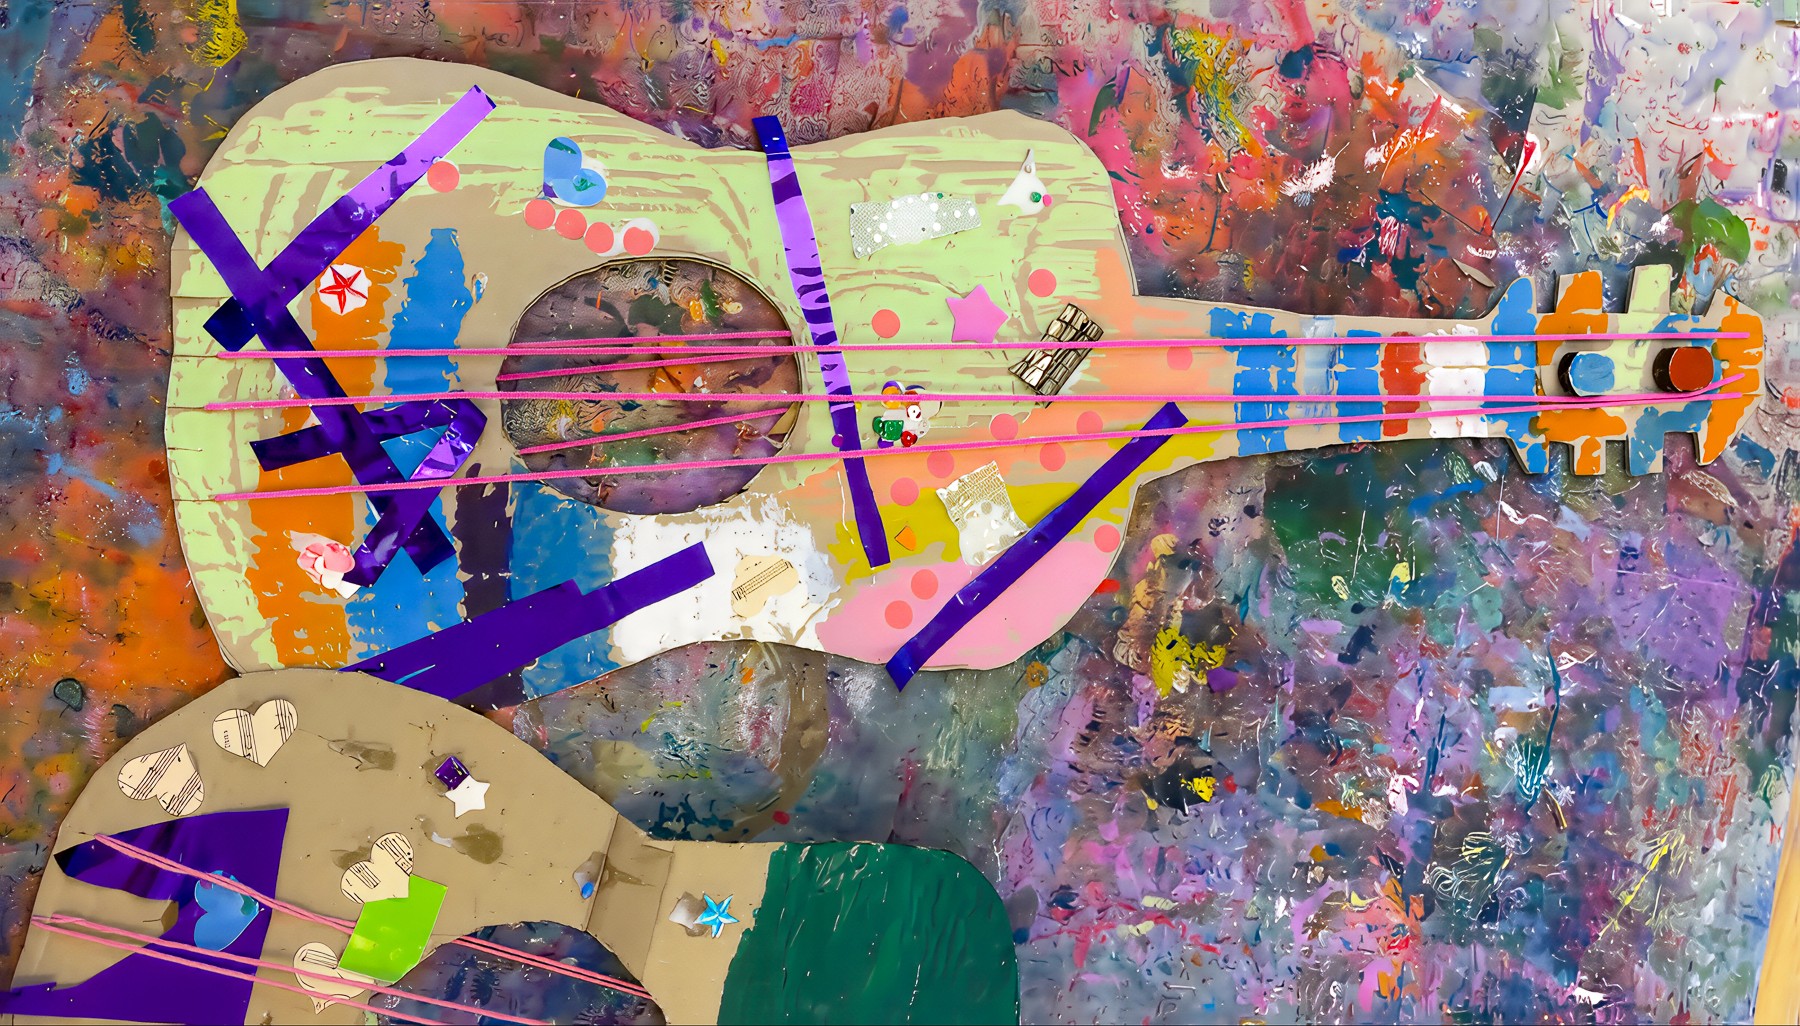
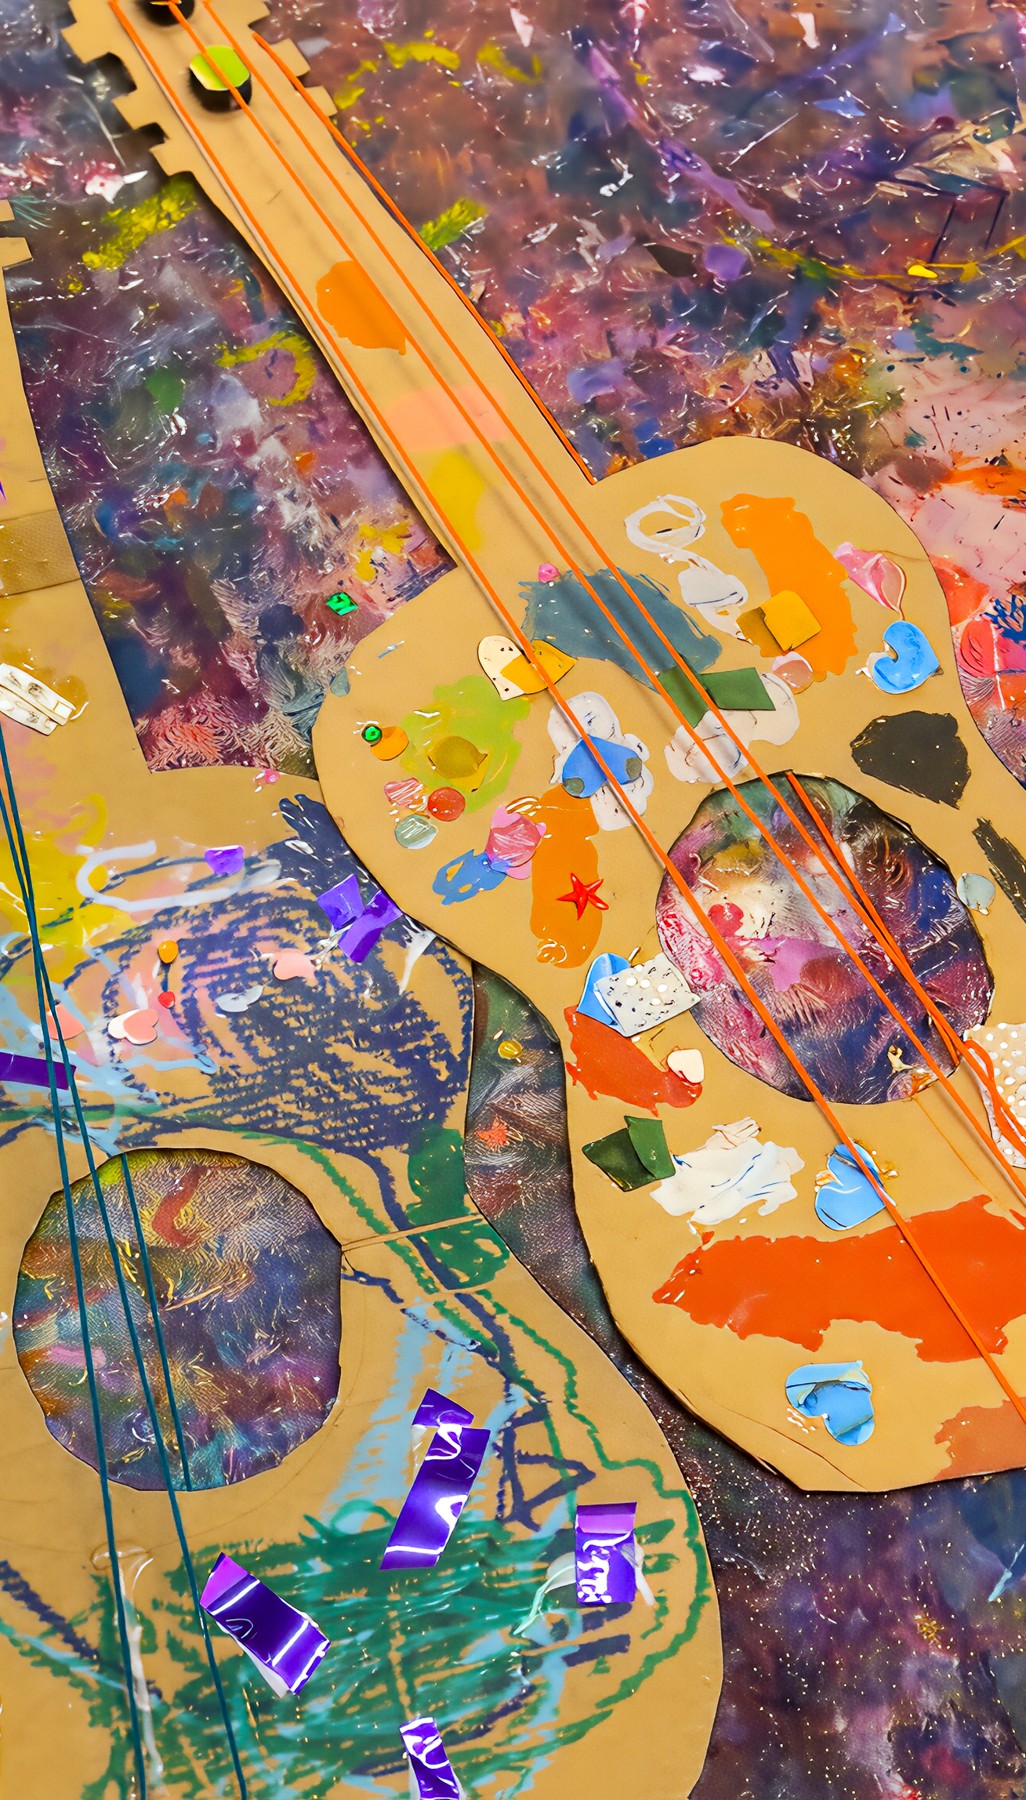
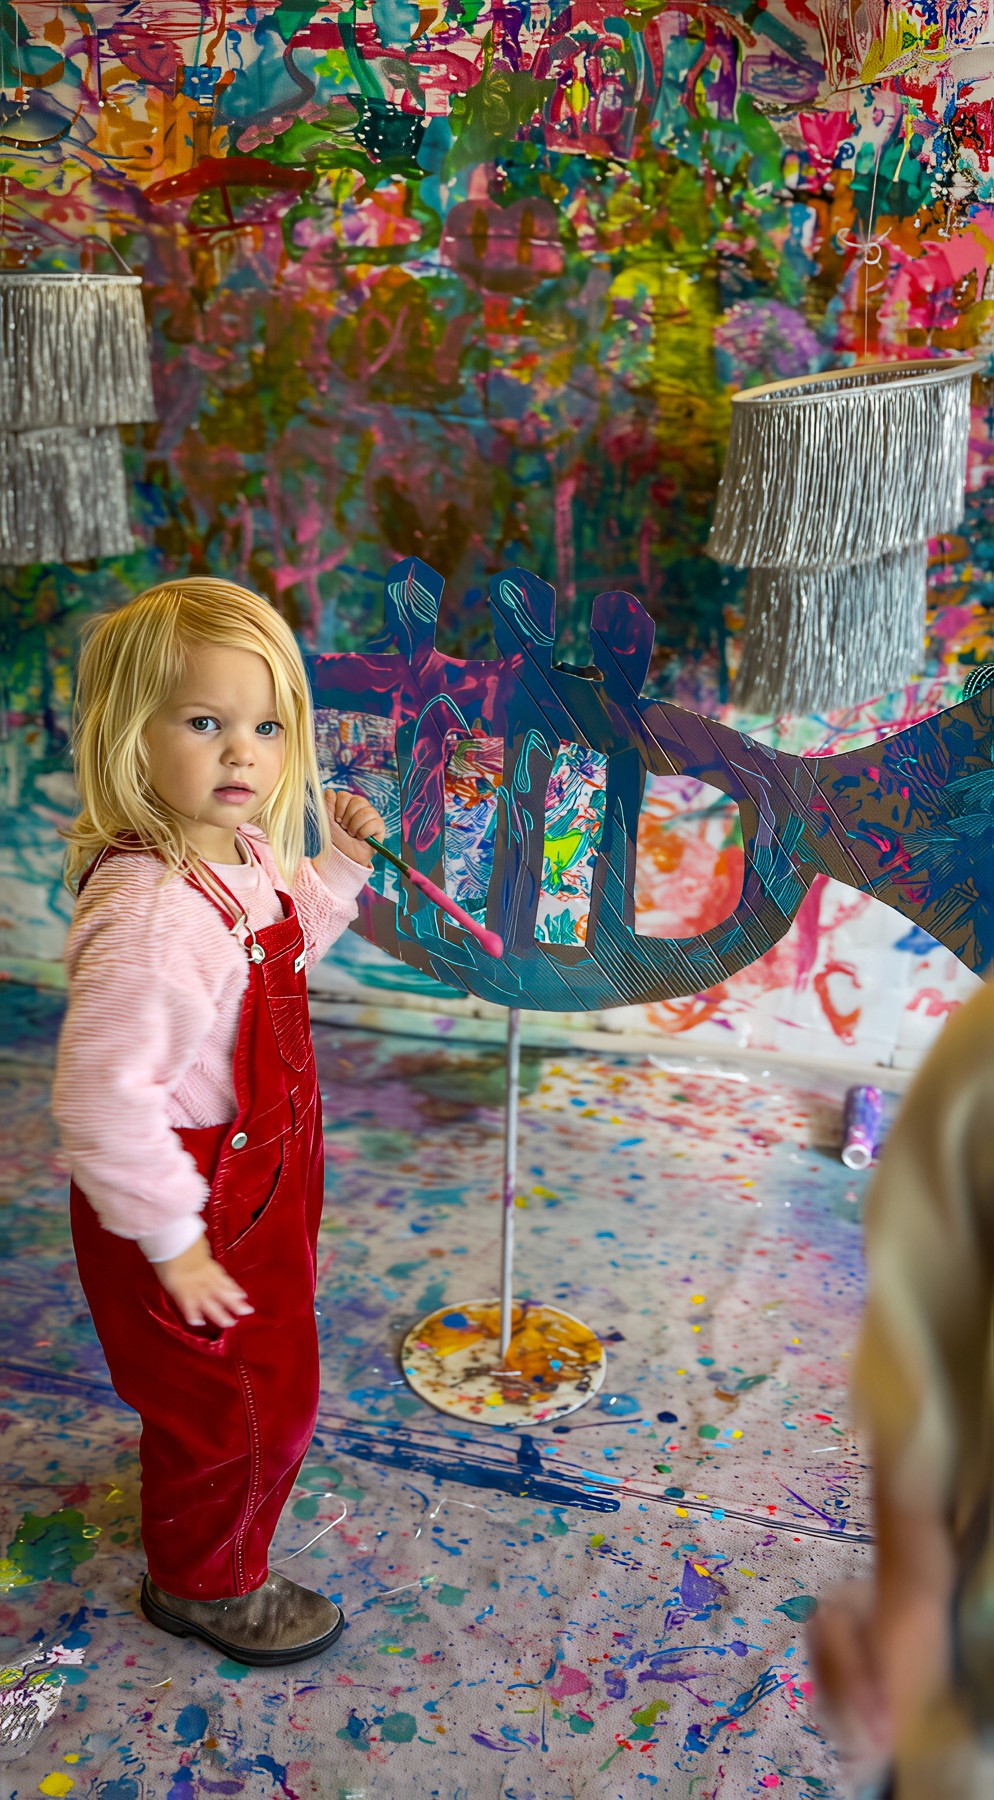
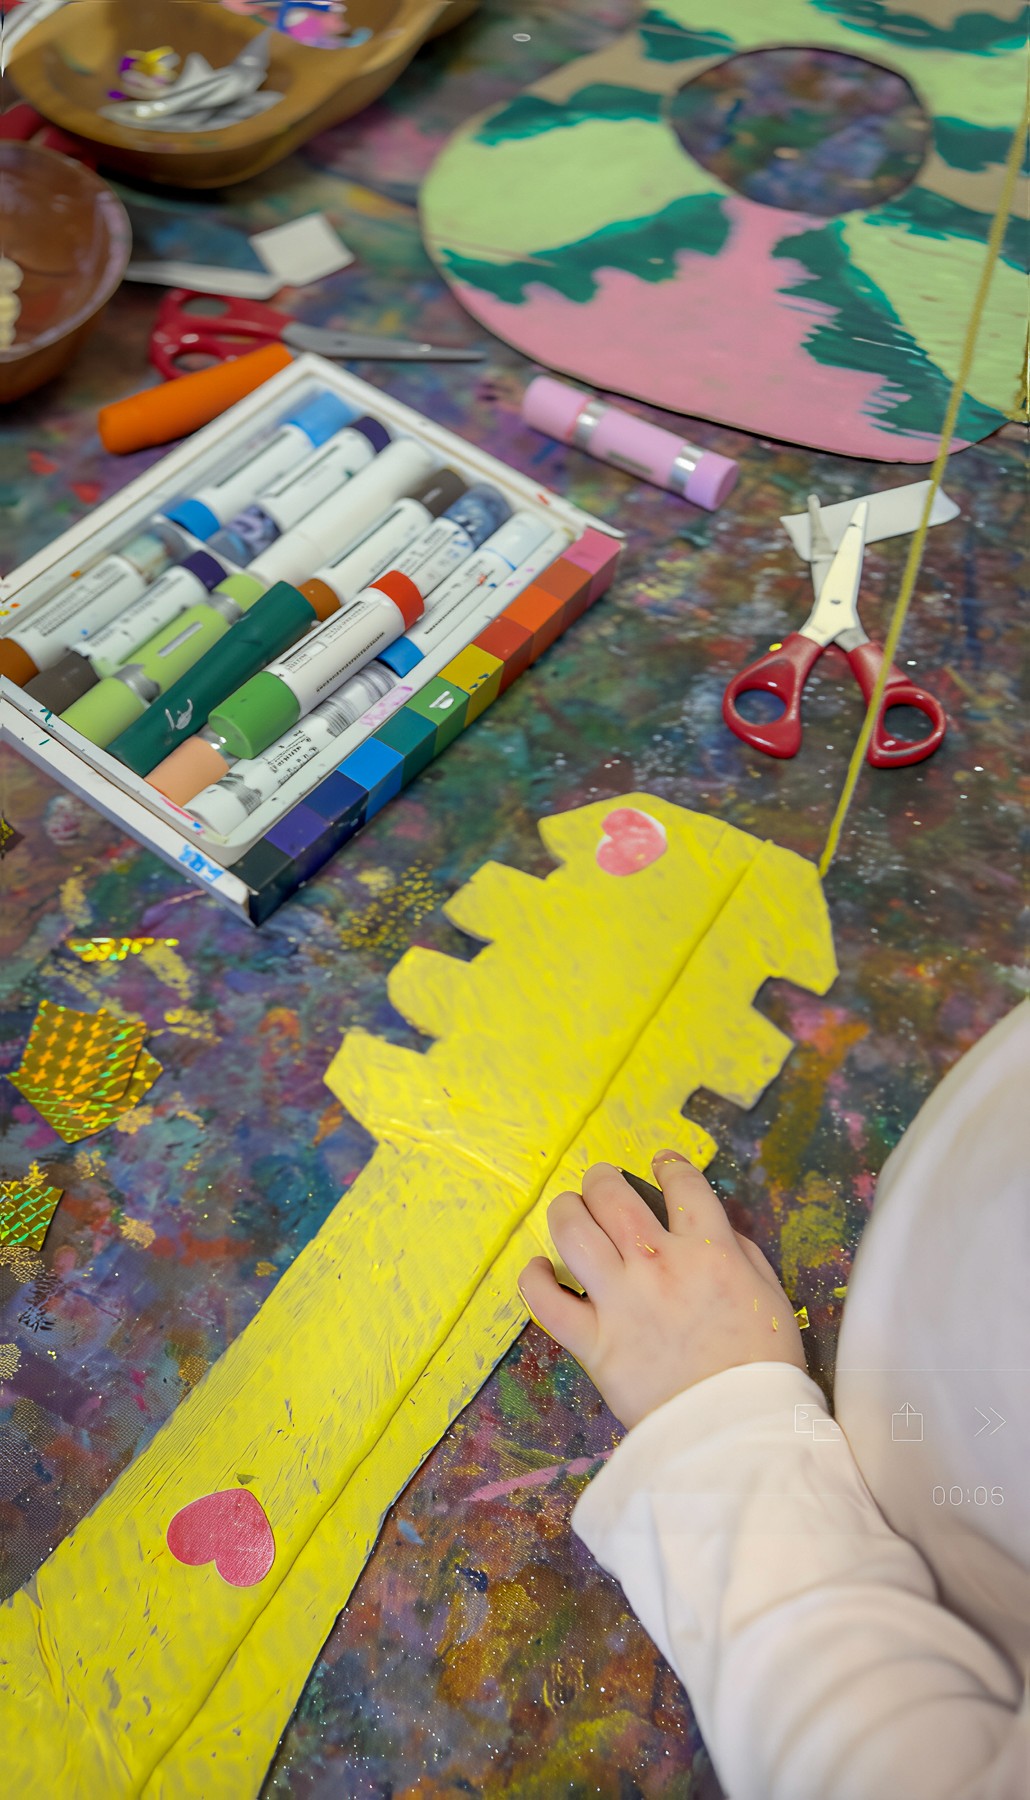
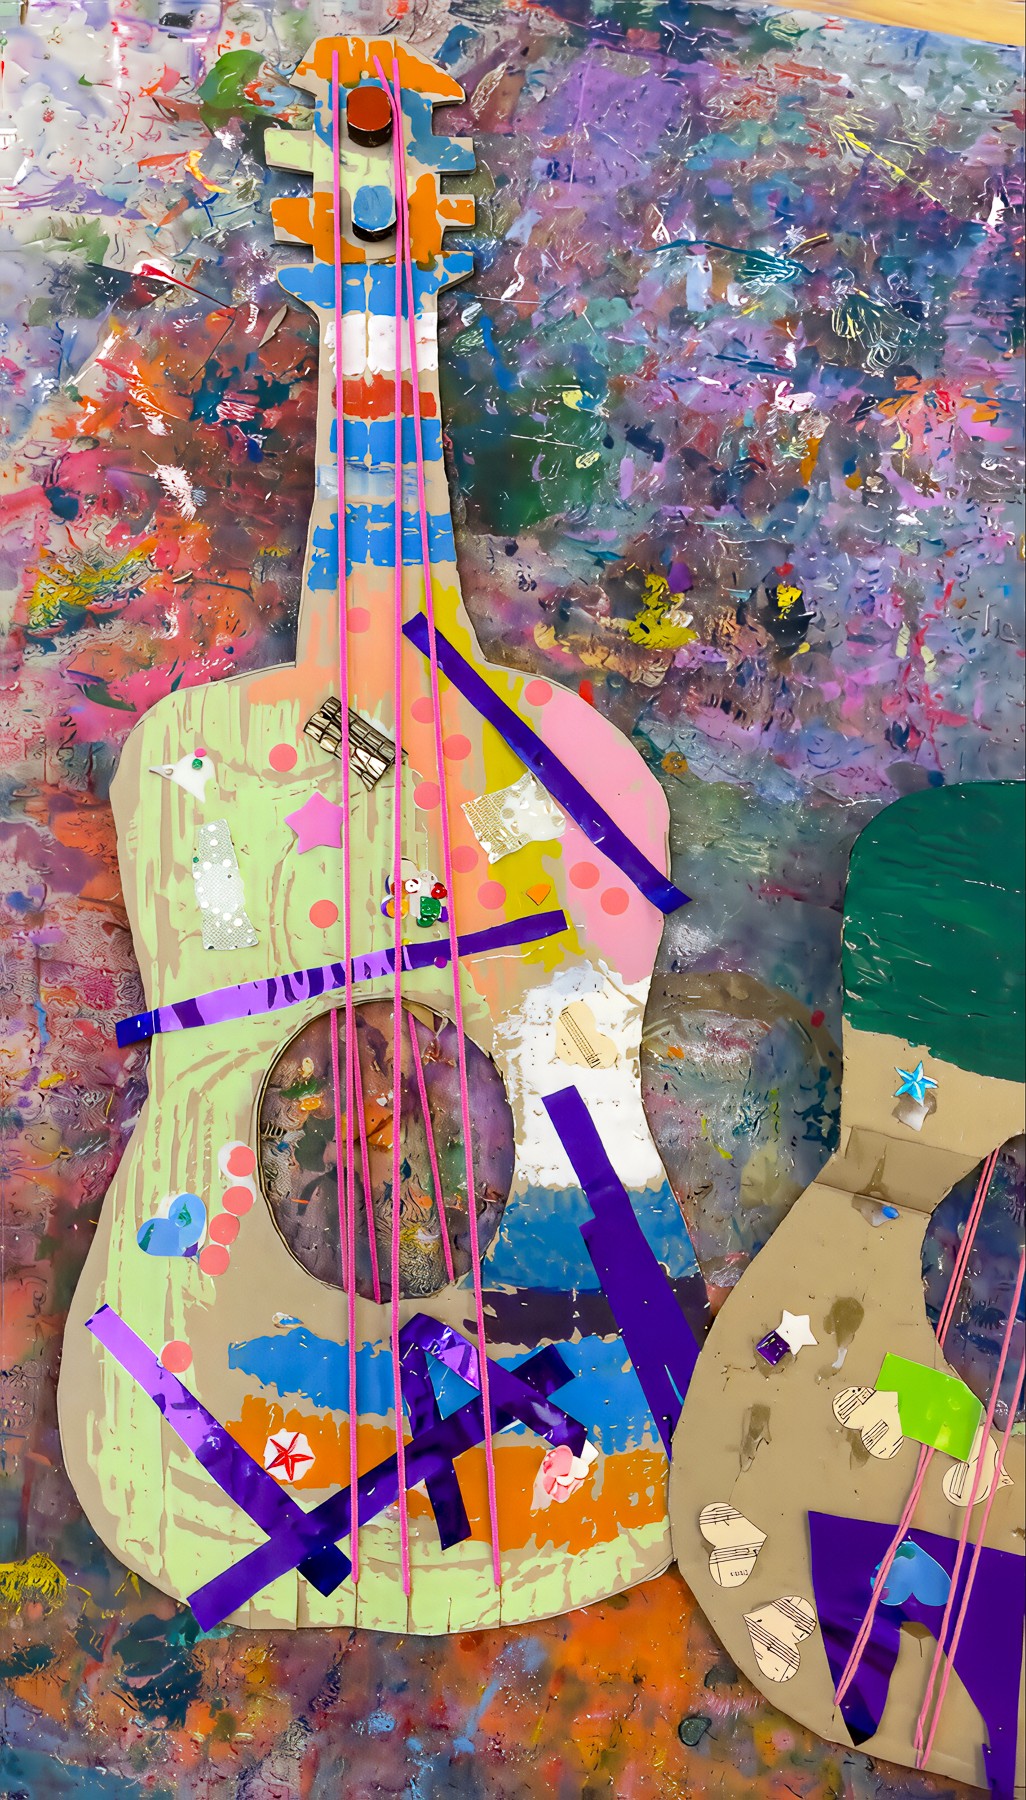
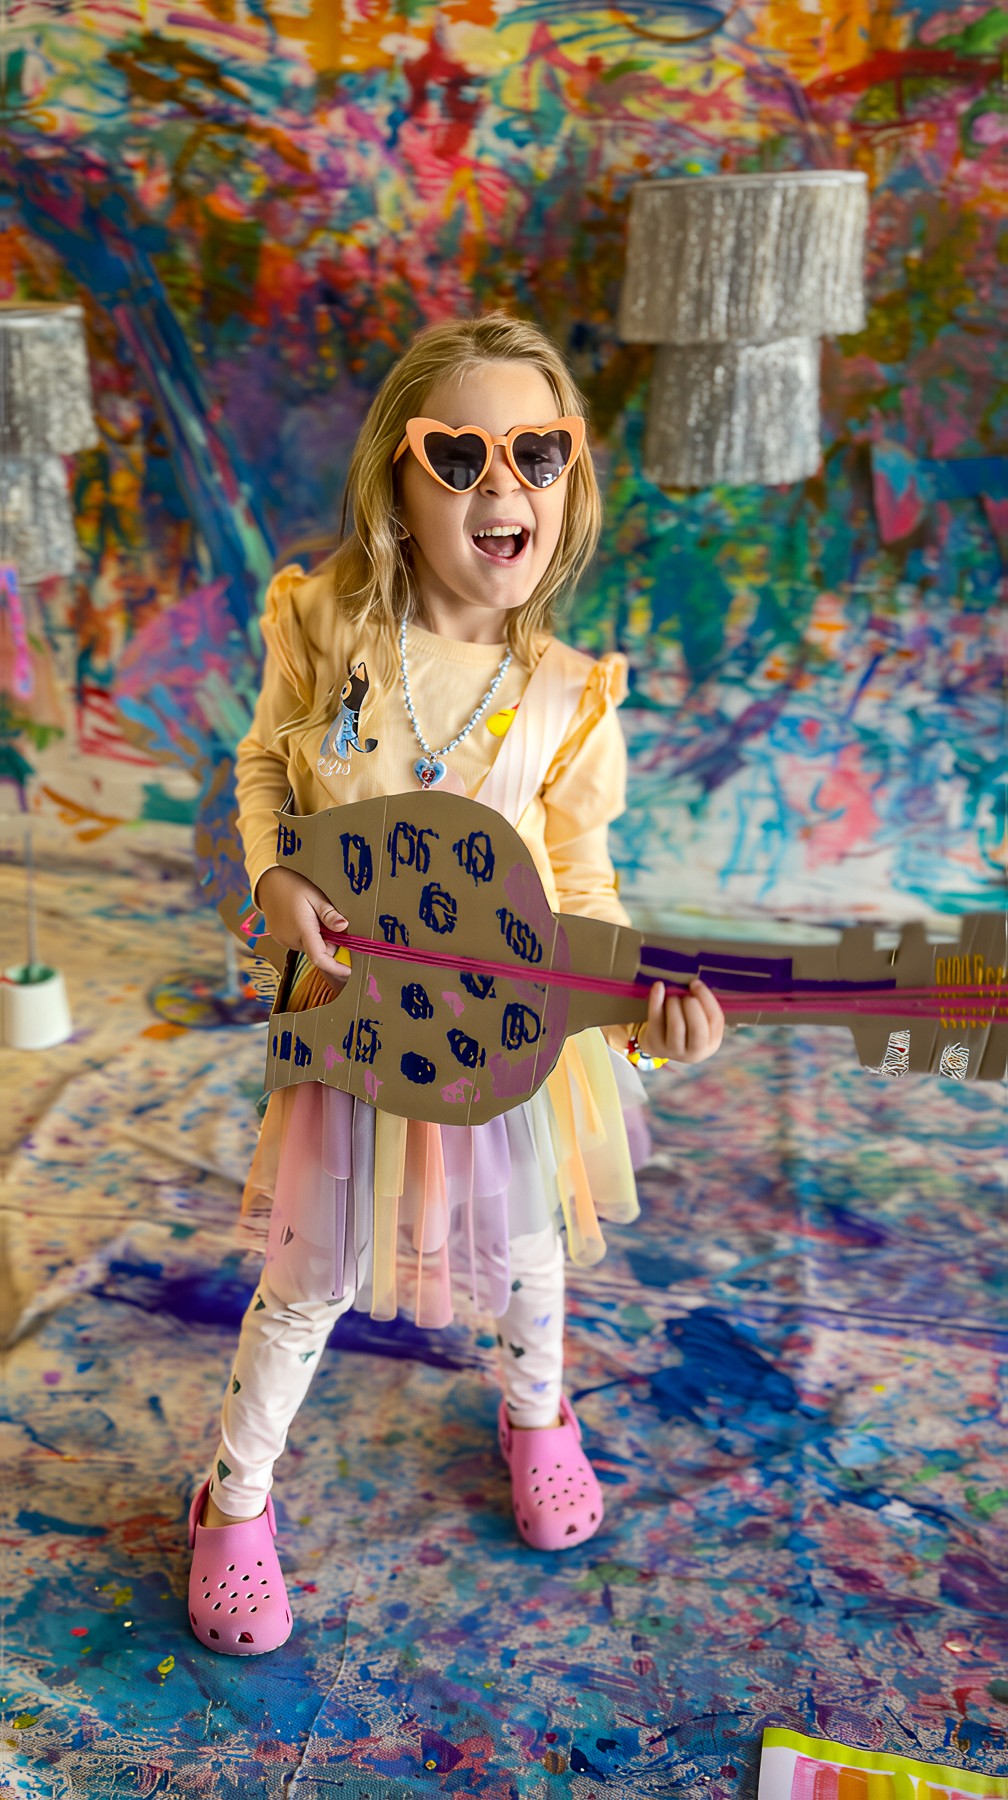
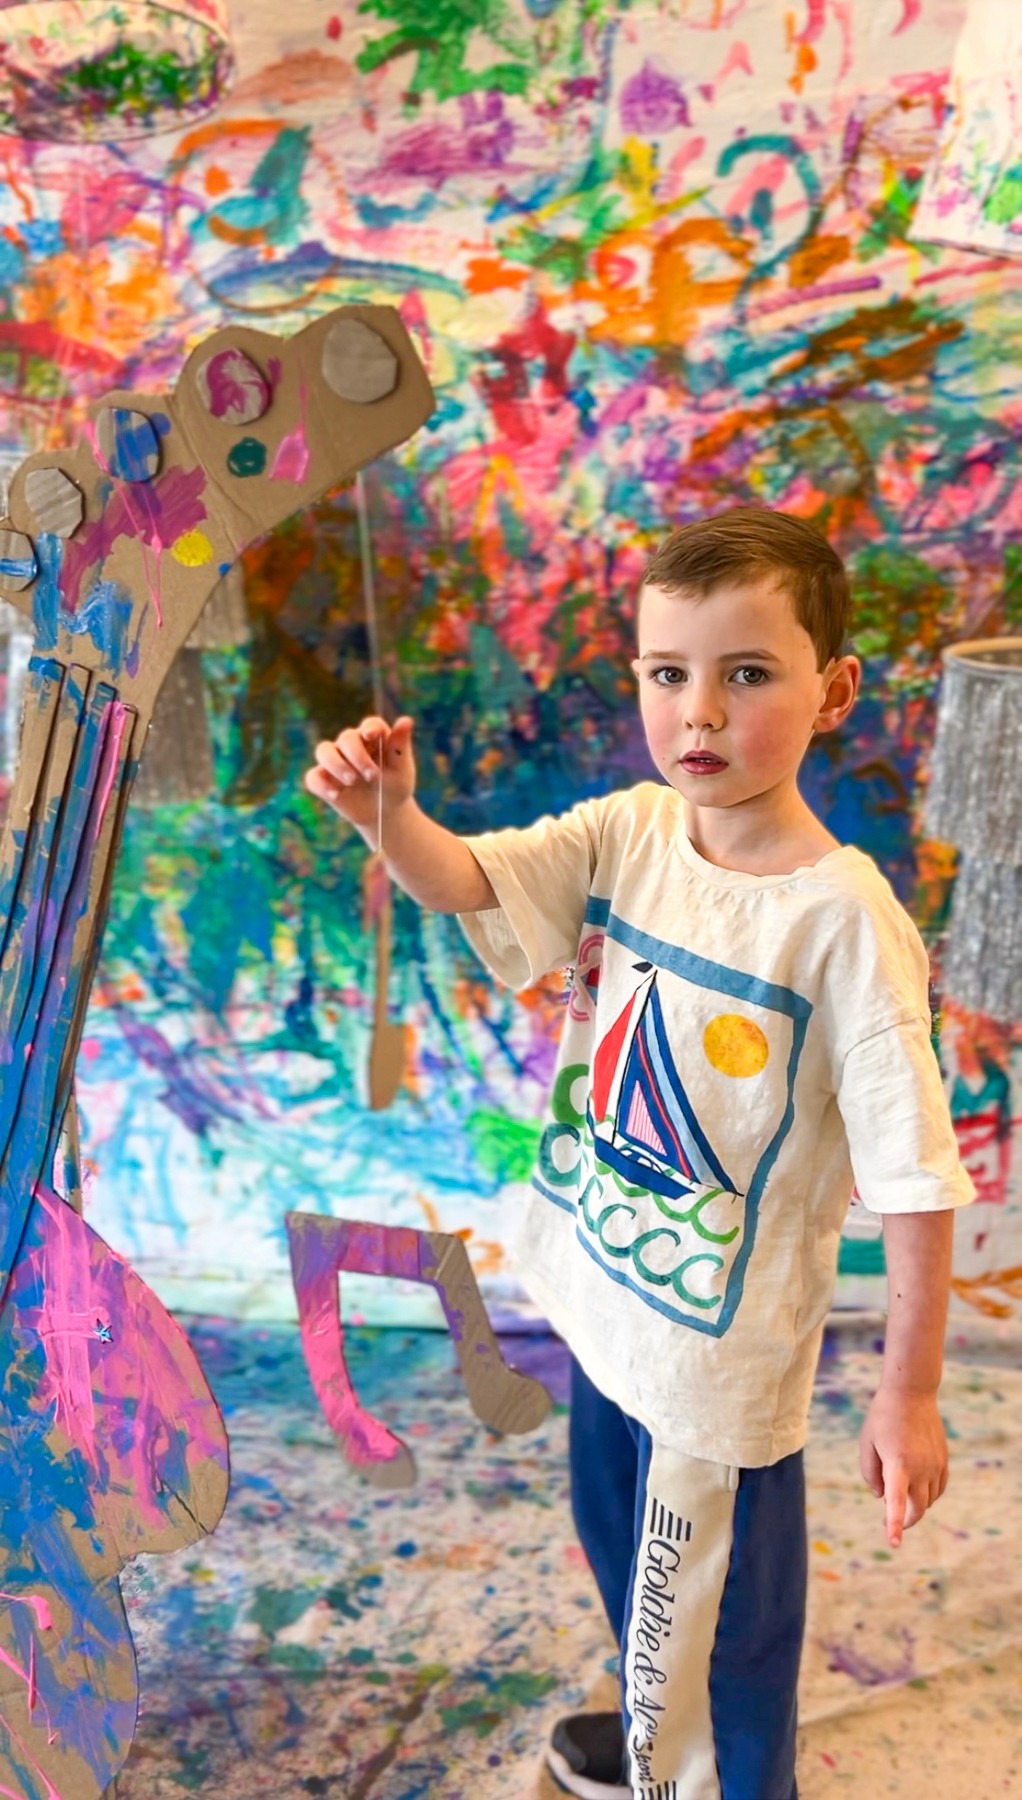
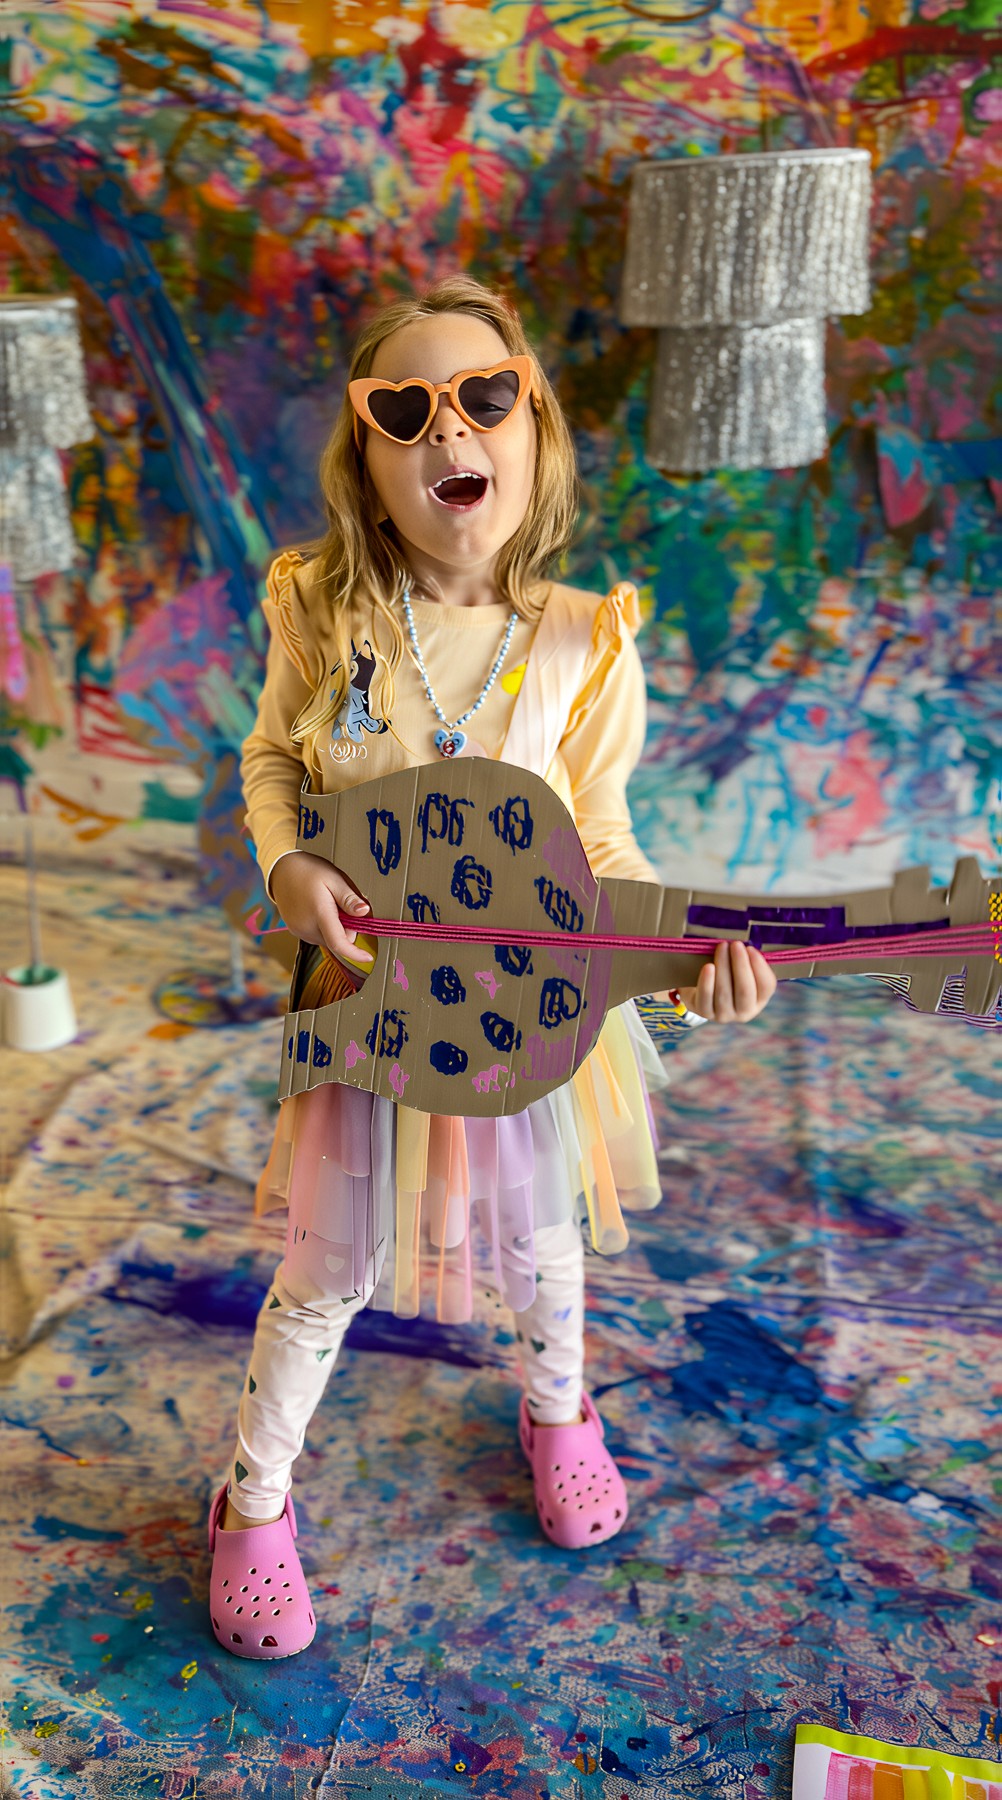
Cardboard Instruments
Take a beat from Picasso’s Blue Guitars
Bookmark
Sculpture
Artist Study: Pablo Picasso
Picasso painted his guitars during what’s known as his “Blue Period.” Those works are full of long, flowing lines and deep, melancholy blues. He wasn’t trying to make his guitars look real, he wanted them to feel real.
He used colour to express mood and line to capture emotion. It’s a perfect reminder that art doesn’t need to copy what we see; it can show what something feels like instead!
The Set Up
Use large sheets of recycled cardboard and sketch outlines of guitars, trumpets, violins, drums (or invent something completely new!). Keep them flat rather than boxy. The simplicity invites more play with line, paint, and form.
Show a few of Picasso’s Blue Guitars or his cubist works for inspiration. Notice how he broke shapes apart and used angles to create rhythm.
Set out trays of poster paint or paint sticks, plus string, yarn, and collage scraps. Pre-punch holes if you want kids to weave or thread. The more tactile, the better!

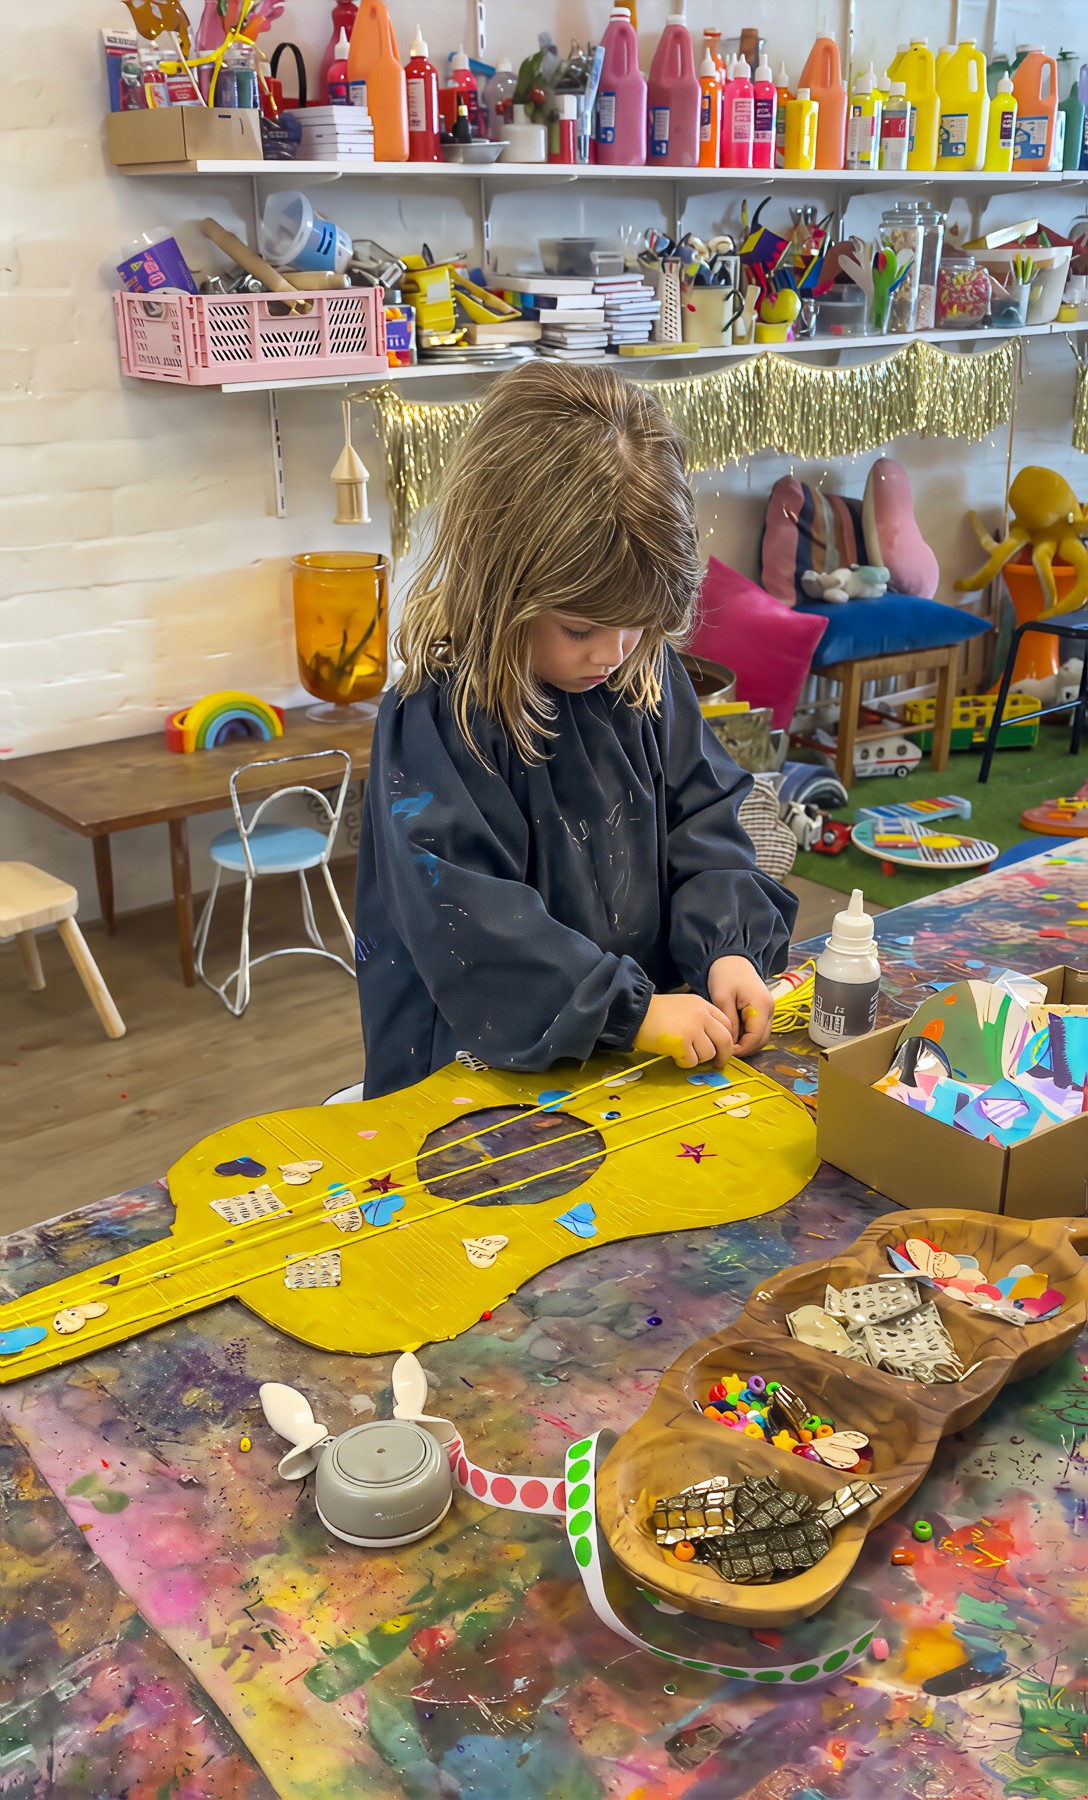
The Making
Encourage loose, expressive mark-making and let the colour mixing take the lead! String or yarn can become guitar strings, trumpet valves, or swirling sound waves.
It’s always gorgeous to play music while they paint; jazz, blues, or something with rhythm.
Variations
Work large-scale and join instruments together for a cardboard orchestra.
Collage foil or metallic paper to echo the shimmer of sound.
Display the finished works upright, like a band waiting to play.
Materials
Flat recycled cardboard
Poster paints or paint sticks
Yarn or string for weaving or “strings”
Hole punch, scissors, brushes, sponges
Images of Picasso’s Blue Guitar series for inspiration
Back to Top
Cardboard Instruments
Take a beat from Picasso’s Blue Guitars
Bookmark
Sculpture
Artist Study: Pablo Picasso
Picasso painted his guitars during what’s known as his “Blue Period.” Those works are full of long, flowing lines and deep, melancholy blues. He wasn’t trying to make his guitars look real, he wanted them to feel real.
He used colour to express mood and line to capture emotion. It’s a perfect reminder that art doesn’t need to copy what we see; it can show what something feels like instead!
The Set Up
Use large sheets of recycled cardboard and sketch outlines of guitars, trumpets, violins, drums (or invent something completely new!). Keep them flat rather than boxy. The simplicity invites more play with line, paint, and form.
Show a few of Picasso’s Blue Guitars or his cubist works for inspiration. Notice how he broke shapes apart and used angles to create rhythm.
Set out trays of poster paint or paint sticks, plus string, yarn, and collage scraps. Pre-punch holes if you want kids to weave or thread. The more tactile, the better!
The Making
Encourage loose, expressive mark-making and let the colour mixing take the lead! String or yarn can become guitar strings, trumpet valves, or swirling sound waves.
It’s always gorgeous to play music while they paint; jazz, blues, or something with rhythm.
Variations
Work large-scale and join instruments together for a cardboard orchestra.
Collage foil or metallic paper to echo the shimmer of sound.
Display the finished works upright, like a band waiting to play.
Materials
Flat recycled cardboard
Poster paints or paint sticks
Yarn or string for weaving or “strings”
Hole punch, scissors, brushes, sponges
Images of Picasso’s Blue Guitar series for inspiration
Back to Top
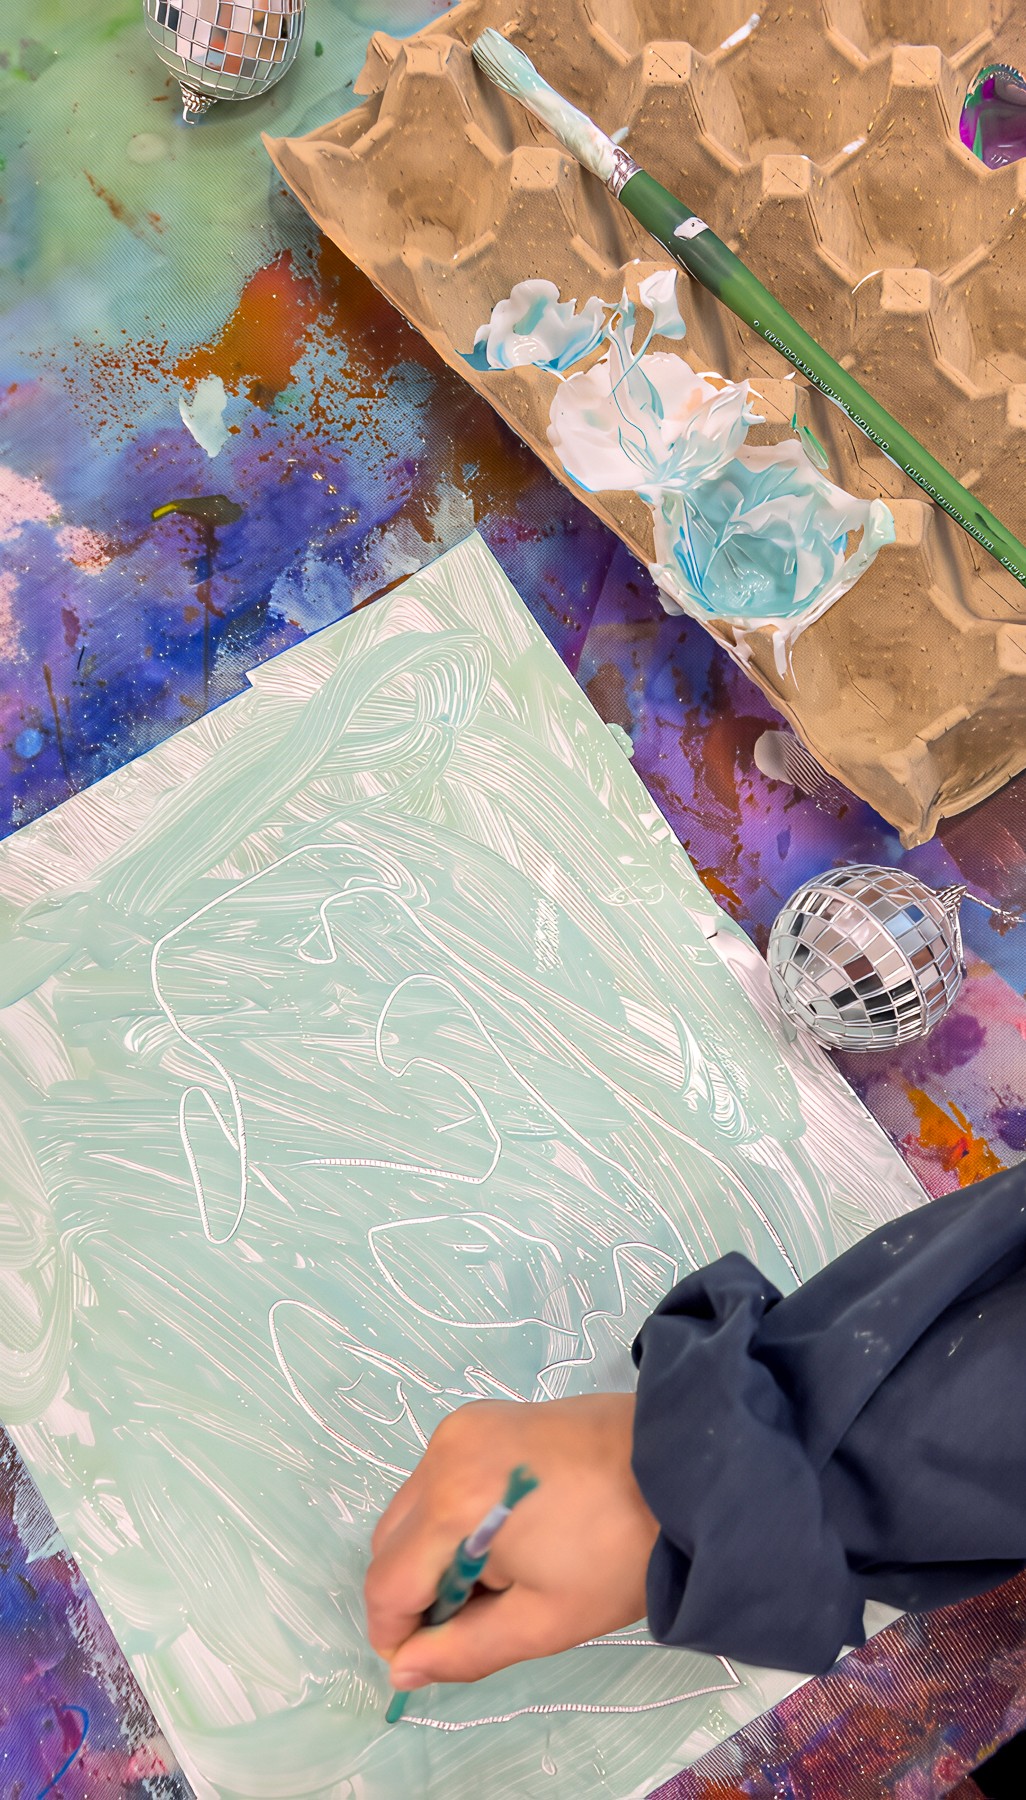
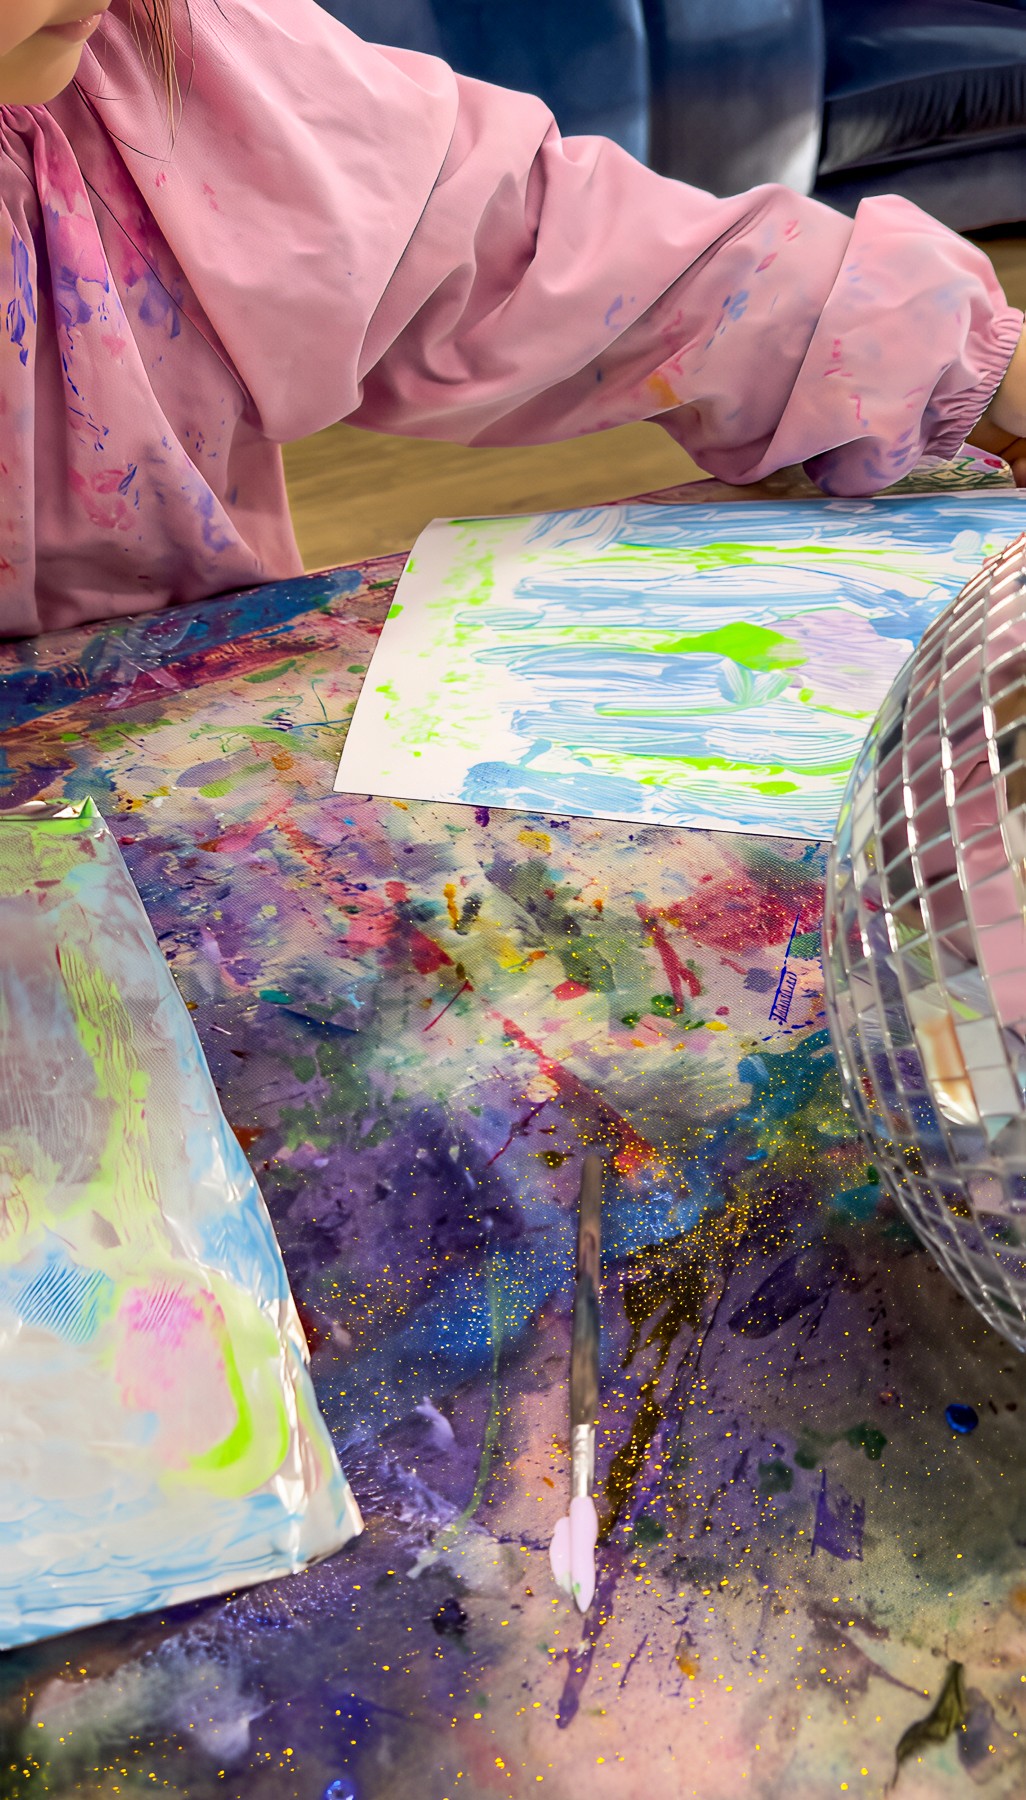
Foil Monoprints
Shiny, shimmery, noisy fun.
Bookmark
Print Making
The Set Up
Smooth sheets of thick foil onto the table and tape them down so they don’t slip. Spoon a few blobs of poster paint into clear jars and add a good squeeze of white in each to keep the paint vibrant and opaque.
It’s great to offer a range of painting tools, and you might like to talk about noticing the sounds of creating before you begin too.
The Making
Paint directly onto the foil. Use brushes, sponges, or the back of a paintbrush to draw through the colour. Then place a sheet of white paper over your design and smooth it gently with your hand. Lift the print and see what gorgeousness stayed behind! Monoprints are such a perfect way to celebrate the process and know that no two prints are ever going to be exactly the same.

Variations
Try darker paper for high contrast.
Layer multiple prints on one page for a more abstract result.
Materials
Thick kitchen foil
Poster paint + white
Brushes, sponges, rollers
White or dark paper for printing
Blunt tools for scraping
Back to Top
Foil Monoprints
Shiny, shimmery, noisy fun.
Bookmark
Print Making
The Set Up
Smooth sheets of thick foil onto the table and tape them down so they don’t slip. Spoon a few blobs of poster paint into clear jars and add a good squeeze of white in each to keep the paint vibrant and opaque.
It’s great to offer a range of painting tools, and you might like to talk about noticing the sounds of creating before you begin too.
The Making
Paint directly onto the foil. Use brushes, sponges, or the back of a paintbrush to draw through the colour. Then place a sheet of white paper over your design and smooth it gently with your hand. Lift the print and see what gorgeousness stayed behind! Monoprints are such a perfect way to celebrate the process and know that no two prints are ever going to be exactly the same.
Variations
Try darker paper for high contrast.
Layer multiple prints on one page for a more abstract result.
Materials
Thick kitchen foil
Poster paint + white
Brushes, sponges, rollers
White or dark paper for printing
Blunt tools for scraping
Back to Top
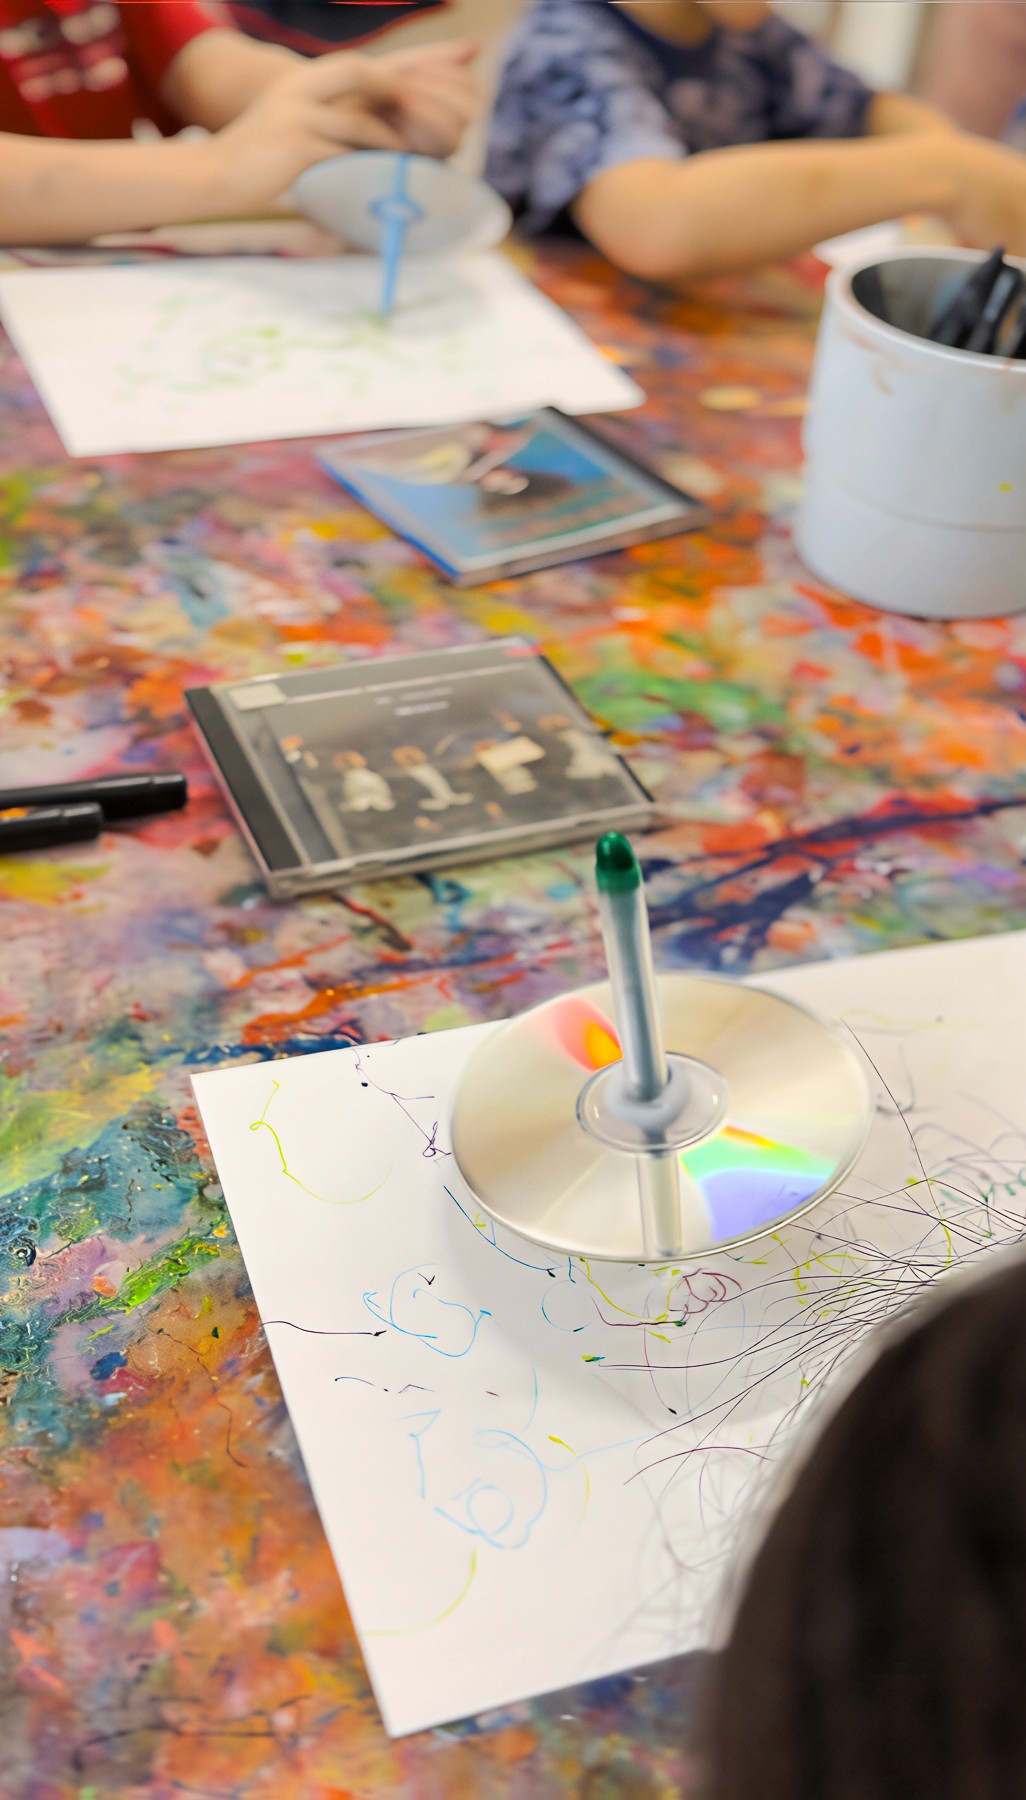
CD Spinners
A musical spinning top
Bookmark
Creative Exploration
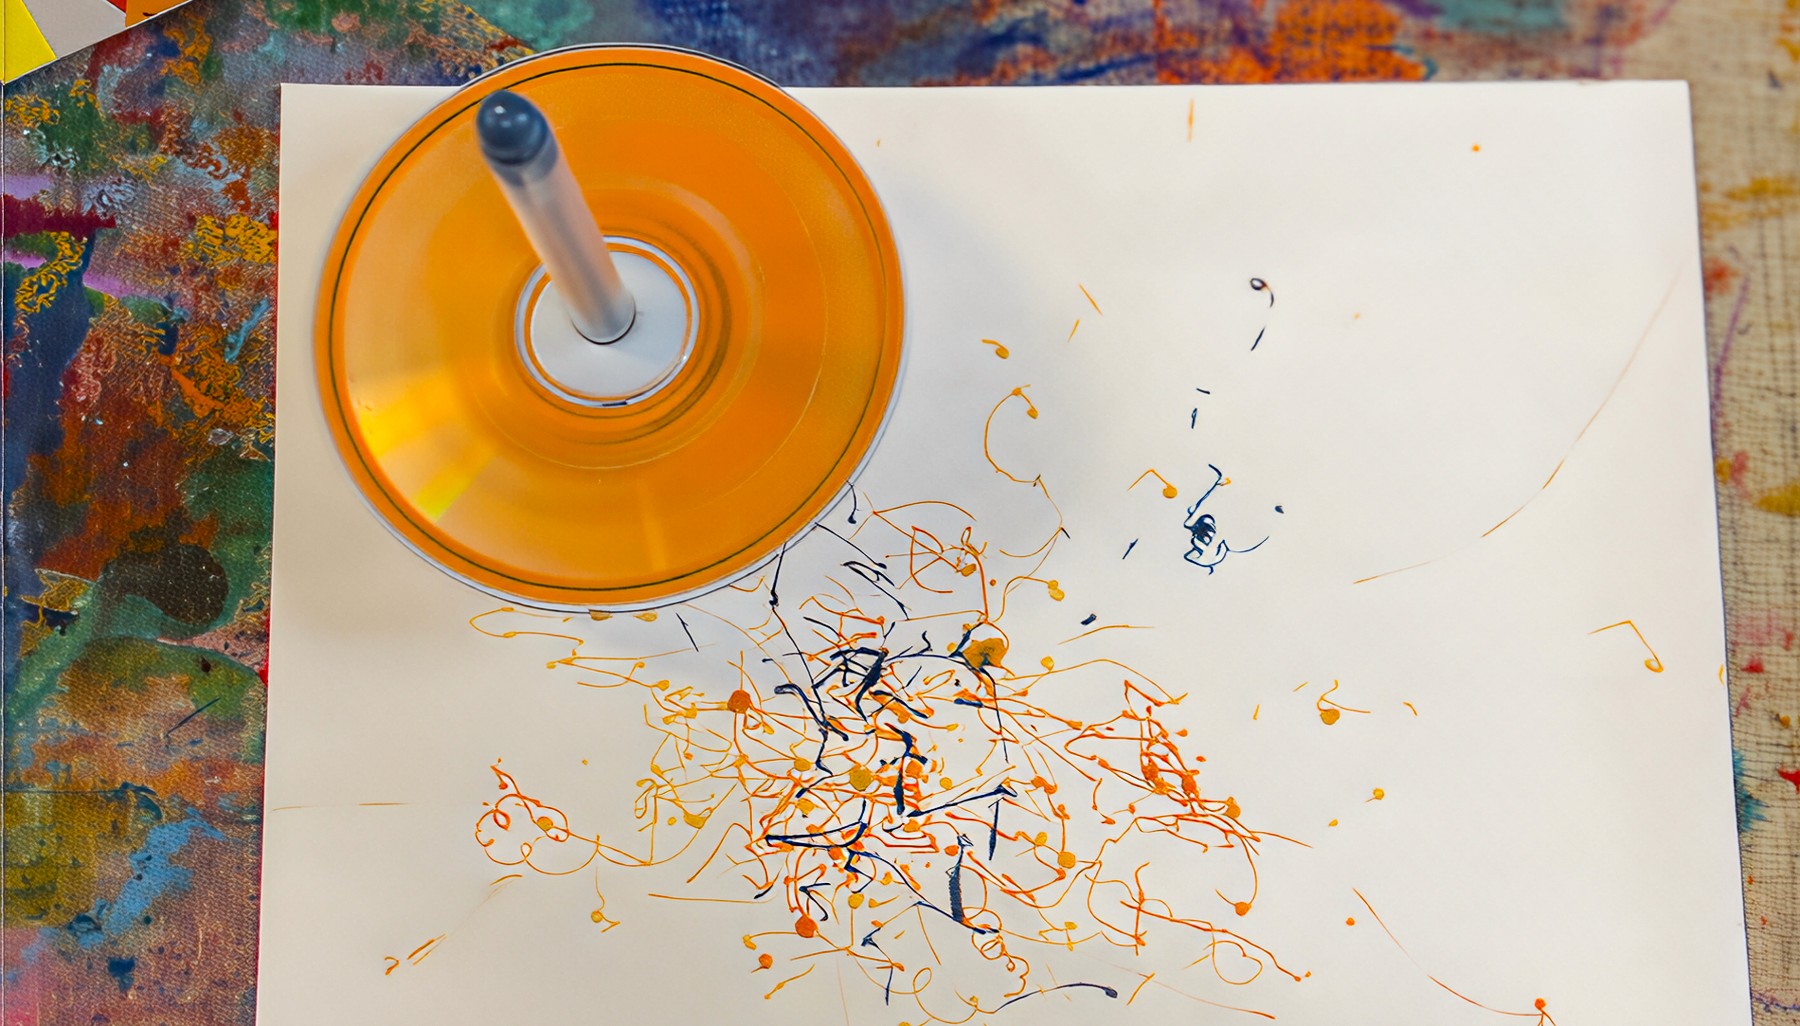
The Set Up
Gather old CDs, markers, and a little blu-tack. Show the balance point in the centre hole and how a pen can act like an axis. It’s a spinning top, a drawing tool, and a little bit of musical chaos all in one!
💿 How CDs Work
CDs store music as patterns of light!
Tiny shiny pits are pressed into the surface, so small you can’t see them. A laser inside the player reads the reflections and then turns them back into sound for us to enjoy.
While vinyl records hold music in grooves you can feel, CDs hold music in patterns you can see (if the light hits just right).
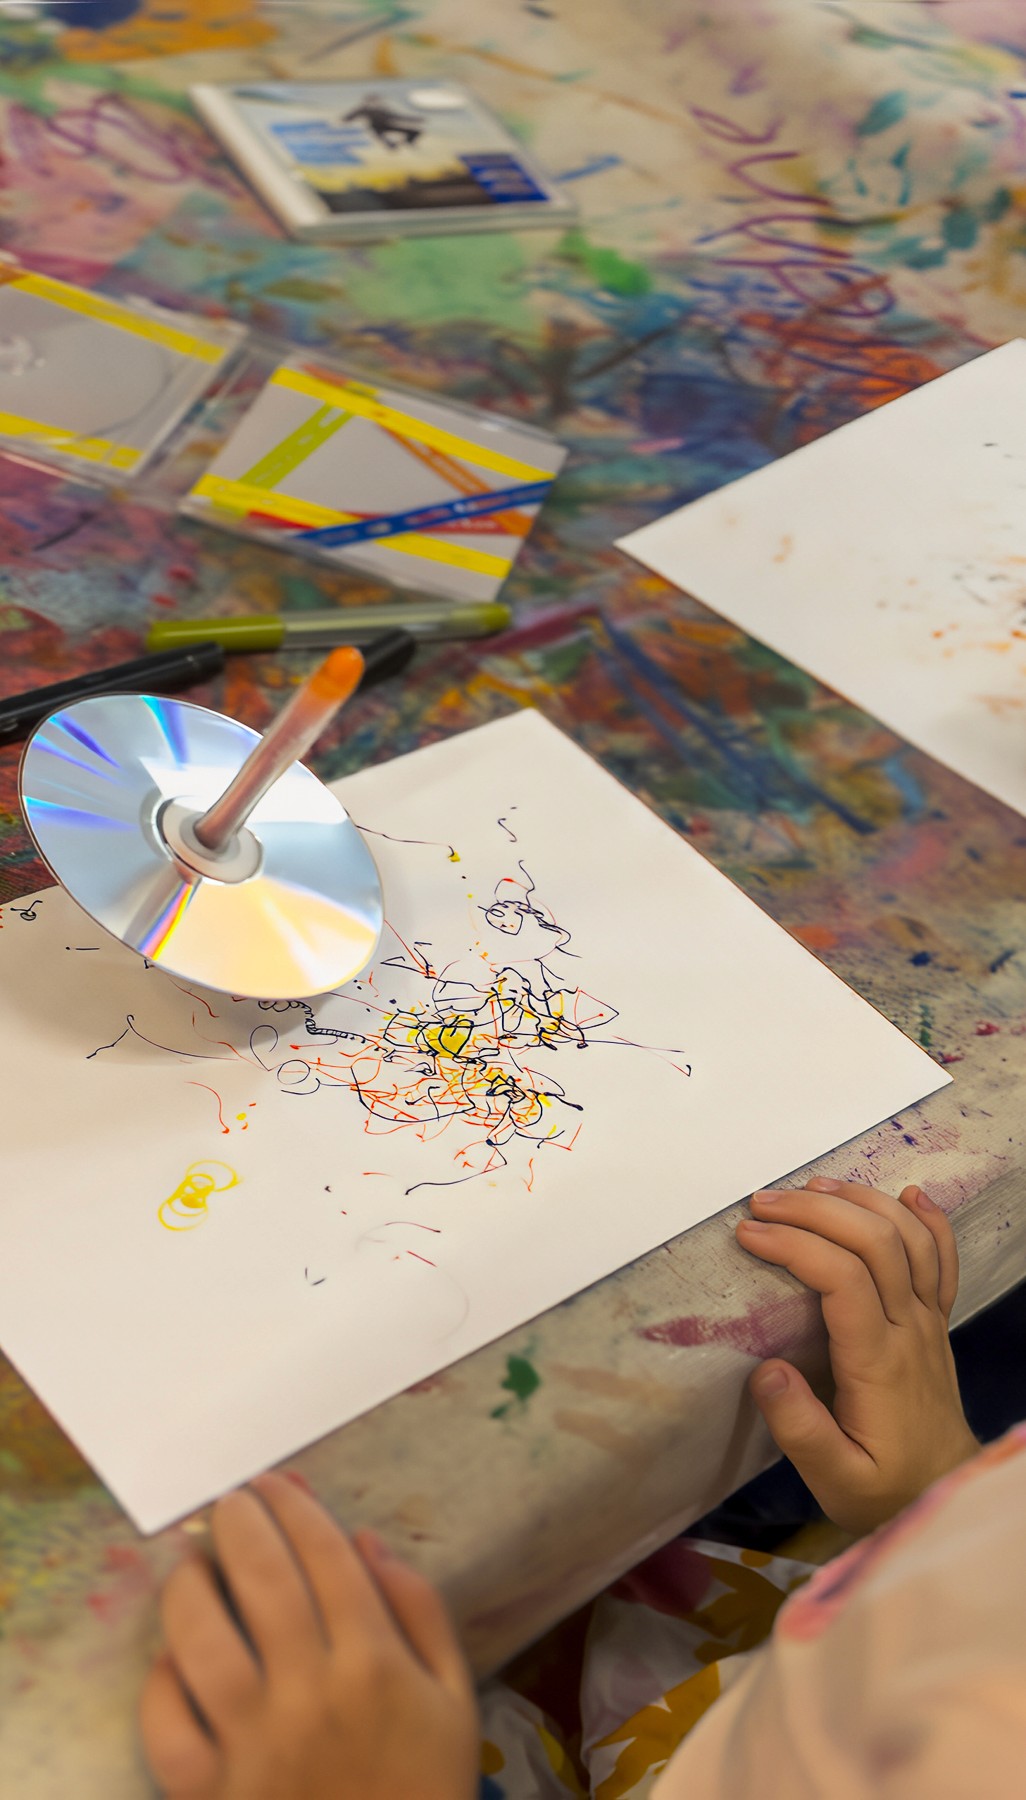
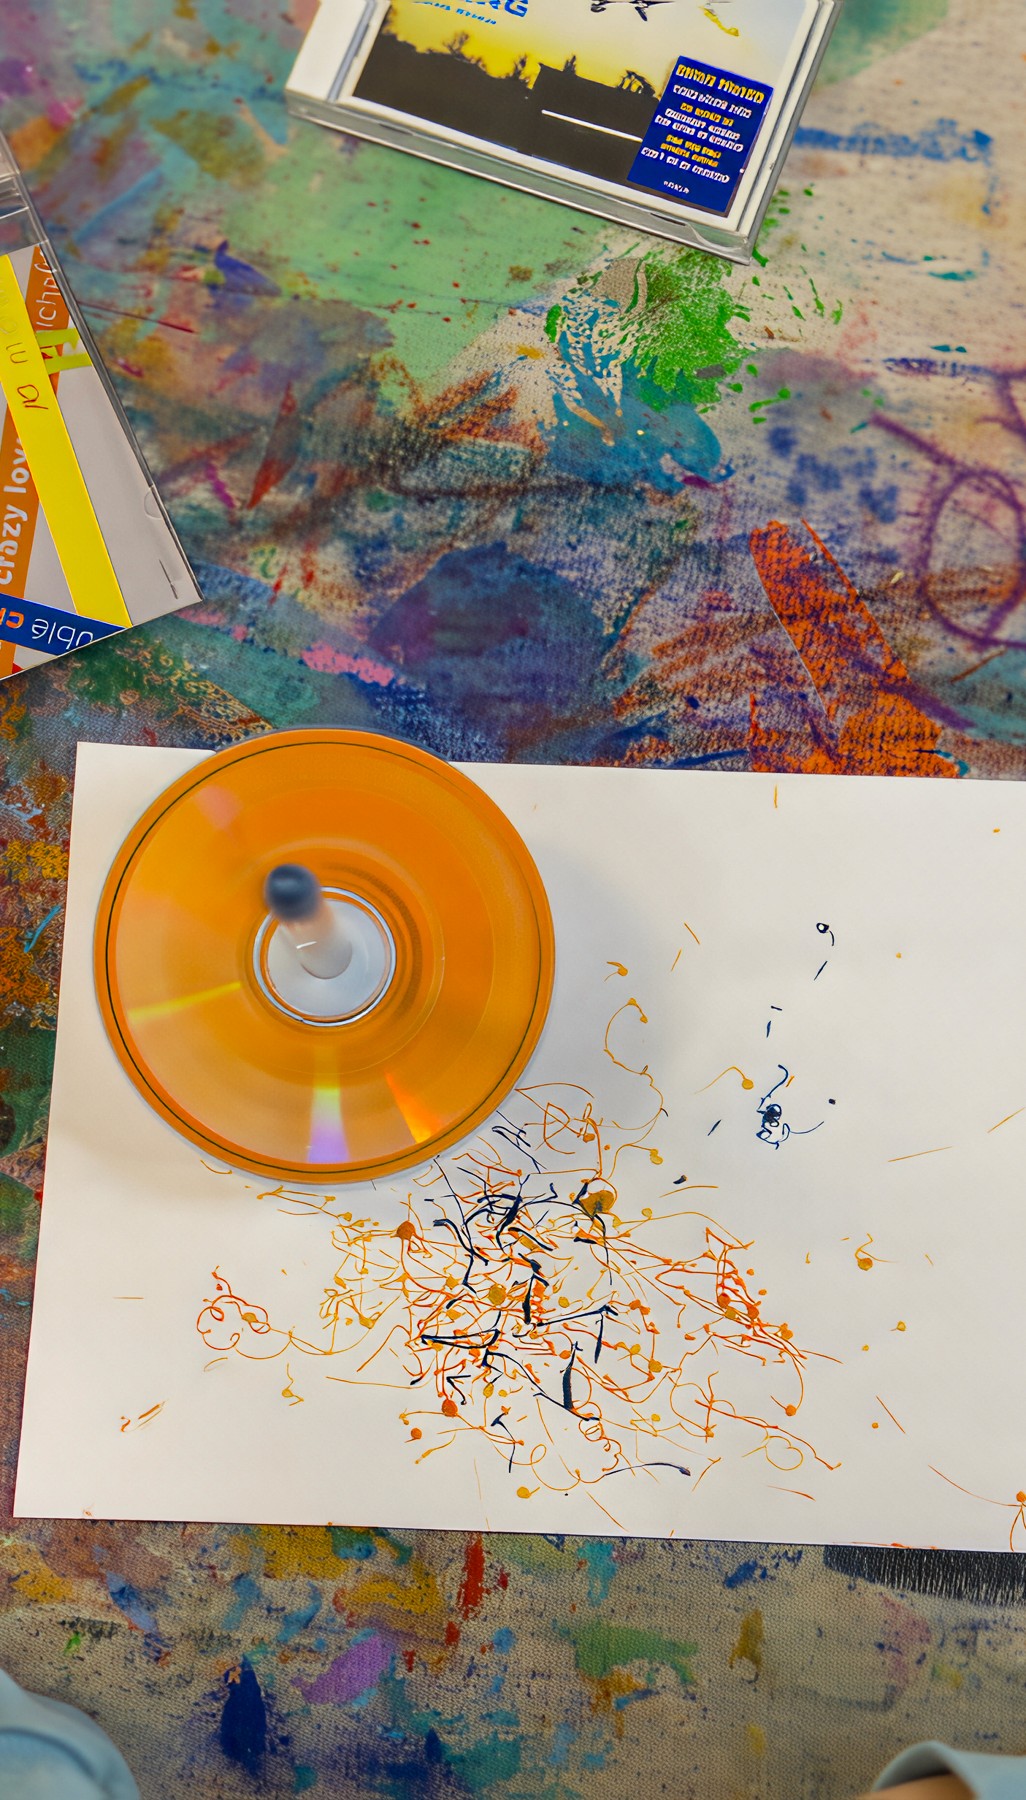
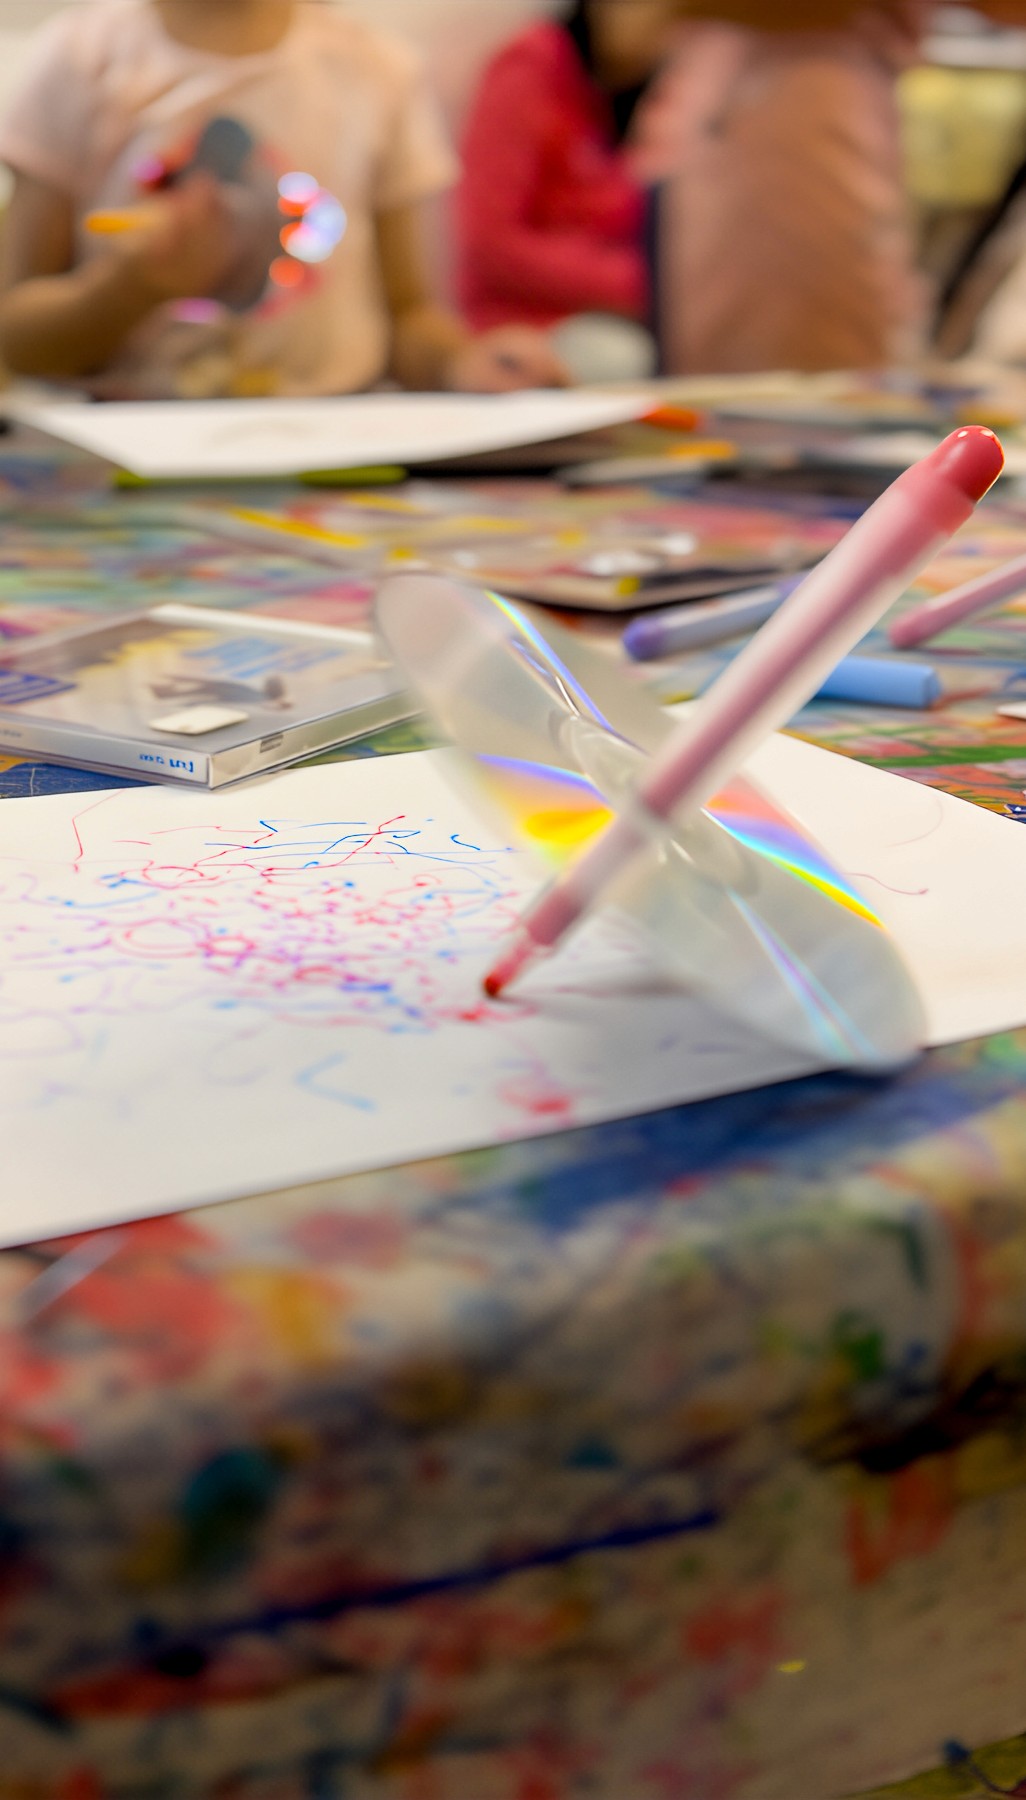
The Making
Experiment! Spin fast, spin slow, try two colours at once. Some artists love the blur, others draw while the CD sits still so the marks appear like a delayed surprise.
It’s rhythmic, meditative, and weirdly addictive once you get the hang of it.

Variations
Use metallic pens on black paper for glowing effects.
Combine two discs back to back for double patterns.
Materials
Old CDs (or DVDs work too!)
Blu-tack
Textas or markers
Paper (white or coloured)
Back to Top
CD Spinners
A musical spinning top
Bookmark
Creative Exploration
The Set Up
Gather old CDs, markers, and a little blu-tack. Show the balance point in the centre hole and how a pen can act like an axis. It’s a spinning top, a drawing tool, and a little bit of musical chaos all in one!
💿 How CDs Work
CDs store music as patterns of light!
Tiny shiny pits are pressed into the surface, so small you can’t see them. A laser inside the player reads the reflections and then turns them back into sound for us to enjoy.
While vinyl records hold music in grooves you can feel, CDs hold music in patterns you can see (if the light hits just right).
The Making
Experiment! Spin fast, spin slow, try two colours at once. Some artists love the blur, others draw while the CD sits still so the marks appear like a delayed surprise.
It’s rhythmic, meditative, and weirdly addictive once you get the hang of it.
Variations
Use metallic pens on black paper for glowing effects.
Combine two discs back to back for double patterns.
Materials
Old CDs (or DVDs work too!)
Blu-tack
Textas or markers
Paper (white or coloured)
Back to Top
