
ARTFUL EXPERIENCES
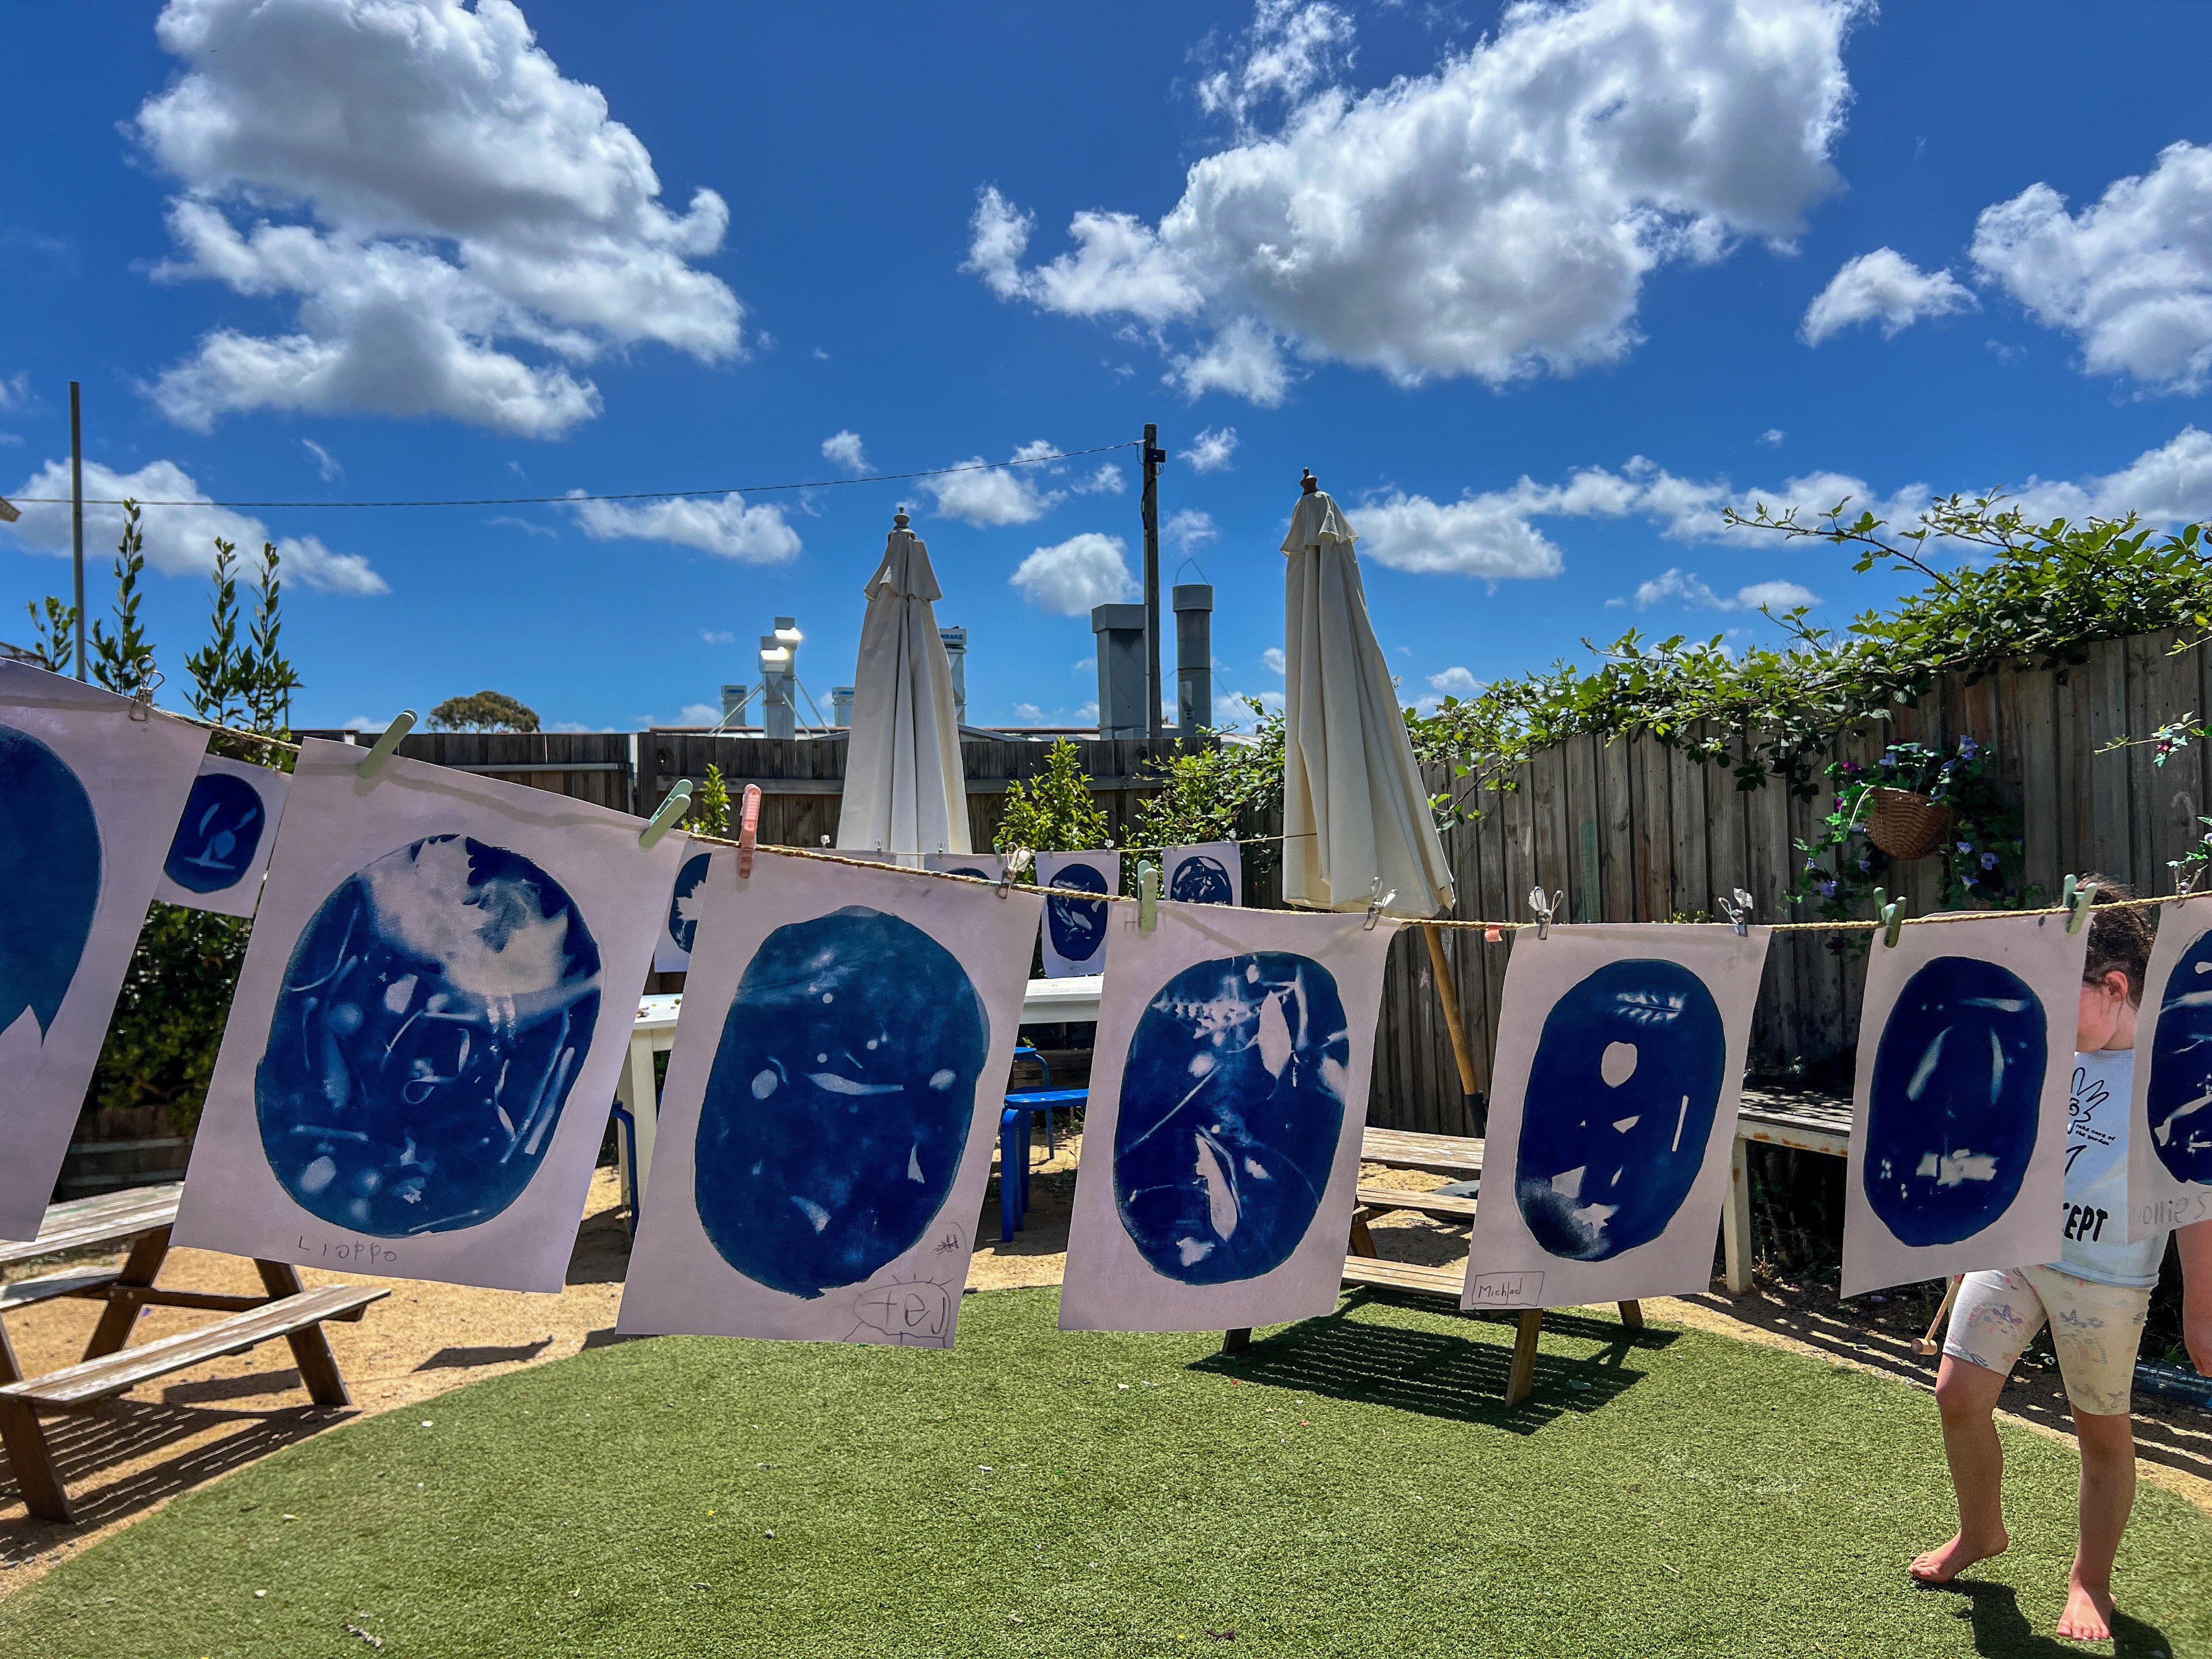
Cyanotype Sun Prints
Art Made with the Sun
Bookmark
Print Making
The Set Up
Cyanotype feels a bit like a magic trick the first time around! It's the most incredible mix of science and art.
We use the Jacquard cyanotype sensitiser kits and I can highly recommend. Once the bottles are prepped, you only ever need small amounts, which makes it easy to bring this process back again and again (one kit has carried us through multiple workshops over months).
You’ll also need thick watercolour paper (200gsm+ works beautifully), a foam brush, a small bowl, and something clear and flat to hold objects in place. Perspex, glass, or a clear clipboard all work well.
If you’re using a sensitiser kit, fill bottles A and B with water and give them a really good shake. Do this at least a day before (24 hours is ideal), then just leave them to settle.
On the day, pour equal amounts from each bottle into a small plastic bowl. You don’t need much. As a rough guide, about 75ml from bottle A and 75ml from bottle B is enough for roughly 20 A3 prints, but this process is very forgiving, so don’t stress if your amounts aren’t exact.
Before you start painting on the mixture, decide on the shape you want to work within. We often make a simple cardboard stencil (ovals look especially gorgeous on A3 sheets) and lightly trace the shape in pencil.
Use a foam brush to paint the mixture onto your paper, staying within your pencilled shape if you’ve drawn one. We usually do this in our storage room at Smudge, but any space away from direct sunlight is fine. Once painted, leave the paper to dry for around an hour.
If you want to try the process in an even simpler way, ready-made sun printing paper is a great option. Lots of gorgeous small businesses make them (like Tribe in Castlemaine, Victoria). Their sun printing paper is beautiful and makes a lovely gift for a young artist too! Or the Jacquard kits are easy to source globally.


The Making
If you have the time, starting with a short nature walk with kids is always special! Leaves and grasses and feathers and fallen petals etc. It's interesting to include a mix of delicate materials where light can sneak through, alongside more solid shapes that block it completely.
Or you can pre-prepare a nature collection and simply invite artists to choose. Feathers are especially effective, and other flat materials work well too. We tend to avoid anything bulky so the clear sheet can press everything down evenly.
Then comes the arranging! Place your design directly on top of the cyanotype mix (as long as the paper stays out of direct sunlight, nothing will start developing).
When everyone’s ready, place the perspex or glass over the top and move into the sunshine. Even cloudy days work! In a hot Melbourne summer, around 12 minutes is usually enough, but timing will vary depending on UV levels.
After exposure, rinse the prints in cold water. Large tubs work beautifully for this and we often use the same IKEA tubs we use for sensory play. Try a gentle spray from a hose (with a shower-style attachment).
Hang the prints to dry and watch the blue deepen as the paper dries.


Materials
Cyanotype sensitiser kit or ready-made sun printing paper
Thick watercolour paper (200gsm or heavier)
Foam brushes
Small plastic bowls
Water (for bottles A and B)
Cardboard stencils (optional)
Natural materials (leaves, grasses, feathers, petals etc)
Perspex, glass, or clear clipboard
Large tubs of cold water
Drying rack or washing line


Back to Top
Cyanotype Sun Prints
Art Made with the Sun
Bookmark
Print Making
The Set Up
Cyanotype feels a bit like a magic trick the first time around! It's the most incredible mix of science and art.
We use the Jacquard cyanotype sensitiser kits and I can highly recommend. Once the bottles are prepped, you only ever need small amounts, which makes it easy to bring this process back again and again (one kit has carried us through multiple workshops over months).
You’ll also need thick watercolour paper (200gsm+ works beautifully), a foam brush, a small bowl, and something clear and flat to hold objects in place. Perspex, glass, or a clear clipboard all work well.
If you’re using a sensitiser kit, fill bottles A and B with water and give them a really good shake. Do this at least a day before (24 hours is ideal), then just leave them to settle.
On the day, pour equal amounts from each bottle into a small plastic bowl. You don’t need much. As a rough guide, about 75ml from bottle A and 75ml from bottle B is enough for roughly 20 A3 prints, but this process is very forgiving, so don’t stress if your amounts aren’t exact.
Before you start painting on the mixture, decide on the shape you want to work within. We often make a simple cardboard stencil (ovals look especially gorgeous on A3 sheets) and lightly trace the shape in pencil.
Use a foam brush to paint the mixture onto your paper, staying within your pencilled shape if you’ve drawn one. We usually do this in our storage room at Smudge, but any space away from direct sunlight is fine. Once painted, leave the paper to dry for around an hour.
If you want to try the process in an even simpler way, ready-made sun printing paper is a great option. Lots of gorgeous small businesses make them (like Tribe in Castlemaine, Victoria). Their sun printing paper is beautiful and makes a lovely gift for a young artist too! Or the Jacquard kits are easy to source globally.
The Making
If you have the time, starting with a short nature walk with kids is always special! Leaves and grasses and feathers and fallen petals etc. It's interesting to include a mix of delicate materials where light can sneak through, alongside more solid shapes that block it completely.
Or you can pre-prepare a nature collection and simply invite artists to choose. Feathers are especially effective, and other flat materials work well too. We tend to avoid anything bulky so the clear sheet can press everything down evenly.
Then comes the arranging! Place your design directly on top of the cyanotype mix (as long as the paper stays out of direct sunlight, nothing will start developing).
When everyone’s ready, place the perspex or glass over the top and move into the sunshine. Even cloudy days work! In a hot Melbourne summer, around 12 minutes is usually enough, but timing will vary depending on UV levels.
After exposure, rinse the prints in cold water. Large tubs work beautifully for this and we often use the same IKEA tubs we use for sensory play. Try a gentle spray from a hose (with a shower-style attachment).
Hang the prints to dry and watch the blue deepen as the paper dries.
Materials
Cyanotype sensitiser kit or ready-made sun printing paper
Thick watercolour paper (200gsm or heavier)
Foam brushes
Small plastic bowls
Water (for bottles A and B)
Cardboard stencils (optional)
Natural materials (leaves, grasses, feathers, petals etc)
Perspex, glass, or clear clipboard
Large tubs of cold water
Drying rack or washing line
Back to Top
Summer Lanterns
Warm your days with moving colour.
Bookmark
Sculpture

The Set Up
Paper lanterns already feel like a celebration, don't they! The best news is that any paper lantern that you can source is absolutely fine. We’ve used ones from IKEA, Kmart, Bunnings, and our local party shops over the years. Thicker paper obviously holds up slightly better but most lanterns can handle a lot if you don’t soak them all at once.
Before you start, decide how the lanterns will sit in the space during the creating. Hanging them makes the process much easier, especially for little hands. They can spin gently as artists work (my most favourite part!). At Smudge, we often use our PVC pendulum frame, but a long dowel, decorating rod, or even string stretched across the room works just as well. Lanterns can also sit on the table if needed. Just encourage artists to turn them as they go.
For these Summer lantern materials, curate a range of warm colours. Oil pastels and paint sticks are a great place to begin, followed by watercolour, glitter paint, and liquid watercolour in spray bottles. The paper soaks up colour beautifully and layering gives depth.


The Making
Work straight onto the lantern using oil pastels and paint sticks first. These 'dry' materials give the paper a base and feel good on the curved surface. And then you can bring in watercolour palettes once there’s colour down. Brush it on, let it move, turn the lantern as you go. Hanging lanterns make this easy and oh so fun!
Liquid watercolour in spray bottles is a favourite. A light mist of colour travels across the paper and layers beautifully, plus glitter paint can come in anywhere.
Once the lantern is dry, finish with a simple wire handle and beads, or leave them as they are. Ready to hang, cluster together, or use as the most gorgeous Summer lampshade.


Variations
Include tissue paper and glue for collage options
Create a large-scale version using extra-large lanterns for an installation focus.
Switch up the colour palette (this works for all Seasons!)


Materials
Paper lanterns (any size)
Oil pastels
Paint sticks
Watercolour paints
Glitter paint
Liquid watercolour
Spray bottles
Brushes
Water containers
Drop sheets
String, dowel, decorating rod, or frame for hanging
Wire and beads for handles (optional)
Gallery


Back to Top
Summer Lanterns
Warm your days with moving colour.
Bookmark
Sculpture
The Set Up
Paper lanterns already feel like a celebration, don't they! The best news is that any paper lantern that you can source is absolutely fine. We’ve used ones from IKEA, Kmart, Bunnings, and our local party shops over the years. Thicker paper obviously holds up slightly better but most lanterns can handle a lot if you don’t soak them all at once.
Before you start, decide how the lanterns will sit in the space during the creating. Hanging them makes the process much easier, especially for little hands. They can spin gently as artists work (my most favourite part!). At Smudge, we often use our PVC pendulum frame, but a long dowel, decorating rod, or even string stretched across the room works just as well. Lanterns can also sit on the table if needed. Just encourage artists to turn them as they go.
For these Summer lantern materials, curate a range of warm colours. Oil pastels and paint sticks are a great place to begin, followed by watercolour, glitter paint, and liquid watercolour in spray bottles. The paper soaks up colour beautifully and layering gives depth.
The Making
Work straight onto the lantern using oil pastels and paint sticks first. These 'dry' materials give the paper a base and feel good on the curved surface. And then you can bring in watercolour palettes once there’s colour down. Brush it on, let it move, turn the lantern as you go. Hanging lanterns make this easy and oh so fun!
Liquid watercolour in spray bottles is a favourite. A light mist of colour travels across the paper and layers beautifully, plus glitter paint can come in anywhere.
Once the lantern is dry, finish with a simple wire handle and beads, or leave them as they are. Ready to hang, cluster together, or use as the most gorgeous Summer lampshade.
Variations
Include tissue paper and glue for collage options
Create a large-scale version using extra-large lanterns for an installation focus.
Switch up the colour palette (this works for all Seasons!)
Materials
Paper lanterns (any size)
Oil pastels
Paint sticks
Watercolour paints
Glitter paint
Liquid watercolour
Spray bottles
Brushes
Water containers
Drop sheets
String, dowel, decorating rod, or frame for hanging
Wire and beads for handles (optional)
Gallery
Back to Top
Clare Young-Inspired Sun Collages
Paint and Cut and Layer
Bookmark
Collage

The Set Up
This experience is inspired by illustrator Clare Youngs and her joyful, graphic suns. Her work is bold but gentle, playful without being busy, and full of simple shapes layered again and again. It feels like a perfect fit for a week centred on warmth and light.
Painting your own collage paper before any of the cutting and tearing happens is where so much of the magic lives! Set out paper and invite artists to explore warm colours freely. Yellows, oranges, reds, pinks, touches of white. Scrape, brush, dab, drag. Thick paint, watery paint. Nothing needs to look finished as it's all about colour and texture and experimentation.
Let the papers dry, then cut or tear them into strips, wedges, and loose shapes. A little swap shop between artists at this point is lovely and keeps things feeling generous and shared.
Have a sturdy base ready. Something like A3 cardstock works beautifully. A lightly pencilled circle can help anchor the composition if that feels useful, but it’s not essential.


The Making
If you have a look at Young's gorgeous collages, you'll see that she cuts radials / rays in different thicknesses and lengths. And adds in (or cuts out) repeated shapes to add visual interest. Experiment with ripping instead of cutting too, as this keeps the edges softer and brings in a different kind of texture to the paper.
This is all about colour relationships. What happens when orange sits next to pink? When red overlaps yellow? When a quieter piece gives the brighter ones somewhere to land?
Start building your sun from the centre out. Layer paper pieces, overlap them, rotate them, move them around before committing with glue.
If any are hanging over the edge of the paper at the end, you can chop these when you're finished (or decide to leave them long!).


Materials
Paper for painting collage sheets
Poster paint, paint sticks, or liquid watercolour
Brushes, scrapers, old cards, and mark-making tools
Scissors
Glue sticks or PVA glue
A3 cardstock or thick paper for bases
Pencils for light sketching (optional)
Back to Top
Clare Young-Inspired Sun Collages
Paint and Cut and Layer
Bookmark
Collage
The Set Up
This experience is inspired by illustrator Clare Youngs and her joyful, graphic suns. Her work is bold but gentle, playful without being busy, and full of simple shapes layered again and again. It feels like a perfect fit for a week centred on warmth and light.
Painting your own collage paper before any of the cutting and tearing happens is where so much of the magic lives! Set out paper and invite artists to explore warm colours freely. Yellows, oranges, reds, pinks, touches of white. Scrape, brush, dab, drag. Thick paint, watery paint. Nothing needs to look finished as it's all about colour and texture and experimentation.
Let the papers dry, then cut or tear them into strips, wedges, and loose shapes. A little swap shop between artists at this point is lovely and keeps things feeling generous and shared.
Have a sturdy base ready. Something like A3 cardstock works beautifully. A lightly pencilled circle can help anchor the composition if that feels useful, but it’s not essential.
The Making
If you have a look at Young's gorgeous collages, you'll see that she cuts radials / rays in different thicknesses and lengths. And adds in (or cuts out) repeated shapes to add visual interest. Experiment with ripping instead of cutting too, as this keeps the edges softer and brings in a different kind of texture to the paper.
This is all about colour relationships. What happens when orange sits next to pink? When red overlaps yellow? When a quieter piece gives the brighter ones somewhere to land?
Start building your sun from the centre out. Layer paper pieces, overlap them, rotate them, move them around before committing with glue.
If any are hanging over the edge of the paper at the end, you can chop these when you're finished (or decide to leave them long!).
Materials
Paper for painting collage sheets
Poster paint, paint sticks, or liquid watercolour
Brushes, scrapers, old cards, and mark-making tools
Scissors
Glue sticks or PVA glue
A3 cardstock or thick paper for bases
Pencils for light sketching (optional)
Back to Top
Sun Catcher Mobiles
Light, balance, and a really good reason to go thrifting!
Bookmark
Sculpture

The Set Up
The best materials for these mobiles come straight from op shops and thrift stores, especially old jewellery. Necklaces, broken chains, odd beads. You’re looking for pieces that catch the light and feel interesting in the hand. An important tip is to take a quick look at hole sizes while you’re sourcing. Very tiny holes can be frustrating for little hands (and for you)!
Embroidery hoops make a beautiful base. Wooden ones are easy to work with and can be wrapped with washi tape or painted if you feel like adding colour. Brass hoops are stunning too if you happen to find them. Fishing line works well for threading because it’s strong and disappears visually, but jewellery wire or string are great options too. Wool can work if the beads are chunky enough (add a bit of clear sticky-tape at the end of the wool will help feed it through).
Set everything out like a small jewellery studio. Bowls of beads. A few strands already cut. Hoops ready to go. If you can hang the mobiles in a sunny spot while working, even better. Seeing light bounce through the beads adds so much to the experience.


The Making
Start by choosing how many strands to hang from each hoop. Odd numbers tend to feel more balanced, and we've found that five is the sweet spot!
Thread beads slowly, paying attention to weight and spacing as you go. Heavier beads sit beautifully lower down, lighter ones float above. Tie a knot to secure each strand (a small dab of hot glue with adult help keeps everything in place).
Once the strands are attached, add a hanging loop to the top of the hoop using ribbon, wool, or elastic. Find the balance point and adjust until it hangs evenly. This part always sparks great conversations about balance and weight; “does this feel right?”
Hang them up and let the light do its thing. The reflections, the movement, the little flashes of colour across the wall. It’s quietly magical, isn't it?


Variations
Wrap the hoop with washi tape or yarn before adding beads.
Create a group installation by hanging multiple mobiles together in one sunny space.
Use the shadows and reflections cast from the mobile as part of a still life drawing.


Materials
Embroidery hoops (wooden or metal)
Beads (thrifted jewellery is perfect)
Fishing line, jewellery wire, or string
Small bowls for sorting beads
Scissors
Ribbon, wool, or elastic for hanging loops
Hot glue (adult use)
Back to Top
Sun Catcher Mobiles
Light, balance, and a really good reason to go thrifting!
Bookmark
Sculpture
The Set Up
The best materials for these mobiles come straight from op shops and thrift stores, especially old jewellery. Necklaces, broken chains, odd beads. You’re looking for pieces that catch the light and feel interesting in the hand. An important tip is to take a quick look at hole sizes while you’re sourcing. Very tiny holes can be frustrating for little hands (and for you)!
Embroidery hoops make a beautiful base. Wooden ones are easy to work with and can be wrapped with washi tape or painted if you feel like adding colour. Brass hoops are stunning too if you happen to find them. Fishing line works well for threading because it’s strong and disappears visually, but jewellery wire or string are great options too. Wool can work if the beads are chunky enough (add a bit of clear sticky-tape at the end of the wool will help feed it through).
Set everything out like a small jewellery studio. Bowls of beads. A few strands already cut. Hoops ready to go. If you can hang the mobiles in a sunny spot while working, even better. Seeing light bounce through the beads adds so much to the experience.
The Making
Start by choosing how many strands to hang from each hoop. Odd numbers tend to feel more balanced, and we've found that five is the sweet spot!
Thread beads slowly, paying attention to weight and spacing as you go. Heavier beads sit beautifully lower down, lighter ones float above. Tie a knot to secure each strand (a small dab of hot glue with adult help keeps everything in place).
Once the strands are attached, add a hanging loop to the top of the hoop using ribbon, wool, or elastic. Find the balance point and adjust until it hangs evenly. This part always sparks great conversations about balance and weight; “does this feel right?”
Hang them up and let the light do its thing. The reflections, the movement, the little flashes of colour across the wall. It’s quietly magical, isn't it?
Variations
Wrap the hoop with washi tape or yarn before adding beads.
Create a group installation by hanging multiple mobiles together in one sunny space.
Use the shadows and reflections cast from the mobile as part of a still life drawing.
Materials
Embroidery hoops (wooden or metal)
Beads (thrifted jewellery is perfect)
Fishing line, jewellery wire, or string
Small bowls for sorting beads
Scissors
Ribbon, wool, or elastic for hanging loops
Hot glue (adult use)
Back to Top
Warm Sensory Play
A warm, lovely place to play.
Bookmark
Sensory Play

The Set Up
This sensory play is all about warmth. Warm colours, warm tones, warm energy. It’s a beautiful counterbalance to some of the bigger, more active making across the week.
If you’re comfortable using a food base, yellow split peas work beautifully. They pour easily, make a soft sound as they move, and instantly set a warm colour palette.
If food-based sensory play isn’t right for your space, swap in non-consumable alternatives instead. Wooden beads, smooth pebbles, dried seed pods, or loose parts in warm tones all create a very similar experience without using food. I also love adding in some fluffy pom poms and other materials with contrasting textures.
Set the base into a large shallow tub or tray and then build around it with scoops, bowls, cups, funnels, and vessels in yellows, oranges, reds, and soft neutrals. Clear containers are especially lovely because you can see the colour shift and fill as artists pour.
This setup doesn’t need much and few thoughtful choices go a long way!


The Making
There’s room for quiet focus here, and also for gentle imaginative play.
Making “sun soup”, sorting by colour, lining things up, rearranging, starting over (and over again!). Or watching how the colours layer when different materials mix and listening to the sound change as containers fill and empty.
The sun's the limit!


Materials
Yellow split peas, dried chickpeas, or similar sensory base
Large shallow tub or tray
Bowls, cups, scoops, funnels, and jugs
Clear containers (optional but lovely)
Small trays or baskets for sorting
Back to Top
Warm Sensory Play
A warm, lovely place to play.
Bookmark
Sensory Play
The Set Up
This sensory play is all about warmth. Warm colours, warm tones, warm energy. It’s a beautiful counterbalance to some of the bigger, more active making across the week.
If you’re comfortable using a food base, yellow split peas work beautifully. They pour easily, make a soft sound as they move, and instantly set a warm colour palette.
If food-based sensory play isn’t right for your space, swap in non-consumable alternatives instead. Wooden beads, smooth pebbles, dried seed pods, or loose parts in warm tones all create a very similar experience without using food. I also love adding in some fluffy pom poms and other materials with contrasting textures.
Set the base into a large shallow tub or tray and then build around it with scoops, bowls, cups, funnels, and vessels in yellows, oranges, reds, and soft neutrals. Clear containers are especially lovely because you can see the colour shift and fill as artists pour.
This setup doesn’t need much and few thoughtful choices go a long way!
The Making
There’s room for quiet focus here, and also for gentle imaginative play.
Making “sun soup”, sorting by colour, lining things up, rearranging, starting over (and over again!). Or watching how the colours layer when different materials mix and listening to the sound change as containers fill and empty.
The sun's the limit!
Materials
Yellow split peas, dried chickpeas, or similar sensory base
Large shallow tub or tray
Bowls, cups, scoops, funnels, and jugs
Clear containers (optional but lovely)
Small trays or baskets for sorting
Back to Top
Sunflower Still Life
Looking closely and letting yellow take the lead!
Bookmark
Painting & Drawing

The Set Up
Sunflowers are such generous subjects. Big shapes. Strong centres. Petals that don’t sit still. They feel perfect for a summer still life.
Set up one or more sunflower arrangements in the space. Real sunflowers are beautiful if you can get them, but dried sunflowers or high-quality artificial ones work just as well and last much longer. Or any Summery-type flowers are great too!
Vary the heights using jars, bottles, or small boxes so there’s something interesting to look at from every angle.
Keep the materials simple. Oil pastels, pencils, charcoal, and watercolour are more than enough here. Heavy paper is helpful, especially if you’re layering drawing and paint.
Place the still life where artists can move around it easily. Sitting, standing, leaning in close. This isn’t about everyone drawing the same view. It’s about noticing.


The Making
Begin with looking. Really looking. The centre. The petals. The way the yellow shifts. Where light hits and where shadows fall.
After that, it’s about trusting what each artist notices. Some might zoom right in on one part of the flower. Others might be drawn to the whole arrangement, or the vase, or the space around it. Occasionally, someone will look for a while and then choose to paint something completely different. That’s all part of it.
Materials are there to respond to whatever shows up on the page. Drawing tools, paint, or a mix of both. Marks can be bold or tentative. Pages can fill up quickly or stay spare. There’s no need to steer this beyond staying curious alongside them.
Prompting observation first tends to be enough. Once kids have really looked, they usually know what they want to explore. The still life becomes a starting point rather than a subject to copy, and the work that comes out of that place is always more interesting.


Artist Study: Vincent Van Gogh
Vincent van Gogh painted sunflowers many times, but not to capture them perfectly. He was interested in what he noticed, how colour felt, and how paint could move.
His sunflowers are full of marks. Thick paint. Scraped lines. Petals that twist and turn in different directions. Some feel bright and alive, others heavy and tired. He wasn’t trying to make one “right” sunflower. He was responding to what he saw and how it made him feel.
When looking at Van Gogh’s sunflowers with kids, it can be helpful to focus less on the subject and more on the choices he made:
The way he used lots of different yellows
How the paint sits thickly on the surface
How not every petal goes the same way
How the flowers don’t match each other
This study isn’t about painting sunflowers like Van Gogh. It’s about noticing that there are many ways to respond to what you see. Big marks, small marks, colour-first, shape-first, or something else entirely.
Just like in our still life work, looking comes first. What happens next is up to the artist!
Materials
Sunflowers (real, dried, or artificial)
Jars, vases, or containers for arranging
Heavy paper (cartridge or watercolour)
Pencils, charcoal, or oil pastels
Watercolour paints
Brushes
Water containers
Back to Top
Sunflower Still Life
Looking closely and letting yellow take the lead!
Bookmark
Painting & Drawing
The Set Up
Sunflowers are such generous subjects. Big shapes. Strong centres. Petals that don’t sit still. They feel perfect for a summer still life.
Set up one or more sunflower arrangements in the space. Real sunflowers are beautiful if you can get them, but dried sunflowers or high-quality artificial ones work just as well and last much longer. Or any Summery-type flowers are great too!
Vary the heights using jars, bottles, or small boxes so there’s something interesting to look at from every angle.
Keep the materials simple. Oil pastels, pencils, charcoal, and watercolour are more than enough here. Heavy paper is helpful, especially if you’re layering drawing and paint.
Place the still life where artists can move around it easily. Sitting, standing, leaning in close. This isn’t about everyone drawing the same view. It’s about noticing.
The Making
Begin with looking. Really looking. The centre. The petals. The way the yellow shifts. Where light hits and where shadows fall.
After that, it’s about trusting what each artist notices. Some might zoom right in on one part of the flower. Others might be drawn to the whole arrangement, or the vase, or the space around it. Occasionally, someone will look for a while and then choose to paint something completely different. That’s all part of it.
Materials are there to respond to whatever shows up on the page. Drawing tools, paint, or a mix of both. Marks can be bold or tentative. Pages can fill up quickly or stay spare. There’s no need to steer this beyond staying curious alongside them.
Prompting observation first tends to be enough. Once kids have really looked, they usually know what they want to explore. The still life becomes a starting point rather than a subject to copy, and the work that comes out of that place is always more interesting.
Artist Study: Vincent Van Gogh
Vincent van Gogh painted sunflowers many times, but not to capture them perfectly. He was interested in what he noticed, how colour felt, and how paint could move.
His sunflowers are full of marks. Thick paint. Scraped lines. Petals that twist and turn in different directions. Some feel bright and alive, others heavy and tired. He wasn’t trying to make one “right” sunflower. He was responding to what he saw and how it made him feel.
When looking at Van Gogh’s sunflowers with kids, it can be helpful to focus less on the subject and more on the choices he made:
The way he used lots of different yellows
How the paint sits thickly on the surface
How not every petal goes the same way
How the flowers don’t match each other
This study isn’t about painting sunflowers like Van Gogh. It’s about noticing that there are many ways to respond to what you see. Big marks, small marks, colour-first, shape-first, or something else entirely.
Just like in our still life work, looking comes first. What happens next is up to the artist!
Materials
Sunflowers (real, dried, or artificial)
Jars, vases, or containers for arranging
Heavy paper (cartridge or watercolour)
Pencils, charcoal, or oil pastels
Watercolour paints
Brushes
Water containers
Back to Top
Colour Mixing
A brush full of possibility!
Bookmark
Creative Exploration

The Set Up
This experience gives colour the time and space it deserves. There’s no rush to make a finished picture and the focus is on noticing what happens when colours meet.
Start with a very limited palette. Red, yellow, and white are perfect. That constraint matters because it keeps the attention on mixing rather than choosing, and it opens up far more discovery than a full rainbow ever could!
Set up trays, jars, or shallow dishes for mixing, with a good range of brushes and tools. Thick and thin. Soft and scratchy. Plenty of water nearby so colours can be lightened, softened, and shifted around. I love using recycled (and cleaned!) egg cartons for colour mixing. The little cups are the perfect size for experimenting, and the larger 36-egg cartons are amazing for really stretching the breadth of colours artists can create.
Paper can be anything you like, but individual sheets work beautifully here. This is a lovely opportunity for each artist to create their own colour page, a kind of personal colour library.


The Making
Let the mixing lead. Red into yellow. Yellow into white. A little more. Too much? Add white and see how it changes.
As colours start to appear, this is a beautiful moment to name what’s happening out loud. Primary colours mixing to make secondary colours. Adding white to create tints. Watching how a colour gets lighter, softer, quieter. Value shifts become visible very quickly when everything is side by side.
Many artists naturally organise their discoveries into swatches. Lining colours up. Naming them. Comparing one mix to the next. These pages become personal colour maps, showing how each artist arrived at their palette.
You might notice conversations popping up around warmth and coolness, brightness and depth. A colour that felt loud at first becomes calmer with white. Another deepens as more pigment is added. There’s no need to correct or steer too much here. Simply naming what you’re seeing gives kids the language to keep experimenting.
Some pages stay as collections of colour. Others might drift into loose shapes or paintings once the palette feels rich enough.


A Little Colour Language
You don’t need to teach colour theory for this experience to work. But having a few shared words can be really helpful when you’re talking alongside kids and naming what’s happening as they mix.
Primary colours
Red, yellow, and blue. These are the starting colours. All other colours are made from mixing them.
Secondary colours
Made by mixing two primary colours together.
Red + yellow = orange
Yellow + blue = green
Red + blue = purple
Tertiary colours
These are the in-between colours. They’re created when a primary and a secondary colour mix, or when colours keep blending and shifting.
Think aqua, teal, turquoise, magenta, coral, chartreuse, plum.
They don’t always have obvious names, and that’s part of the joy.
Tints
A colour mixed with white. This makes the colour lighter and softer.
“This one’s the same colour, just lighter.”
Value
How light or dark a colour feels. Adding white raises the value. Adding more pigment lowers it.
“This one feels much deeper than the last mix.”
You don’t need to correct or label everything. Simply naming what you notice gives kids language for their thinking and keeps the focus on exploration rather than outcomes.


Materials
Red, yellow, and white poster/tempera paint
Optional metallic or pearlescent paint
Palettes, trays, jars, shallow dishes, or recycled egg cartons
Brushes in a range of sizes and textures
Droppers or pipettes (optional)
Water containers
Paper for colour swatches and experimenting (cartridge or watercolour paper)
Paint swatches from a hardware or paint store (optional, for colour matching)
Paper towels or cloths for wiping brushes
Back to Top
Colour Mixing
A brush full of possibility!
Bookmark
Creative Exploration
The Set Up
This experience gives colour the time and space it deserves. There’s no rush to make a finished picture and the focus is on noticing what happens when colours meet.
Start with a very limited palette. Red, yellow, and white are perfect. That constraint matters because it keeps the attention on mixing rather than choosing, and it opens up far more discovery than a full rainbow ever could!
Set up trays, jars, or shallow dishes for mixing, with a good range of brushes and tools. Thick and thin. Soft and scratchy. Plenty of water nearby so colours can be lightened, softened, and shifted around. I love using recycled (and cleaned!) egg cartons for colour mixing. The little cups are the perfect size for experimenting, and the larger 36-egg cartons are amazing for really stretching the breadth of colours artists can create.
Paper can be anything you like, but individual sheets work beautifully here. This is a lovely opportunity for each artist to create their own colour page, a kind of personal colour library.
The Making
Let the mixing lead. Red into yellow. Yellow into white. A little more. Too much? Add white and see how it changes.
As colours start to appear, this is a beautiful moment to name what’s happening out loud. Primary colours mixing to make secondary colours. Adding white to create tints. Watching how a colour gets lighter, softer, quieter. Value shifts become visible very quickly when everything is side by side.
Many artists naturally organise their discoveries into swatches. Lining colours up. Naming them. Comparing one mix to the next. These pages become personal colour maps, showing how each artist arrived at their palette.
You might notice conversations popping up around warmth and coolness, brightness and depth. A colour that felt loud at first becomes calmer with white. Another deepens as more pigment is added. There’s no need to correct or steer too much here. Simply naming what you’re seeing gives kids the language to keep experimenting.
Some pages stay as collections of colour. Others might drift into loose shapes or paintings once the palette feels rich enough.
A Little Colour Language
You don’t need to teach colour theory for this experience to work. But having a few shared words can be really helpful when you’re talking alongside kids and naming what’s happening as they mix.
Primary colours
Red, yellow, and blue. These are the starting colours. All other colours are made from mixing them.
Secondary colours
Made by mixing two primary colours together.
Red + yellow = orange
Yellow + blue = green
Red + blue = purple
Tertiary colours
These are the in-between colours. They’re created when a primary and a secondary colour mix, or when colours keep blending and shifting.
Think aqua, teal, turquoise, magenta, coral, chartreuse, plum.
They don’t always have obvious names, and that’s part of the joy.
Tints
A colour mixed with white. This makes the colour lighter and softer.
“This one’s the same colour, just lighter.”
Value
How light or dark a colour feels. Adding white raises the value. Adding more pigment lowers it.
“This one feels much deeper than the last mix.”
You don’t need to correct or label everything. Simply naming what you notice gives kids language for their thinking and keeps the focus on exploration rather than outcomes.
Materials
Red, yellow, and white poster/tempera paint
Optional metallic or pearlescent paint
Palettes, trays, jars, shallow dishes, or recycled egg cartons
Brushes in a range of sizes and textures
Droppers or pipettes (optional)
Water containers
Paper for colour swatches and experimenting (cartridge or watercolour paper)
Paint swatches from a hardware or paint store (optional, for colour matching)
Paper towels or cloths for wiping brushes
Back to Top
