

ARTFUL EXPERIENCES
Cardboard Cakes
Looks good enough to eat.
Bookmark
Sculpture

The Set Up
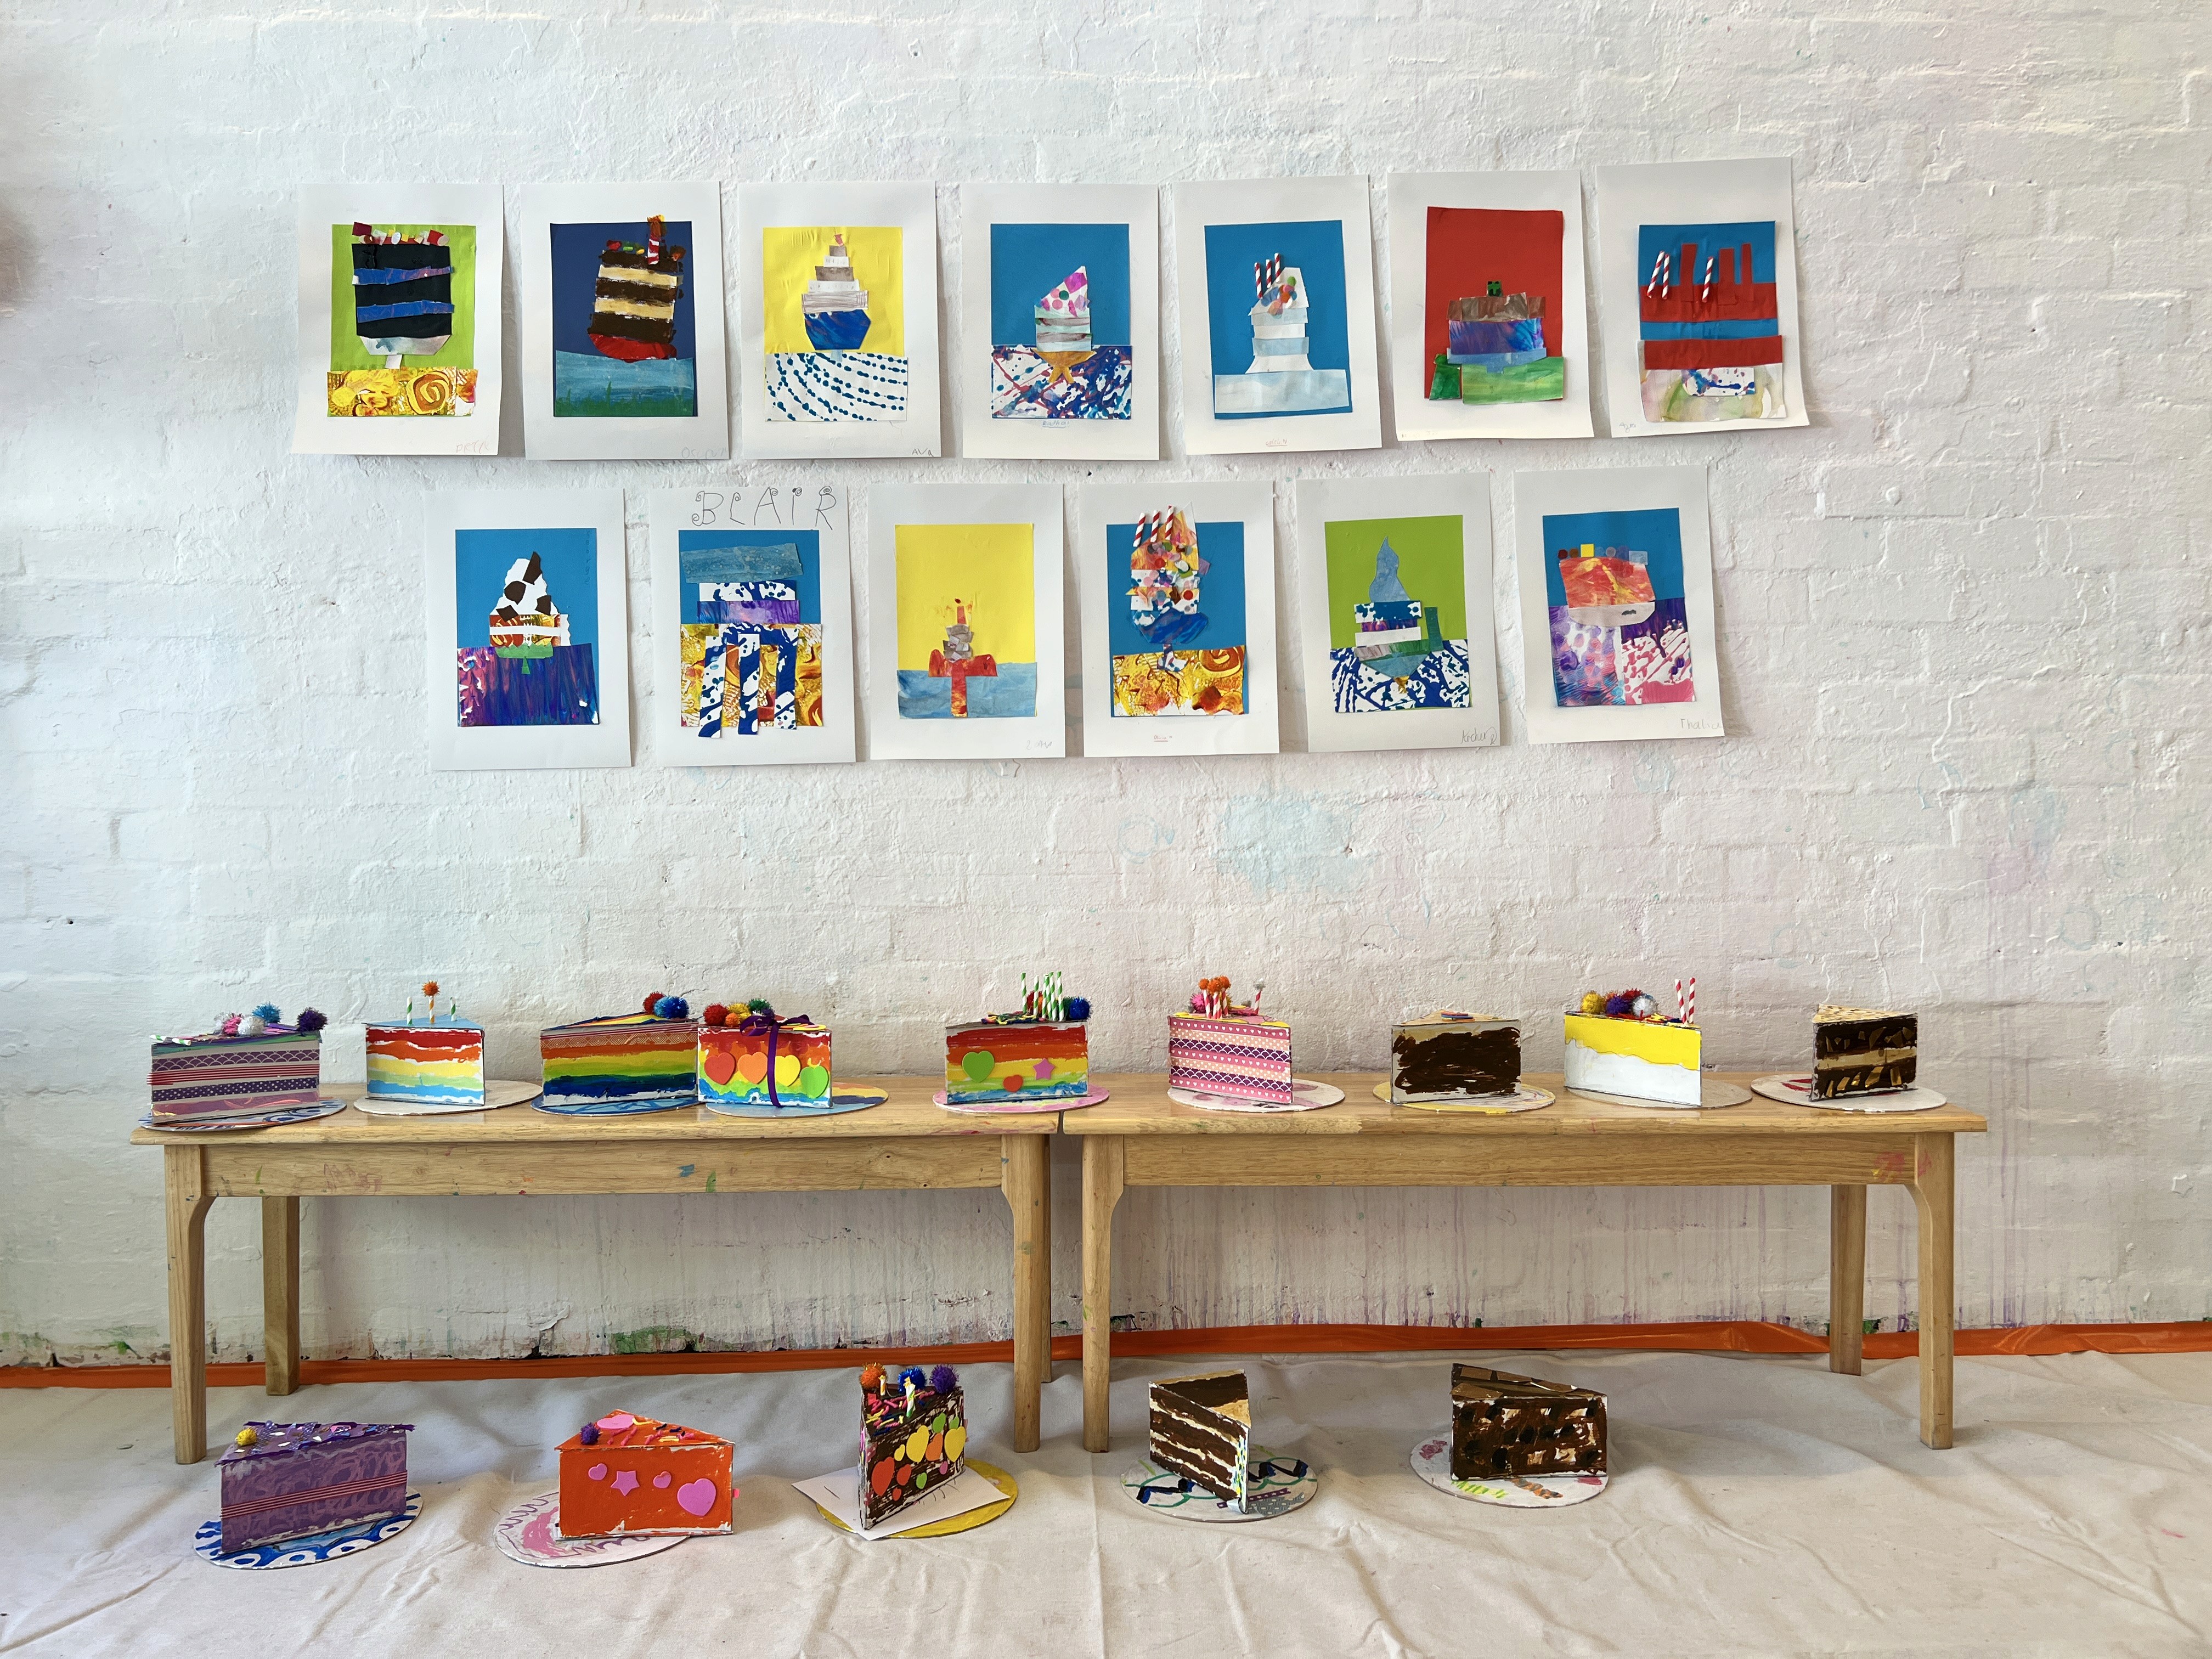
These cardboard cake slices are inspired by the joyful, colour-soaked workshops of Emma Collins in the UK, and they’ve brought so much delight to parties and classes at Smudge!
This one does need a bit of prep, so it’s worth planning ahead. As a rough guide, allow around ten minutes per slice for construction time, depending on how thick your cardboard is and how many you’re making.
Each slice is built from one long rectangular piece and two triangular side pieces, hot glued together. You can add a lid or leave the top open to create a secret cake box (perfect for pens, notes, or tiny treasures later). A Make.Do score roller makes folding easier and neater, especially with thicker cardboard, but it’s optional.
These are the dimensions we use and love:
A rectangle measuring 545mm x 100mm (about 21.5 inches x 4 inches), folded into three sections of 205mm | 135mm | 205mm (roughly 8.1 in | 5.3 in | 8.1 in).
Two triangles measuring 135mm x 205mm x 205mm (approximately 5.3 in x 8.1 in x 8.1 in).
If you’re working with older kids (around 10+), the slices can absolutely be constructed by the artists themselves and then decorated during a later session. It becomes a beautiful mix of making, measuring, and figuring things out as they go!


The Making
Once the slices are ready, set out a generous (but thoughtful!) selection of decorating materials. Paint sticks, washi tape, pom poms, beads, foil, wool scraps, hama or melty beads, ribbon, sequins, straws.
This is also a really lovely moment to talk about cake. Favourite flavours? Best birthday cakes? Crazy cake themes? The ideas will also start flowing quickly once the materials are in front of them.
If you have time, add circular cardboard or plywood pieces so artists can design their own cake plates too.
At the end, bring all the slices together to form one large shared cake. Then each artist can take their own (sculptural) slices to enjoy.


Variations
Use recycled boxes for ready-to-go cakes that don't need to preparation.


Materials
Cardboard cake slices (pre-constructed or flat pieces for older artists)
Hot glue (adult use)
Paint sticks
Washi tape
Pom poms
Beads
Foil
Wool scraps
Hama or melty beads
Ribbon
Sequins
Straws
Optional: circular cardboard or plywood pieces for cake plates


Back to Top
Cardboard Cakes
Looks good enough to eat.
Bookmark
Sculpture
The Set Up
These cardboard cake slices are inspired by the joyful, colour-soaked workshops of Emma Collins in the UK, and they’ve brought so much delight to parties and classes at Smudge!
This one does need a bit of prep, so it’s worth planning ahead. As a rough guide, allow around ten minutes per slice for construction time, depending on how thick your cardboard is and how many you’re making.
Each slice is built from one long rectangular piece and two triangular side pieces, hot glued together. You can add a lid or leave the top open to create a secret cake box (perfect for pens, notes, or tiny treasures later). A Make.Do score roller makes folding easier and neater, especially with thicker cardboard, but it’s optional.
These are the dimensions we use and love:
A rectangle measuring 545mm x 100mm (about 21.5 inches x 4 inches), folded into three sections of 205mm | 135mm | 205mm (roughly 8.1 in | 5.3 in | 8.1 in).
Two triangles measuring 135mm x 205mm x 205mm (approximately 5.3 in x 8.1 in x 8.1 in).
If you’re working with older kids (around 10+), the slices can absolutely be constructed by the artists themselves and then decorated during a later session. It becomes a beautiful mix of making, measuring, and figuring things out as they go!
The Making
Once the slices are ready, set out a generous (but thoughtful!) selection of decorating materials. Paint sticks, washi tape, pom poms, beads, foil, wool scraps, hama or melty beads, ribbon, sequins, straws.
This is also a really lovely moment to talk about cake. Favourite flavours? Best birthday cakes? Crazy cake themes? The ideas will also start flowing quickly once the materials are in front of them.
If you have time, add circular cardboard or plywood pieces so artists can design their own cake plates too.
At the end, bring all the slices together to form one large shared cake. Then each artist can take their own (sculptural) slices to enjoy.
Variations
Use recycled boxes for ready-to-go cakes that don't need to preparation.
Materials
Cardboard cake slices (pre-constructed or flat pieces for older artists)
Hot glue (adult use)
Paint sticks
Washi tape
Pom poms
Beads
Foil
Wool scraps
Hama or melty beads
Ribbon
Sequins
Straws
Optional: circular cardboard or plywood pieces for cake plates
Back to Top
Patisserie Collages
Layers on layers of yum!
Bookmark
Collage

The Set Up
This experience is inspired by Melbourne illustrator and designer Alice Oehr, whose cake illustrations are graphic and bold. She's also written lots (and lots) of books (both non-fiction and kids' books), including my personal favourite; 'The Art of Cake'.
While Alice often uses printmaking, collage gives artists a similar visual impact through layering, pattern, and contrast.
This is the perfect place to repurpose old paintings and scraps, or to prepare a pile of painted collage papers ahead of time. Think texture and mark making rather than neat shapes. If time is tight, paint sticks work beautifully because the paper dries instantly and can be used straight away. The best!
Each artist works on a thick A3 base. We often glue a coloured A4 sheet into the centre as a kind of frame, referencing Alice’s bordered compositions, but this is just a design choice (and totally optional).


The Making
This is a hands-first process! Start by experimenting with tearing paper rather than cutting it. Ripping creates edges that feel softer and more cake-like, and it keeps the work loose from the start. Thick tears and thin strips and curved edges and accidental shapes! It's also lovely to chat about colour choices, and contrasting patterns. If you're able to take a look at Alice's work, you'll no doubt be struck by how gorgeous her colour choices are! She's a colour wiz for sure.
Gradually encourage the kids to build their layers (just like baking in the real world). A base for the plate or cake stand. Larger shapes for cake layers. Smaller pieces stacked on top for icing, fillings, and decorative details. Pieces get shuffled, overlapped, pulled off, and tried again before any glue comes out. That moving-around stage is important. It’s where decisions get made without pressure.
Once the composition starts to feel right for the artist, glue everything down from the bottom up.
I think it's great to focus more on flavour and feeling than precision or perfect outcomes!


Variations
Limit the palette to two or three colours plus one patterned paper for a more graphic look.
Work collaboratively on one large “bakery window” instead of individual pieces.
Add drawn details over the top with oil pastel or paint marker once everything is dry.


Materials
Thick A3 paper or card for bases
Coloured A4 paper (optional centre frame)
Painted collage papers or old artworks
Paint sticks (for quick paper prep)
Scissors (optional, ripping encouraged)
Glue sticks or PVA
Oil pastels or paint markers (optional finishing details)
Gallery


Back to Top
Patisserie Collages
Layers on layers of yum!
Bookmark
Collage
The Set Up
This experience is inspired by Melbourne illustrator and designer Alice Oehr, whose cake illustrations are graphic and bold. She's also written lots (and lots) of books (both non-fiction and kids' books), including my personal favourite; 'The Art of Cake'.
While Alice often uses printmaking, collage gives artists a similar visual impact through layering, pattern, and contrast.
This is the perfect place to repurpose old paintings and scraps, or to prepare a pile of painted collage papers ahead of time. Think texture and mark making rather than neat shapes. If time is tight, paint sticks work beautifully because the paper dries instantly and can be used straight away. The best!
Each artist works on a thick A3 base. We often glue a coloured A4 sheet into the centre as a kind of frame, referencing Alice’s bordered compositions, but this is just a design choice (and totally optional).
The Making
This is a hands-first process! Start by experimenting with tearing paper rather than cutting it. Ripping creates edges that feel softer and more cake-like, and it keeps the work loose from the start. Thick tears and thin strips and curved edges and accidental shapes! It's also lovely to chat about colour choices, and contrasting patterns. If you're able to take a look at Alice's work, you'll no doubt be struck by how gorgeous her colour choices are! She's a colour wiz for sure.
Gradually encourage the kids to build their layers (just like baking in the real world). A base for the plate or cake stand. Larger shapes for cake layers. Smaller pieces stacked on top for icing, fillings, and decorative details. Pieces get shuffled, overlapped, pulled off, and tried again before any glue comes out. That moving-around stage is important. It’s where decisions get made without pressure.
Once the composition starts to feel right for the artist, glue everything down from the bottom up.
I think it's great to focus more on flavour and feeling than precision or perfect outcomes!
Variations
Limit the palette to two or three colours plus one patterned paper for a more graphic look.
Work collaboratively on one large “bakery window” instead of individual pieces.
Add drawn details over the top with oil pastel or paint marker once everything is dry.
Materials
Thick A3 paper or card for bases
Coloured A4 paper (optional centre frame)
Painted collage papers or old artworks
Paint sticks (for quick paper prep)
Scissors (optional, ripping encouraged)
Glue sticks or PVA
Oil pastels or paint markers (optional finishing details)
Gallery
Back to Top
Shaving Foam Icing
Pure sensory joy, straight from a can
Bookmark
Print Making
The Set Up
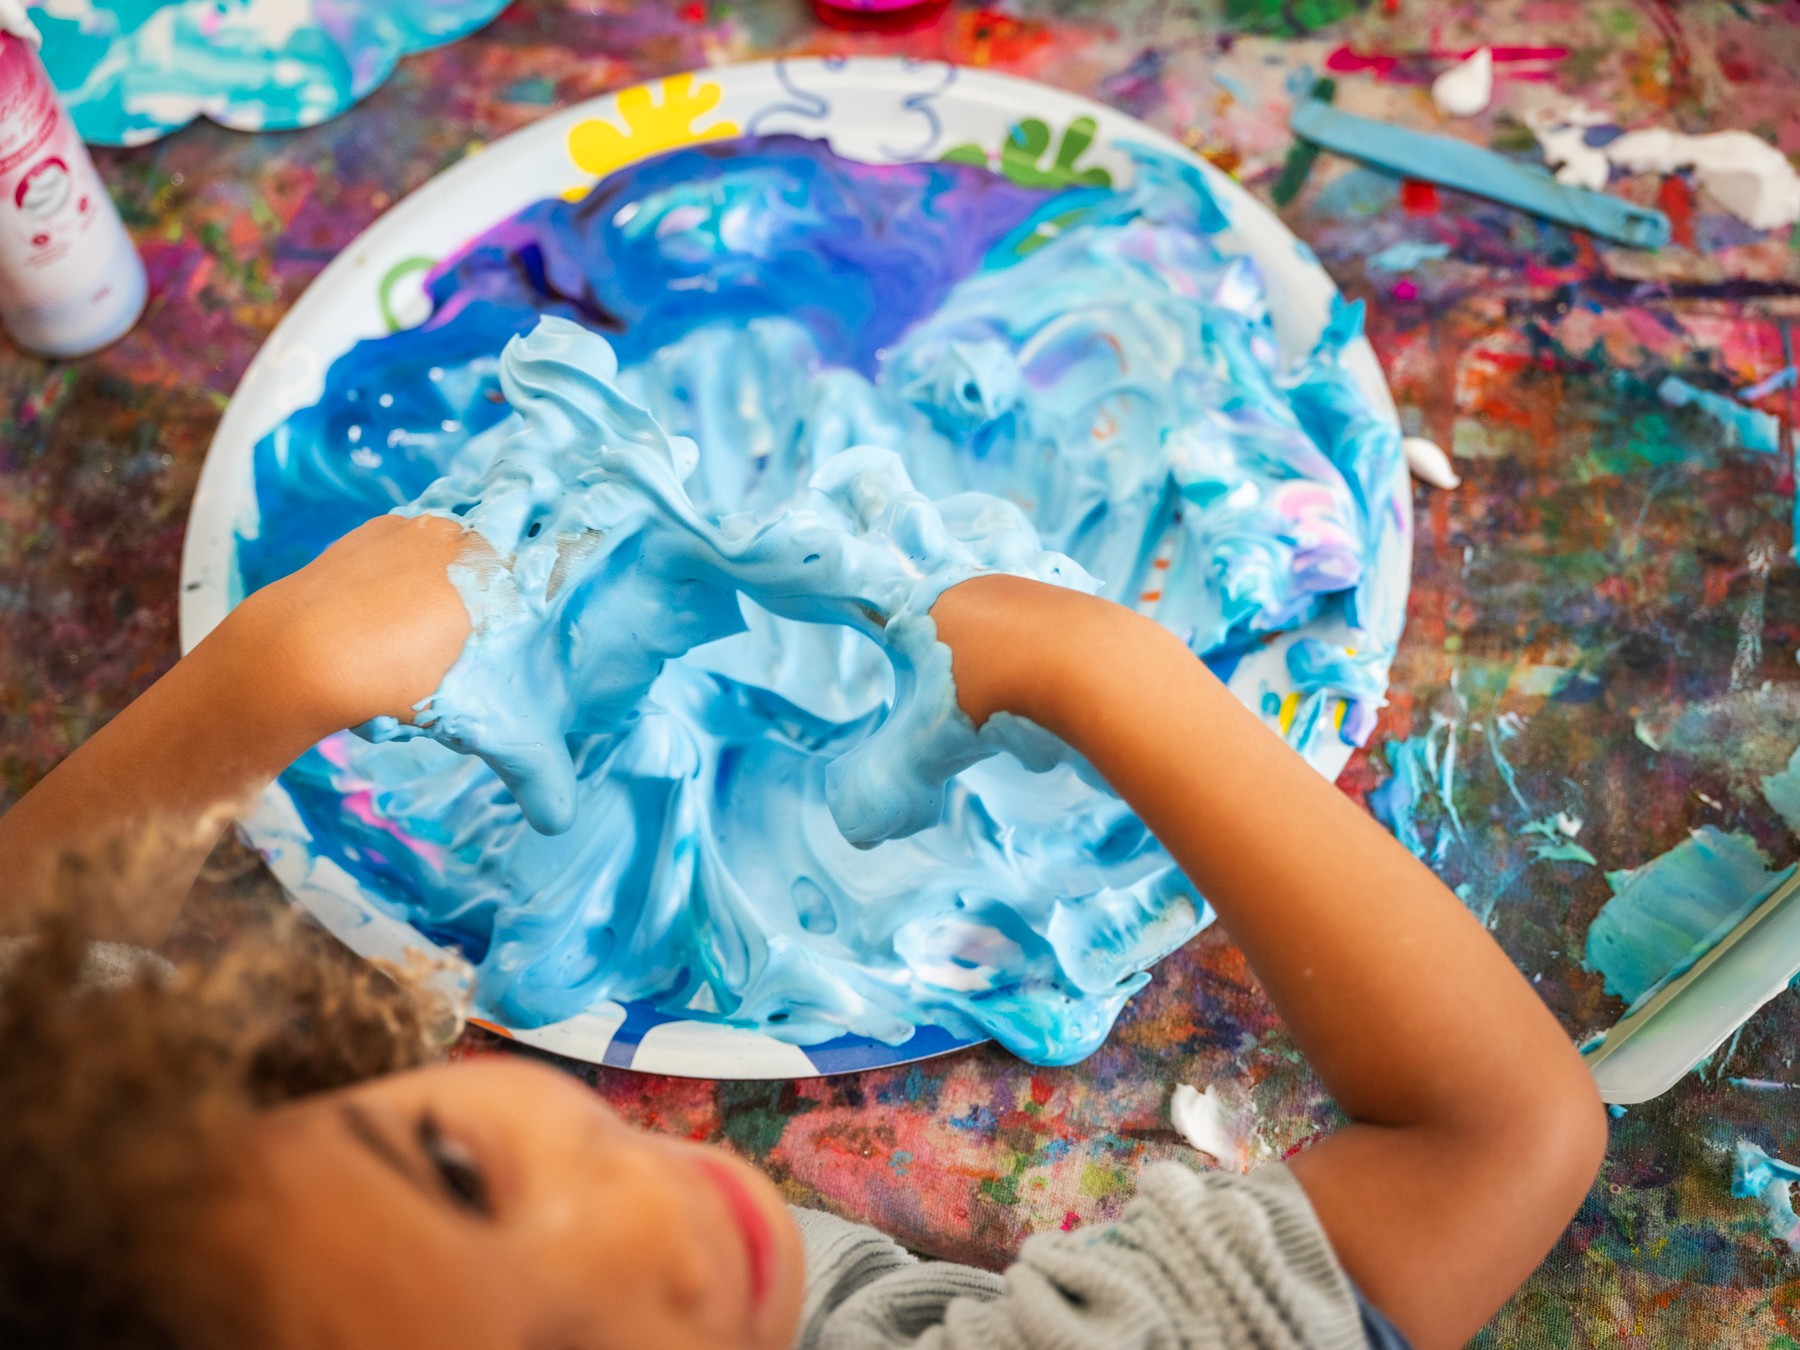
Shaving foam marbling sticks around for a reason. It’s such a playful and surprising process, and still feels magical no matter how many times you’ve done it.
Set out trays with cans of shaving foam, liquid watercolours, scrapers or squeegees, and a large container nearby for scraping excess foam into. Icy-pole sticks or chopsticks work well for swirling and mixing. But my favourite is when the kids dive in (hands first!).
Pre-cut cupcake elements, made of thick cardstock, have worked really well for our Art Play Lab classes at Smudge. We cut simple icing shapes and cupcake bases, and often have a stack of patty pans ready to go as well (they’re perfect for leaning into the cupcake illusion).


The Making
There are a couple of lovely ways to run this, and they work just as well side by side.
One approach is classic marbling (the OG sensory process). Drop colour into the foam, swirl gently, then press the paper in. Scrape away the excess to reveal the pattern underneath. The smell, the sound, and the way the foam grows out of the can are part of the experience.
The other way is to build a foam-y cupcake. Place a patty pan directly onto the tray, fill it with shaving foam, and decorate it like you would a real cupcake. Drip liquid watercolour over the top, sprinkle on actual sprinkles (or sequins, sand, anything small and colourful), and swirl lightly. Once it looks good enough to eat, flip or squish it onto a paper cupcake shape, spread gently, then lift to reveal the print.
Another beautiful thing about this, is that the prints dry almost straight away! So the cupcake bases can be collaged, layered, drawn on or decorated whenever inspiration strikes.


Materials
Shaving foam
Trays
Liquid watercolours
Icy-pole sticks or chopsticks for swirling
Scrapers or squeegees
Large container for scraping excess foam
Patty pans or cupcake papers
Thick cardstock or paper cupcake shapes
Sprinkles or small loose parts (optional)
Cloths or paper towel for clean-up
Back to Top
Shaving Foam Icing
Pure sensory joy, straight from a can
Bookmark
Print Making
The Set Up
Shaving foam marbling sticks around for a reason. It’s such a playful and surprising process, and still feels magical no matter how many times you’ve done it.
Set out trays with cans of shaving foam, liquid watercolours, scrapers or squeegees, and a large container nearby for scraping excess foam into. Icy-pole sticks or chopsticks work well for swirling and mixing. But my favourite is when the kids dive in (hands first!).
Pre-cut cupcake elements, made of thick cardstock, have worked really well for our Art Play Lab classes at Smudge. We cut simple icing shapes and cupcake bases, and often have a stack of patty pans ready to go as well (they’re perfect for leaning into the cupcake illusion).
The Making
There are a couple of lovely ways to run this, and they work just as well side by side.
One approach is classic marbling (the OG sensory process). Drop colour into the foam, swirl gently, then press the paper in. Scrape away the excess to reveal the pattern underneath. The smell, the sound, and the way the foam grows out of the can are part of the experience.
The other way is to build a foam-y cupcake. Place a patty pan directly onto the tray, fill it with shaving foam, and decorate it like you would a real cupcake. Drip liquid watercolour over the top, sprinkle on actual sprinkles (or sequins, sand, anything small and colourful), and swirl lightly. Once it looks good enough to eat, flip or squish it onto a paper cupcake shape, spread gently, then lift to reveal the print.
Another beautiful thing about this, is that the prints dry almost straight away! So the cupcake bases can be collaged, layered, drawn on or decorated whenever inspiration strikes.
Materials
Shaving foam
Trays
Liquid watercolours
Icy-pole sticks or chopsticks for swirling
Scrapers or squeegees
Large container for scraping excess foam
Patty pans or cupcake papers
Thick cardstock or paper cupcake shapes
Sprinkles or small loose parts (optional)
Cloths or paper towel for clean-up
Back to Top
Coffee, Please
Pouring, scooping, pretending.
Bookmark
Sensory Play

The Set Up
Coffee beans are kind of magic. They’re lightweight in little hands, smell incredible (for coffee-loving adults like me), and sound beautiful when they’re tipped and poured.
We source all the vessels from op shops. Teapots, jugs, goblets, tiny spoons. Old brass and tin pieces make it feel formal in a good way, like a tiny café setup rather than a sensory bin.


The Making
Artists scoop, pour, tip, and pretend. Tiny teaspoons get a real workout and are brilliant for fine motor control. The play that unfolds is imaginative and focused without being loud or chaotic.
Why We Love It
It feels grown-up in the best possible way! Kids love being trusted with real tools and materials, and the play that emerges is calm, focused, and deeply satisfying. It’s also incredibly easy to recreate at home, in classrooms, or in studios. A kitchen table works just as well as a big open floor.


Variations
If coffee beans aren’t suitable for your space and or you don't use consumables, large seeds, wooden beads, or smooth pebbles work just as well.
Materials
Coffee beans (or a non-food substitute)
Large tubs or trays
Teapots, jugs, cups, goblets
Small spoons and scoops
Back to Top
Coffee, Please
Pouring, scooping, pretending.
Bookmark
Sensory Play
The Set Up
Coffee beans are kind of magic. They’re lightweight in little hands, smell incredible (for coffee-loving adults like me), and sound beautiful when they’re tipped and poured.
We source all the vessels from op shops. Teapots, jugs, goblets, tiny spoons. Old brass and tin pieces make it feel formal in a good way, like a tiny café setup rather than a sensory bin.
The Making
Artists scoop, pour, tip, and pretend. Tiny teaspoons get a real workout and are brilliant for fine motor control. The play that unfolds is imaginative and focused without being loud or chaotic.
Why We Love It
It feels grown-up in the best possible way! Kids love being trusted with real tools and materials, and the play that emerges is calm, focused, and deeply satisfying. It’s also incredibly easy to recreate at home, in classrooms, or in studios. A kitchen table works just as well as a big open floor.
Variations
If coffee beans aren’t suitable for your space and or you don't use consumables, large seeds, wooden beads, or smooth pebbles work just as well.
Materials
Coffee beans (or a non-food substitute)
Large tubs or trays
Teapots, jugs, cups, goblets
Small spoons and scoops
Back to Top
Sweet Treat Still Life
Look closely and then enjoy together.
Bookmark
Painting & Drawing

The Set Up
Sweet Treat Still Life days at Smudge are always a bit special! Set up the still life like you’re styling a table you’d actually love to sit at. Cake stands, plates, boxes, stacked boards. Different heights really make all the difference, and try to leave a little breathing room between each treat (especially for younger kids) so that it's a bit simpler to see the form and shapes.
Gather the kids around the table. I just love the noses close, pointing things out, chatting about flavours and layers and who wants which slice later.
It's a good idea to keep the materials simple so that the artists can be comfortable with the medium, and focus on observing closely and drawing what they see. Oil pastels, watercolours, paint markers.


The Making
Start with oil pastel outlines. If you'd like to offer a little guidance, then try encouraging larger shapes first. It's also gorgeous when artists don't take their eyes off the cake, and trust their hands to sketch the shapes they see without looking at the page (or overthinking).
Bring in watercolour next. Loose washes, layering colour, letting things bleed a little. Oil pastel resists just enough to keep things grounded without becoming stiff. They might like to add in the table line and imagine a gorgeous design for the table cloth. Final details can be added once the paint dries.
Then the yummy part! Let them eat cake.


Materials
Real cakes, sweet treats, fruit
Cake stands, plates, boxes
Oil pastels
Watercolours
Brushes
Paint markers (optional)
Paper, A3 or larger (cold-pressed watercolour paper works wonders)
Back to Top
Sweet Treat Still Life
Look closely and then enjoy together.
Bookmark
Painting & Drawing
The Set Up
Sweet Treat Still Life days at Smudge are always a bit special! Set up the still life like you’re styling a table you’d actually love to sit at. Cake stands, plates, boxes, stacked boards. Different heights really make all the difference, and try to leave a little breathing room between each treat (especially for younger kids) so that it's a bit simpler to see the form and shapes.
Gather the kids around the table. I just love the noses close, pointing things out, chatting about flavours and layers and who wants which slice later.
It's a good idea to keep the materials simple so that the artists can be comfortable with the medium, and focus on observing closely and drawing what they see. Oil pastels, watercolours, paint markers.
The Making
Start with oil pastel outlines. If you'd like to offer a little guidance, then try encouraging larger shapes first. It's also gorgeous when artists don't take their eyes off the cake, and trust their hands to sketch the shapes they see without looking at the page (or overthinking).
Bring in watercolour next. Loose washes, layering colour, letting things bleed a little. Oil pastel resists just enough to keep things grounded without becoming stiff. They might like to add in the table line and imagine a gorgeous design for the table cloth. Final details can be added once the paint dries.
Then the yummy part! Let them eat cake.
Materials
Real cakes, sweet treats, fruit
Cake stands, plates, boxes
Oil pastels
Watercolours
Brushes
Paint markers (optional)
Paper, A3 or larger (cold-pressed watercolour paper works wonders)
Back to Top
Citrus Painting
Art x Science
Bookmark
Painting & Drawing

The Set Up
Bright citrus colours and simple tools are a match made in heaven! Cut some lemon and lime circles and wedges, and fill a small cup or two with juice. Thick watercolour paper is preferred, because the paper will inevitably get soaked with the gorgeous citrus-y liquid watercolours. Plus oil pastels and little droppers or pipettes add another layer of curiosity and fine-motor control.
If using real citrus isn’t suitable for your space, vinegar or a citric acid solution can be used instead. The effect changes slightly, but the sense of discovery remains and the general bones of the process remain the same.
Pre-cutting the paper into citrus-y shapes for younger artists is helpful, or stick with the rectangular page for more open-ended creations.


The Making
I adore this art experience, because the materials are simply laid out and everyone is free to explore. Liquid watercolours, citrus, droppers. From there, the page becomes a place to try things and see what happens!
Kids will start noticing the science very quickly. Mixing and reacting and changing. There’s a lot to watch if you slow down enough.


Variations
Add baking soda sparingly for extra fizz and texture.
Limit the palette to yellows, greens, and oranges.


Materials
Paper
Liquid watercolours
Lemons and limes (both full fruits and bottles of juice)
Droppers or pipettes
Bowls
Back to Top
Citrus Painting
Art x Science
Bookmark
Painting & Drawing
The Set Up
Bright citrus colours and simple tools are a match made in heaven! Cut some lemon and lime circles and wedges, and fill a small cup or two with juice. Thick watercolour paper is preferred, because the paper will inevitably get soaked with the gorgeous citrus-y liquid watercolours. Plus oil pastels and little droppers or pipettes add another layer of curiosity and fine-motor control.
If using real citrus isn’t suitable for your space, vinegar or a citric acid solution can be used instead. The effect changes slightly, but the sense of discovery remains and the general bones of the process remain the same.
Pre-cutting the paper into citrus-y shapes for younger artists is helpful, or stick with the rectangular page for more open-ended creations.
The Making
I adore this art experience, because the materials are simply laid out and everyone is free to explore. Liquid watercolours, citrus, droppers. From there, the page becomes a place to try things and see what happens!
Kids will start noticing the science very quickly. Mixing and reacting and changing. There’s a lot to watch if you slow down enough.
Variations
Add baking soda sparingly for extra fizz and texture.
Limit the palette to yellows, greens, and oranges.
Materials
Paper
Liquid watercolours
Lemons and limes (both full fruits and bottles of juice)
Droppers or pipettes
Bowls
Back to Top
Muffin Tray Monoprinting
A colourful field of cupcakes.
Bookmark
Print Making

The Set Up
Using actual baking tools in art always feels right! The set-up is simple and familiar, which frees everyone up to focus on colour mixing and play rather than instructions.
I first came across this idea on Barbara Rucci’s blog, Art Bar. Her approach to process art has shaped Smudge in a big way, especially that gentle reminder to set things up well and then step back.
Flip muffin trays upside down so the circles are raised. Pour poster paint into jars and add a little white to each colour (it makes everything feel brighter and more delicious). Think icing tones, bakery windows, trays lined up and ready.


The Making
Load up the circles with brushes, sponges, rollers, or fingertips. Paint can stay neatly separated or be mixed straight on the tray. Both work beautifully, and watching the colours swirl and meet is half the joy.
Lay a sheet of A3 paper over the top and press down firmly with your hands, or flip the tray onto the paper in one confident movement. Peel it back and reveal a whole tray of prints in one go. It always feels good.
You can print again straight away, rotate the paper, or layer another pass over the top.


Variations
Liquid watercolours create a softer, more translucent print.
Rotate the paper and print again so the circles overlap and build up layers.
Line finished prints up side by side to create a bakery-style display.


Materials
Muffin trays
Poster paint with a little white added
Jars or containers
Brushes, sponges, or rollers
A3 paper or larger
Back to Top
Muffin Tray Monoprinting
A colourful field of cupcakes.
Bookmark
Print Making
The Set Up
Using actual baking tools in art always feels right! The set-up is simple and familiar, which frees everyone up to focus on colour mixing and play rather than instructions.
I first came across this idea on Barbara Rucci’s blog, Art Bar. Her approach to process art has shaped Smudge in a big way, especially that gentle reminder to set things up well and then step back.
Flip muffin trays upside down so the circles are raised. Pour poster paint into jars and add a little white to each colour (it makes everything feel brighter and more delicious). Think icing tones, bakery windows, trays lined up and ready.
The Making
Load up the circles with brushes, sponges, rollers, or fingertips. Paint can stay neatly separated or be mixed straight on the tray. Both work beautifully, and watching the colours swirl and meet is half the joy.
Lay a sheet of A3 paper over the top and press down firmly with your hands, or flip the tray onto the paper in one confident movement. Peel it back and reveal a whole tray of prints in one go. It always feels good.
You can print again straight away, rotate the paper, or layer another pass over the top.
Variations
Liquid watercolours create a softer, more translucent print.
Rotate the paper and print again so the circles overlap and build up layers.
Line finished prints up side by side to create a bakery-style display.
Materials
Muffin trays
Poster paint with a little white added
Jars or containers
Brushes, sponges, or rollers
A3 paper or larger
Back to Top
Iced Tea Water Play
Perfect for a Summer's afternoon!
Bookmark
Sensory Play

The Set Up
Water play doesn’t need much to be engaging, does it? Cool water, gentle colour, and a few thoughtful additions are more than enough!
Fill tubs, bowls, or jugs with water and add a few drops of yellow or orange liquid watercolour, letting it drift before stirring. Float in slices of lemon and orange, then add fresh mint. I can smell it from here!
Real vessels make a big difference too, so try to find jugs, cups, small teapots, ladles.


Variations
Add ice cubes for sound and temperature contrast.
Use clear cups to highlight colour gradients.
Limit the palette to a single colour family for a calmer feel.
Materials
Water
Liquid watercolour (3 - 5 drops is more than enough)
Lemon and orange slices
Fresh mint
Jugs, cups, ladles
Back to Top
Iced Tea Water Play
Perfect for a Summer's afternoon!
Bookmark
Sensory Play
The Set Up
Water play doesn’t need much to be engaging, does it? Cool water, gentle colour, and a few thoughtful additions are more than enough!
Fill tubs, bowls, or jugs with water and add a few drops of yellow or orange liquid watercolour, letting it drift before stirring. Float in slices of lemon and orange, then add fresh mint. I can smell it from here!
Real vessels make a big difference too, so try to find jugs, cups, small teapots, ladles.
Variations
Add ice cubes for sound and temperature contrast.
Use clear cups to highlight colour gradients.
Limit the palette to a single colour family for a calmer feel.
Materials
Water
Liquid watercolour (3 - 5 drops is more than enough)
Lemon and orange slices
Fresh mint
Jugs, cups, ladles
Back to Top
