
ARTFUL EXPERIENCES
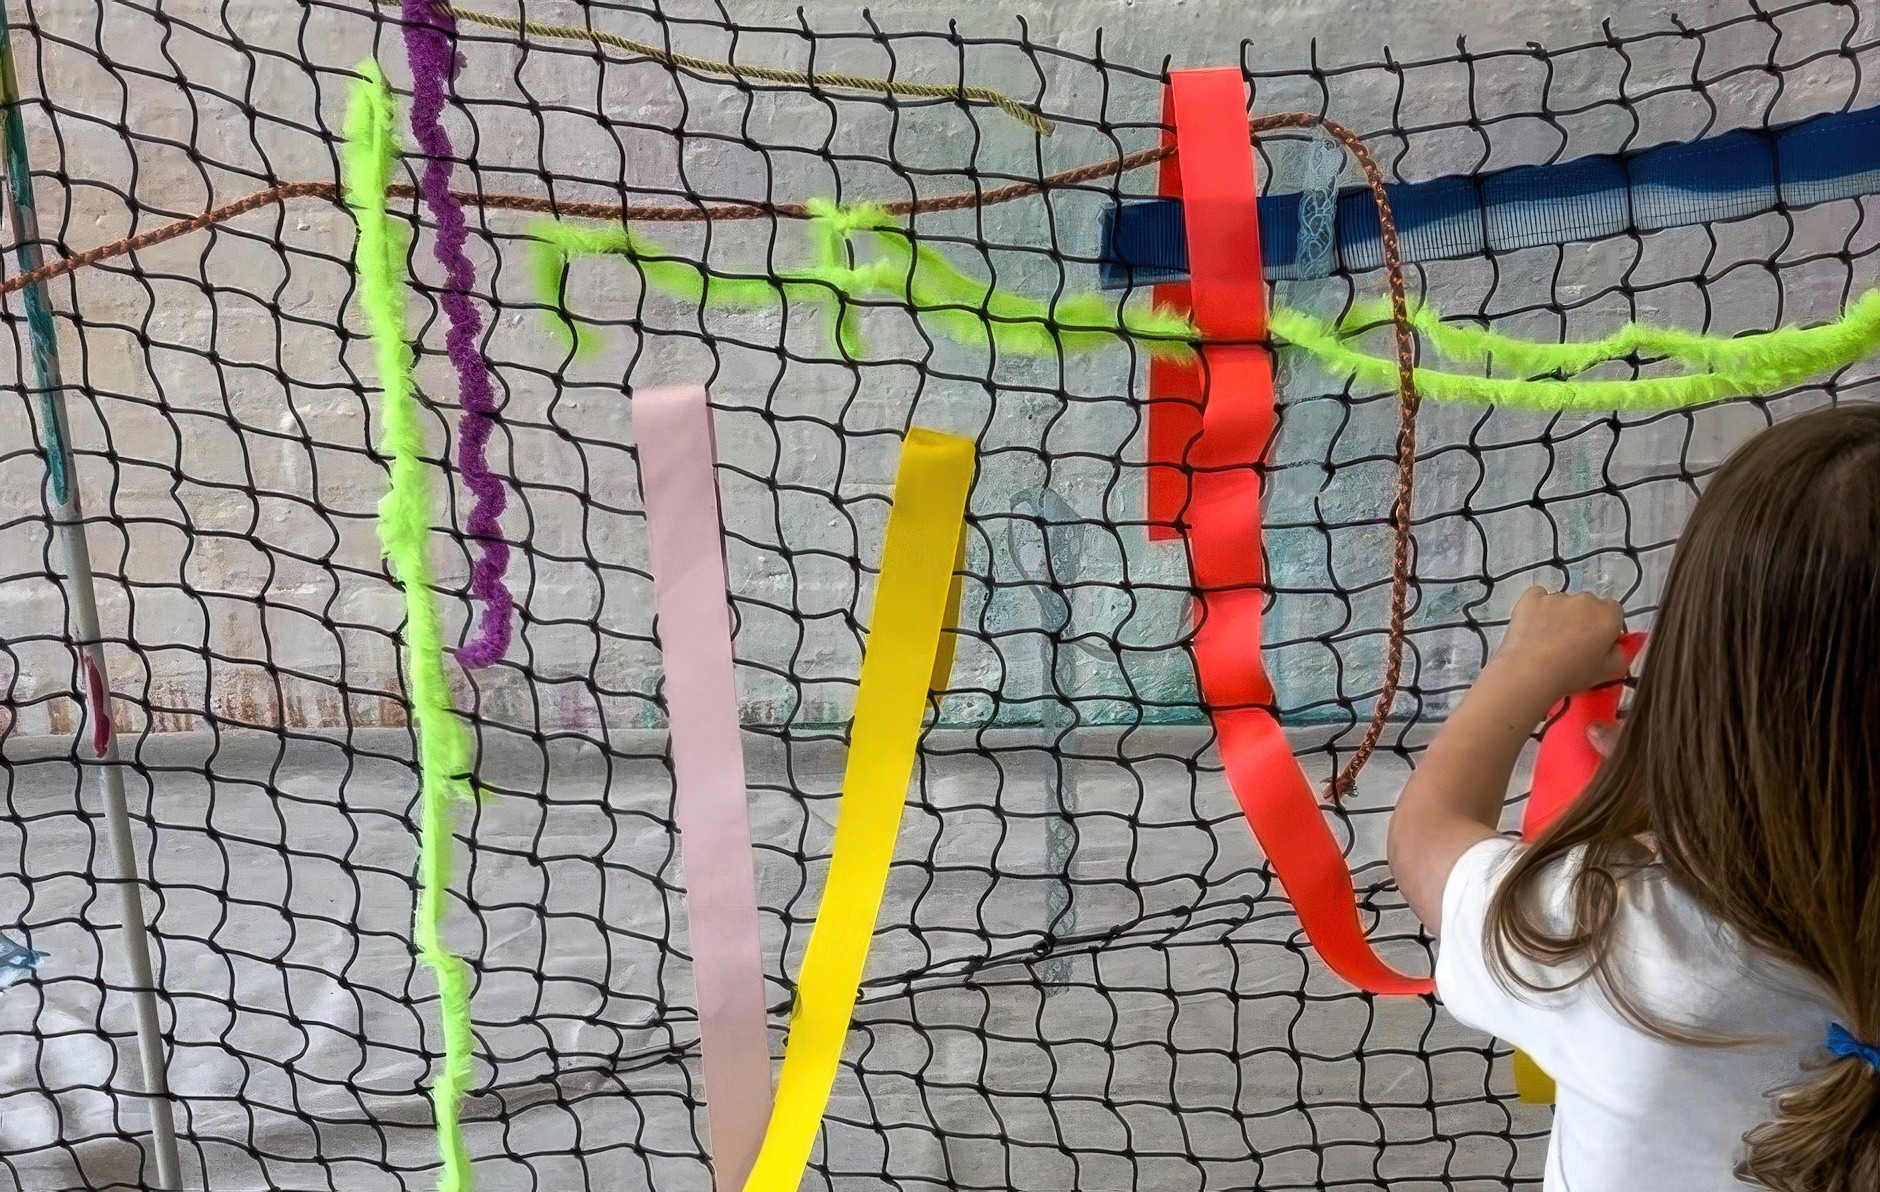
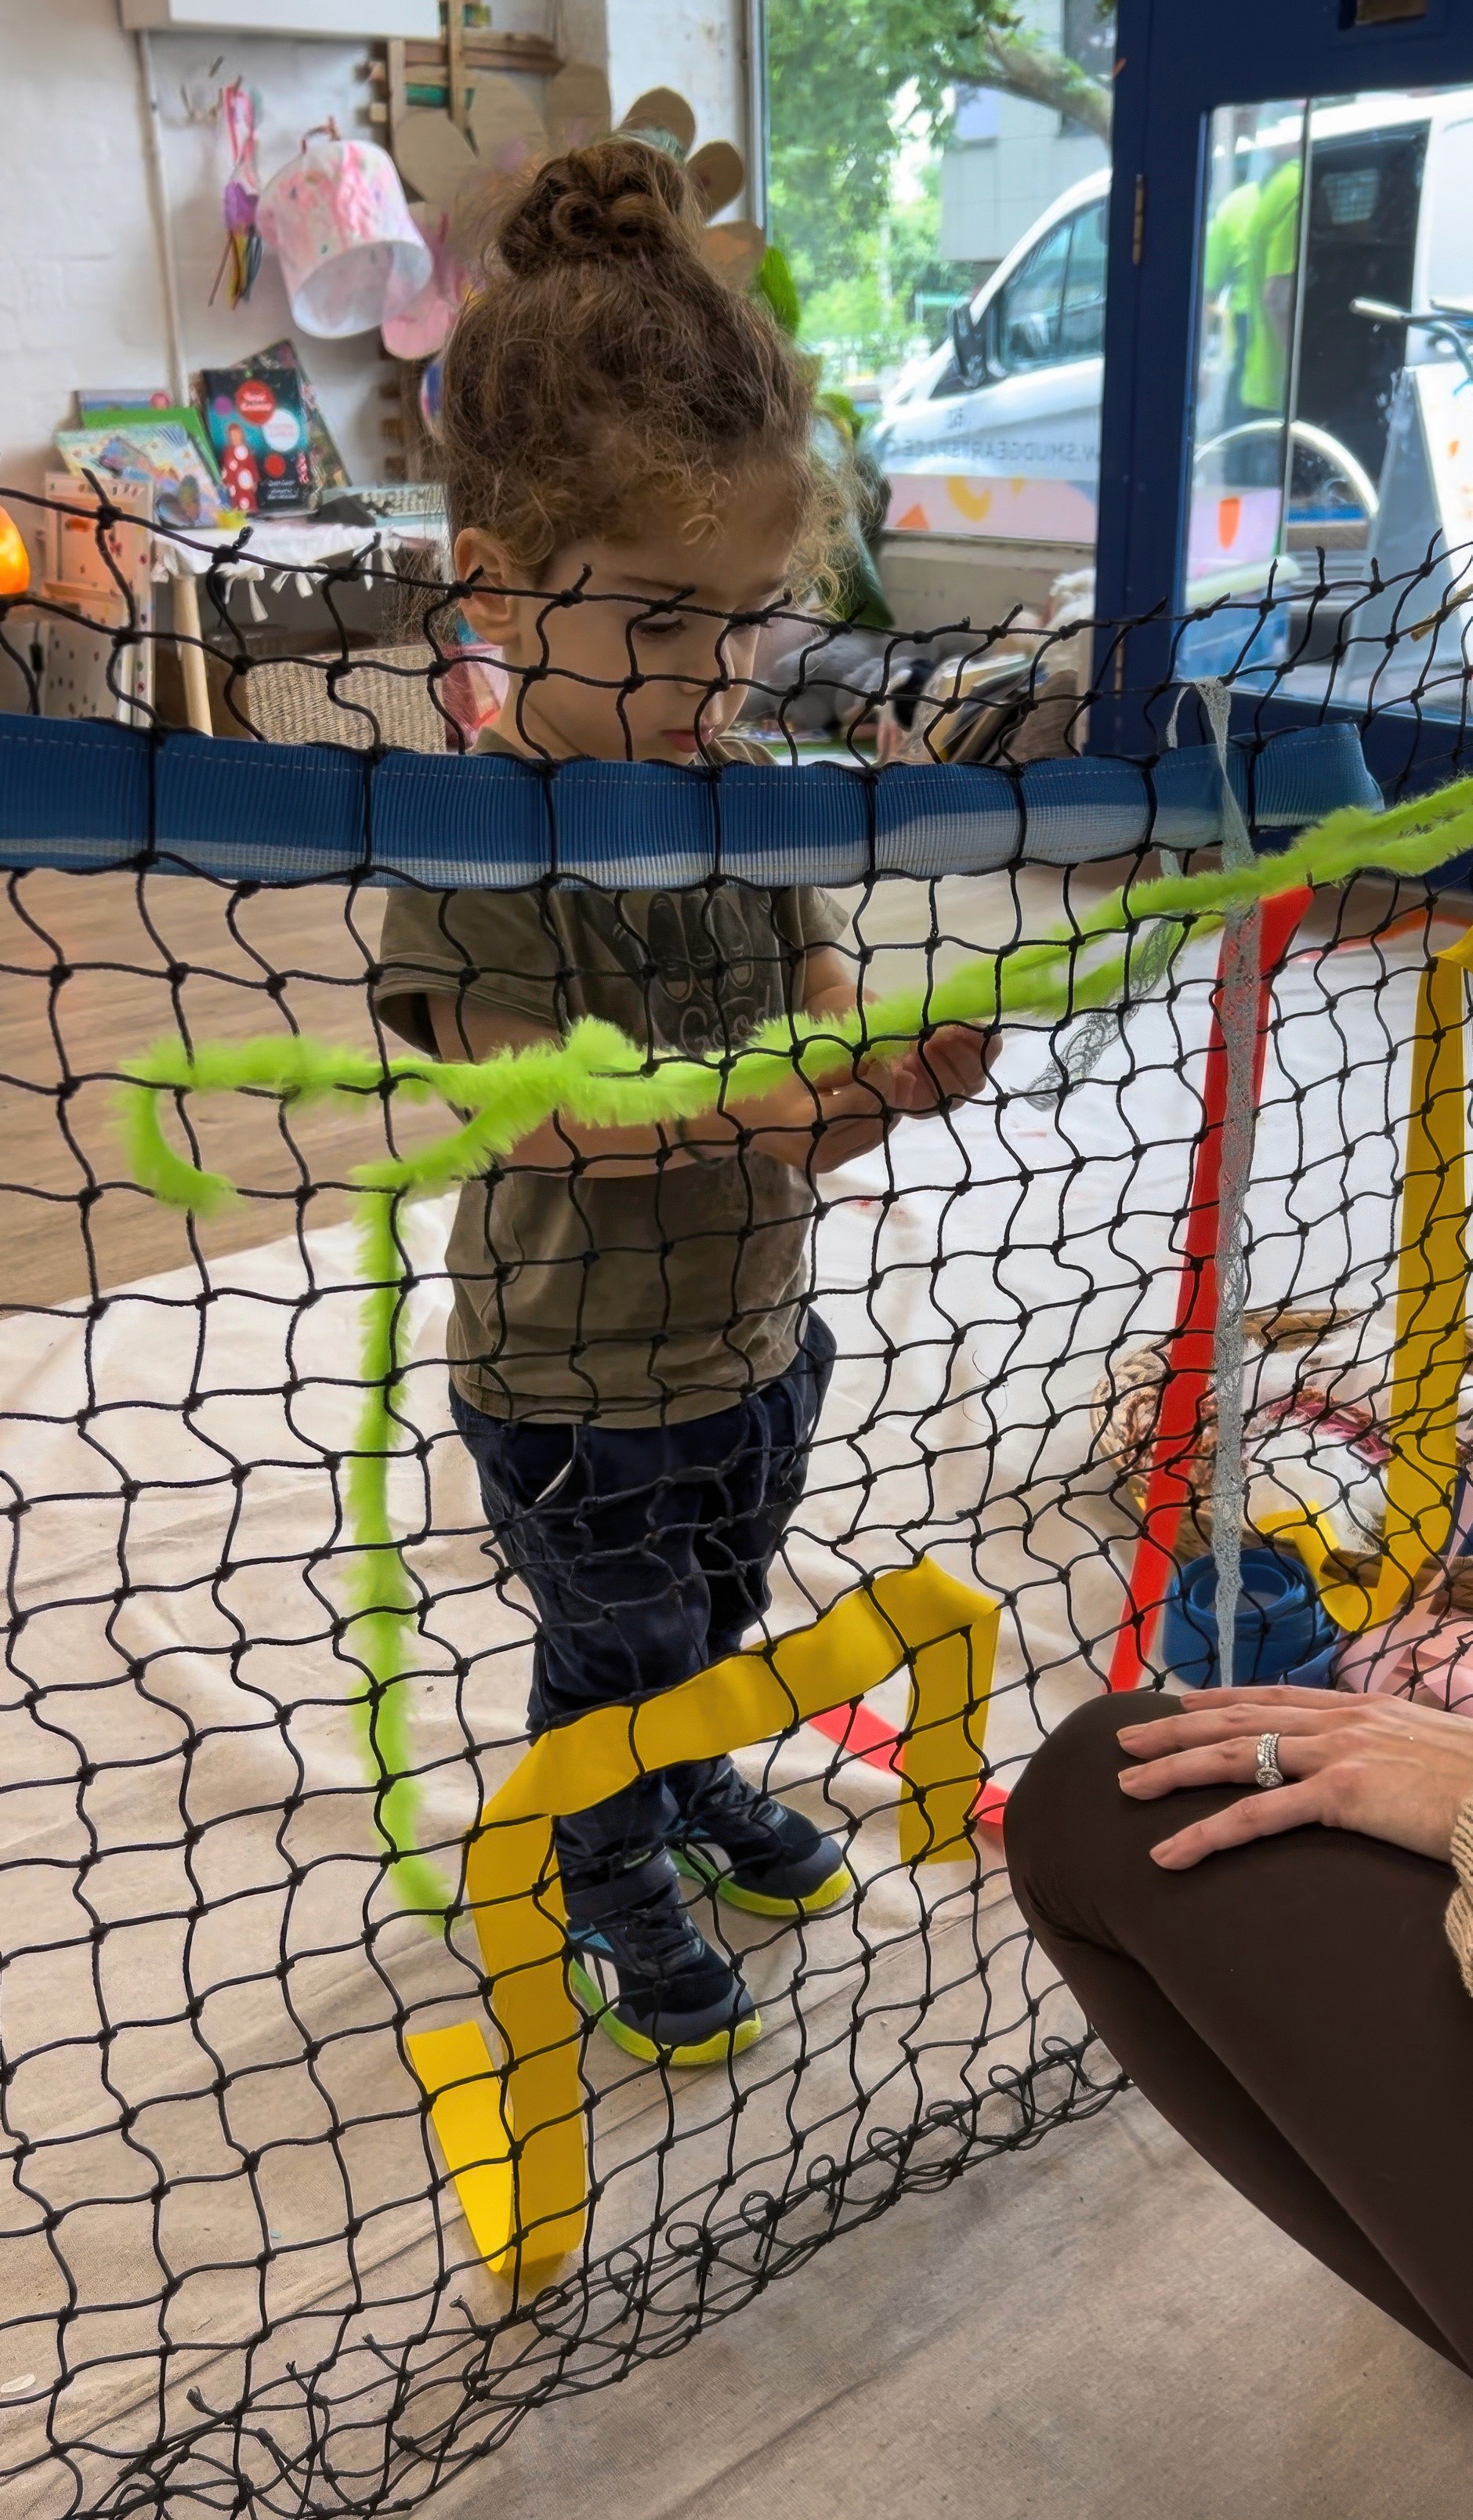
The Big Weave
Under and over and weave together
Bookmark
Installations
The Set Up
String a long net at kid height so small arms can reach from both sides. I like bright construction netting because it reads across the room, and a borrowed tennis net works beautifully too. Give it a little wiggle so it feels tight enough with a little bit of give, but not floppy. Slip big baskets beneath with all the good things… thick wool and ribbons and cords and fabric strips and pom pom offcuts and one odd wild card for a surprise (like tulle or T shirt offcuts!).
The Making
As with all installations, this really is a 'choose your own adventure' type of set up!
Under and over. Through and around. One artist moves low and calm, another sends a bright colour on a long path and the whole surface answers back. I ask small questions and then step out of the way. Where does your line want to travel? What happens if you echo your neighbour? Isn’t it magical when two colours cross and a new path appears and everyone leans closer.
When Olive and I tested this out at home for the first time, it was super clear straight away that a little slack is necessary so little hands can pull without strain. Keep adding and weaving and pulling and threading. Plus, collaborative weaving is just the best!
Variations
Leaves and grasses woven in for a day outside to see what the wind does
Materials
Plastic net or tennis net
Thick wool, ribbons, cords, fabric strips
Hooks or poles and strong string
Scissors
Drop cloth or pegs as needed
Back to Top
Wet Felting
Watch loose wool turn into fabric in your hands!
Bookmark
Sculpture
The Set Up
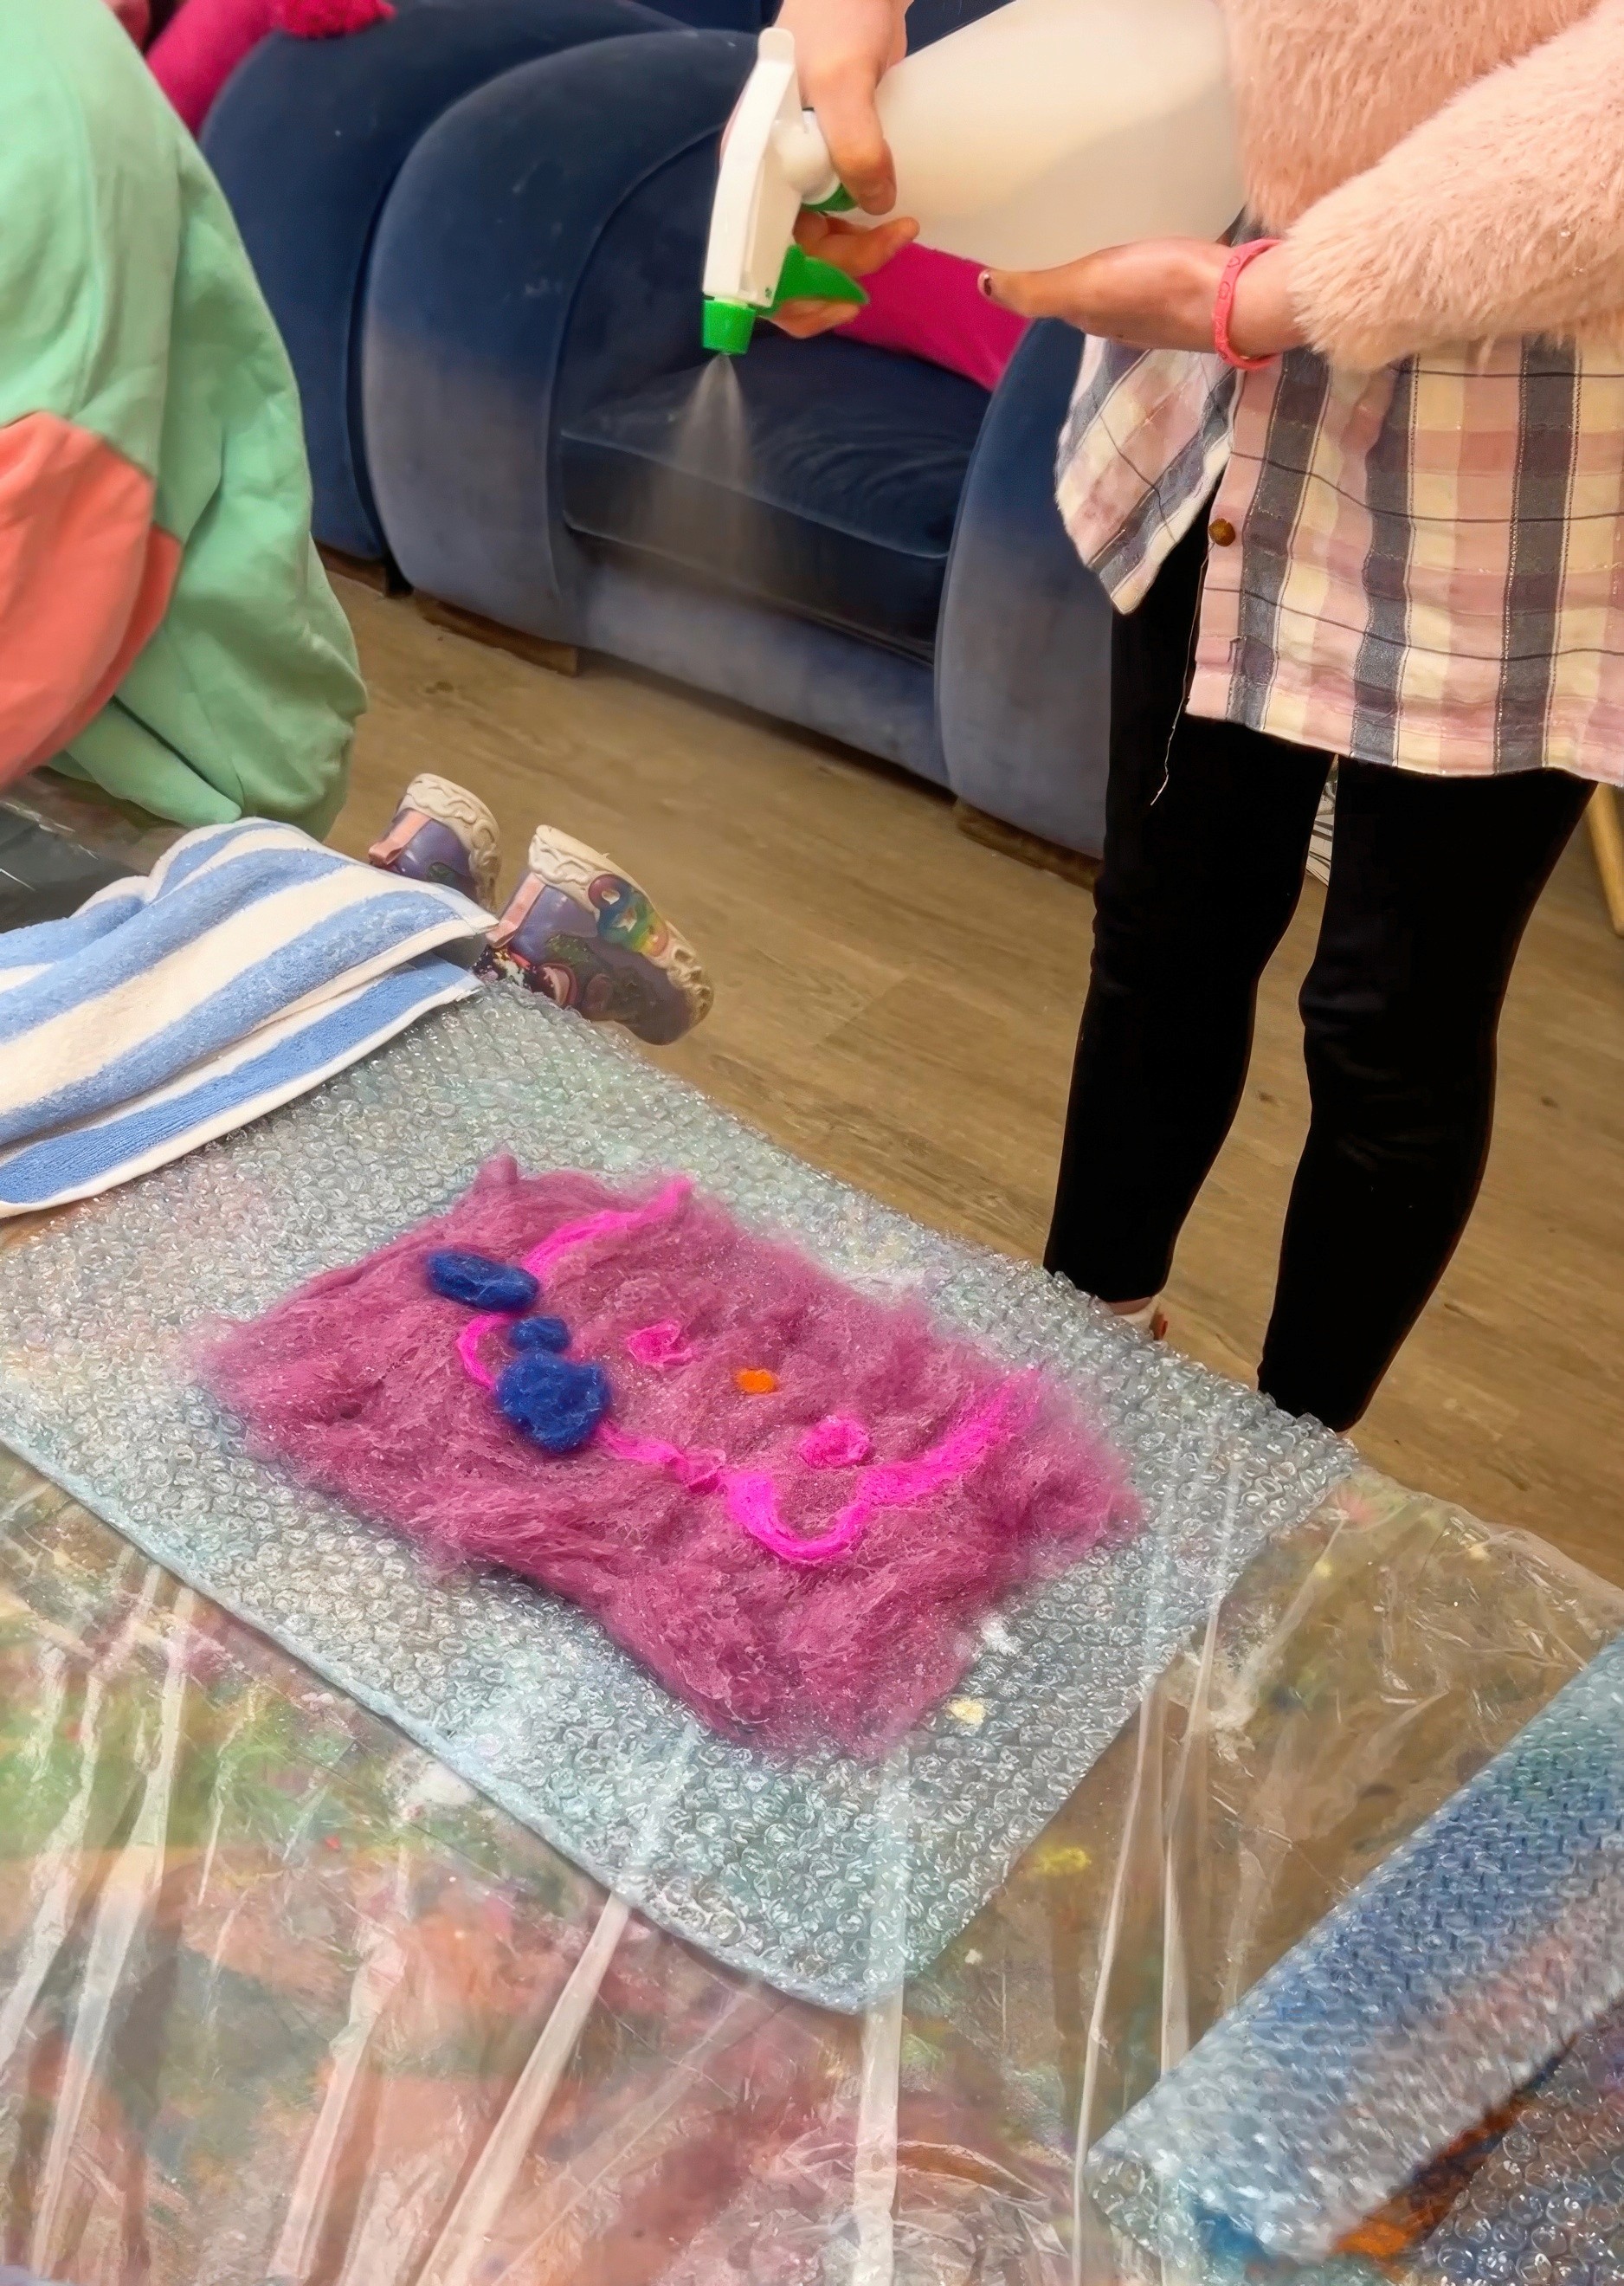
Let’s get the table ready for felting. I cover it with plastic, slide a dark sheet of paper underneath as a loose size guide, then lay bubble wrap on top with the bubbles facing up and big enough to fold over the work later. At Smudge we park spray bottles filled with warm water and a small pump of hand soap right where we can grab them, with towels, refill bowls, and a flat drying spot within reach.
I like to pass around a tiny felted toy first so everyone can feel where we are headed (Tara’s Treasures are my favourite). Then a two minute chat about wool and the wet felting process, how it works. Warm soapy water opens the tiny scales on each fibre, steady rolling helps them hook and hold, and a quick cool rinse tells the whole piece to stay put.
It's definitely important to think about the materials and to pick your wool with intent. Softer roving felts quickly and finishes smooth. A slightly coarser fibre keeps more texture. We source from KraftKolour through ZartArt because the colours are gorgeous and the fibres behave beautifully!
Pile the roving centre stage… that mountain of colour pulls the kids in before you say a word!
The Making
If you can, give everyone a minute with the roving first so the room settles. I show how to pinch and pull fairy floss wisps so the fibres stay airy.
Have a chat about what everyone is dreaming of making today. Pure colour and mood? A place you love? An animal with personality? Older kids might sketch the faintest guide and lay wool over it; little ones jump straight in. Then we build the base or background in two thin layers. The first one goes left to right and the other top to bottom (or vice versa), so it holds without bulk. It’s a great idea to suggest big shapes first and then add the light details later so everything felts cleanly.
As with everything we love at Smudge, encourage play and experimenting with new ideas!
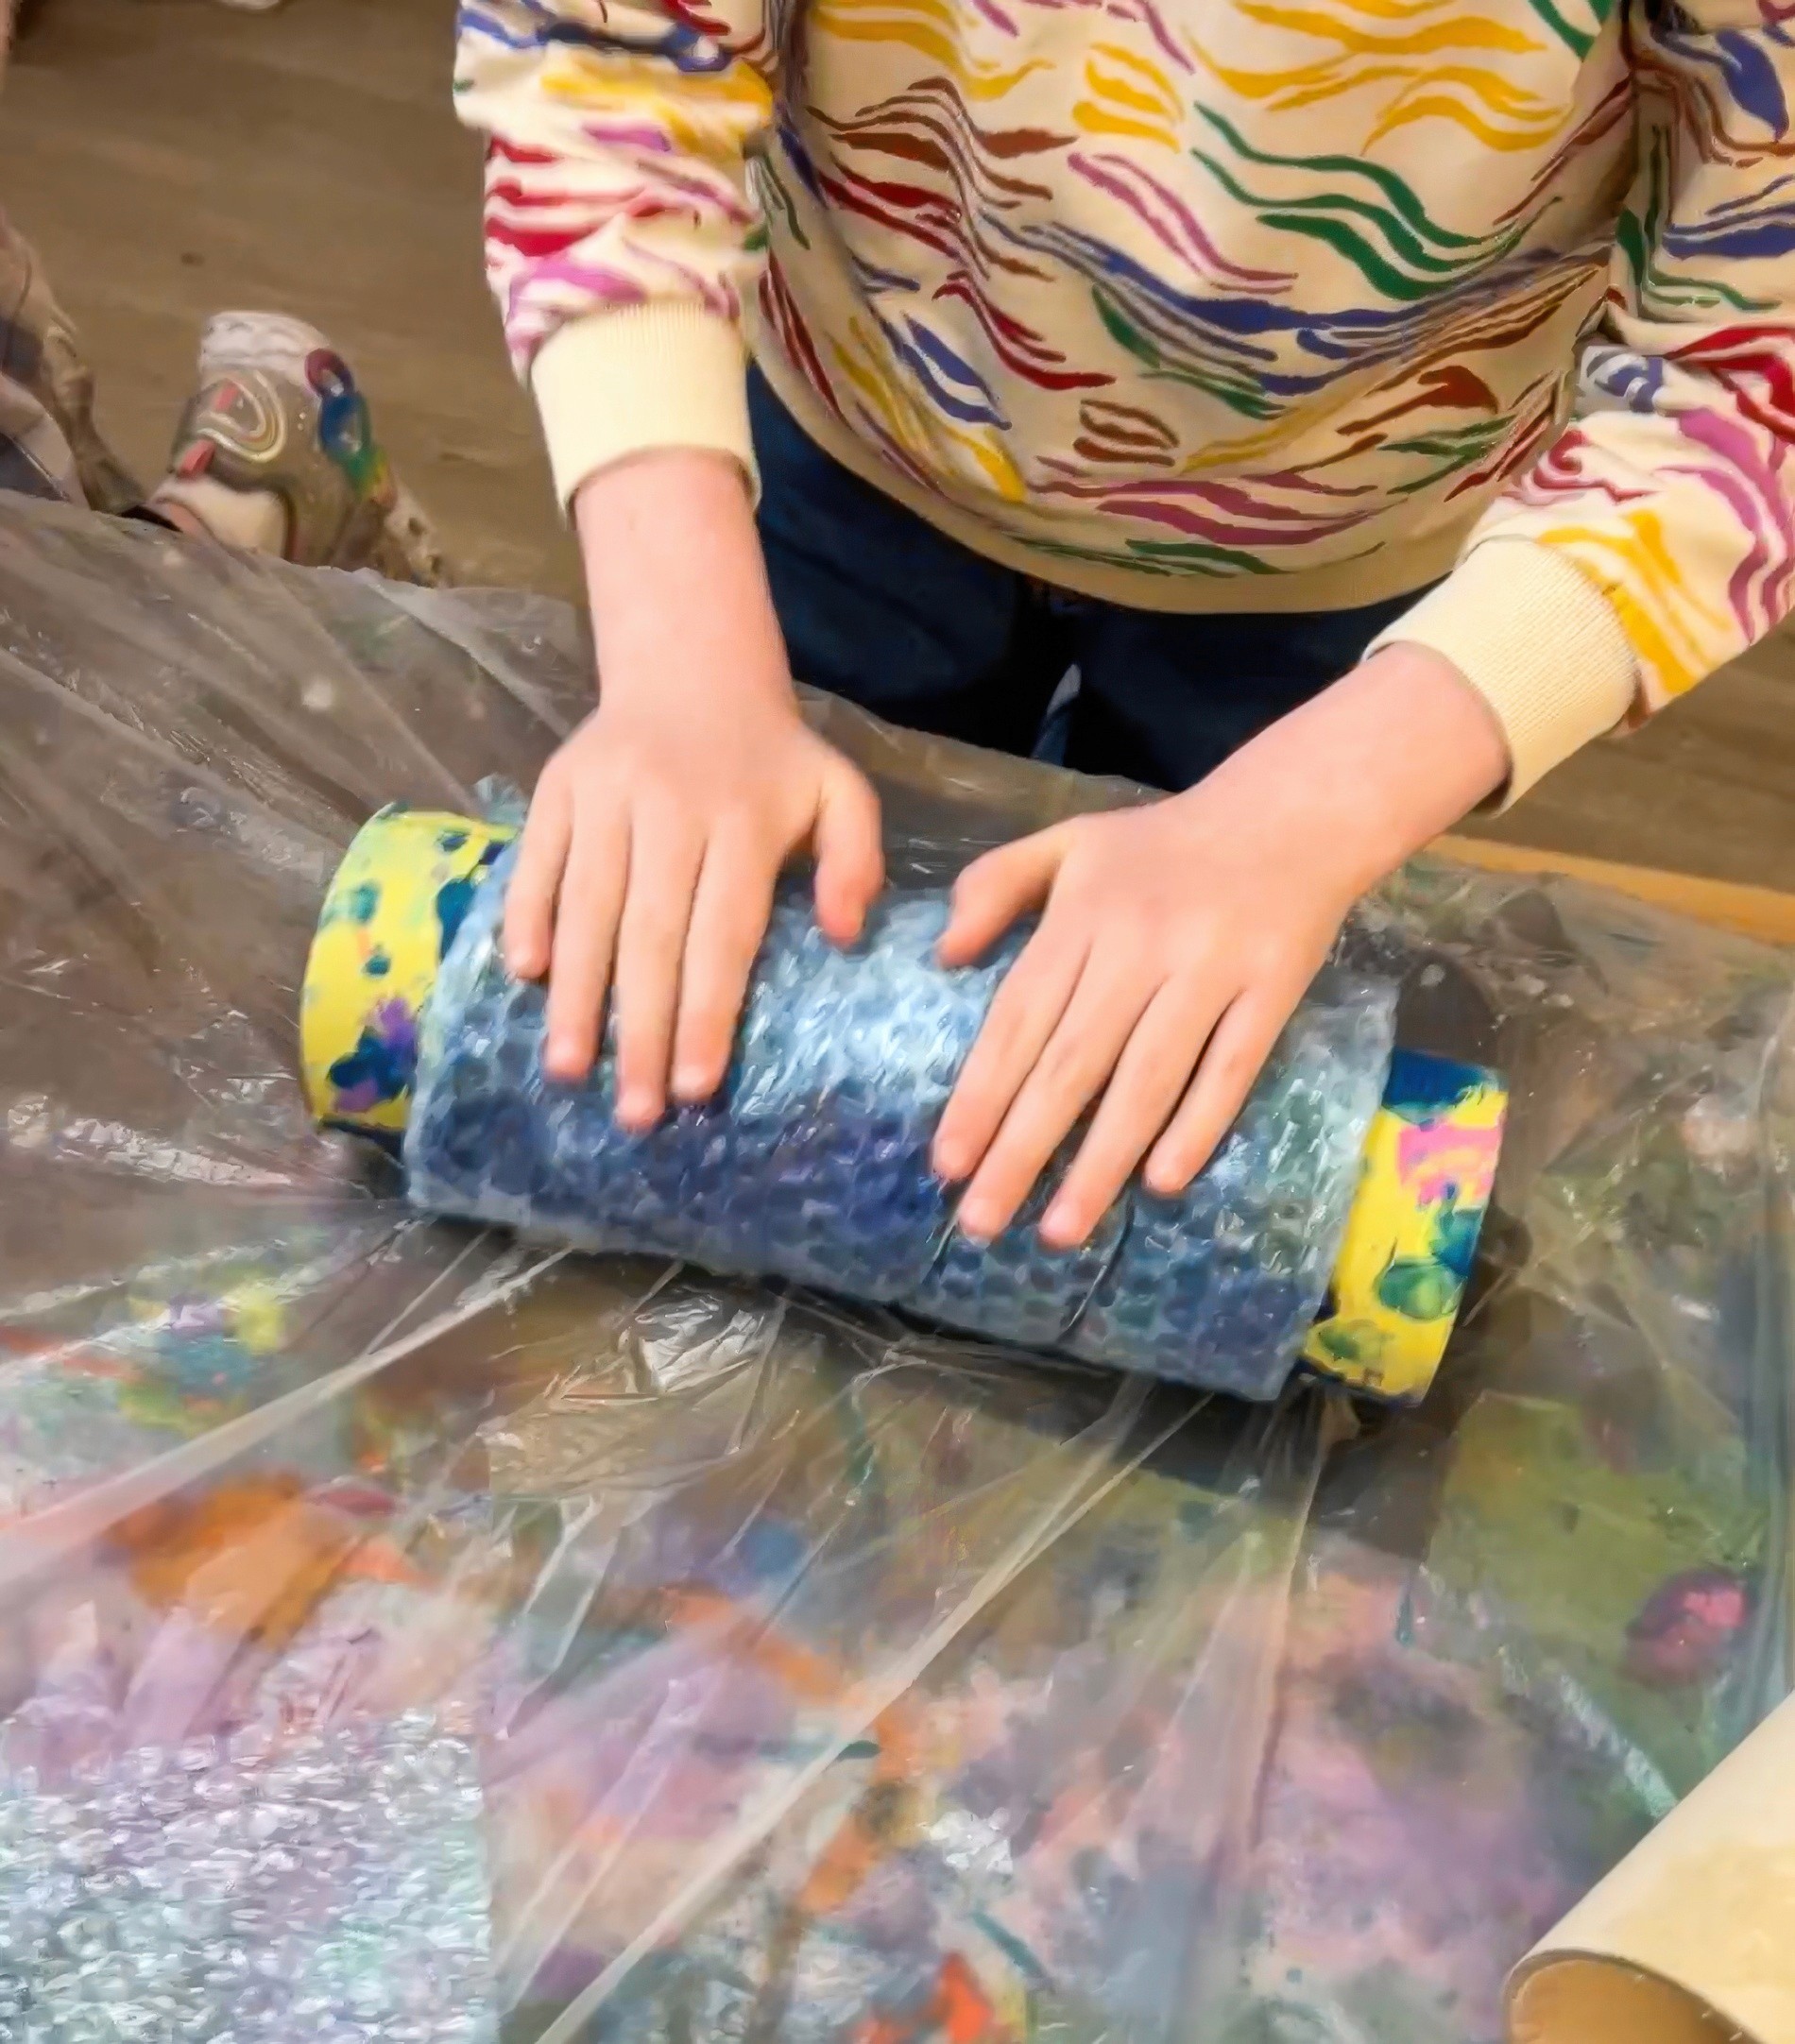
When you’re ready and happy with the design, it’s water time! An adult fills the spray bottles with hot water and a little soap. We often spray from above by standing on benches for even coverage and a bit of theatre (chat safety first). As they spray, remind them that we want designs slippery, not fully drenched; if big puddles appear, blot with a towel. Cover the entire piece with bubble wrap, bubbles down, and roll with what’s on hand, whether it’s a pool noodle, a cardboard tube, or a rolling pin; keep the pressure steady and even, like smoothing dough rather than wringing a sponge. It’s helpful to secure with a couple of elastic bands for little hands so the wool doesn’t slip if grip strength is low.
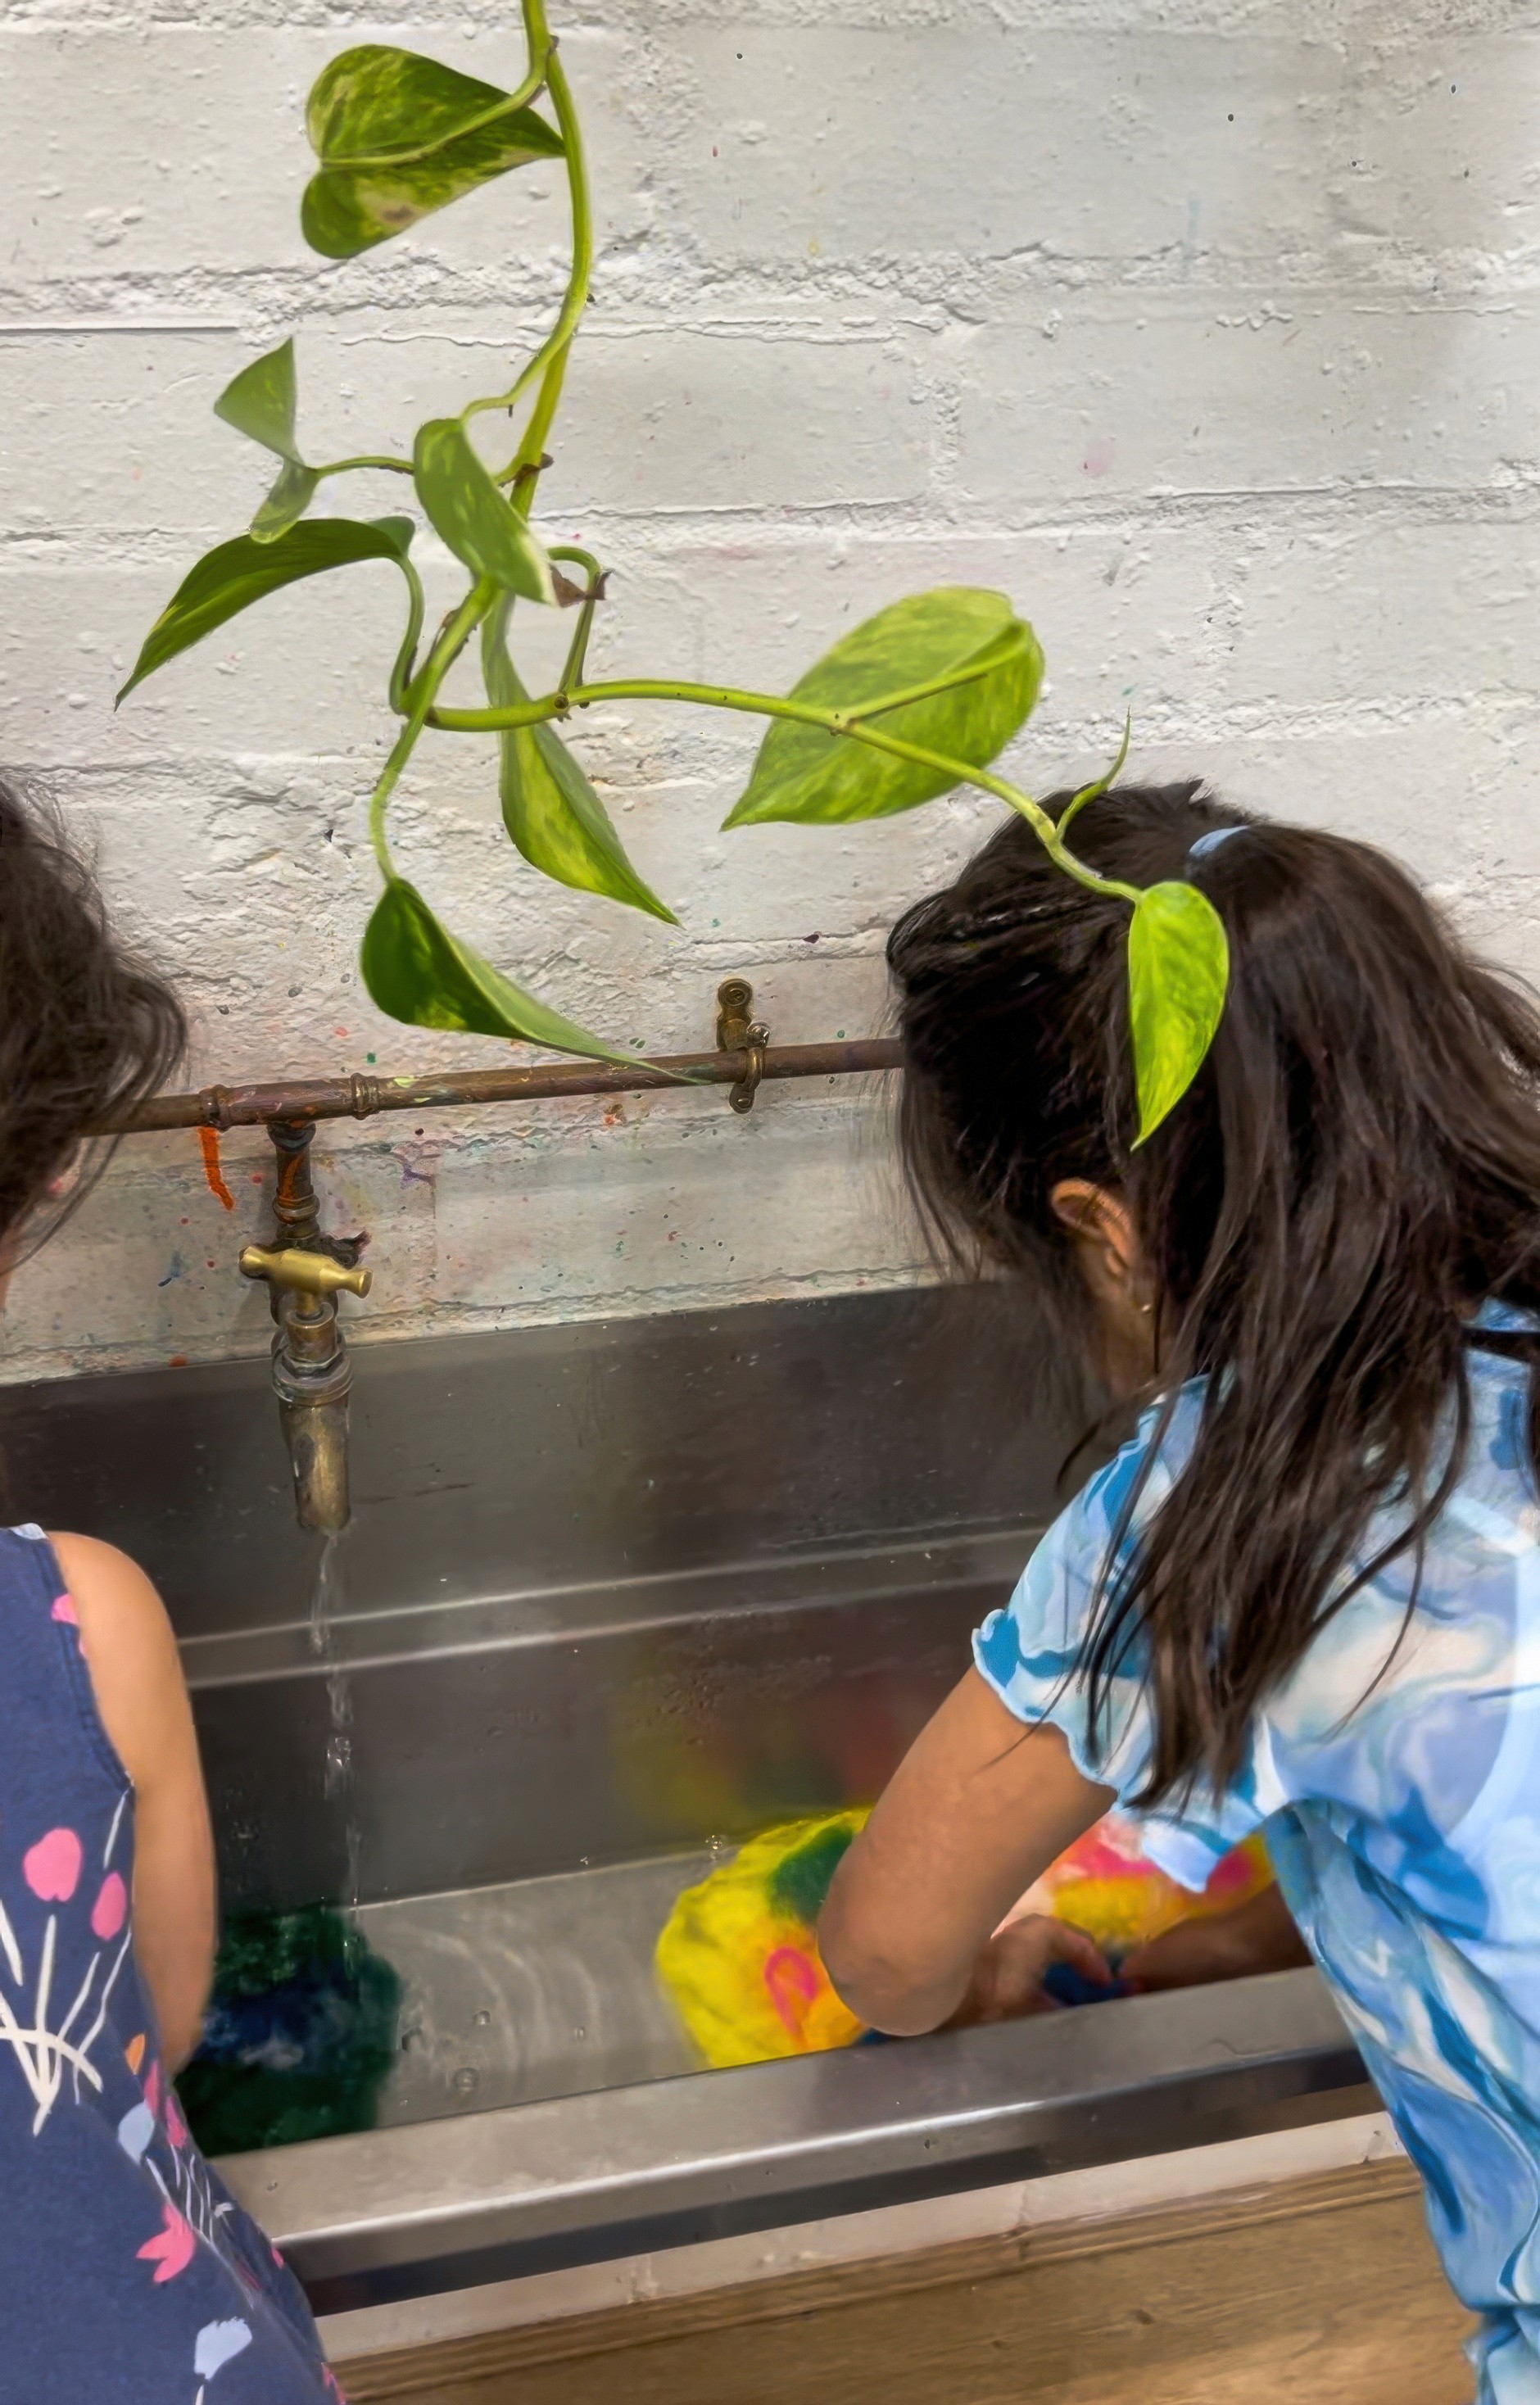
Work in short rounds. Roll for a couple of minutes, open and turn the whole piece a quarter, then roll again (and again!). Do the pinch test. If fibres lift off, keep rolling. If they hold together, unwrap fully and carry the piece to a sink, or dip it into a deep tray of cold water. That cool rinse shocks the wool. Squeeze out the water and head back to the table for a little more rolling to full the felt (a light mist of hot soapy water helps).
Holes happen. No drama! Drop a few wisps over the spot, give it a light spritz, cover, roll… and watch it mend. Too wet? Keep it rolled inside the bubble wrap and give a few gentle passes. Sliding everywhere? Blot once, add a tiny mist, then back to steady rolling.
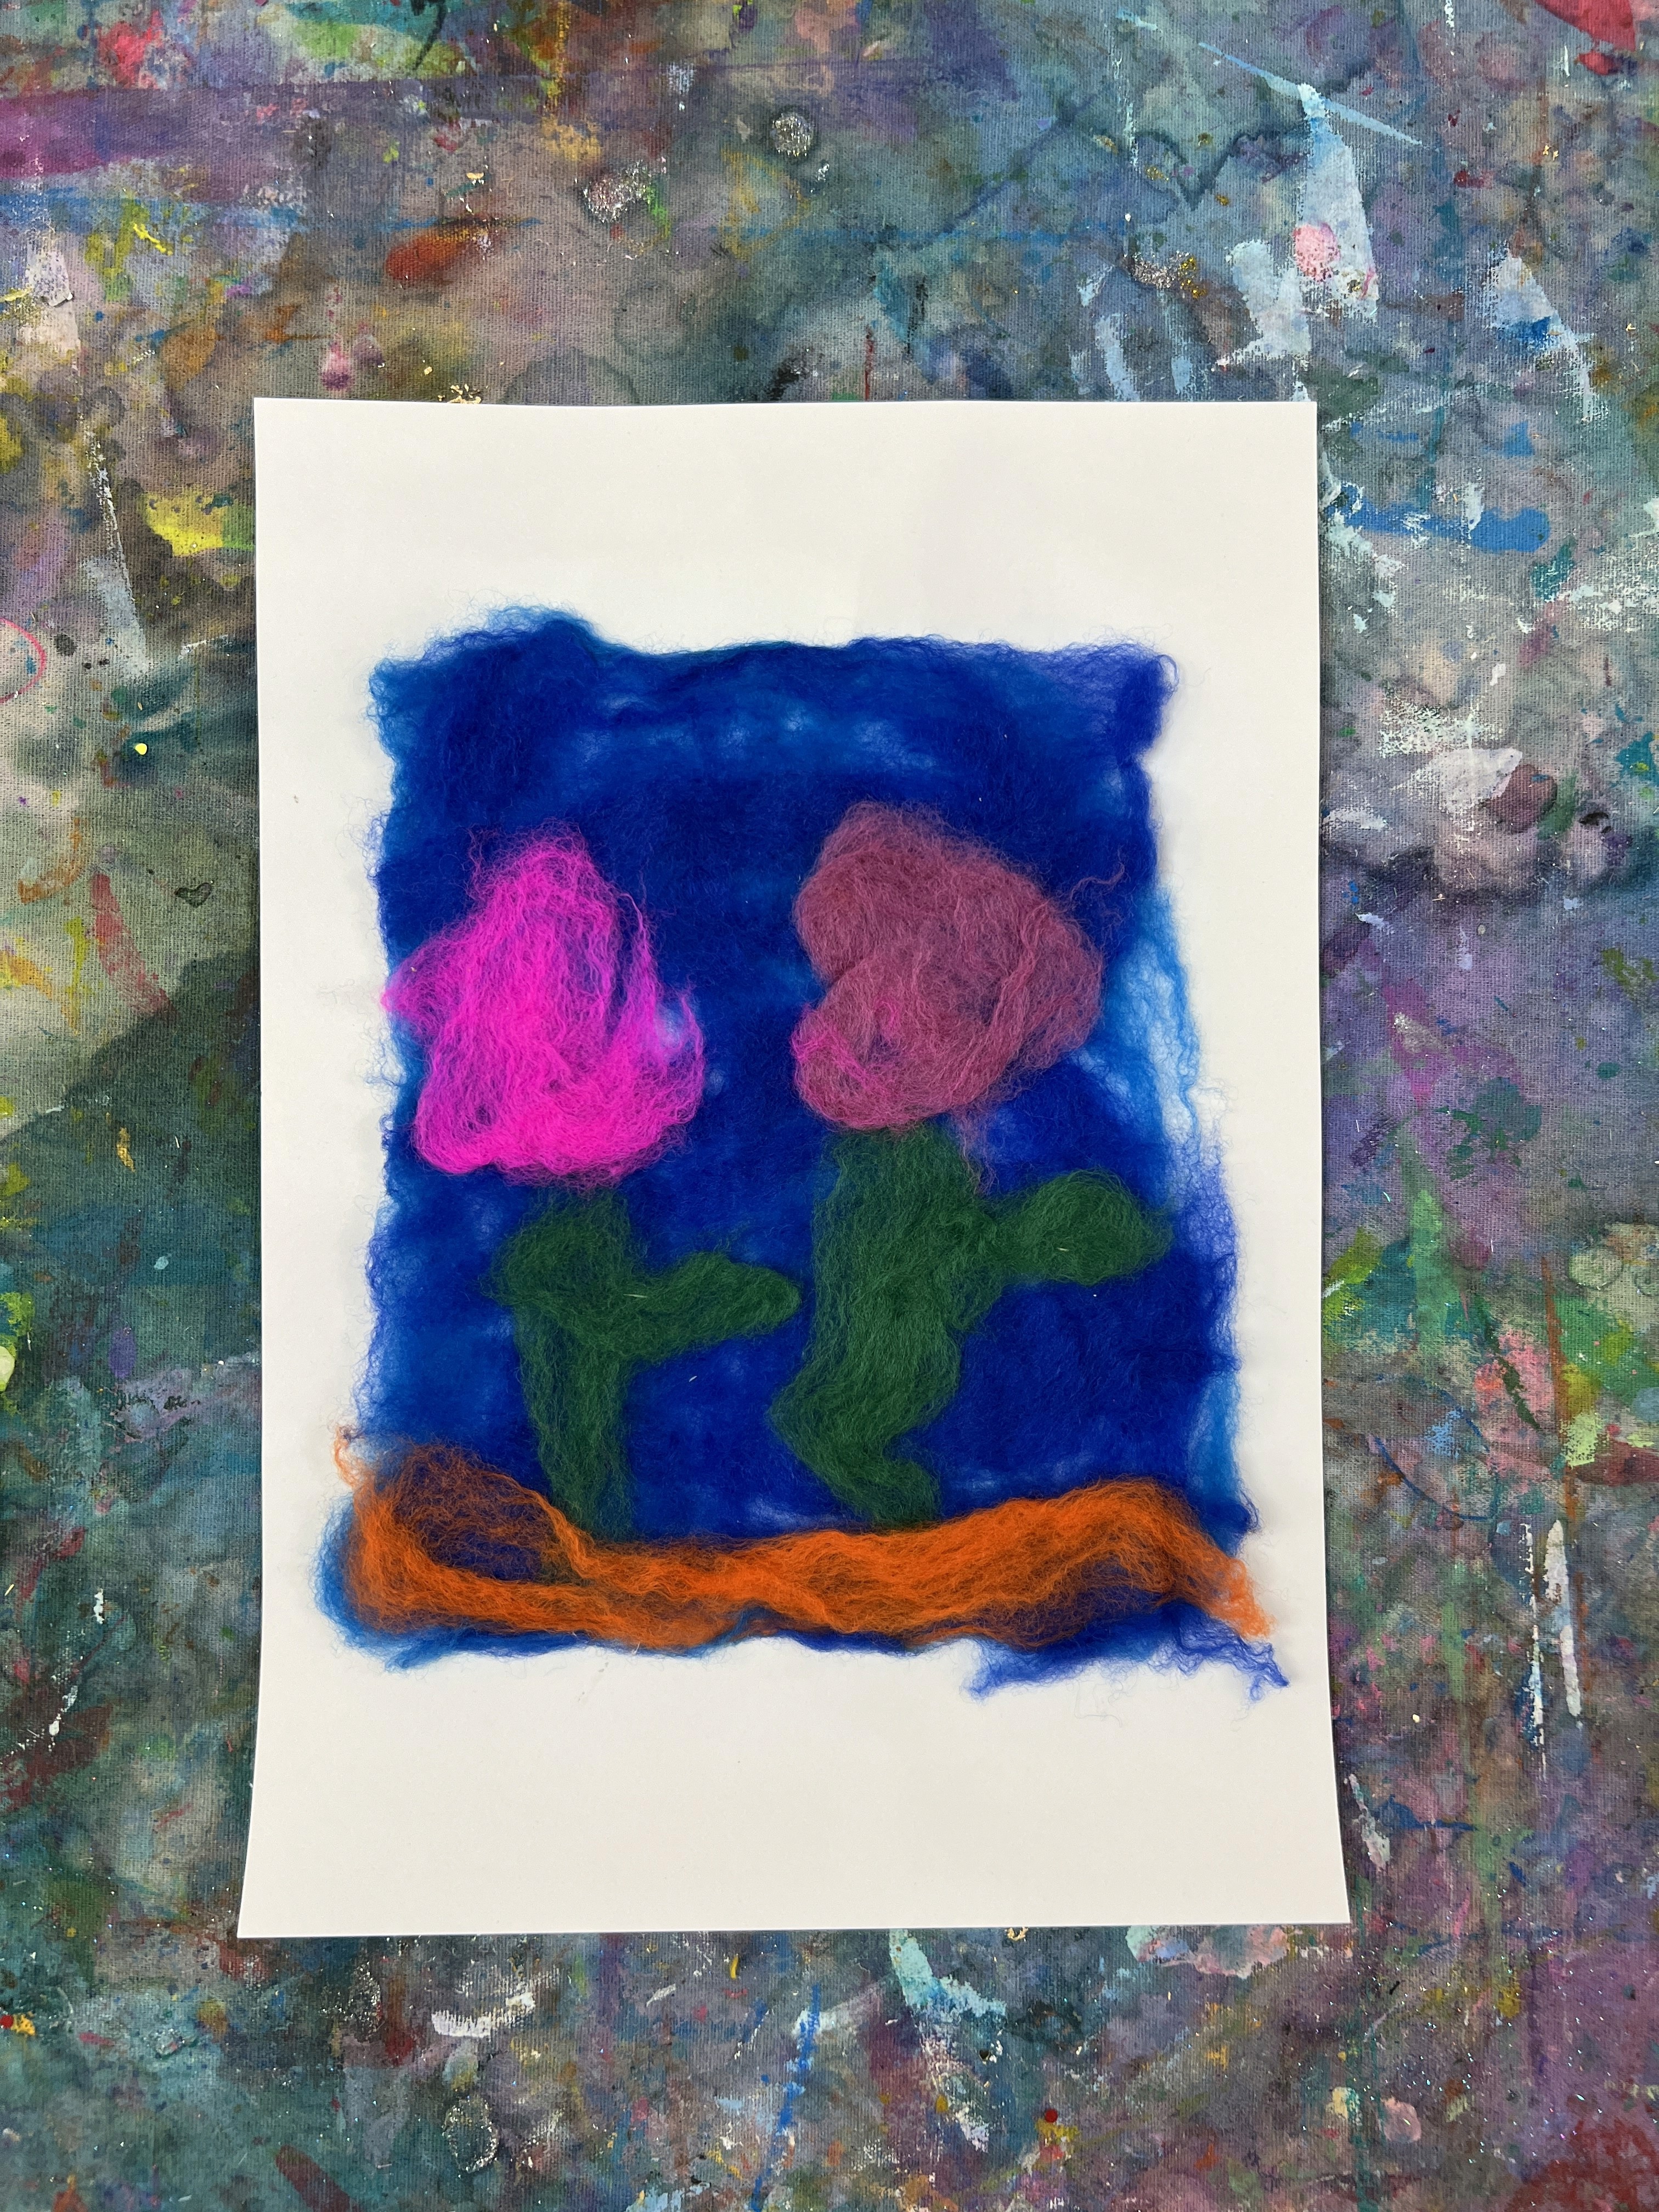
Plan on about fifteen to twenty minutes of rolling time for a small to medium piece. Lay it flat to dry. Mount on white card stock for clean contrast, or cut and stitch it into a pouch or a bookmark, or simply keep it as a small piece of cloth that came from your own hands.
That moment when loose wool becomes fabric never gets old!
Materials
Wool roving in many colours (we love KraftKolour through ZartArt)
Bubble wrap and plastic cloth
Spray bottles with warm water and a little liquid soap
Pool noodle or cardboard tube or rolling pin
Towels, bowls, drying rack
White card optional
Gallery
Back to Top
Wet Felting
Watch loose wool turn into fabric in your hands!
Bookmark
Sculpture
The Set Up
Let’s get the table ready for felting. I cover it with plastic, slide a dark sheet of paper underneath as a loose size guide, then lay bubble wrap on top with the bubbles facing up and big enough to fold over the work later. At Smudge we park spray bottles filled with warm water and a small pump of hand soap right where we can grab them, with towels, refill bowls, and a flat drying spot within reach.
I like to pass around a tiny felted toy first so everyone can feel where we are headed (Tara’s Treasures are my favourite). Then a two minute chat about wool and the wet felting process, how it works. Warm soapy water opens the tiny scales on each fibre, steady rolling helps them hook and hold, and a quick cool rinse tells the whole piece to stay put.
It's definitely important to think about the materials and to pick your wool with intent. Softer roving felts quickly and finishes smooth. A slightly coarser fibre keeps more texture. We source from KraftKolour through ZartArt because the colours are gorgeous and the fibres behave beautifully!
Pile the roving centre stage… that mountain of colour pulls the kids in before you say a word!
The Making
If you can, give everyone a minute with the roving first so the room settles. I show how to pinch and pull fairy floss wisps so the fibres stay airy.
Have a chat about what everyone is dreaming of making today. Pure colour and mood? A place you love? An animal with personality? Older kids might sketch the faintest guide and lay wool over it; little ones jump straight in. Then we build the base or background in two thin layers. The first one goes left to right and the other top to bottom (or vice versa), so it holds without bulk. It’s a great idea to suggest big shapes first and then add the light details later so everything felts cleanly.
As with everything we love at Smudge, encourage play and experimenting with new ideas!
When you’re ready and happy with the design, it’s water time! An adult fills the spray bottles with hot water and a little soap. We often spray from above by standing on benches for even coverage and a bit of theatre (chat safety first). As they spray, remind them that we want designs slippery, not fully drenched; if big puddles appear, blot with a towel. Cover the entire piece with bubble wrap, bubbles down, and roll with what’s on hand, whether it’s a pool noodle, a cardboard tube, or a rolling pin; keep the pressure steady and even, like smoothing dough rather than wringing a sponge. It’s helpful to secure with a couple of elastic bands for little hands so the wool doesn’t slip if grip strength is low.
Work in short rounds. Roll for a couple of minutes, open and turn the whole piece a quarter, then roll again (and again!). Do the pinch test. If fibres lift off, keep rolling. If they hold together, unwrap fully and carry the piece to a sink, or dip it into a deep tray of cold water. That cool rinse shocks the wool. Squeeze out the water and head back to the table for a little more rolling to full the felt (a light mist of hot soapy water helps).
Holes happen. No drama! Drop a few wisps over the spot, give it a light spritz, cover, roll… and watch it mend. Too wet? Keep it rolled inside the bubble wrap and give a few gentle passes. Sliding everywhere? Blot once, add a tiny mist, then back to steady rolling.
Plan on about fifteen to twenty minutes of rolling time for a small to medium piece. Lay it flat to dry. Mount on white card stock for clean contrast, or cut and stitch it into a pouch or a bookmark, or simply keep it as a small piece of cloth that came from your own hands.
That moment when loose wool becomes fabric never gets old!
Materials
Wool roving in many colours (we love KraftKolour through ZartArt)
Bubble wrap and plastic cloth
Spray bottles with warm water and a little liquid soap
Pool noodle or cardboard tube or rolling pin
Towels, bowls, drying rack
White card optional
Gallery
Back to Top
Tennis Racquet Weaving
Op shop racquets become bright little looms (with pixels you can touch).
Bookmark
Sculpture
The Set Up
Op shop racquets are our secret weapon! Tennis or badminton or squash, any oval on strings can instantly transform into a loom.
Set a few on the table and hang some on hooks at kid height so standing or sitting both feel welcome. Pop some bowls of thick wool and ribbons and fabric strips within easy reach, plus a jar of large plastic embroidery needles that feel safe in small hands.
I love to offer gridded paper and pencils for anyone who likes to test and draw an idea before it hits the strings.
Kids often think in pixels because of games and things they're used to on screens, so names and simple characters and bold shapes land beautifully on a racquet!
The Making
Choose a starting knot and begin! Over and under brings pattern quickly and teaches tension without any fuss. Depending on what their design is, kids can practise creating little x's / cross-stitches on the loom, or simply wrap around and across the little 'squares' between the strings.
At Smudge we always talk about experimentation and play more than perfection! It doesn't matter if their weaving is in tight rows and feels calm and sure. Or has more open spacing and feels breezy and bright. Neither is better! They simply look differently across the racquet.
When Olive and I tried this at home we learned that shorter lengths reduce tangles and keep decisions moving, so we cut as we go rather than pre measuring everything.
A little tip; if the knot slips, double it and tuck the tail under a neighbouring string and press it flat with your thumb so the back stays friendly.
Variations
Add beads to the wool as you weave to give more texture to the piece.
Materials
Old tennis or badminton racquets
Thick wool, ribbons, fabric strips
Large plastic embroidery needles
Gridded paper circles and pencils
Scissors and a few hooks for hanging
Optional: Beads in a small bowl
Gallery
Back to Top
Fibre Collage
Soft treasure trays for little makers.
Bookmark
Collage
The Set Up
Tip the good stuff out onto the table: ribbon, yarn, lace, tulle, hessian, felt offcuts… all the tiny bits that refused the bin. Lay out thick card or sturdy boards, then set PVA in shallow trays with broad brushes; add a couple of glue sticks for small hands that like control. Liquid watercolours sit in jars with big brushes and a few droppers; we add a tiny squirt of white poster paint so the colour reads clearly in the jar without needing too much water. I make little “snip bowls” of short ribbons and teeny fringes ready to pick up. If you are with under threes, keep pieces big enough to see and skip the super tiny bits. Scissors on the table and you’re ready!
The Making
Collage is so wonderful because it's always open and tactile. If you want colour underneath, give the board a little liquid watercolour wash (one or two shades) and let it dry.
Now collect three textures you really want to touch again… ribbon, yarn, lace, felt offcuts… and begin!
Brush glue where the fibre will land and press with your whole hand; count to three so little pieces actually stick.
I love sneaking in scissor practice here. Short ribbons become fringe. Tiny snips along felt make hair or grass.
Materials
• Thick card or small wooden boards
• PVA in shallow trays with broad brushes
• Liquid watercolours with big brushes and droppers
• Fibre mix; ribbons, yarn, lace, tulle, hessian, felt offcuts, fabric strips, threads
• Scissors
• Small bowls for sorting and one tray for offcuts
Gallery
Back to Top
String Stamps
Lines that print and repeat
Bookmark
Print Making
The Set Up
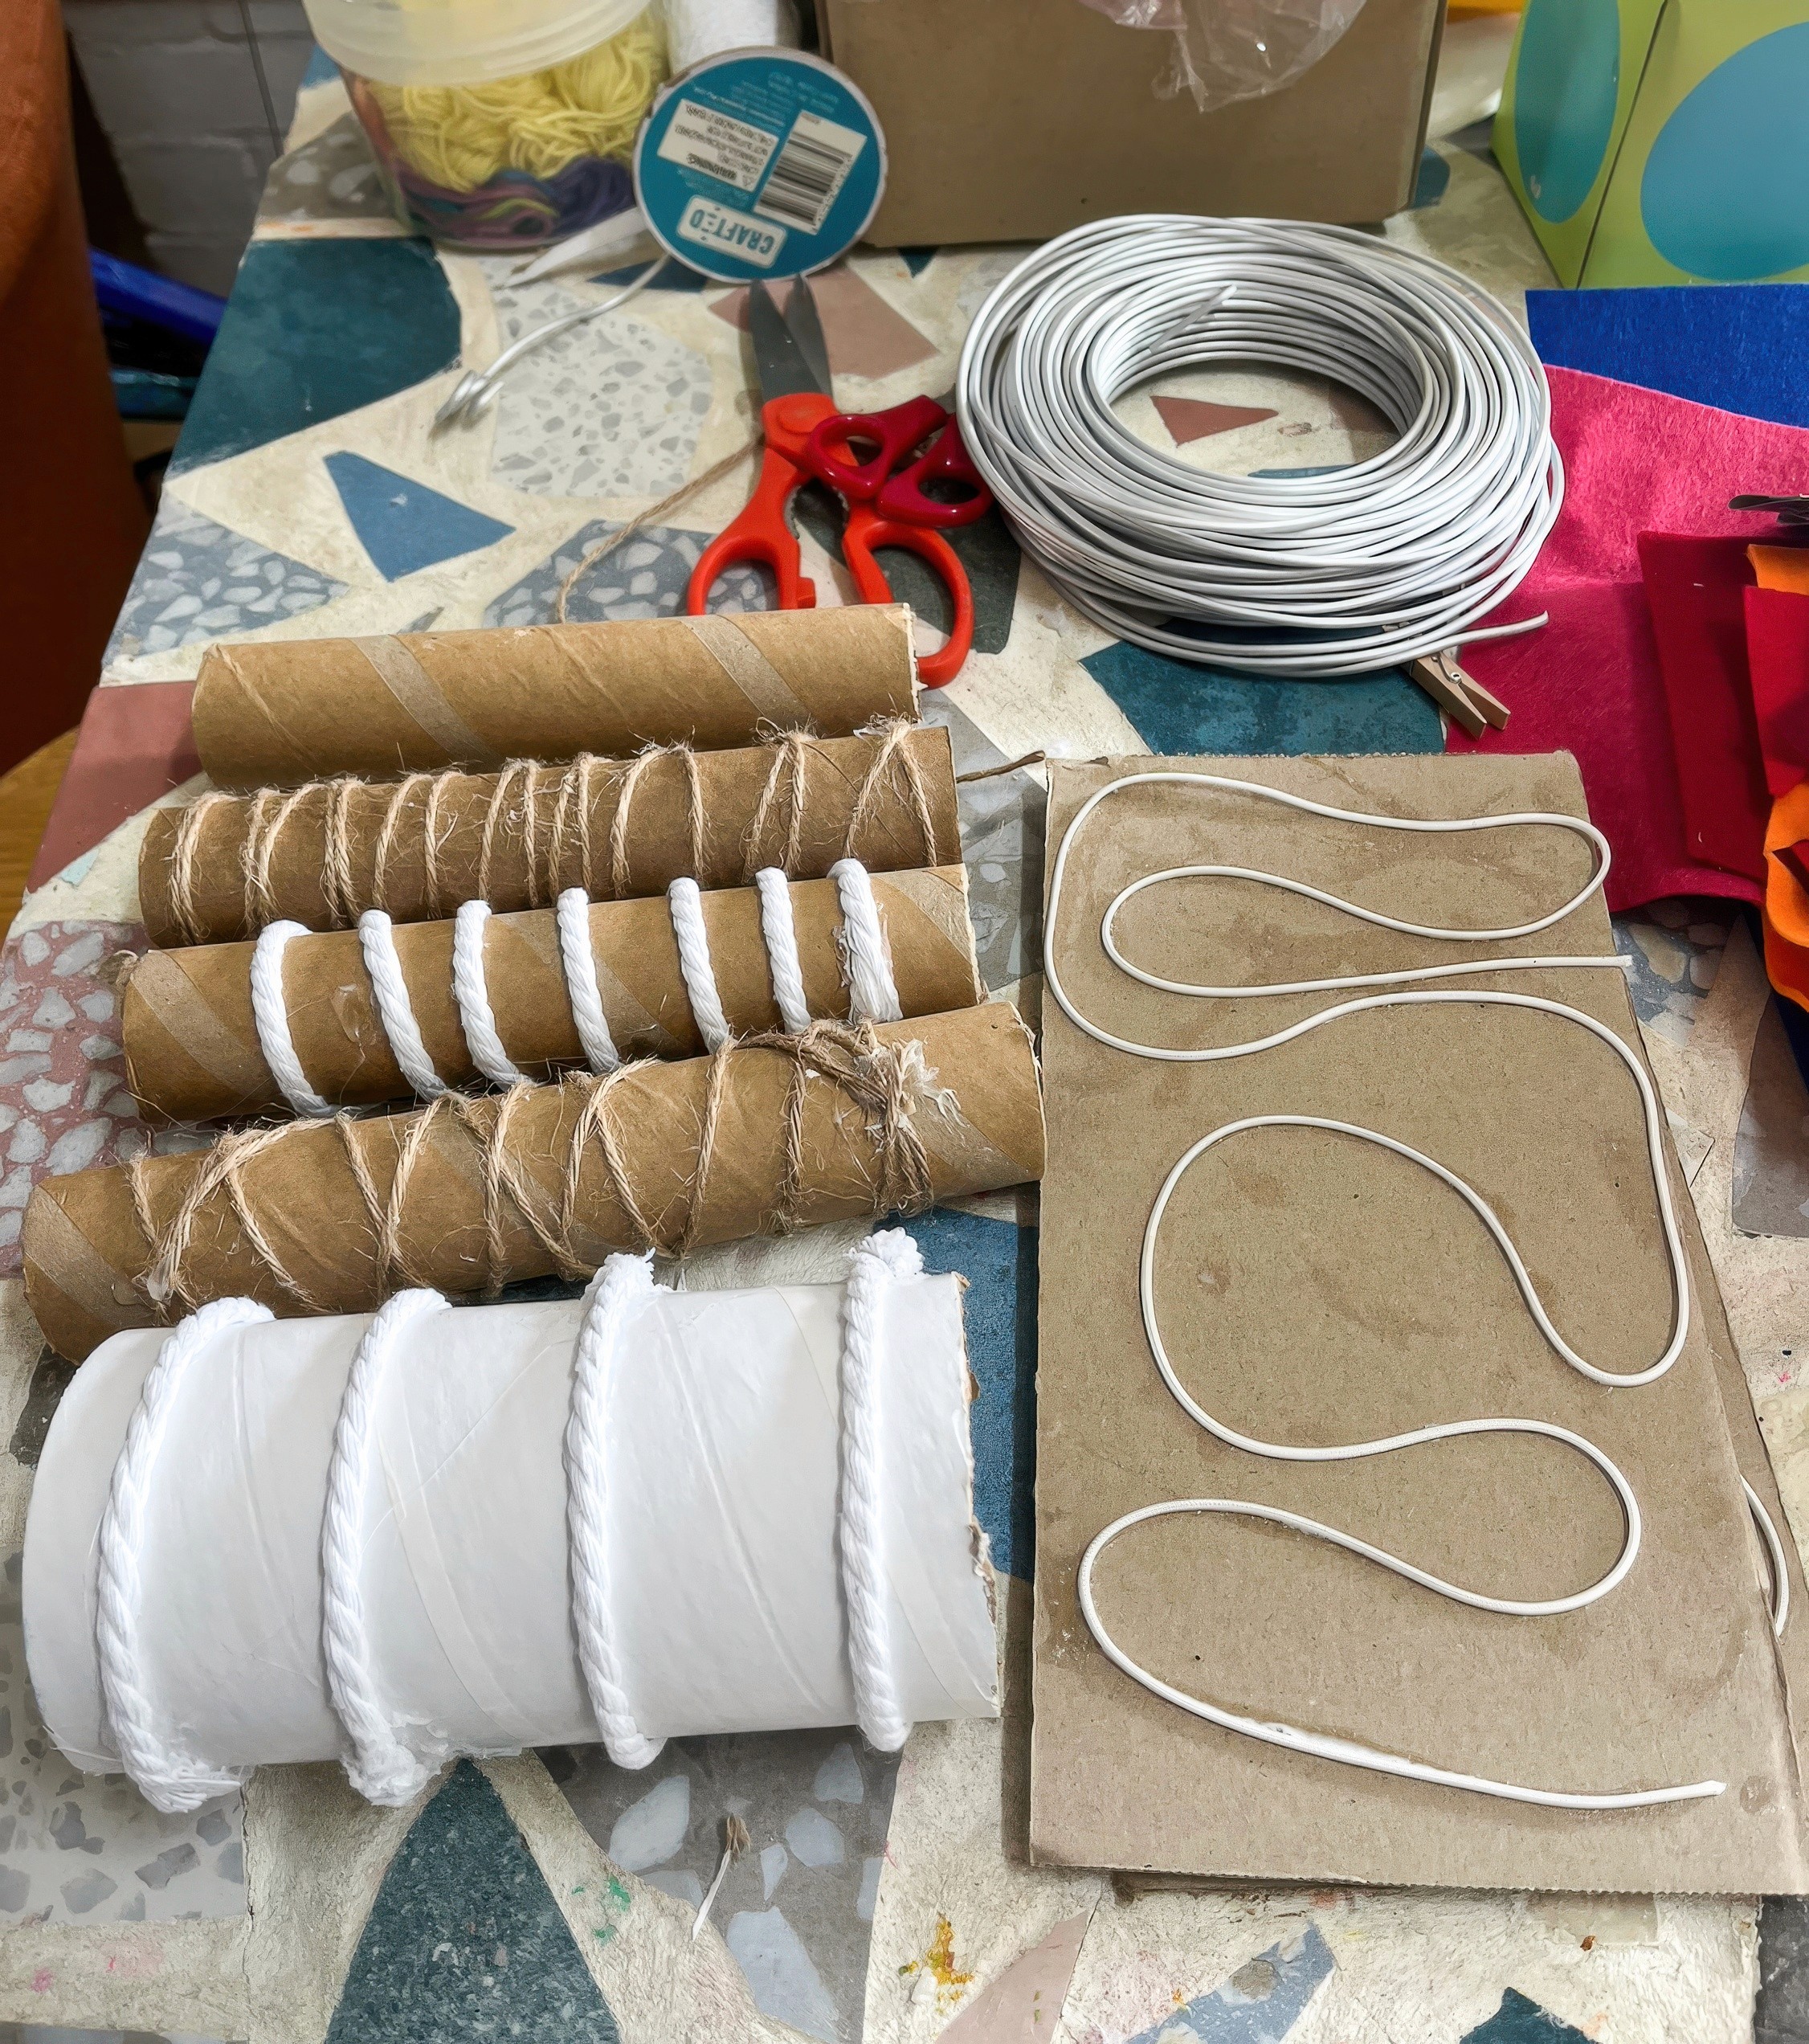
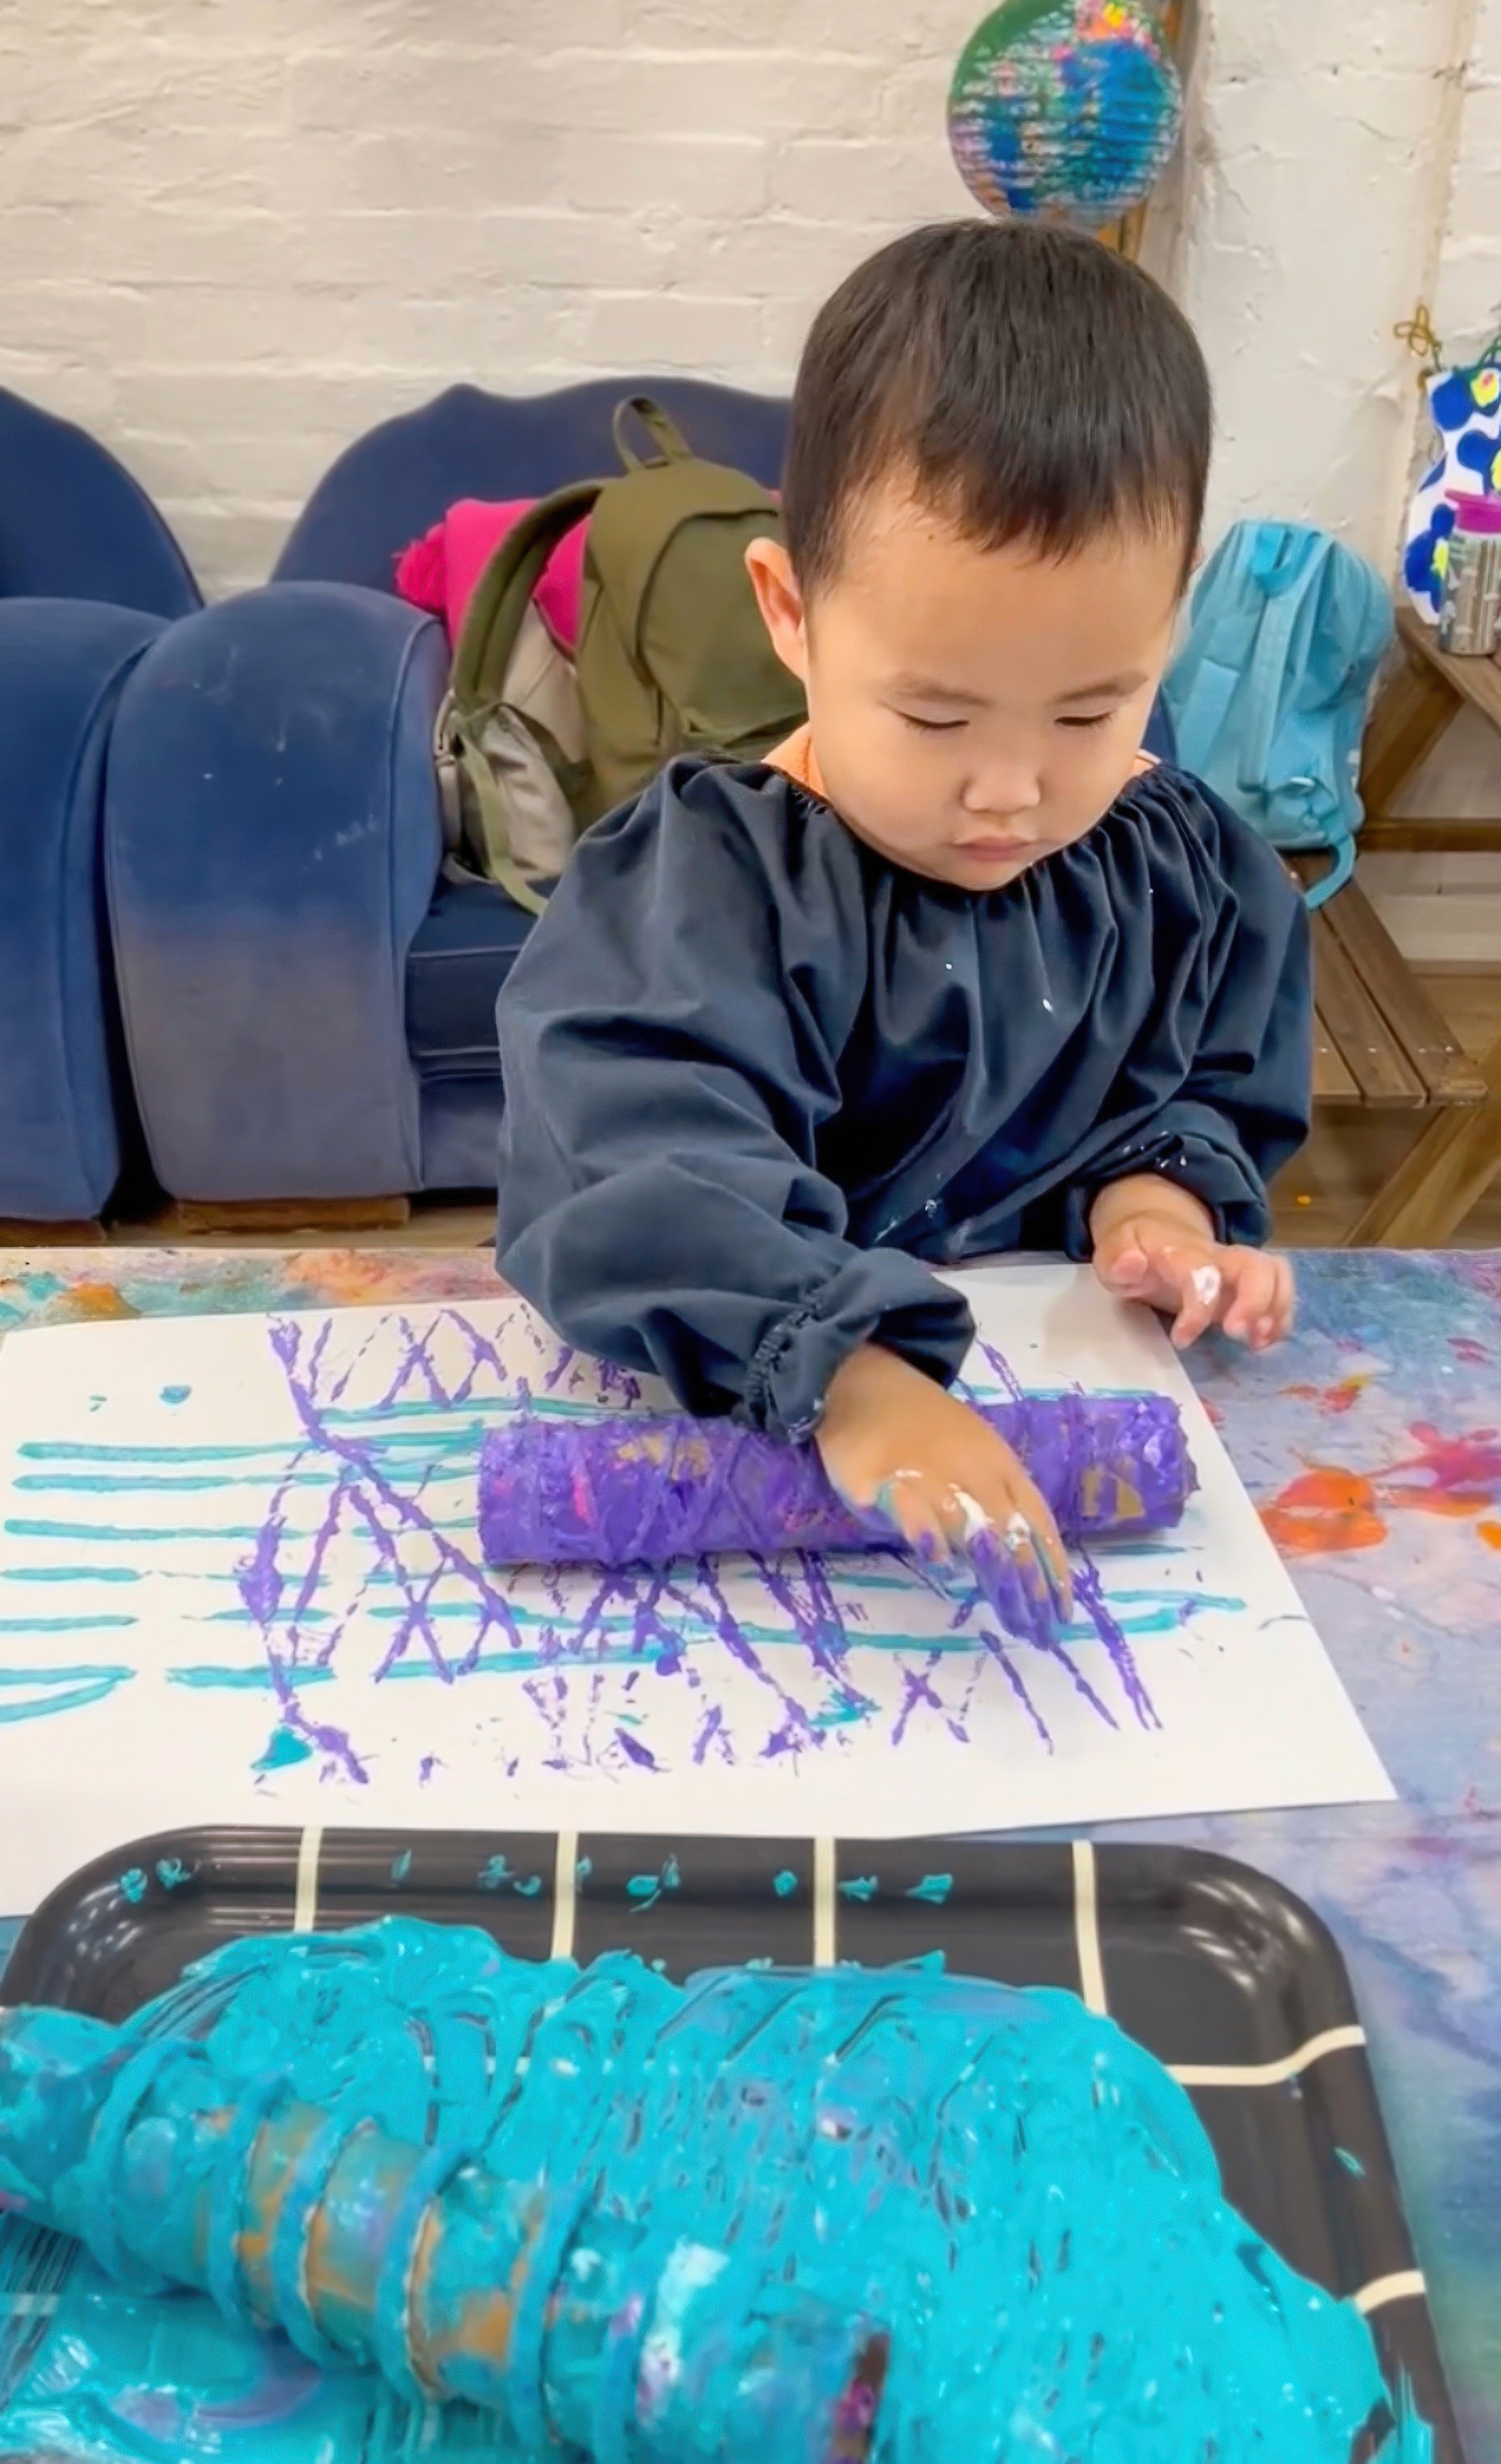
Make the stamps first so the energy can go into printing.
Wind string or wool around cardboard tubes and small wooden blocks, set it with hot glue, then leave them a minute to cool. At Smudge we pour poster paint into shallow trays (big enough to fit the whole cardboard tube stamp!), and stack heavy paper within reach. It's a good idea to have foam rollers or paintbrushes sitting close by, so kids can do touch ups to the paint coverage so it's smooth.
Artist Study: Anni Albers
Anni Albers treated line like a proper building block, not decoration. She helped shift textiles from “useful” to fine art and later carried those woven rhythms into printmaking.
Quick story to bring to the table. Anni studied and taught at the Bauhaus, landed in the weaving studio when women were nudged there, then made it her own. When the school closed, she and Josef Albers moved to Black Mountain College in the US, where she asked students to let materials lead and to learn by doing first (couldn't love this more!).
In 1949 Anni became the first textile artist with a solo show at MoMA, which tells you how boldly she worked.
She kept experimenting for decades, shifting into printmaking and designing smart patterns like Éclat that look random at first and then reveal an order when you stay with them.
The Making
As always, let the materials lead first and begin with play!
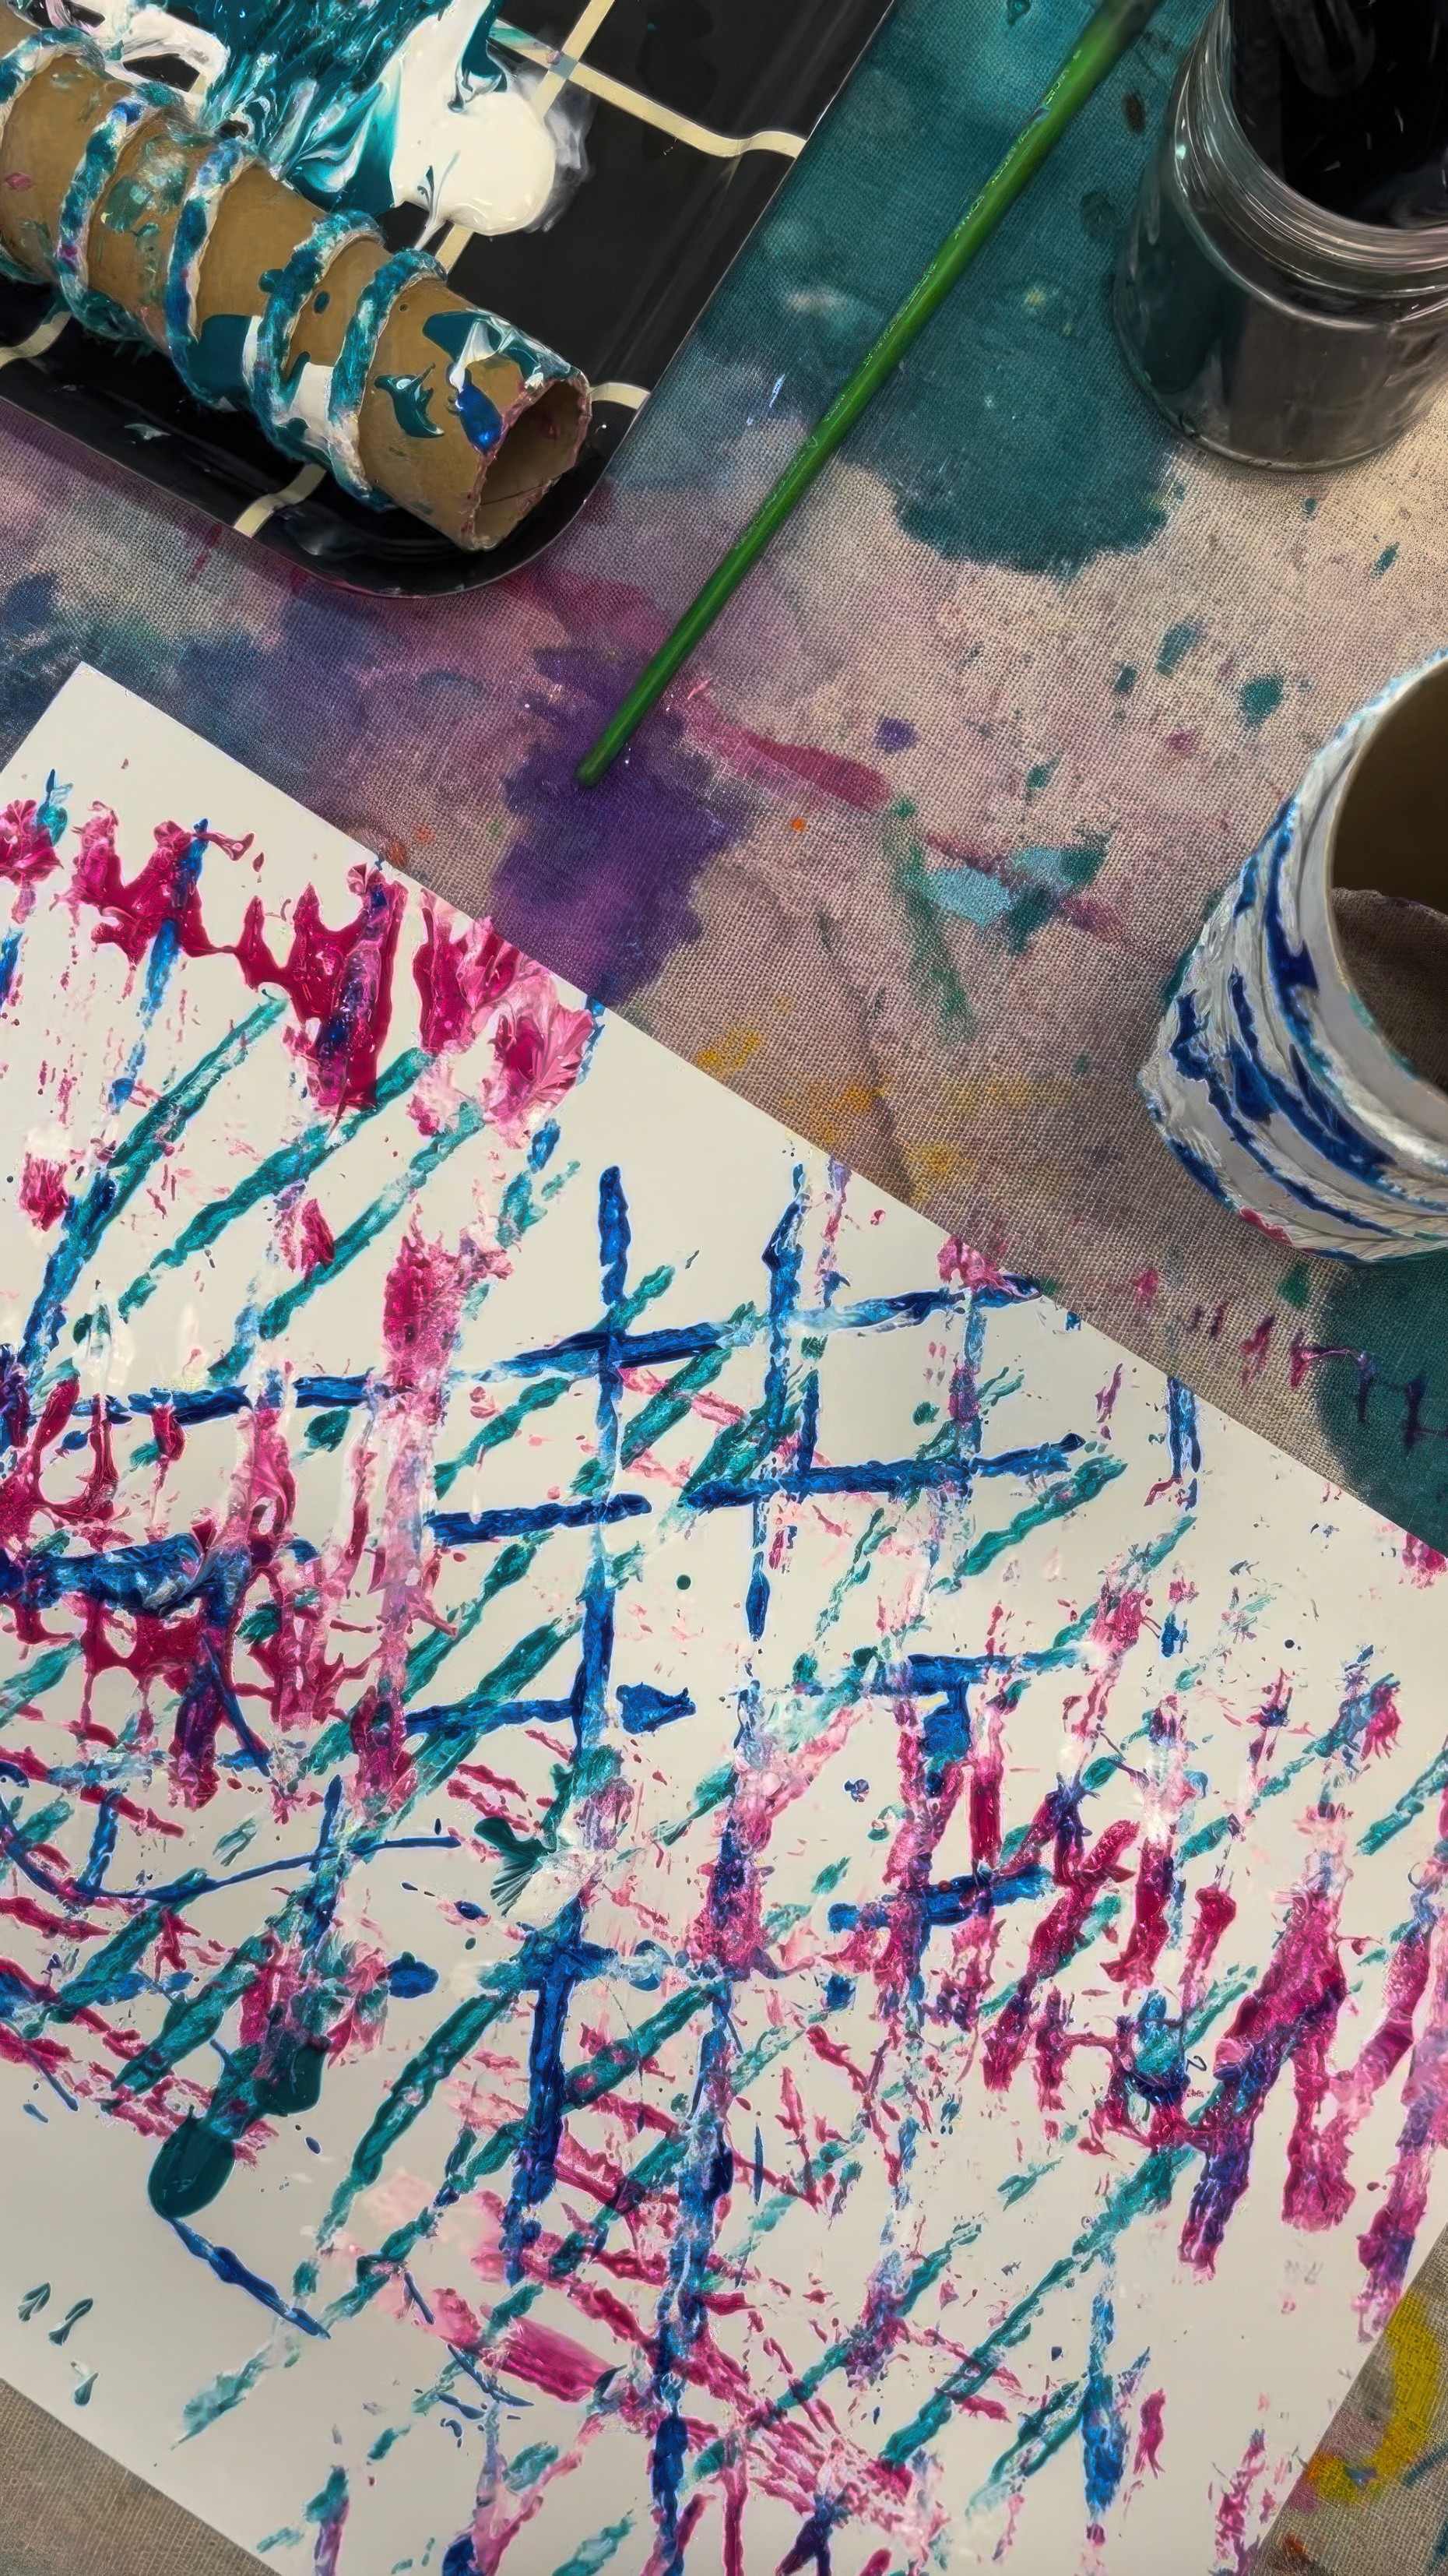
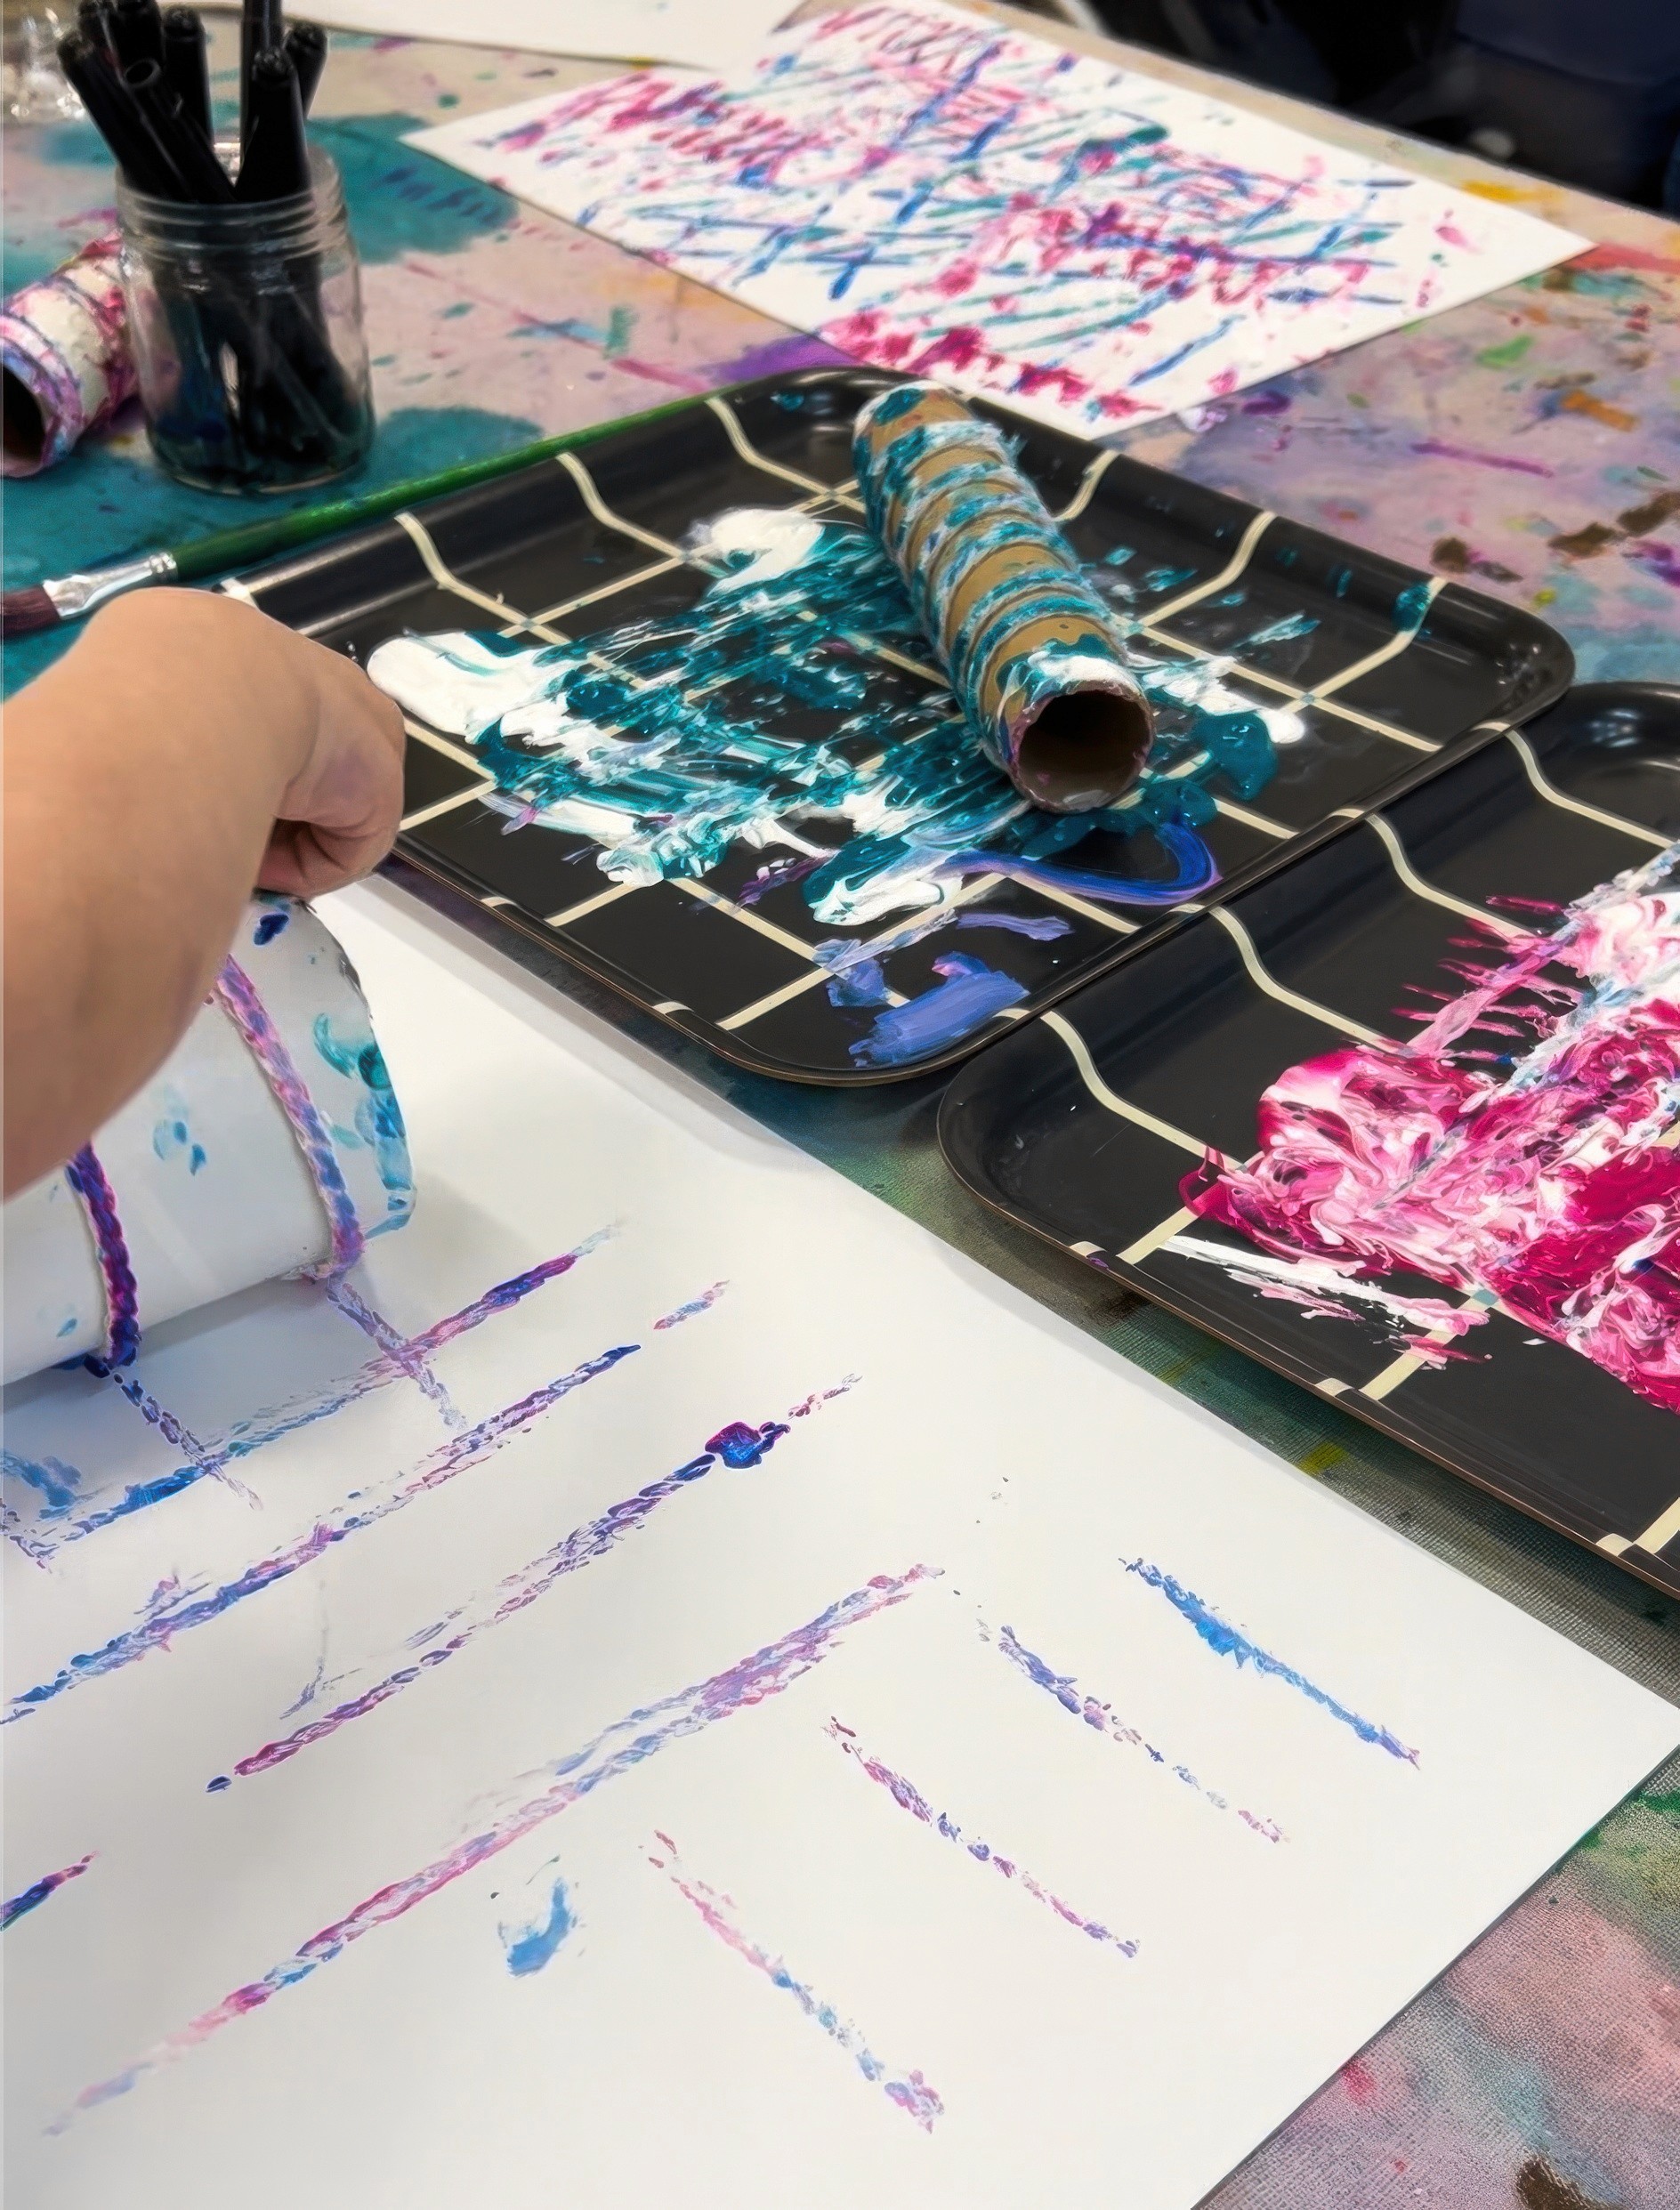
Press and roll the stamp into the paint and then experiment with the marks on the page. Lift and rotate and press again. You can try one stamp with many repeats or use two (or more!) stamps across the page. It's a good idea to clean the stamp face every now and then so detail stays sharp.
Variations
Work on one giant collaborative sheet, then cut it into tiles and build a new grid together.
Print onto a calico bag with fabric paint, then heat set when dry.
Materials
String or wool for wrapping
Cardboard tubes and small wooden blocks
Hot glue gun and glue sticks
Poster paint in shallow trays
Heavy paper
Rollers, painter’s tape, scrap paper for offloading
Damp cloths for quick wipe downs
Back to Top
String Stamps
Lines that print and repeat
Bookmark
Print Making
The Set Up
Make the stamps first so the energy can go into printing.
Wind string or wool around cardboard tubes and small wooden blocks, set it with hot glue, then leave them a minute to cool. At Smudge we pour poster paint into shallow trays (big enough to fit the whole cardboard tube stamp!), and stack heavy paper within reach. It's a good idea to have foam rollers or paintbrushes sitting close by, so kids can do touch ups to the paint coverage so it's smooth.
Artist Study: Anni Albers
Anni Albers treated line like a proper building block, not decoration. She helped shift textiles from “useful” to fine art and later carried those woven rhythms into printmaking.
Quick story to bring to the table. Anni studied and taught at the Bauhaus, landed in the weaving studio when women were nudged there, then made it her own. When the school closed, she and Josef Albers moved to Black Mountain College in the US, where she asked students to let materials lead and to learn by doing first (couldn't love this more!).
In 1949 Anni became the first textile artist with a solo show at MoMA, which tells you how boldly she worked.
She kept experimenting for decades, shifting into printmaking and designing smart patterns like Éclat that look random at first and then reveal an order when you stay with them.
The Making
As always, let the materials lead first and begin with play!
Press and roll the stamp into the paint and then experiment with the marks on the page. Lift and rotate and press again. You can try one stamp with many repeats or use two (or more!) stamps across the page. It's a good idea to clean the stamp face every now and then so detail stays sharp.
Variations
Work on one giant collaborative sheet, then cut it into tiles and build a new grid together.
Print onto a calico bag with fabric paint, then heat set when dry.
Materials
String or wool for wrapping
Cardboard tubes and small wooden blocks
Hot glue gun and glue sticks
Poster paint in shallow trays
Heavy paper
Rollers, painter’s tape, scrap paper for offloading
Damp cloths for quick wipe downs
Back to Top
Felt Banners & Pennants
A little triangle with a lot to say!
Bookmark
Collage
The Set Up
Pennant flags always take me straight to old sports carnivals I mostly know from movies. Cut grass. A brassy little band. Locker rooms and grandstands and team colours that suddenly mean everything. That Perfect energy for kids!
Leave a pile of smaller felt sheets for letters and shapes. Glue sits beside needles and thread so makers can choose sticky or stitchy. Bowls of extras within reach… ribbon, sequins, a few pom poms. Pencils for the lightest guide dots (they disappear under felt, no tracing drama).
Size guide for banners and pennants
If you have A4 felt
A4 is 21 × 29.7 cm (8.3 × 11.7 in). Perfect for a rectangular drop banner. Use the sheet as is, portrait. Add a 2 to 3 cm header strip along the top or side for your dowel.
If you have A3 felt
A3 is 29.7 × 42 cm (11.7 × 16.5 in). Great for a triangular pennant. Place the sheet landscape. Measure 17 cm in from the left along the top edge and make a mark. Draw a line from that mark to the bottom right corner and cut. You get a clean, classic triangle that reads beautifully on a wall.
If you want a little bigger
Head to your local craft store and buy felt off the roll. Ask for wool-blend if you can. Cut rectangles to 23 × 61 cm (9 × 24 in) for that traditional sport-pennant look, or go 30 × 45 cm (12 × 18 in) for a sturdy classroom size that is big enough to share but not enormous.
Header strip and hanging
Keep the header 2 to 3 cm wide so a thin dowel or skewer fits.
Or sometimes I just use a hole punch to make holes in the felt, thread through some wire and they're ready for hanging!
Hot gluing on a skewer or bamboo chopstick works brilliantly too.
The Making
If the artists are open to it, I usually recommend laying out their designs first, then commit with glue after. This means that they can slide letters or nudge shapes around or try the sizing different ways and pick the one that lands. Names and teams and quotes / mottos work beautifully because they're bold.
Have a think about whether you can get the kids to glue now and stitch later (great if you want your banner to travel far and last). But obviously for tiny hands, glueing and designing their banners is lots of creative work, so the sewing can be an extension for older kids.
Variations
Everyone could create one banner each that joins as a group garland
Create a pocket flag with a tiny felt pocket for notes or wishes
Fringe ribbon or yarn along the bottom for movement
Materials
Thick felt bases
Felt sheets for letters and motifs
Fabric glue or needle and thread
Ribbon and sequins
Wooden dowels with string for hanging
Simple stencils and pencils
Scissors and a small ruler
Back to Top
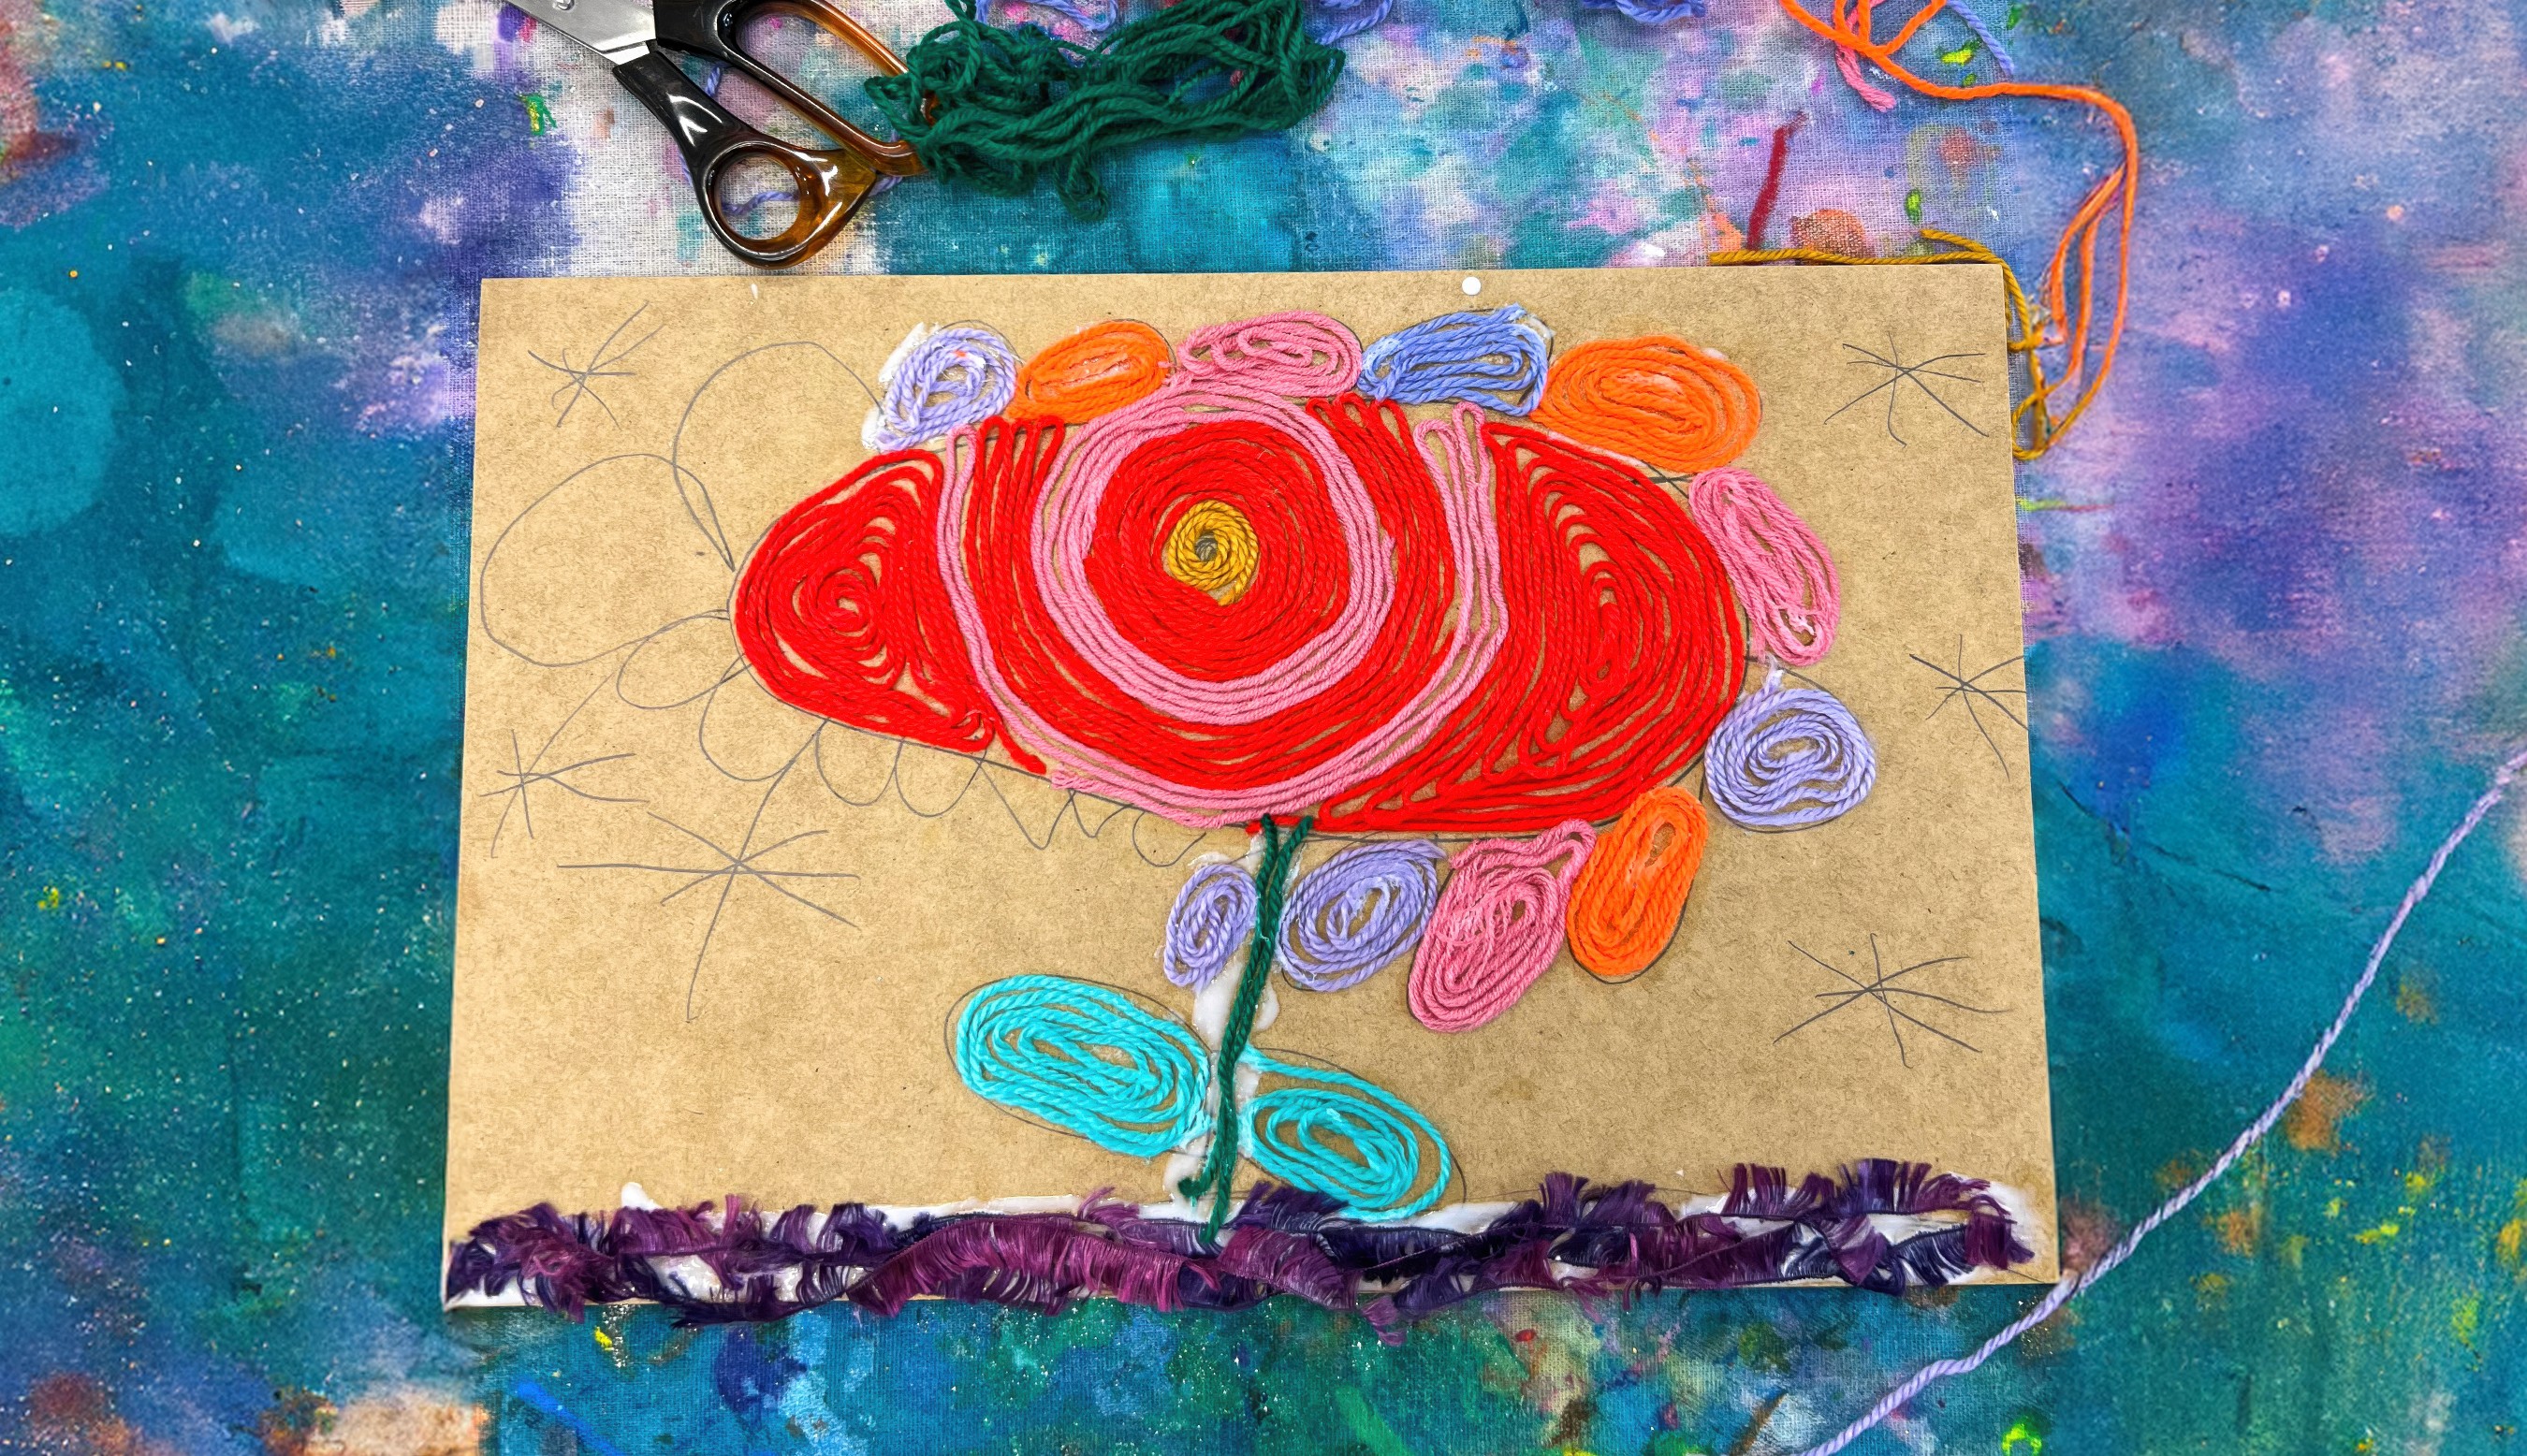
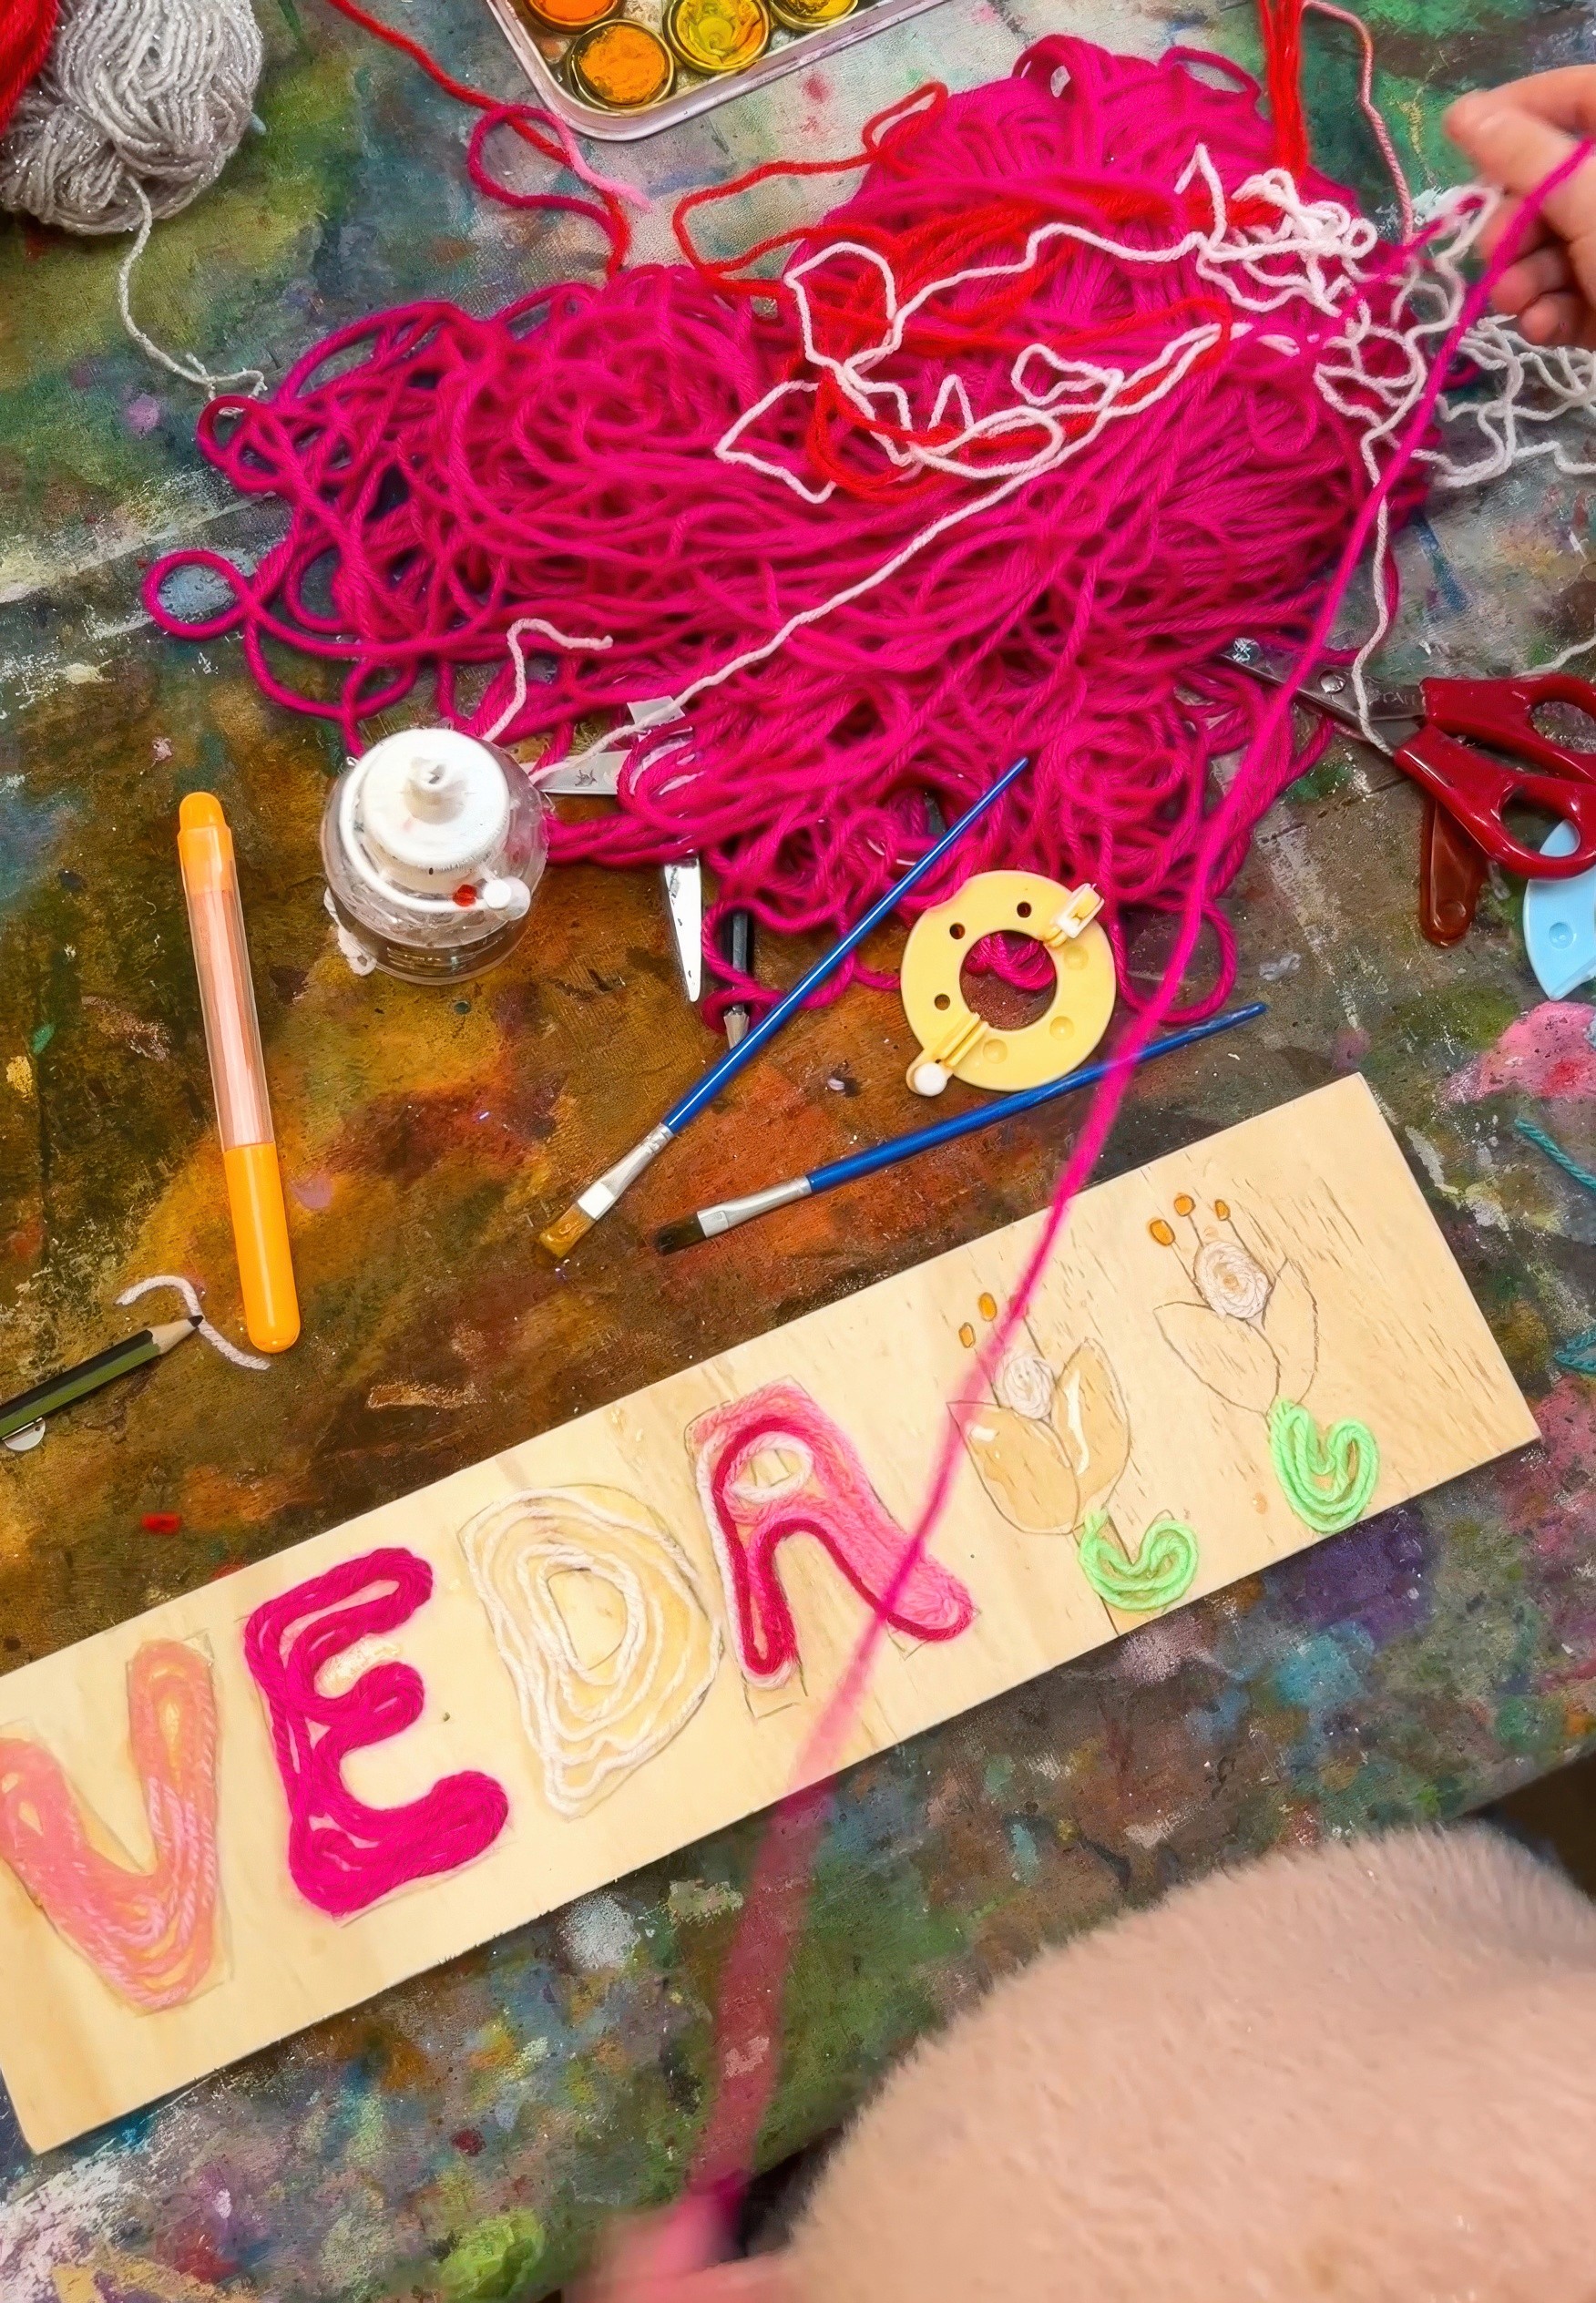
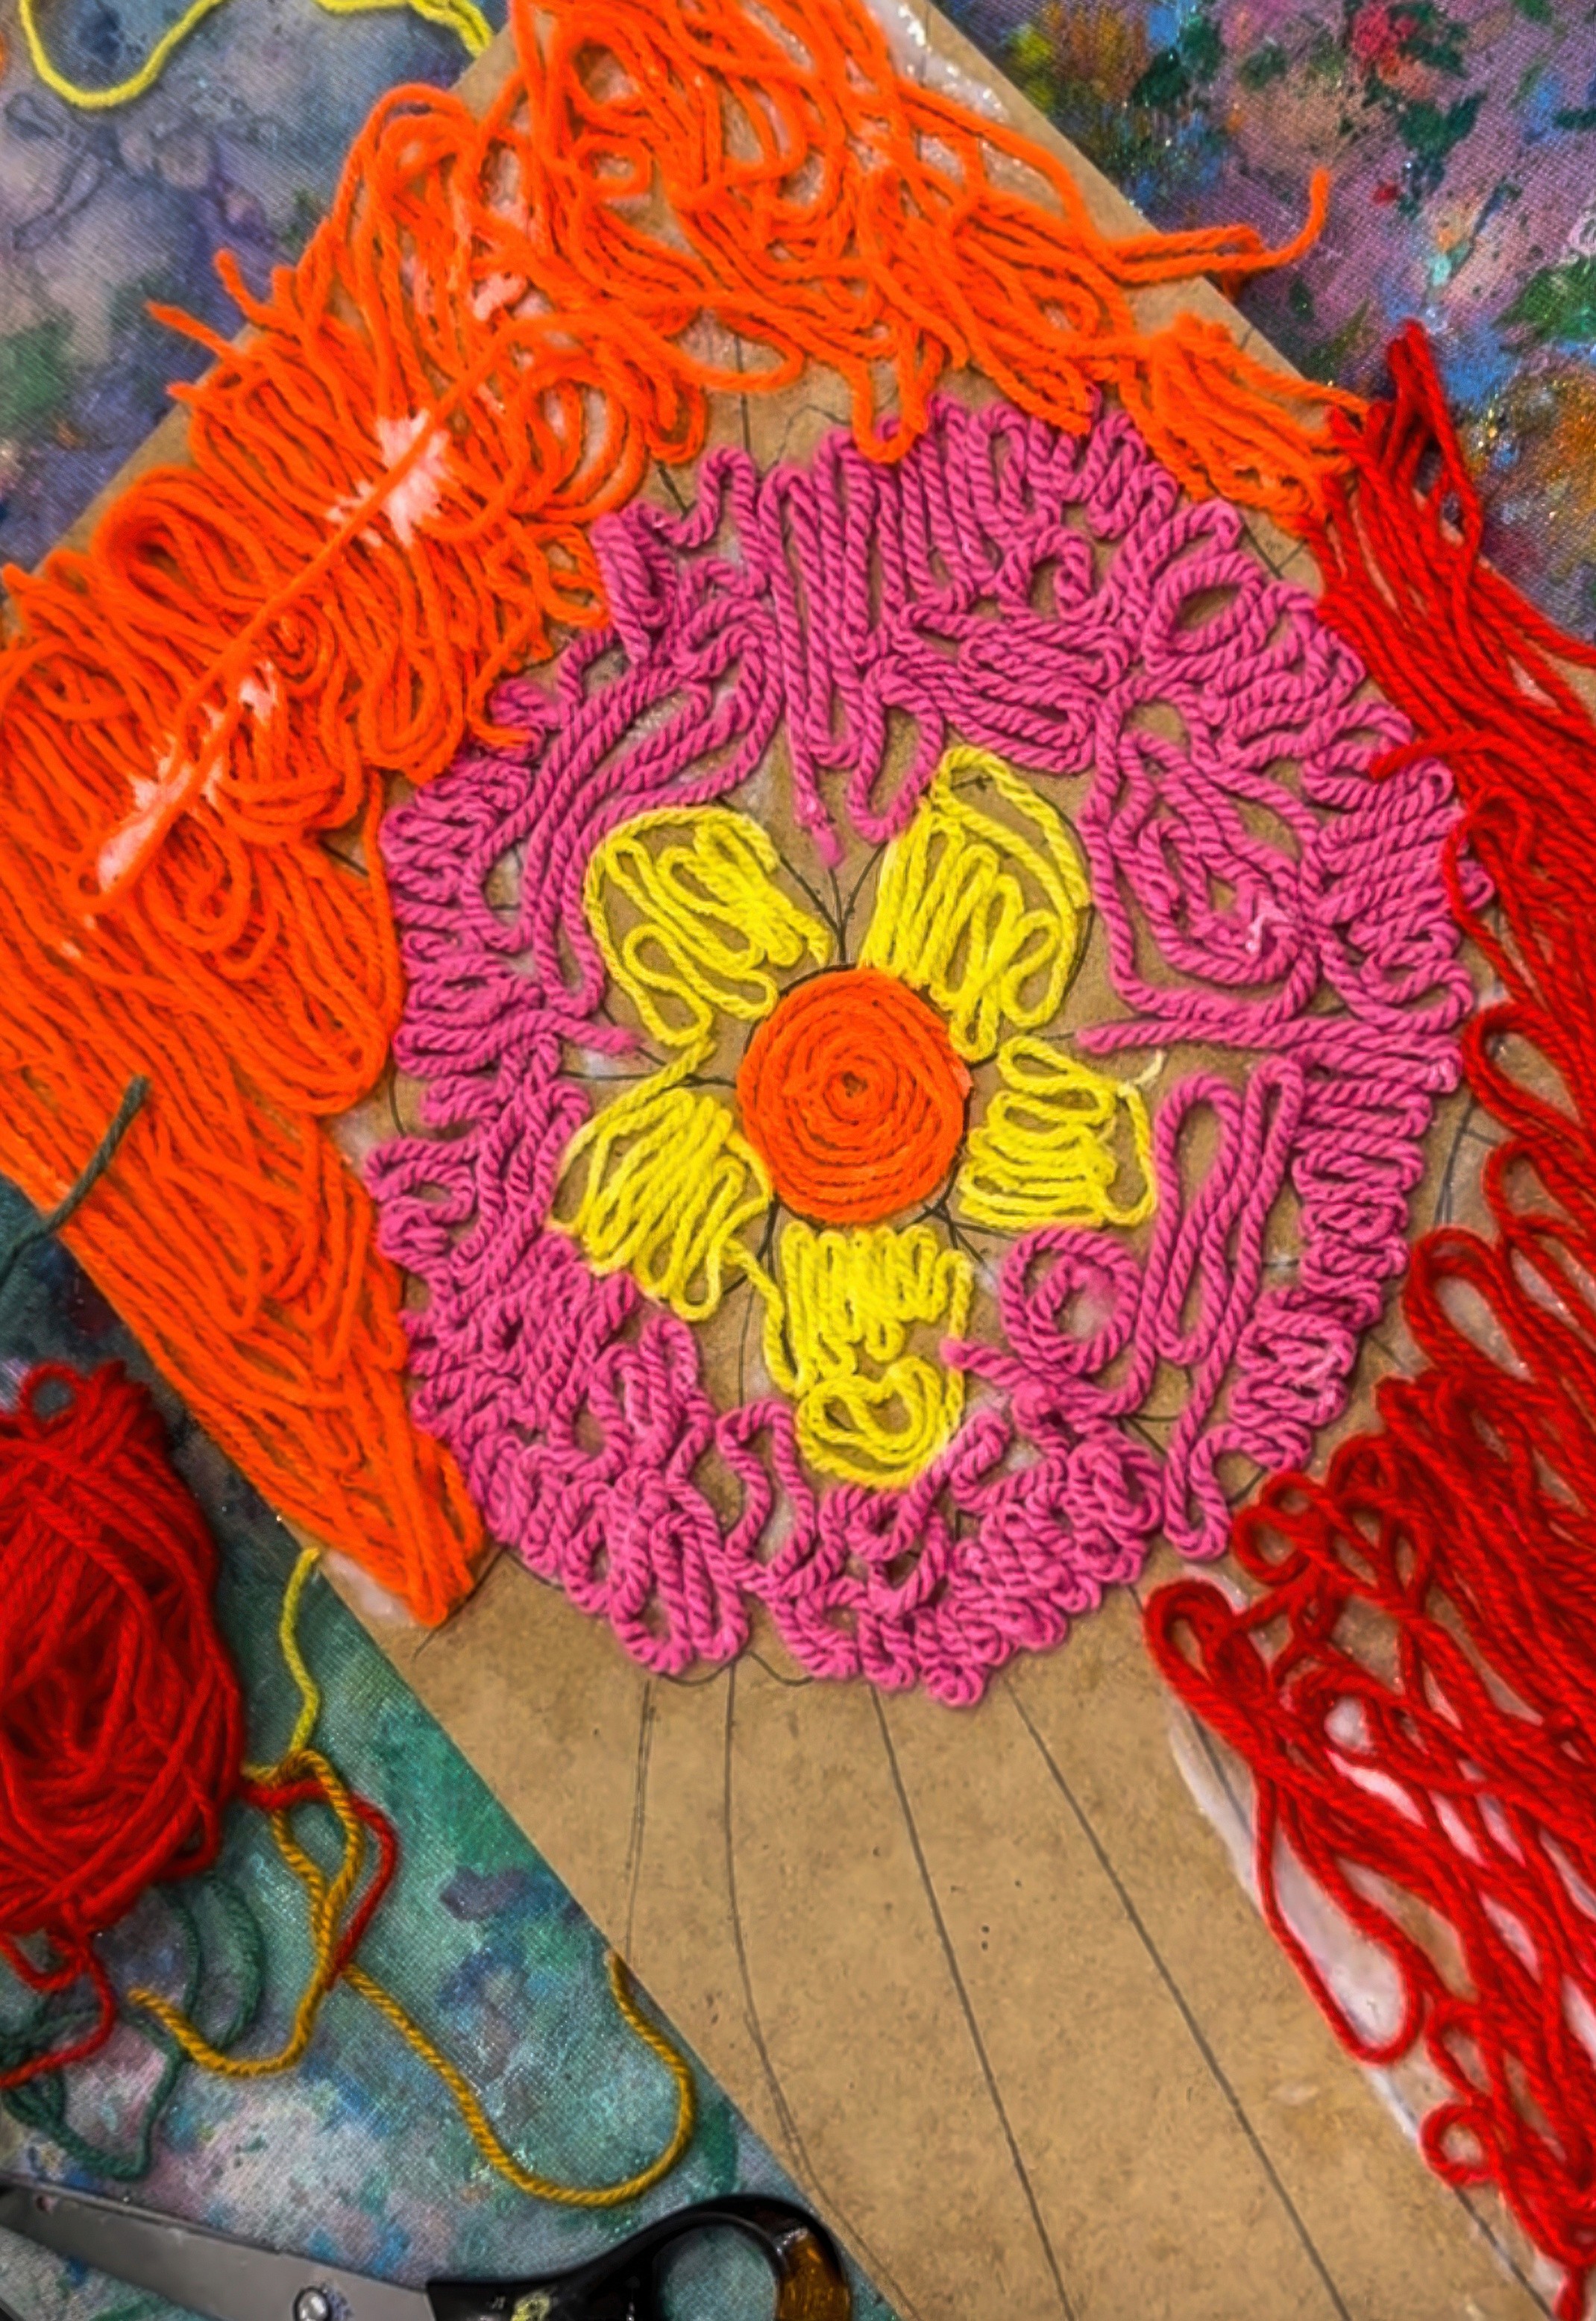
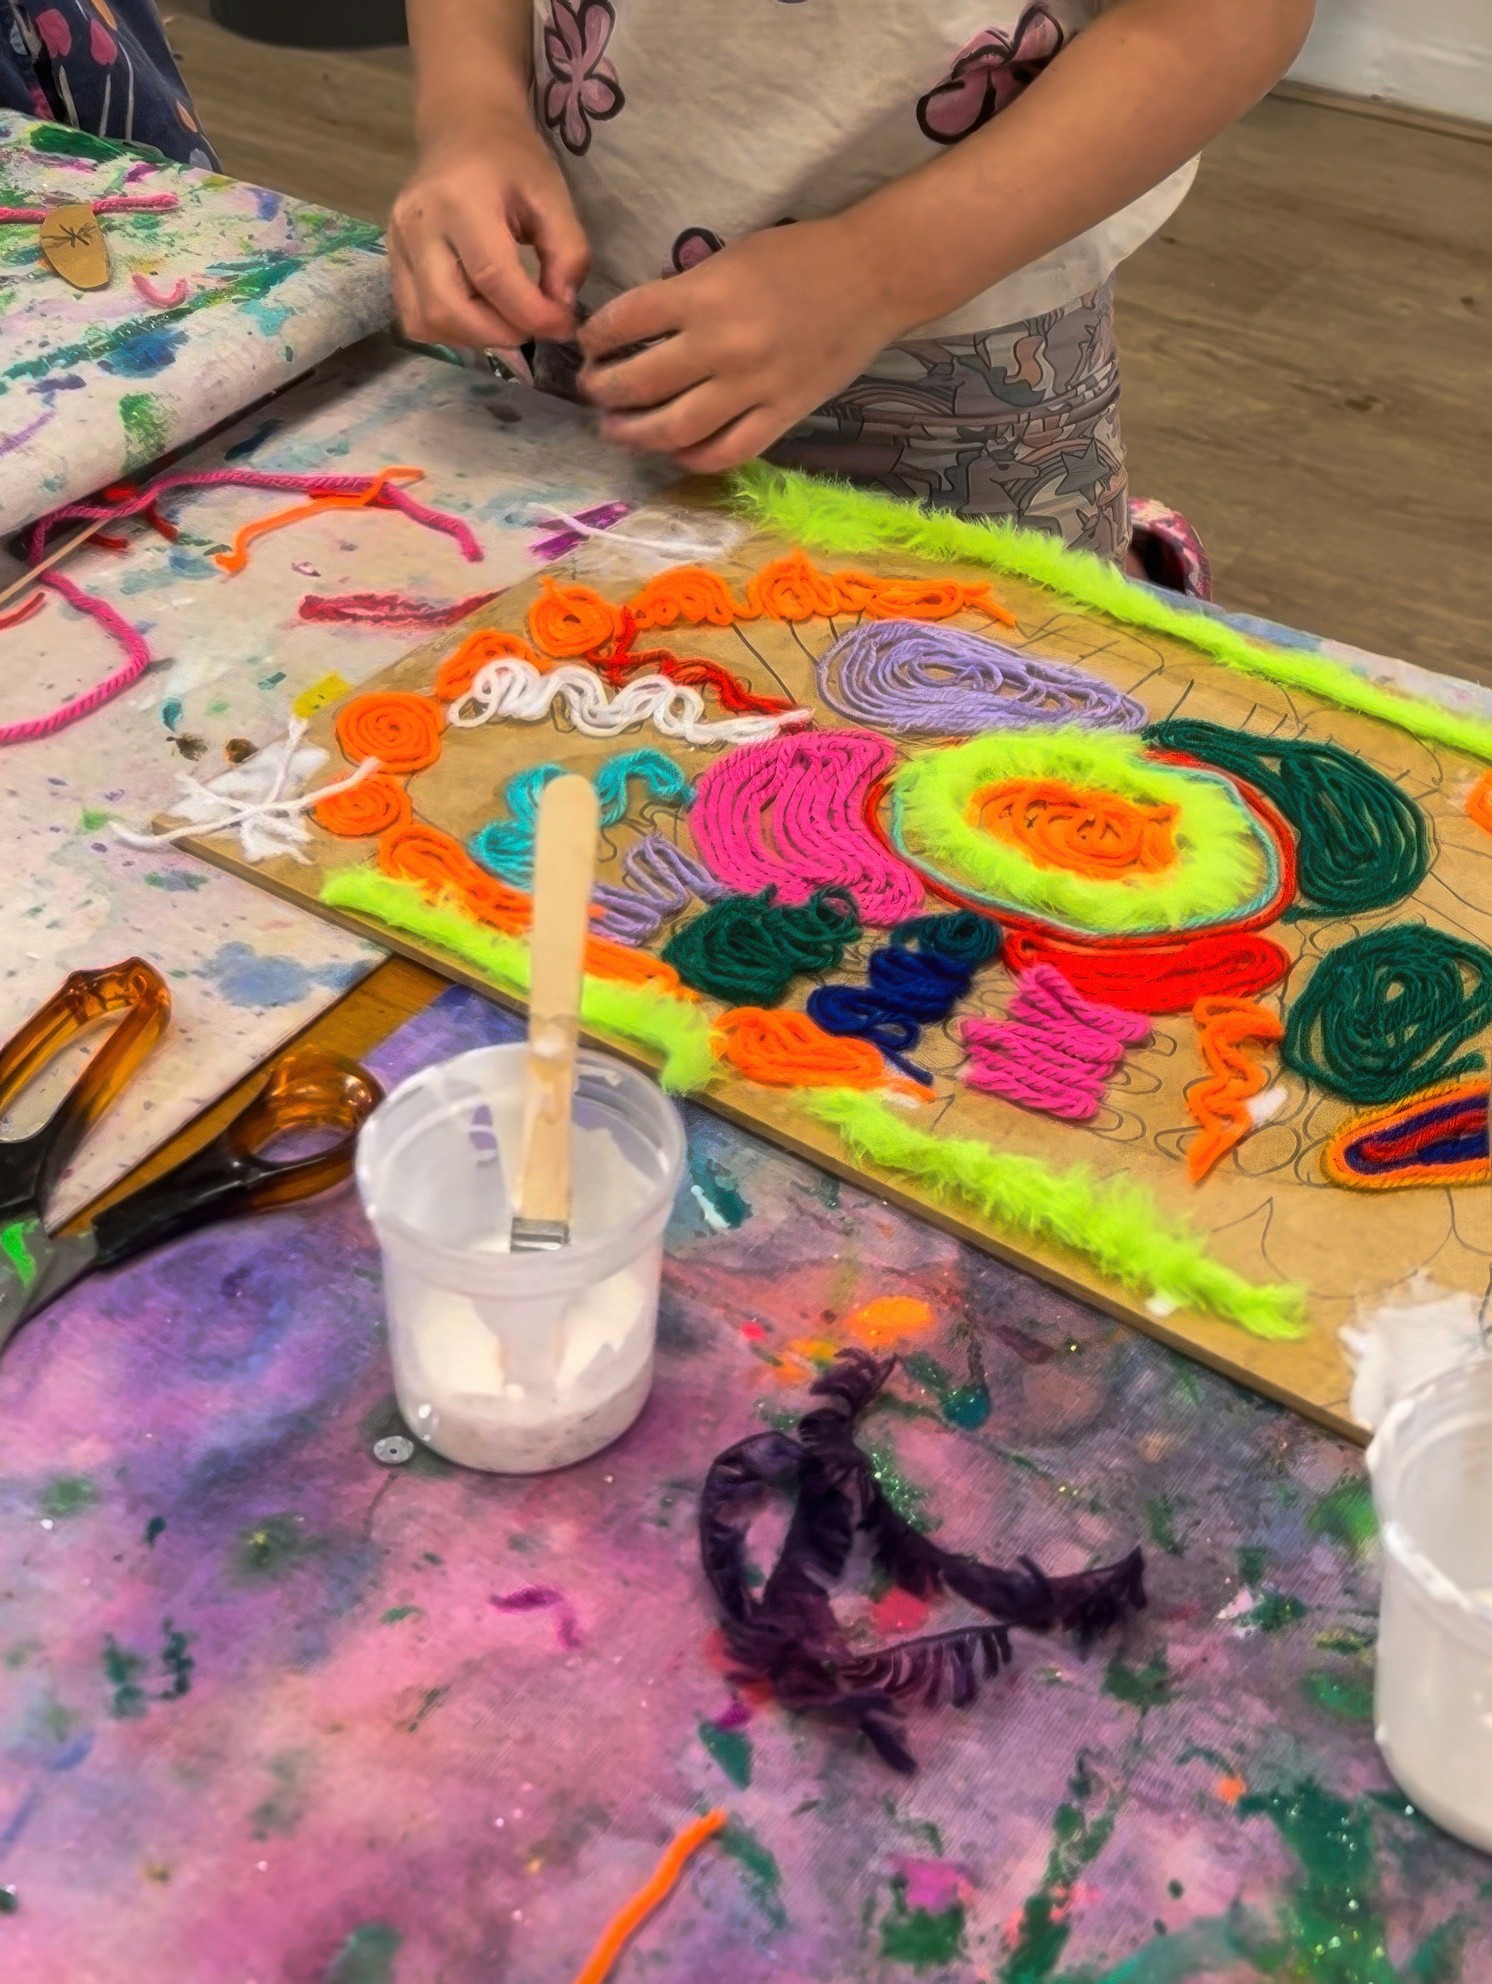
Painting with Wool
Bold colours and textured strands
Bookmark
Collage

The Set Up
Lay boards on the table first. I love wood for the feel in the hand, though thick card is brilliant when you need lightness! Curate bowls of PVA with fine brushes can sit where hands can easily reach, and trays of cut wool strands in all the colours.
Now's the perfect time to share some images of yarn paintings by Huichol artists in Mexico, also known as Wixárika. You'll see colourful yarn and beads pressed into wood with symbols that hold story and place.
For the artists in your world, invite personal symbols rather than copying sacred designs. Maybe a coastline you know or a plant from your street or a shape that belongs to your family?
Also highly recommend have a damp cloth waiting for the gluey fingers to come.
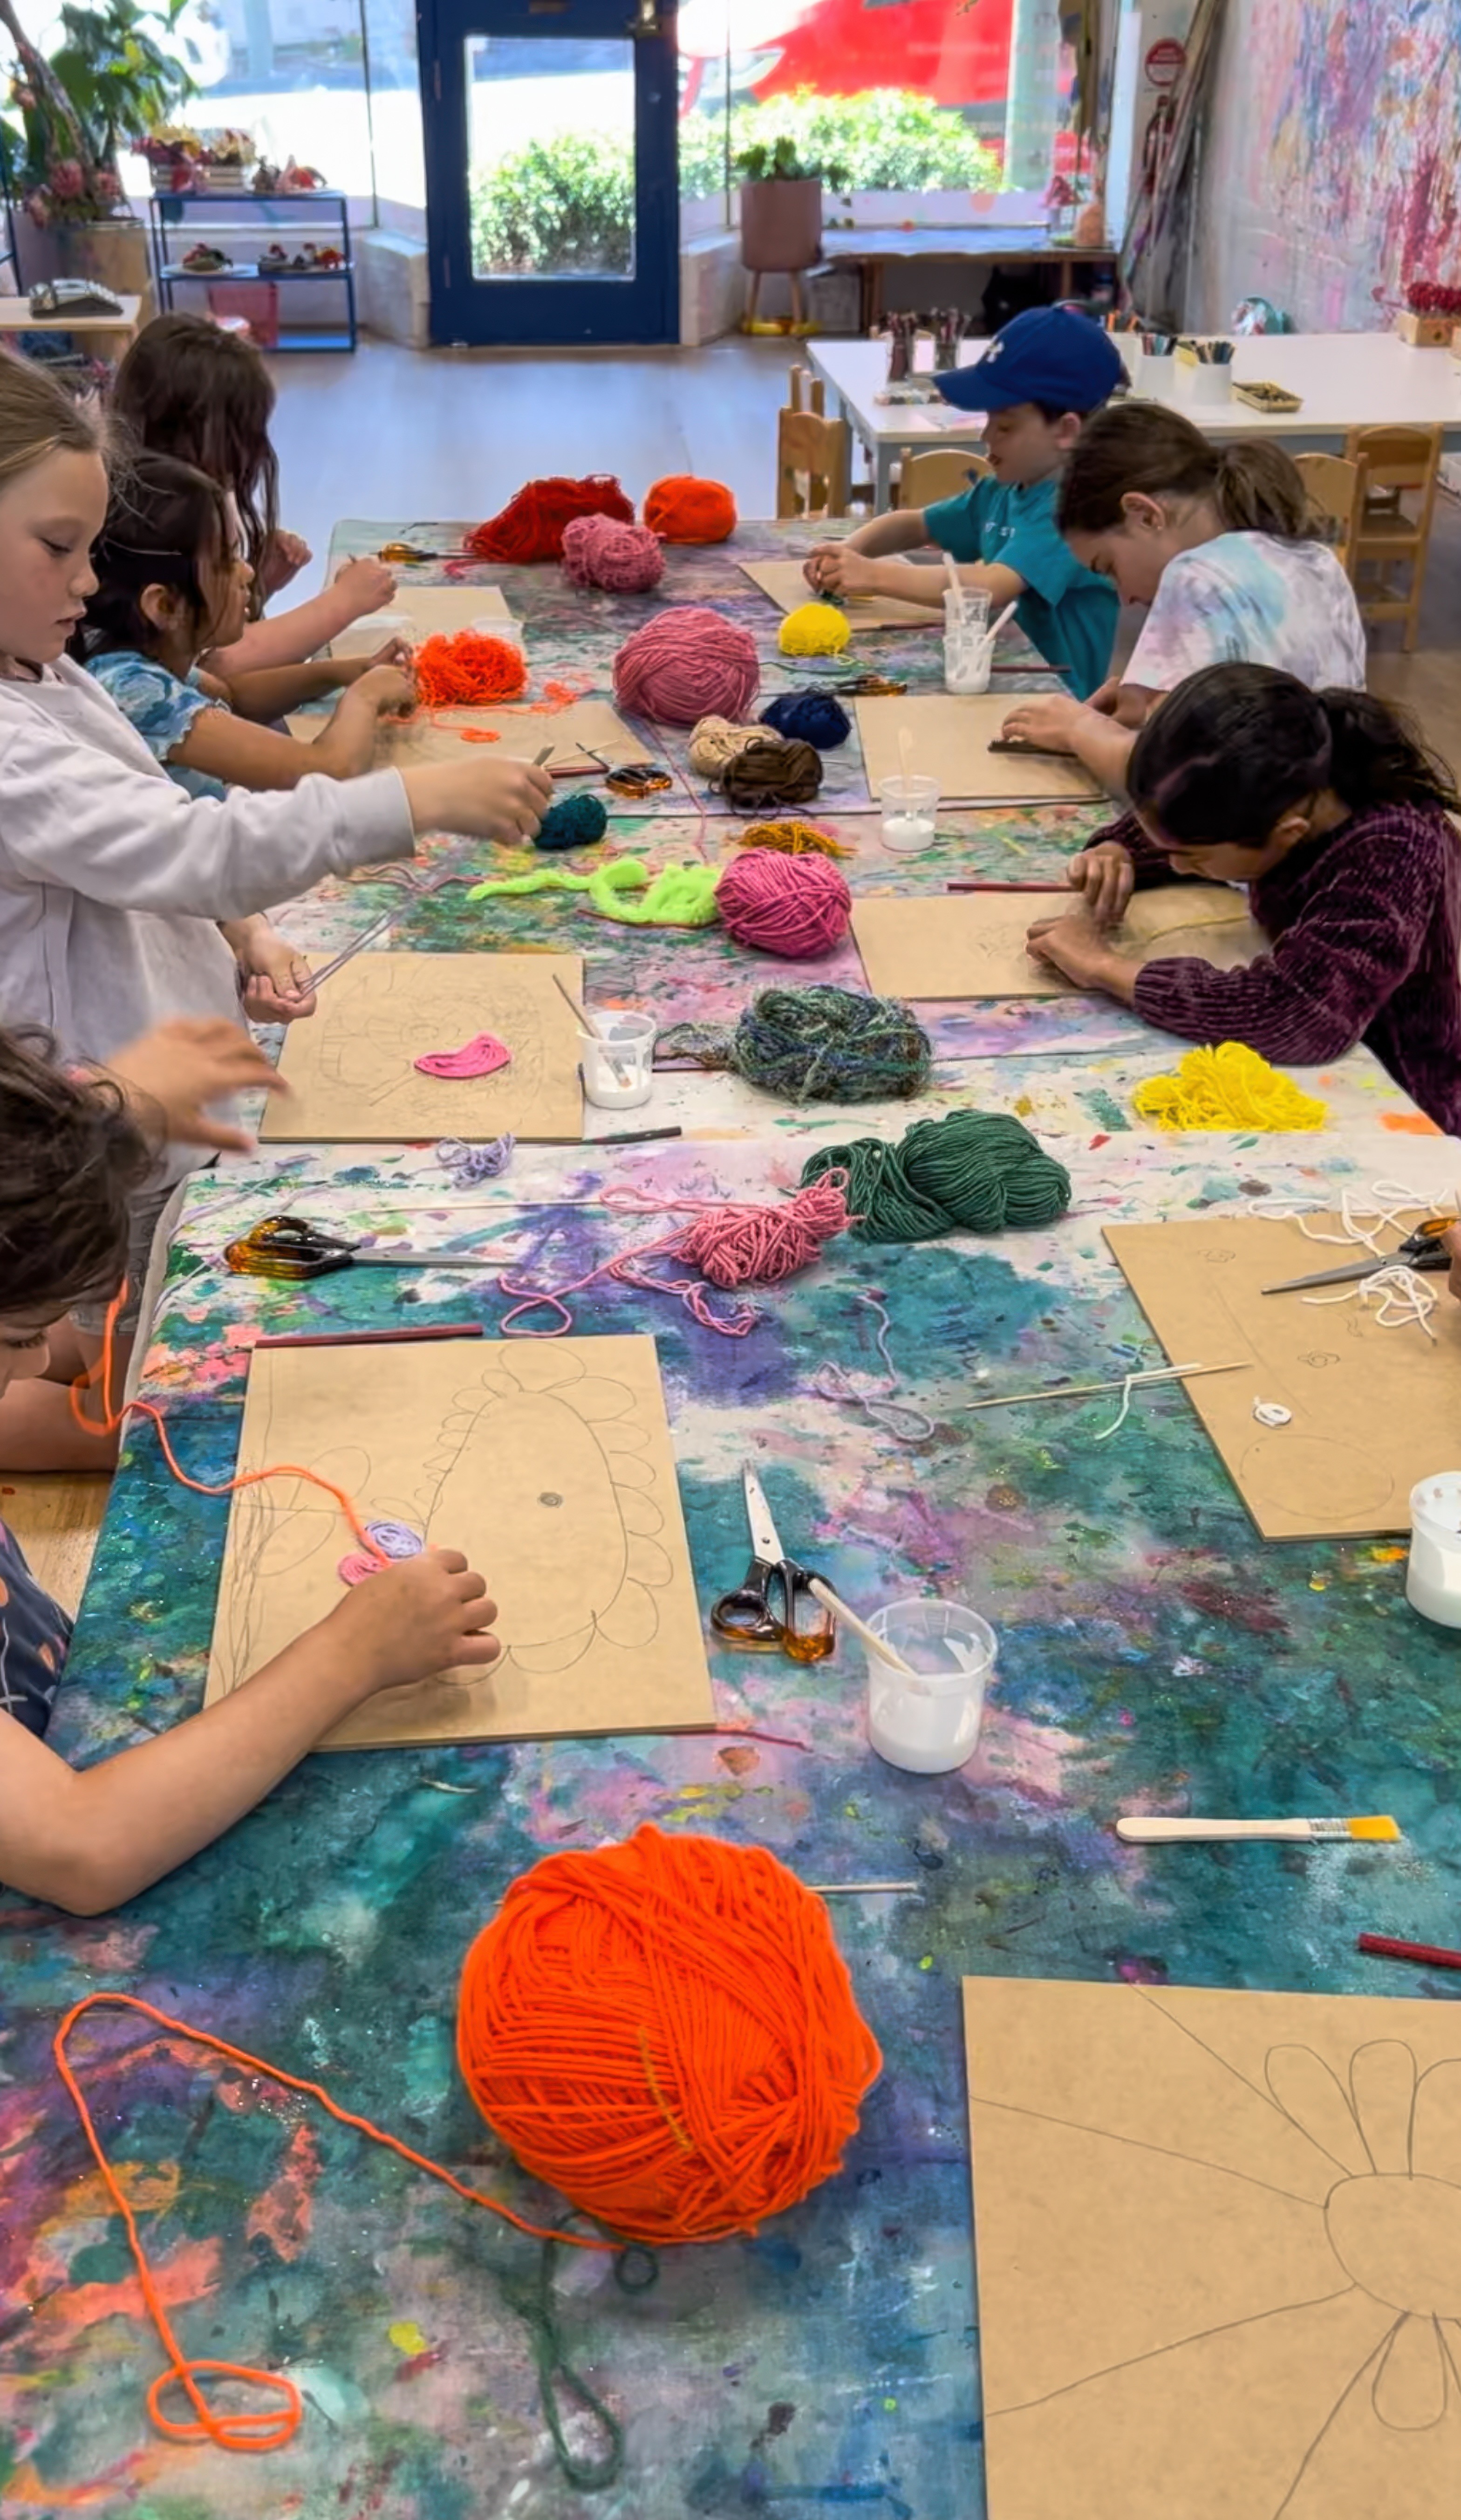
The Making
Begin with a quick pencil sketch and keep it bold rather than intricate so the wool can sit cleanly. Sometimes a palette decides the piece before the drawing does, so choose your colours and see what they suggest. Kids can decide whether they want to start right in the middle and let the picture grow outward, or start with the edges and a slow creep in. Both work!
Brush glue a little ahead of the line, then press the strand into place with the tip of a brush or a stick and keep the curve moving (short strands are friendlier for corners and tight turns).
Sticky fingers? Good! That means it’s working!
At Smudge we like to test colour pairings as we go and notice what happens when a calm shade sits beside a loud one. Keep checking the flow by tilting the board and stepping back for a second look.
Variations
One word, big and bold, filled with slow lines (JOY is a great start)
Monochrome day; sticking to one colour family so spacing and rhythm do the talking
Create a tiny series with three small tiles that speak to each other and hang as a set
Materials
Wool
Base board of wood or cardboard
PVA glue
Scissors
Pencil

Back to Top
Painting with Wool
Bold colours and textured strands
Bookmark
Collage
The Set Up
Lay boards on the table first. I love wood for the feel in the hand, though thick card is brilliant when you need lightness! Curate bowls of PVA with fine brushes can sit where hands can easily reach, and trays of cut wool strands in all the colours.
Now's the perfect time to share some images of yarn paintings by Huichol artists in Mexico, also known as Wixárika. You'll see colourful yarn and beads pressed into wood with symbols that hold story and place.
For the artists in your world, invite personal symbols rather than copying sacred designs. Maybe a coastline you know or a plant from your street or a shape that belongs to your family?
Also highly recommend have a damp cloth waiting for the gluey fingers to come.
The Making
Begin with a quick pencil sketch and keep it bold rather than intricate so the wool can sit cleanly. Sometimes a palette decides the piece before the drawing does, so choose your colours and see what they suggest. Kids can decide whether they want to start right in the middle and let the picture grow outward, or start with the edges and a slow creep in. Both work!
Brush glue a little ahead of the line, then press the strand into place with the tip of a brush or a stick and keep the curve moving (short strands are friendlier for corners and tight turns).
Sticky fingers? Good! That means it’s working!
At Smudge we like to test colour pairings as we go and notice what happens when a calm shade sits beside a loud one. Keep checking the flow by tilting the board and stepping back for a second look.
Variations
One word, big and bold, filled with slow lines (JOY is a great start)
Monochrome day; sticking to one colour family so spacing and rhythm do the talking
Create a tiny series with three small tiles that speak to each other and hang as a set
Materials
Wool
Base board of wood or cardboard
PVA glue
Scissors
Pencil
Back to Top
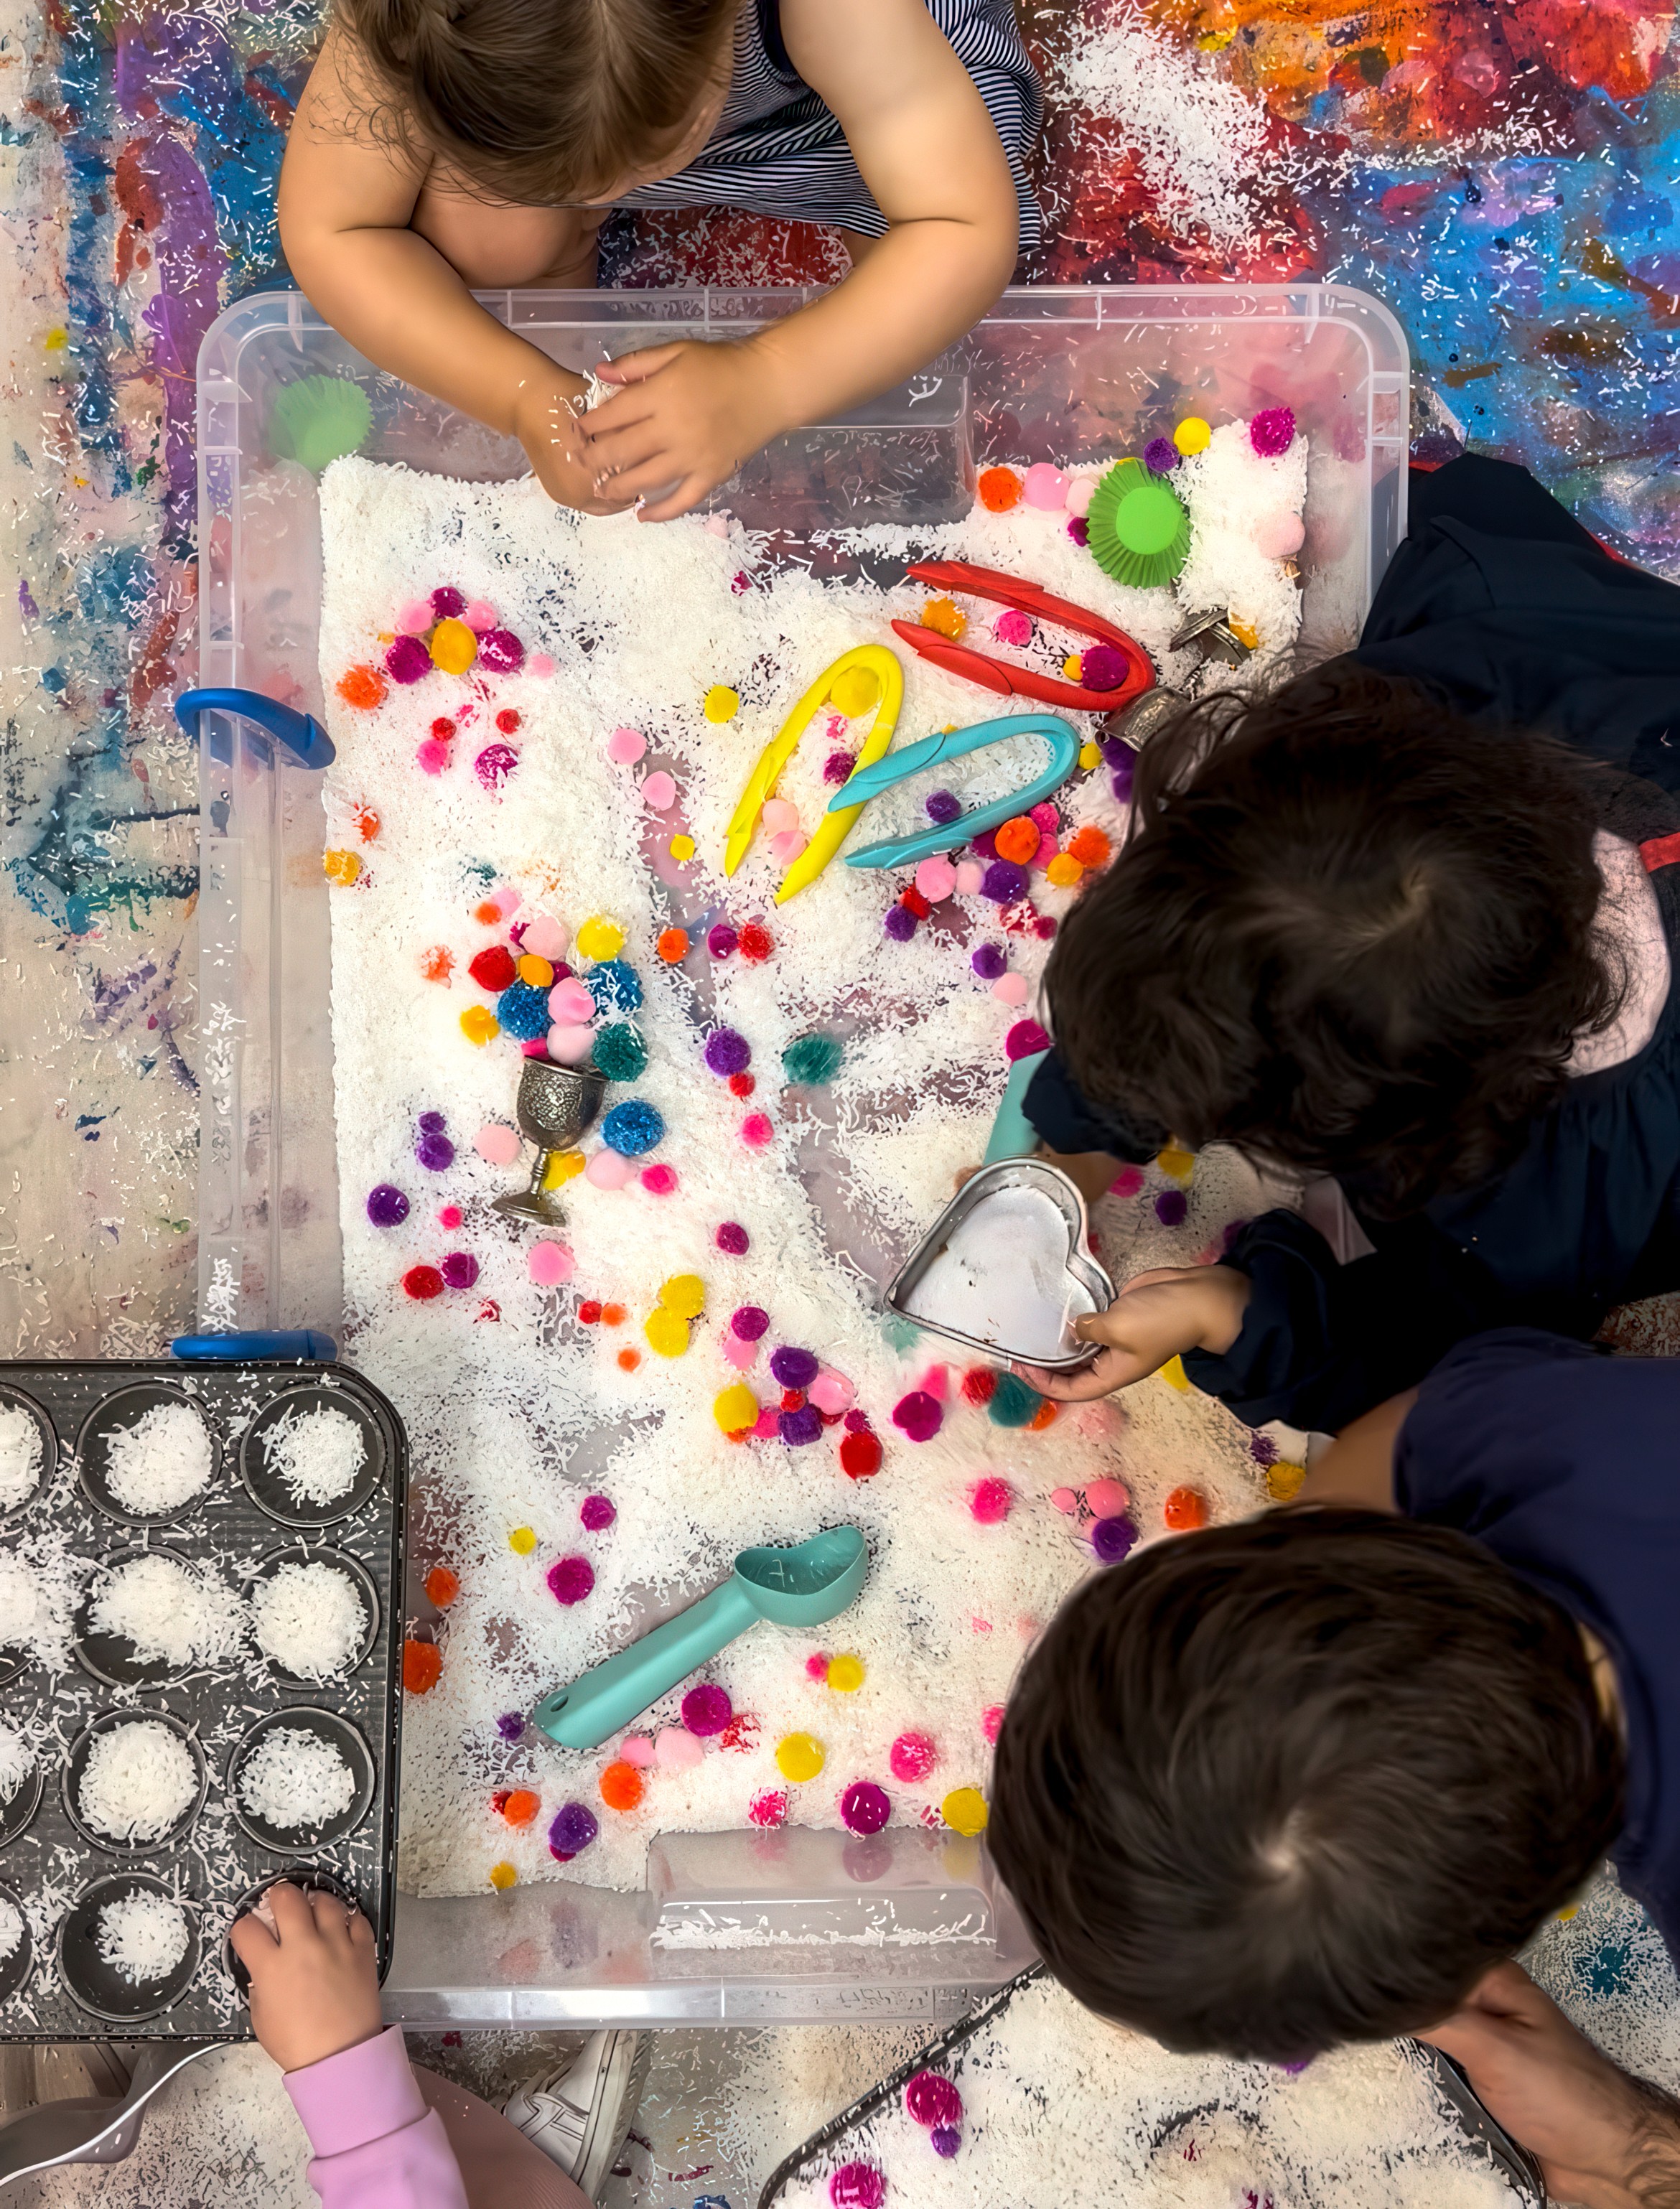
Pom Pom Play
A tiny fibre room you can play in!
Bookmark
Sensory Play

The Set Up
Fill a tub with pom poms in every size and colour! Sometimes we add another sensory tub 'base' to bulk it out a bit. Scatter in cups, bowls, scoops, and tweezers. Line the base with safety mirrors so the colours bounce and multiply.
The Making
Pick up, drop, sort, and pile. Tiny pom poms test fine motor skills with tweezers. Giant fluffy ones are perfect for scooping and pouring. Some artists sort by colour, others build towers or nests. The soft texture and bright palette feel joyful no matter how they are handled.
Variations
Make your own pom poms first and mix them in.
Add dot stickers to cups and bowls for colour-matching games.
Mix in buttons, felt mushrooms, or wooden counters for extra textures.
Materials
Pom poms in a range of colours and sizes
Cups, bowls, scoops, tweezers or tongs
Safety mirrors for the base
Optional: wool and cardboard rings to make pom poms or extra loose parts
Back to Top
Pom Pom Play
A tiny fibre room you can play in!
Bookmark
Sensory Play
The Set Up
Fill a tub with pom poms in every size and colour! Sometimes we add another sensory tub 'base' to bulk it out a bit. Scatter in cups, bowls, scoops, and tweezers. Line the base with safety mirrors so the colours bounce and multiply.
The Making
Pick up, drop, sort, and pile. Tiny pom poms test fine motor skills with tweezers. Giant fluffy ones are perfect for scooping and pouring. Some artists sort by colour, others build towers or nests. The soft texture and bright palette feel joyful no matter how they are handled.
Variations
Make your own pom poms first and mix them in.
Add dot stickers to cups and bowls for colour-matching games.
Mix in buttons, felt mushrooms, or wooden counters for extra textures.
Materials
Pom poms in a range of colours and sizes
Cups, bowls, scoops, tweezers or tongs
Safety mirrors for the base
Optional: wool and cardboard rings to make pom poms or extra loose parts
Back to Top
