

ARTFUL EXPERIENCES
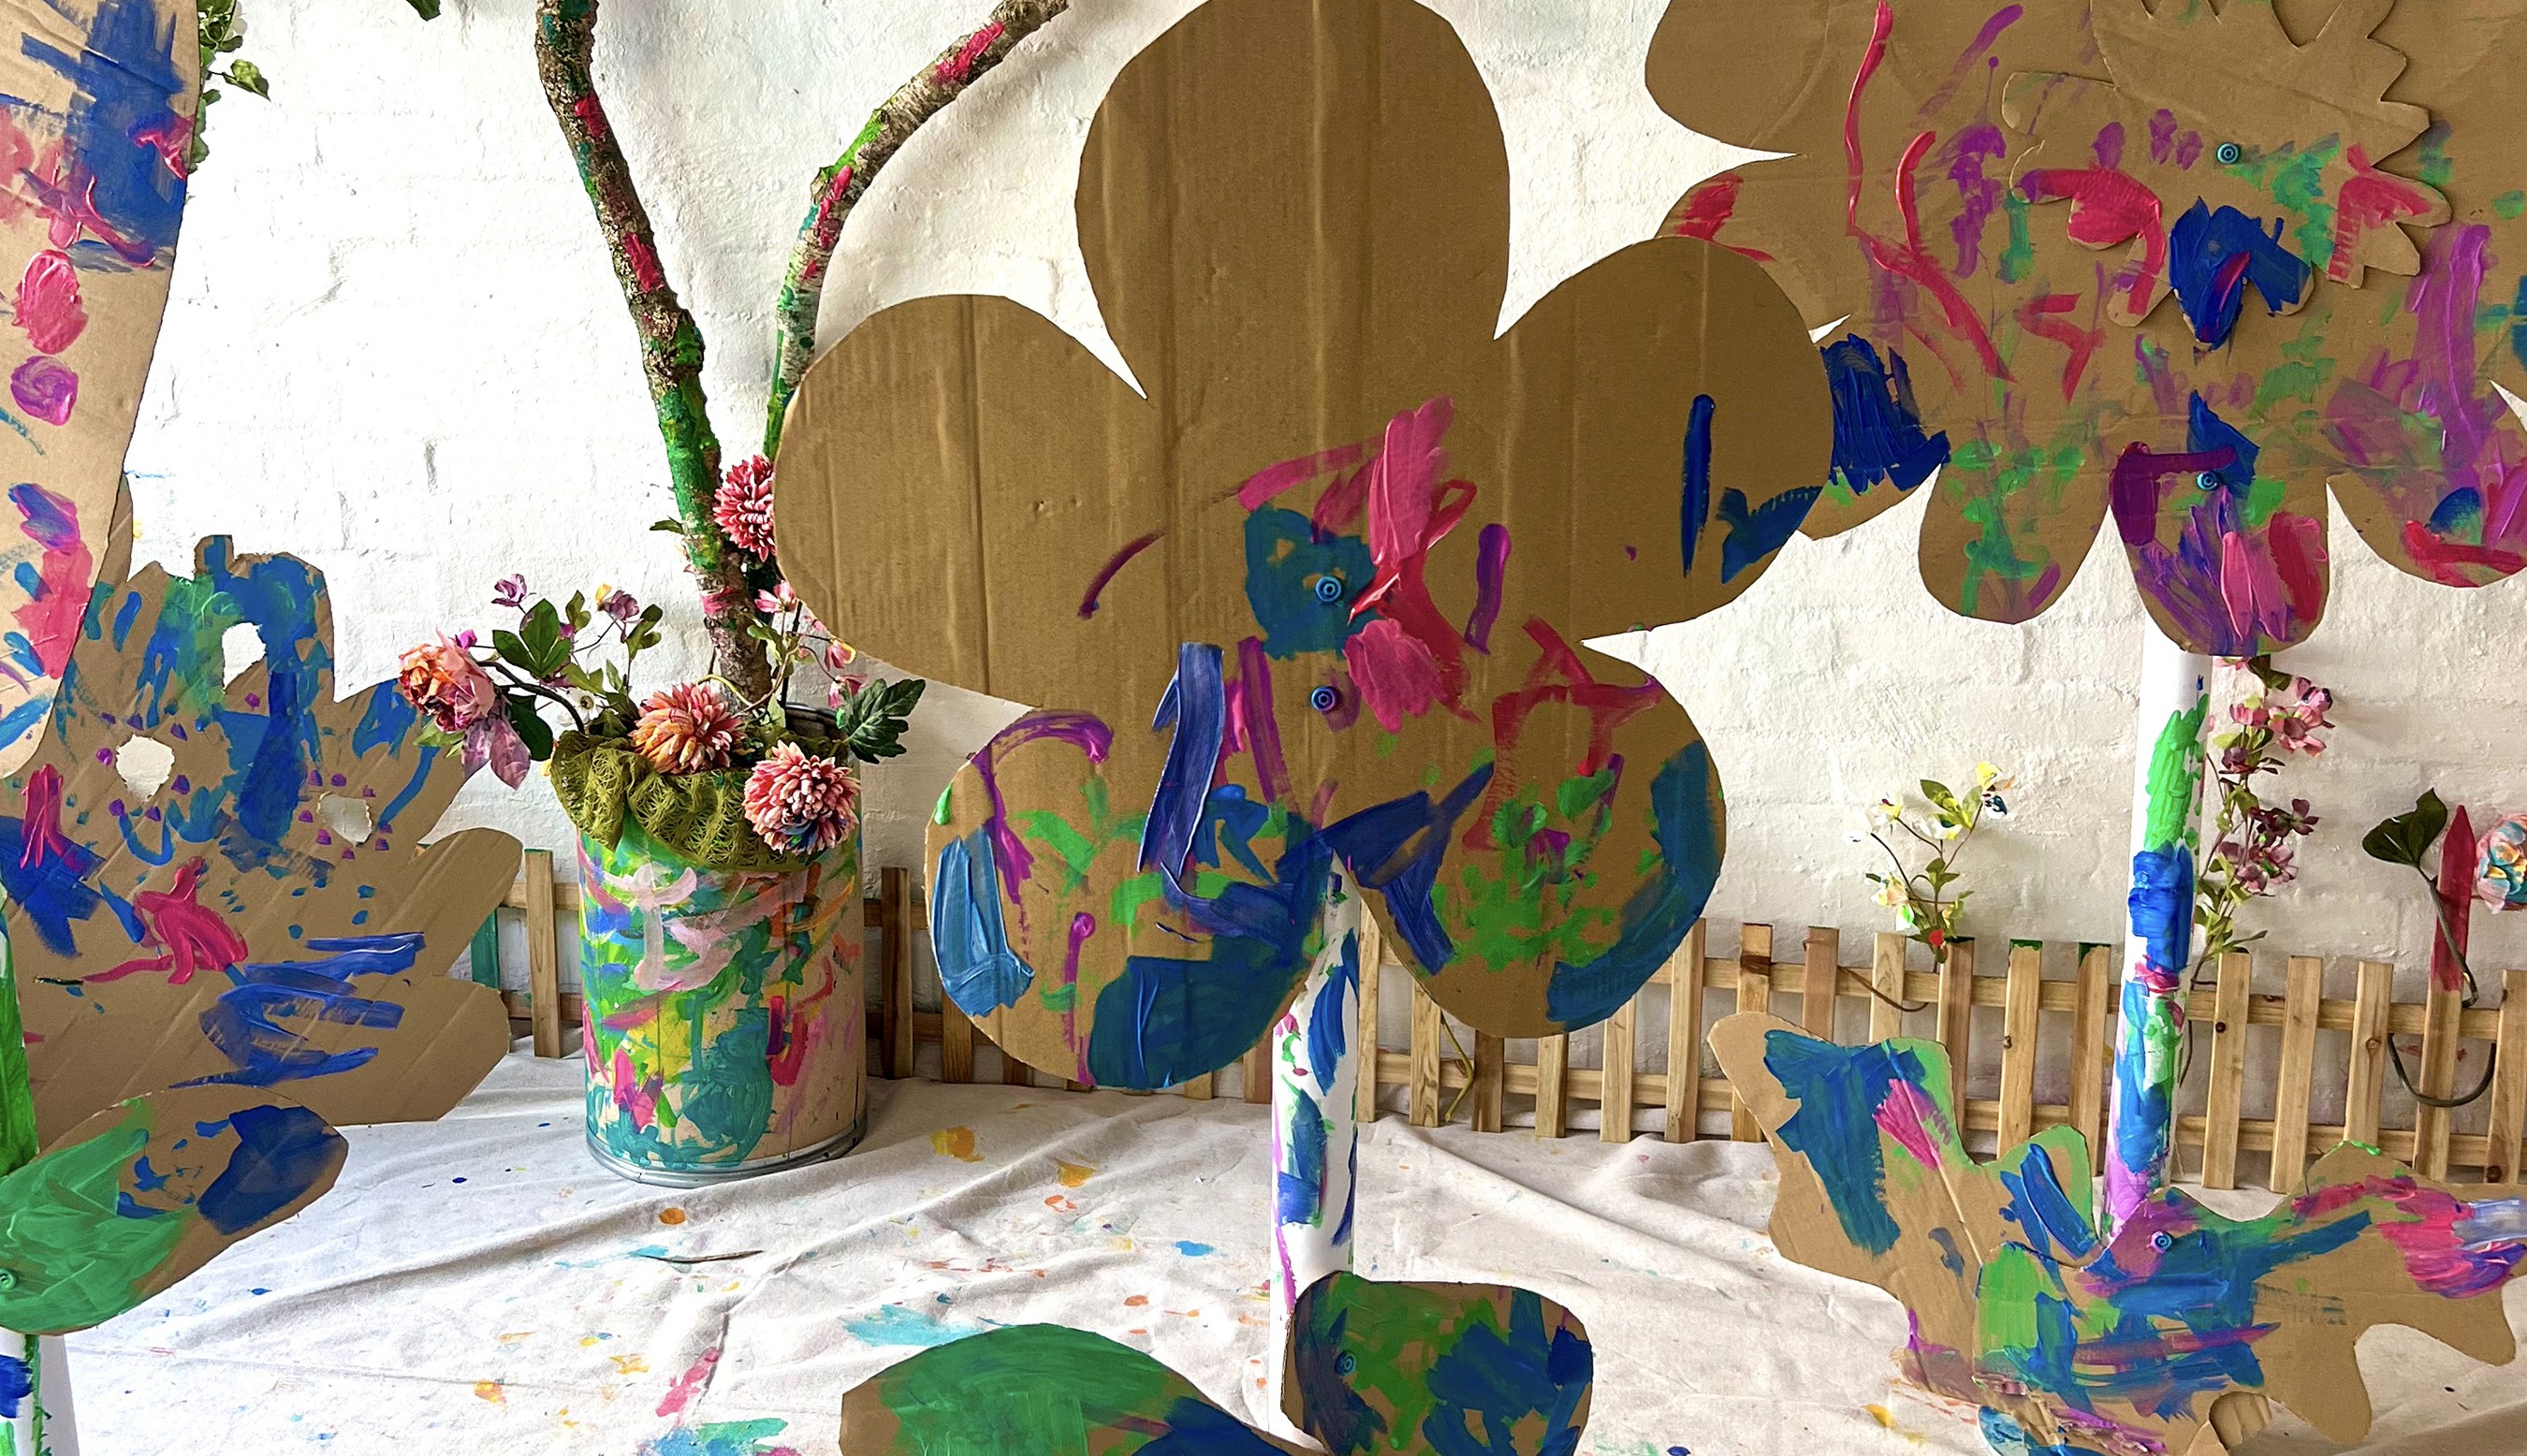
Cardboard Garden
Turn cardboard into a living world that grows with every new piece.
Bookmark
Installations
The Set Up
Start with large pieces of cardboard and imagine a garden that has no limits. Gather cardboard scissors, tape or glue, and bright paint mixed with a little white for extra vibrancy. MakeDo tools are brilliant for strong joins but masking tape or a glue gun will do the job too.


The Making
Children cut and join cardboard into giant flowers, tall stems, and wild shapes that don't even have to exist in any real garden. Big brushes or sponges quickly cover shapes in bold colour. Over time the garden expands and changes, growing with each new addition.


Variations
Add bugs, butterflies, or magical creatures made from smaller scraps. Let the installation evolve over a week or more, photographing its growth as a record.
Materials
Large sheets of cardboard (the sturdier the better)
Cardboard tubes from wrapping paper
Cardboard scissors (Fiskars are our favourite)
MakeDo tools, masking tape, or a glue gun for joining
Poster or tempera paints mixed with a little white for vibrancy
Big brushes and sponges for bold coverage
Drop cloths or painter’s canvas to protect the floor
Optional: metal stands or poles to hold up tall flowers or stems


Back to Top
Cardboard Garden
Turn cardboard into a living world that grows with every new piece.
Bookmark
Installations
The Set Up
Start with large pieces of cardboard and imagine a garden that has no limits. Gather cardboard scissors, tape or glue, and bright paint mixed with a little white for extra vibrancy. MakeDo tools are brilliant for strong joins but masking tape or a glue gun will do the job too.
The Making
Children cut and join cardboard into giant flowers, tall stems, and wild shapes that don't even have to exist in any real garden. Big brushes or sponges quickly cover shapes in bold colour. Over time the garden expands and changes, growing with each new addition.
Variations
Add bugs, butterflies, or magical creatures made from smaller scraps. Let the installation evolve over a week or more, photographing its growth as a record.
Materials
Large sheets of cardboard (the sturdier the better)
Cardboard tubes from wrapping paper
Cardboard scissors (Fiskars are our favourite)
MakeDo tools, masking tape, or a glue gun for joining
Poster or tempera paints mixed with a little white for vibrancy
Big brushes and sponges for bold coverage
Drop cloths or painter’s canvas to protect the floor
Optional: metal stands or poles to hold up tall flowers or stems
Back to Top
Flower Pounding
Truly the most special way to savour Spring forever!
Bookmark
Print Making

The Set Up
Gather fresh flowers such as pansies, marigolds, or violets. Cotton banners, canvas bags, or fabric squares all work. Lay flowers onto fabric, cover with baking paper if you prefer, and provide wooden mallets. I often buy small pots of pansies from our local nursery — they are magic. We bring them inside, children pick blooms, and then we return the pots outdoors. With sun and rain they flower again in a day or two.


The Making
Hammer gently and watch colour transfer straight from the petals into the fabric. Purples, yellows, and greens appear like natural paint. Be prepared for the process to be noisy, joyful, and absorbing.
Rolling pins or tiny wooden hammers work beautifully too. Heavy bashes or light taps (depending on their creative expression).
Flower favourites
The flowers that pound best are the soft ones that hold a lot of colour.
Pansies and violas are our go-to because they’re small, easy to handle, and so pigmented.
Marigolds make bold yellows and oranges, geraniums and petunias give brilliant pinks and reds, and cosmos bring a delicate, pretty imprint.
Loose rose petals work well too, especially in deep colours.
Herbs like mint or basil can also be fun to try; the greens come through and they smell incredible!


Variations
Thread a stick and string through the top for a banner. Cut smaller pieces for cards or wrapping paper.


Materials
Fresh flowers (pansies, marigolds, geraniums, petunias, cosmos, rose petals)
Optional extras: herbs or leaves for green imprints
Canvas bags, cotton banners, or fabric squares
Baking paper (optional)
Wooden mallets, rolling pins, or small hammers
Sticks and string for banners
Back to Top
Flower Pounding
Truly the most special way to savour Spring forever!
Bookmark
Print Making
The Set Up
Gather fresh flowers such as pansies, marigolds, or violets. Cotton banners, canvas bags, or fabric squares all work. Lay flowers onto fabric, cover with baking paper if you prefer, and provide wooden mallets. I often buy small pots of pansies from our local nursery — they are magic. We bring them inside, children pick blooms, and then we return the pots outdoors. With sun and rain they flower again in a day or two.
The Making
Hammer gently and watch colour transfer straight from the petals into the fabric. Purples, yellows, and greens appear like natural paint. Be prepared for the process to be noisy, joyful, and absorbing.
Rolling pins or tiny wooden hammers work beautifully too. Heavy bashes or light taps (depending on their creative expression).
Flower favourites
The flowers that pound best are the soft ones that hold a lot of colour.
Pansies and violas are our go-to because they’re small, easy to handle, and so pigmented.
Marigolds make bold yellows and oranges, geraniums and petunias give brilliant pinks and reds, and cosmos bring a delicate, pretty imprint.
Loose rose petals work well too, especially in deep colours.
Herbs like mint or basil can also be fun to try; the greens come through and they smell incredible!
Variations
Thread a stick and string through the top for a banner. Cut smaller pieces for cards or wrapping paper.
Materials
Fresh flowers (pansies, marigolds, geraniums, petunias, cosmos, rose petals)
Optional extras: herbs or leaves for green imprints
Canvas bags, cotton banners, or fabric squares
Baking paper (optional)
Wooden mallets, rolling pins, or small hammers
Sticks and string for banners
Back to Top
Curious Creatures
Things with wings and sparkly bugs, oh my!
Bookmark
Sculpture

The Set Up
Lay out a table that looks like a treasure hunt. Shiny foil, crunchy bubble wrap, scraps of fabric and ribbon, strips of cellophane that catch the light. Add beads, feathers, pipe cleaners, cardboard offcuts, and bottle lids. Pile it all up so children feel like they are diving into possibilities. Have scissors, glue, and paint sticks ready for whatever wild combinations appear.
For younger artists you can pre cut bug bodies, wings, and legs so they can mix and match easily. Older ones usually prefer to invent their own shapes.


The Making
Pick a shape to begin and then see where it leads. A pipe cleaner might twist into wings or legs, foil might crumple into an armour plate, or a feather might become the whole personality of the creature. At Smudge, I love when children wander over to our open shelves (a treasure trove of materials in my opinion!) and ask to pull something down to add just the right finishing touch. That extra sparkle, texture, or colour is what makes each creature feel completely unique.


Variations
Tuck your creatures into the Cardboard Garden installation so they peek out from giant flowers. Create a bug parade along the wall, or string them together into a colourful hanging that buzzes with life.
Materials
Shiny scraps: foil, cellophane, metallic paper
Textured favourites: bubble wrap, fabric offcuts, ribbon, felt
Loose parts: beads, feathers, bottle lids, buttons
Cardboard pieces (pre-painted or plain)
Pipe cleaners and wire for twisting and shaping
Paint sticks or markers for quick colour
Scissors and glue (PVA or glue sticks, depending on the age group)
Pre cut bug bodies, wings, and legs for younger children (optional)
Back to Top
Curious Creatures
Things with wings and sparkly bugs, oh my!
Bookmark
Sculpture
The Set Up
Lay out a table that looks like a treasure hunt. Shiny foil, crunchy bubble wrap, scraps of fabric and ribbon, strips of cellophane that catch the light. Add beads, feathers, pipe cleaners, cardboard offcuts, and bottle lids. Pile it all up so children feel like they are diving into possibilities. Have scissors, glue, and paint sticks ready for whatever wild combinations appear.
For younger artists you can pre cut bug bodies, wings, and legs so they can mix and match easily. Older ones usually prefer to invent their own shapes.
The Making
Pick a shape to begin and then see where it leads. A pipe cleaner might twist into wings or legs, foil might crumple into an armour plate, or a feather might become the whole personality of the creature. At Smudge, I love when children wander over to our open shelves (a treasure trove of materials in my opinion!) and ask to pull something down to add just the right finishing touch. That extra sparkle, texture, or colour is what makes each creature feel completely unique.
Variations
Tuck your creatures into the Cardboard Garden installation so they peek out from giant flowers. Create a bug parade along the wall, or string them together into a colourful hanging that buzzes with life.
Materials
Shiny scraps: foil, cellophane, metallic paper
Textured favourites: bubble wrap, fabric offcuts, ribbon, felt
Loose parts: beads, feathers, bottle lids, buttons
Cardboard pieces (pre-painted or plain)
Pipe cleaners and wire for twisting and shaping
Paint sticks or markers for quick colour
Scissors and glue (PVA or glue sticks, depending on the age group)
Pre cut bug bodies, wings, and legs for younger children (optional)
Back to Top
Flower Potions
A forever favourite for kids (and adults!) everywhere.
Bookmark
Creative Exploration

The Set Up
Set the table like a potion lab! Big bowls or tubs of water, jars of diluted liquid watercolours in spring shades, and piles of fresh petals ready to be stirred in. Add sequins, glitter, or beads so the brews sparkle, and a collection of scoops, jugs, and ladles for pouring and mixing. If you want extra magic, have bicarb and vinegar on hand for fizz. A friend of mine also lays out crushed up bath bombs! Everyone’s eyes always light up when the bubbles start.


The Making
Scoop and swirl, sprinkle and stir. Petals release their colours into the water, glitter floats, beads sink, and suddenly the bowl feels like a garden turned liquid. Add vinegar to a spoonful of bicarb and the whole potion comes alive, fizzing and frothing. Some mixtures shimmer like treasure, others smell sweet from the petals, and every one feels like a discovery.


Variations
Turn the whole space into a potion shop. Provide jars, labels, and a simple menu of “recipes” and let children bottle up their brews to display or take home.


Materials
Bowls or tubs of water
Liquid watercolours in spring colours
Fresh petals and leaves
Sequins, glitter, beads, or other sparkly loose parts
Cups, jugs, ladles, spoons, scoops
Bicarb and vinegar for fizz (or crushed bath bombs!)
Optional jars and labels for potion shop play
Back to Top
Flower Potions
A forever favourite for kids (and adults!) everywhere.
Bookmark
Creative Exploration
The Set Up
Set the table like a potion lab! Big bowls or tubs of water, jars of diluted liquid watercolours in spring shades, and piles of fresh petals ready to be stirred in. Add sequins, glitter, or beads so the brews sparkle, and a collection of scoops, jugs, and ladles for pouring and mixing. If you want extra magic, have bicarb and vinegar on hand for fizz. A friend of mine also lays out crushed up bath bombs! Everyone’s eyes always light up when the bubbles start.
The Making
Scoop and swirl, sprinkle and stir. Petals release their colours into the water, glitter floats, beads sink, and suddenly the bowl feels like a garden turned liquid. Add vinegar to a spoonful of bicarb and the whole potion comes alive, fizzing and frothing. Some mixtures shimmer like treasure, others smell sweet from the petals, and every one feels like a discovery.
Variations
Turn the whole space into a potion shop. Provide jars, labels, and a simple menu of “recipes” and let children bottle up their brews to display or take home.
Materials
Bowls or tubs of water
Liquid watercolours in spring colours
Fresh petals and leaves
Sequins, glitter, beads, or other sparkly loose parts
Cups, jugs, ladles, spoons, scoops
Bicarb and vinegar for fizz (or crushed bath bombs!)
Optional jars and labels for potion shop play
Back to Top
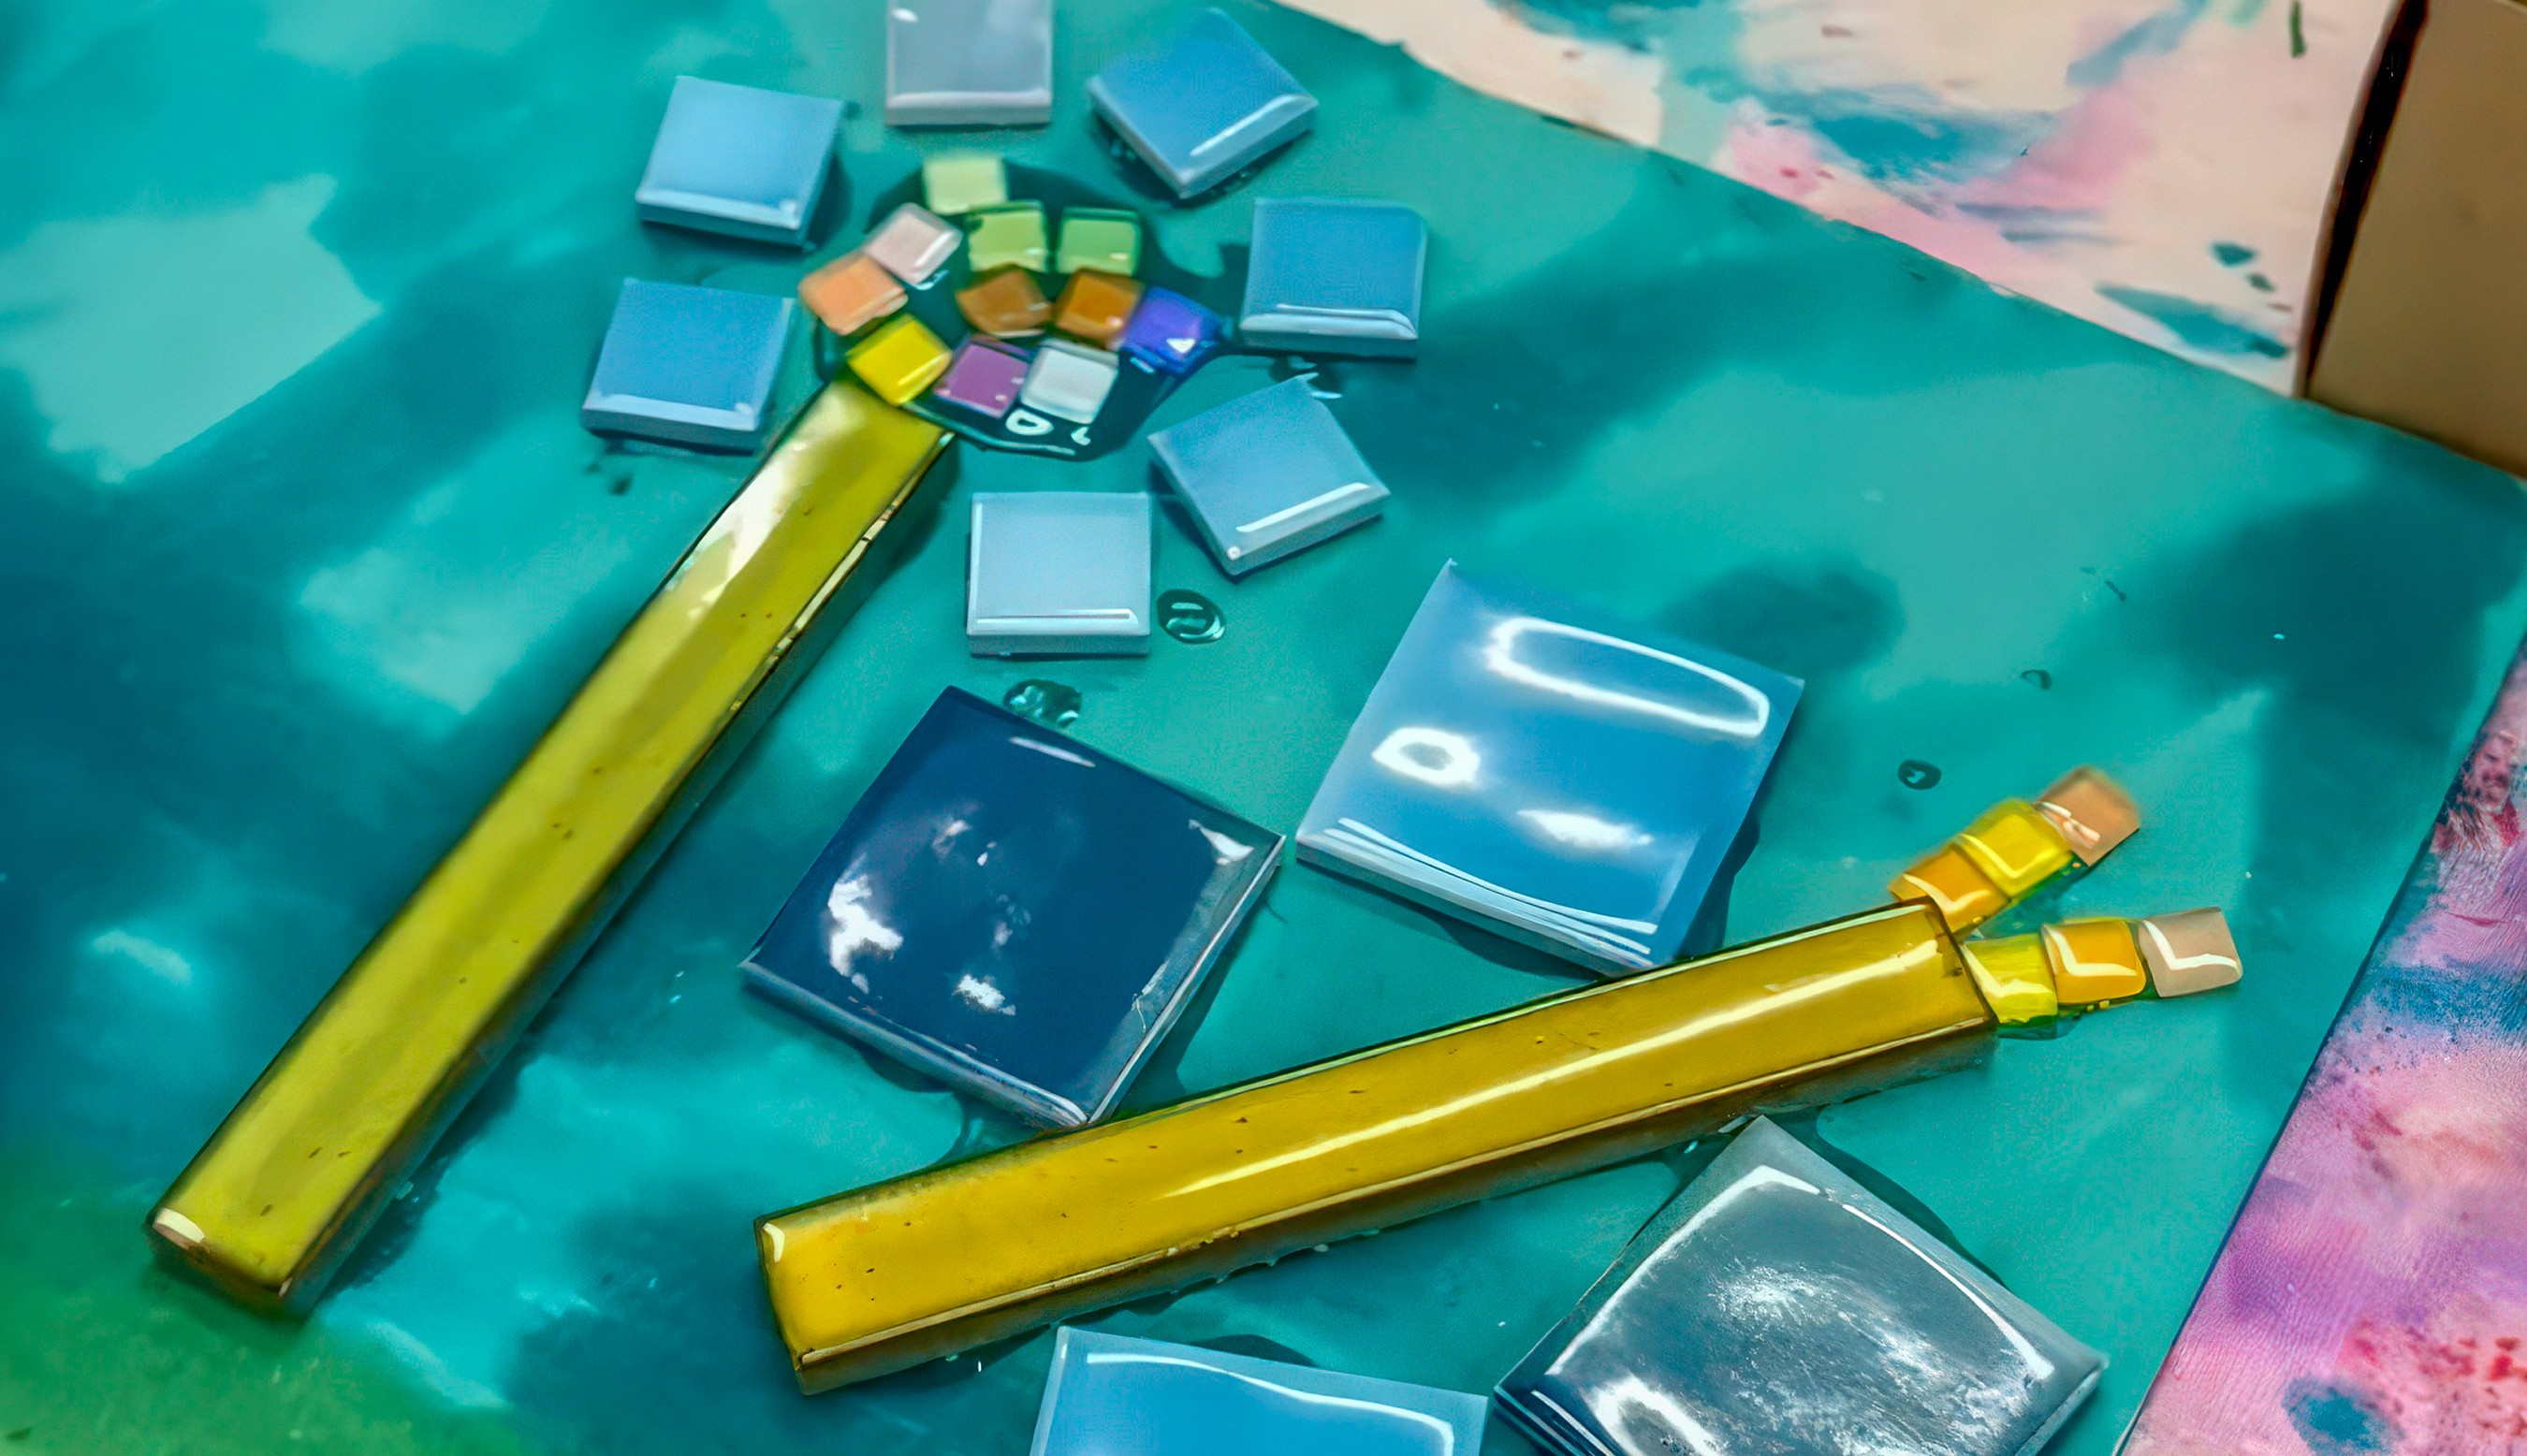
Wildflower Tiles
Mosaics and more!
Bookmark
Collage
The Set Up
Tile shops are often the best-kept secret here! Ask if they’ve got damaged or leftover sheets of tiles and you’ll usually walk away with a pile of treasures. The more variety in shapes, sizes, and colours, the better. We’ve had beautiful results with everything from tiny tessellated squares to larger offcuts.
Choose a sturdy base. Thick cardboard works in a pinch, but plywood gives the best result if you want something that lasts. Craft glue is usually strong enough, though a hot glue gun or mosaic glue will hold extra firmly. We often offer paint sticks or watercolours as well, so artists can add colour around the tiles or create a background layer before or after gluing.


The Making
Begin by planning the layout. Play with shapes, move them around, notice how the gaps form patterns of their own. Once you’re happy, glue the tiles in place. If you’re pressed for time, it often helps to stick first and paint later. But if you’re using paint sticks, they will dry almost instantly and makes the colours pop! Some mosaics look like meadows and others like abstract bursts of spring energy and I love describing this art form to kids like they're actually painting with tiles.


Variations
Older artists (9+) love the kinetic thrill of smashing tiles with a rubber mallet or cutting them into new shapes. Goggles and gloves are an absolute must!
Mix in other textures like beads, buttons, or shells for a layered surface.
Work as a group to build a larger panel that grows into a whole “wildflower wall.”
Materials
Scrap or sample tiles (broken sheets from tile shops)
Thick cardboard or plywood bases
Craft glue, hot glue, or mosaic glue
Paint sticks or watercolours
Brushes, sponges, or cloths for painting
Optional: rubber mallet, tile cutters, safety goggles, gloves
Back to Top
Wildflower Tiles
Mosaics and more!
Bookmark
Collage
The Set Up
Tile shops are often the best-kept secret here! Ask if they’ve got damaged or leftover sheets of tiles and you’ll usually walk away with a pile of treasures. The more variety in shapes, sizes, and colours, the better. We’ve had beautiful results with everything from tiny tessellated squares to larger offcuts.
Choose a sturdy base. Thick cardboard works in a pinch, but plywood gives the best result if you want something that lasts. Craft glue is usually strong enough, though a hot glue gun or mosaic glue will hold extra firmly. We often offer paint sticks or watercolours as well, so artists can add colour around the tiles or create a background layer before or after gluing.
The Making
Begin by planning the layout. Play with shapes, move them around, notice how the gaps form patterns of their own. Once you’re happy, glue the tiles in place. If you’re pressed for time, it often helps to stick first and paint later. But if you’re using paint sticks, they will dry almost instantly and makes the colours pop! Some mosaics look like meadows and others like abstract bursts of spring energy and I love describing this art form to kids like they're actually painting with tiles.
Variations
Older artists (9+) love the kinetic thrill of smashing tiles with a rubber mallet or cutting them into new shapes. Goggles and gloves are an absolute must!
Mix in other textures like beads, buttons, or shells for a layered surface.
Work as a group to build a larger panel that grows into a whole “wildflower wall.”
Materials
Scrap or sample tiles (broken sheets from tile shops)
Thick cardboard or plywood bases
Craft glue, hot glue, or mosaic glue
Paint sticks or watercolours
Brushes, sponges, or cloths for painting
Optional: rubber mallet, tile cutters, safety goggles, gloves
Back to Top
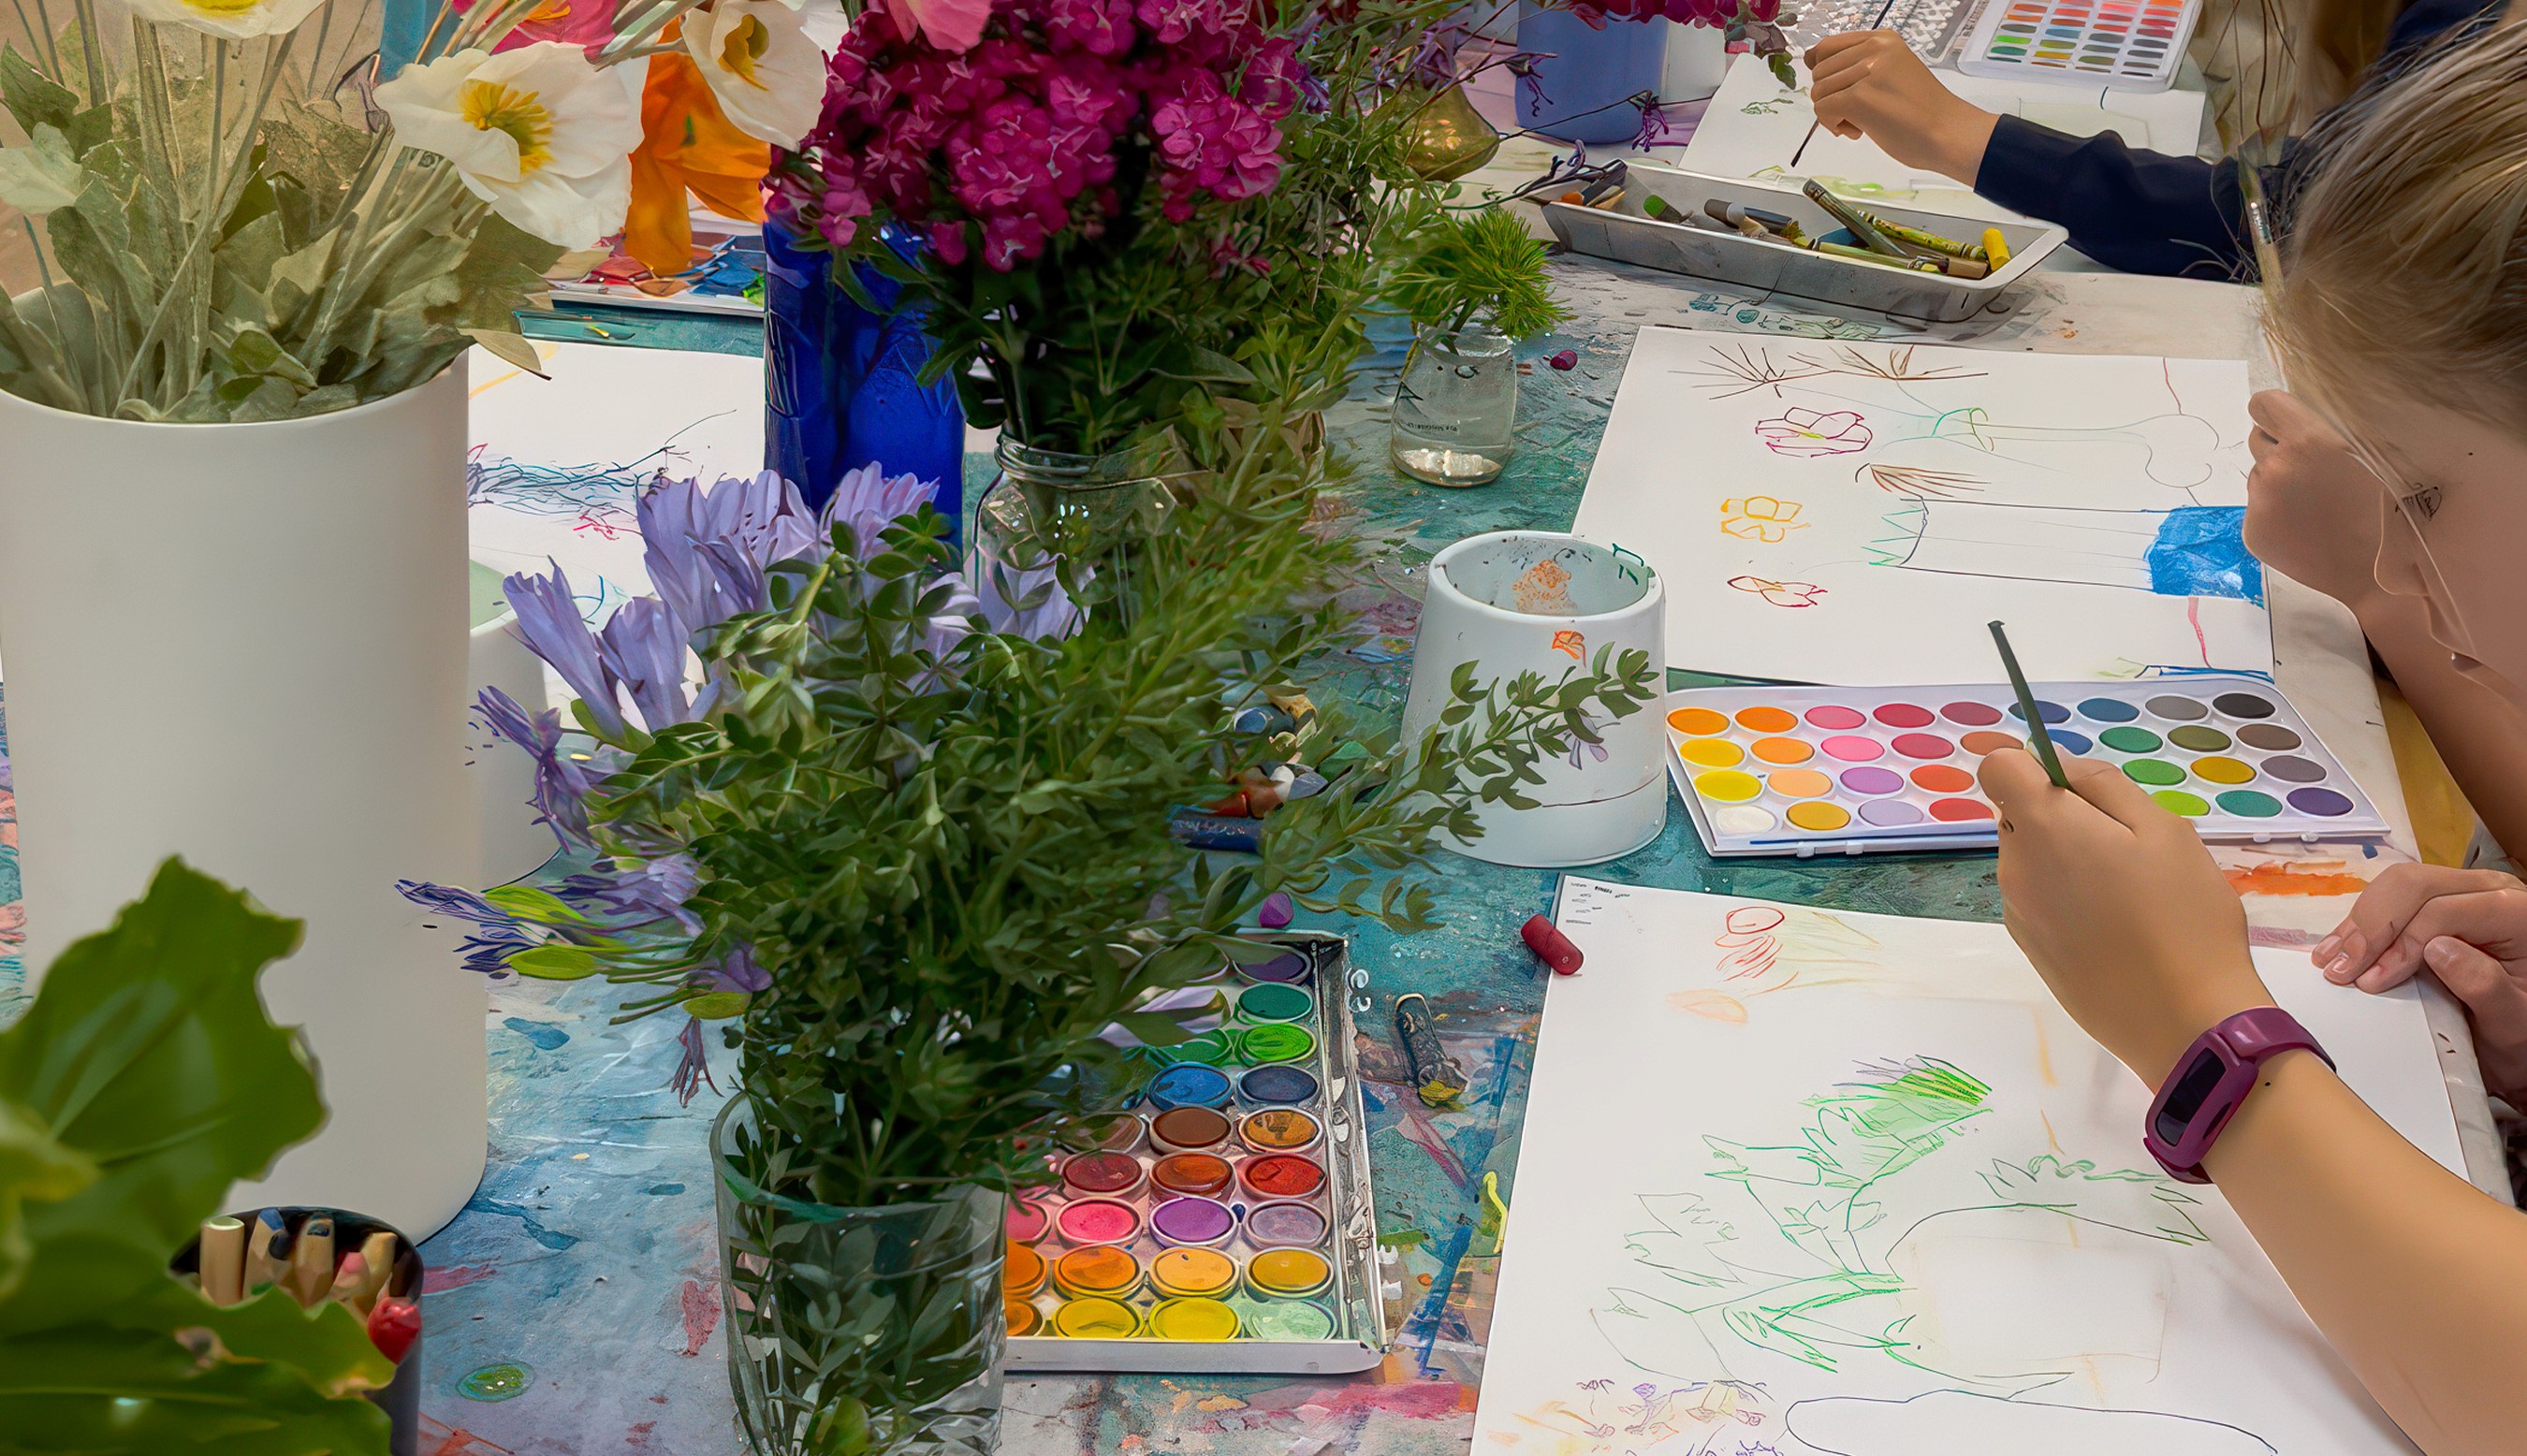
Spring Still Life
Noticing all the gorgeous colours and forms of Spring!
Bookmark
Painting & Drawing
The Set Up
This was the very first activity I ever offered at Smudge — the first day of our first holiday program in September. I was nervous, excited, and it filled me with so much joy that it has stayed a favourite ever since. Still life is such a gorgeous way to slow down and really look. Collect a mix of flowers and plants, including indoor greenery if you have it. The more variety the better — tall stems, trailing leaves, bursts of colour, unusual shapes. Set them up in jars and vases at different heights, almost like creating a stage for the plants.
Use thick A3 card or watercolour paper. Offer oil pastels, watercolour palettes, liquid watercolours, pencils, and markers so there is plenty to choose from.


The Making
Begin with a playful warm-up: smaller pieces of paper, an oil pastel, and a challenge not to lift it off the page. Keep your eyes on the flower or leaf and let your hand keep moving. These continuous line drawings are loose, surprising, and often hilarious, and they free everyone up before the “big” piece begins.
On larger paper, sketch the outline in pencil or pastel. Talk about the 'table line' as it anchors the objects and can be placed high or low depending on the composition. Add colour with watercolours or pastels, layering patterns and textures into the background. Scatter petals or fruit across the table for extra detail. At Smudge we often chat about analogous colours (those close together on the colour wheel) or complementary ones (opposites) and how they shift the feeling of the piece. Also, it's great to remember that colours do not need to be realistic! A pink leaf or a blue flower can make the whole page sing. It's always better to use a colour palette that makes your own heart sing.


Variations
Spray liquid watercolours for a loose, unpredictable effect on the background. Focus on a single leaf or bloom and create a series of studies rather than one big piece.
Materials
A variety of fresh flowers, indoor plants, and leaves
Vases and jars for arranging
A3 card or watercolour paper
Oil pastels, pencils, markers
Watercolour palettes and liquid watercolours
Paintbrushes, water jars, cloths
Smaller A5 paper for warm-ups
Back to Top
Spring Still Life
Noticing all the gorgeous colours and forms of Spring!
Bookmark
Painting & Drawing
The Set Up
This was the very first activity I ever offered at Smudge — the first day of our first holiday program in September. I was nervous, excited, and it filled me with so much joy that it has stayed a favourite ever since. Still life is such a gorgeous way to slow down and really look. Collect a mix of flowers and plants, including indoor greenery if you have it. The more variety the better — tall stems, trailing leaves, bursts of colour, unusual shapes. Set them up in jars and vases at different heights, almost like creating a stage for the plants.
Use thick A3 card or watercolour paper. Offer oil pastels, watercolour palettes, liquid watercolours, pencils, and markers so there is plenty to choose from.
The Making
Begin with a playful warm-up: smaller pieces of paper, an oil pastel, and a challenge not to lift it off the page. Keep your eyes on the flower or leaf and let your hand keep moving. These continuous line drawings are loose, surprising, and often hilarious, and they free everyone up before the “big” piece begins.
On larger paper, sketch the outline in pencil or pastel. Talk about the 'table line' as it anchors the objects and can be placed high or low depending on the composition. Add colour with watercolours or pastels, layering patterns and textures into the background. Scatter petals or fruit across the table for extra detail. At Smudge we often chat about analogous colours (those close together on the colour wheel) or complementary ones (opposites) and how they shift the feeling of the piece. Also, it's great to remember that colours do not need to be realistic! A pink leaf or a blue flower can make the whole page sing. It's always better to use a colour palette that makes your own heart sing.
Variations
Spray liquid watercolours for a loose, unpredictable effect on the background. Focus on a single leaf or bloom and create a series of studies rather than one big piece.
Materials
A variety of fresh flowers, indoor plants, and leaves
Vases and jars for arranging
A3 card or watercolour paper
Oil pastels, pencils, markers
Watercolour palettes and liquid watercolours
Paintbrushes, water jars, cloths
Smaller A5 paper for warm-ups
Back to Top
Petal Printing
Dip a bloom and stamp the page.
Bookmark
Print Making

The Set Up
Printmaking has always been one of my favourite things to offer at Smudge because it is full of surprises! You never know if a stamp will be bold and clear or soft and blurred, and that unpredictability is the best part. For flower printing, gather blooms with a bit of structure that can hold their shape when pressed. Daisies are brilliant, and so are chrysanthemums or zinnias. Even geraniums can work well. Pop a few into jars on the table so children can choose their “stamp.” Mix poster paint with a little white so the colours stay bright, then tip it into shallow trays. Paper or fabric squares work equally well for printing.


The Making
Dip a flower into paint and stamp it down. Maybe it leaves a perfect daisy, maybe just a splash of colour, and maybe the petals fall away and make their own marks. Try layering colours before one dries, or stamping in clusters until the page feels alive. Some artists go for neat patterns, others build a wild tangle of overlapping blooms. Both are beautiful, aren't they?


Variations
Print repeat patterns to make wrapping paper, or keep adding to one giant shared mural. Once dry, add details with oil pastels, pens, or more paint.
Materials
Sturdy flowers such as daisies, chrysanthemums, zinnias, or geraniums
Poster paint mixed with white for vibrancy
Shallow trays or plates for paint
Thick paper or fabric squares
Oil pastels or markers for detail (optional)
Back to Top
Petal Printing
Dip a bloom and stamp the page.
Bookmark
Print Making
The Set Up
Printmaking has always been one of my favourite things to offer at Smudge because it is full of surprises! You never know if a stamp will be bold and clear or soft and blurred, and that unpredictability is the best part. For flower printing, gather blooms with a bit of structure that can hold their shape when pressed. Daisies are brilliant, and so are chrysanthemums or zinnias. Even geraniums can work well. Pop a few into jars on the table so children can choose their “stamp.” Mix poster paint with a little white so the colours stay bright, then tip it into shallow trays. Paper or fabric squares work equally well for printing.
The Making
Dip a flower into paint and stamp it down. Maybe it leaves a perfect daisy, maybe just a splash of colour, and maybe the petals fall away and make their own marks. Try layering colours before one dries, or stamping in clusters until the page feels alive. Some artists go for neat patterns, others build a wild tangle of overlapping blooms. Both are beautiful, aren't they?
Variations
Print repeat patterns to make wrapping paper, or keep adding to one giant shared mural. Once dry, add details with oil pastels, pens, or more paint.
Materials
Sturdy flowers such as daisies, chrysanthemums, zinnias, or geraniums
Poster paint mixed with white for vibrancy
Shallow trays or plates for paint
Thick paper or fabric squares
Oil pastels or markers for detail (optional)
Back to Top
Garden Play
Pour and plant and play with a tiny garden in a tub.
Bookmark
Sensory Play

The Set Up
Think of this as a garden in a tub, built from whatever you have on hand. Green split peas are our go-to because they pour beautifully and sound amazing as they slip through little hands. But you can swap them out for potpourri, dried petals, mown grass, or even sand. Each one gives the play its own scent, texture, and mood. Fill a large tub and add bowls, scoops, spoons, and cups for pouring and building. Our favourite felt toys come from Tara’s Treasures, who make the most beautiful flowers, vegetables, and insects to tuck into play.
The Making
Pour a scoop and listen to the soft rattle as the peas tumble down. They slip through fingers like water and pile into little hills that never stay put for long. This kind of sensory play is more than soothing isn't it? It builds focus, strengthens fine motor skills, and gives children space to create their own little worlds.


Variations
Hide small insects or treasures for children to discover. Add sticks, bark, or stones collected from outside. Use funnels or tubes for rivers and watch how the peas or petals rush through.
Materials
Green split peas, potpourri, dried petals, sand, or grass clippings
Felt toys and flowers (we love Tara’s Treasures)
Small garden tools or loose parts like stones and sticks
Bowls, spoons, scoops, cups, funnels
Back to Top
Garden Play
Pour and plant and play with a tiny garden in a tub.
Bookmark
Sensory Play
The Set Up
Think of this as a garden in a tub, built from whatever you have on hand. Green split peas are our go-to because they pour beautifully and sound amazing as they slip through little hands. But you can swap them out for potpourri, dried petals, mown grass, or even sand. Each one gives the play its own scent, texture, and mood. Fill a large tub and add bowls, scoops, spoons, and cups for pouring and building. Our favourite felt toys come from Tara’s Treasures, who make the most beautiful flowers, vegetables, and insects to tuck into play.
The Making
Pour a scoop and listen to the soft rattle as the peas tumble down. They slip through fingers like water and pile into little hills that never stay put for long. This kind of sensory play is more than soothing isn't it? It builds focus, strengthens fine motor skills, and gives children space to create their own little worlds.
Variations
Hide small insects or treasures for children to discover. Add sticks, bark, or stones collected from outside. Use funnels or tubes for rivers and watch how the peas or petals rush through.
Materials
Green split peas, potpourri, dried petals, sand, or grass clippings
Felt toys and flowers (we love Tara’s Treasures)
Small garden tools or loose parts like stones and sticks
Bowls, spoons, scoops, cups, funnels
Back to Top
