


ARTFUL EXPERIENCES
The Great Egg Hunt
Build an over-sized Easter scene, wall to wall
Bookmark
Installations

The Set Up
Create giant egg shapes cut from cardboard. The bigger the better! We're talking 60 to 80cm tall. Freehand is more than fine for these because eggs are a very forgiving shape, and I think the wobbly ones have just as much charm as perfect ovals. Add oversized bunny silhouettes too if you're feeling ambitious!
For the hanging carrots, grab orange plastic yarn cones (craft stores or opp shops) and twist green pipe cleaners into the tops for leaves. Hang them from the ceiling with fishing line and suddenly you've got carrots dangling at kid height everywhere.
Appliance boxes from your local whitegoods store are the best source for large, sturdy cardboard. You can also ask at IKEA... they always have a stack out the back they're more than happy to give away.
Our metal stands have a heavy base and are perfect for attaching cardboard creations to. If you ever come across an old sign stand or the bases for the fancy velvet ropes at the movies, then snatch them up!
Lay out bright paints, big brushes, sponges, and rollers so the artists can paint directly onto the cardboard shapes. As always, mix in a little white to your poster / tempera paint so the colours stay punchy. You could also offer collage materials, tissue paper, and stickers for layering.


The Making
Brushes get swapped for hands pretty quickly, and the eggs end up covered in wild colour combinations that no real egg could ever pull off. As always with our installations, each new day (or class) will bring a new energy and it will change in gorgeous ways across the week.
A tip for the week? Photograph the installation each afternoon before you leave. It changes so much day to day and that visual record of how it grows is gorgeous and celebrates the process most of all.


Variations
Add smaller egg shapes on paper for the artists who want to paint at the table rather than on the wall. Not everyone gravitates toward large scale work, and the table eggs can be cut out and added to the installation later.
Materials
Large sheets of cardboard (appliance boxes from IKEA or your local whitegoods store are perfect)
Cardboard scissors, MakeDo tools, or a box cutter (adults only)
Poster or tempera paints in bright Easter colours (mix in a little white to keep colours punchy on cardboard)
Big brushes, sponges, and rollers
Masking tape for securing shapes to the wall
Orange yarn cones or orange cellophane shaped into cones
Green pipe cleaners for carrot tops
Fishing line or string for hanging
Collage materials, tissue paper, stickers (optional)
Back to Top
The Great Egg Hunt
Build an over-sized Easter scene, wall to wall
Bookmark
Installations
The Set Up
Create giant egg shapes cut from cardboard. The bigger the better! We're talking 60 to 80cm tall. Freehand is more than fine for these because eggs are a very forgiving shape, and I think the wobbly ones have just as much charm as perfect ovals. Add oversized bunny silhouettes too if you're feeling ambitious!
For the hanging carrots, grab orange plastic yarn cones (craft stores or opp shops) and twist green pipe cleaners into the tops for leaves. Hang them from the ceiling with fishing line and suddenly you've got carrots dangling at kid height everywhere.
Appliance boxes from your local whitegoods store are the best source for large, sturdy cardboard. You can also ask at IKEA... they always have a stack out the back they're more than happy to give away.
Our metal stands have a heavy base and are perfect for attaching cardboard creations to. If you ever come across an old sign stand or the bases for the fancy velvet ropes at the movies, then snatch them up!
Lay out bright paints, big brushes, sponges, and rollers so the artists can paint directly onto the cardboard shapes. As always, mix in a little white to your poster / tempera paint so the colours stay punchy. You could also offer collage materials, tissue paper, and stickers for layering.
The Making
Brushes get swapped for hands pretty quickly, and the eggs end up covered in wild colour combinations that no real egg could ever pull off. As always with our installations, each new day (or class) will bring a new energy and it will change in gorgeous ways across the week.
A tip for the week? Photograph the installation each afternoon before you leave. It changes so much day to day and that visual record of how it grows is gorgeous and celebrates the process most of all.
Variations
Add smaller egg shapes on paper for the artists who want to paint at the table rather than on the wall. Not everyone gravitates toward large scale work, and the table eggs can be cut out and added to the installation later.
Materials
Large sheets of cardboard (appliance boxes from IKEA or your local whitegoods store are perfect)
Cardboard scissors, MakeDo tools, or a box cutter (adults only)
Poster or tempera paints in bright Easter colours (mix in a little white to keep colours punchy on cardboard)
Big brushes, sponges, and rollers
Masking tape for securing shapes to the wall
Orange yarn cones or orange cellophane shaped into cones
Green pipe cleaners for carrot tops
Fishing line or string for hanging
Collage materials, tissue paper, stickers (optional)
Back to Top
Bunny Baskets
The ones they'll be so proud to carry on Easter morning!
Bookmark
Sculpture

The Set Up
Draw a bunny head shape (or any animal you like!) on cardboard and cut it out. About 25cm tall works well, big enough to hold a decent haul of chocolate but small enough for little arms to carry. Use that as a template to make a second identical one. A curved bottom edge works really well for stability. You'll also need a thick cardboard rectangle to join the two shapes together and form the base of the basket. Double-wall corrugated cardboard is ideal because the basket needs to hold its shape once it's loaded up with eggs. MakeDo tools, cardboard scissors, or a Chompshop Chompsaw all work for cutting.
The trickiest bit is attaching the rectangle base between the two bunny shapes. Hot glue gives the strongest join (adults do this part if you're supporting younger kids), but MakeDo screws work realy well too and let kids do the construction themselves. You'll just need to have extra cardboard rectangles for the joins on the inside of the basket. Tape tends to pull away once there's any weight in the basket, so we avoid it for the structural joins.
Have paint sticks, stickers, collage materials, beads, and ribbon laid out for decorating. We use paint sticks rather than liquid paint for these because cardboard warps when it gets wet, and paint sticks dry instantly so artists can build, decorate, and take it home in one session. A MakeDo hole puncher is brilliant because artists can punch holes around the ears or along the edges and thread ribbon through, or pop in fresh flowers later.


The Making
The building part is so satisfying! Lining up two shapes, figuring out how the rectangle connects them, working out how to make it stand. There's real problem-solving in this. For the very youngest artists, pre-assemble the basket shape and let them focus on decorating.
Every basket ends up wildly different. Stripes, polka dots, rainbow ears, flowers tucked into the holes. We always attach a ribbon handle at the end so they can carry them around, and the look on a kid's face when they realise they just built something they'll actually use on Easter Sunday... just the best. Ours survived a backyard hunt with a very enthusiastic four-year-old, chocolates and all.


Variations
Make them in different sizes! A tiny one for a chocolate egg or two, a big one for the full Easter hunt haul. You could also skip the bunny shape entirely and do chicks, or eggs, or a carrot basket.

Materials
Double-wall corrugated cardboard (thick enough to hold its shape when loaded with chocolate)
Cardboard scissors, MakeDo saw, or Chompsaw
MakeDo hole puncher Mini-tool
Paint sticks
Hot glue gun, low-temp (for adult use on structural joins) or PVA
Ribbon for handles
Collage materials: stickers, beads, sequins, pom poms
Fresh flowers or greenery (optional, for finishing)
Back to Top
Bunny Baskets
The ones they'll be so proud to carry on Easter morning!
Bookmark
Sculpture
The Set Up
Draw a bunny head shape (or any animal you like!) on cardboard and cut it out. About 25cm tall works well, big enough to hold a decent haul of chocolate but small enough for little arms to carry. Use that as a template to make a second identical one. A curved bottom edge works really well for stability. You'll also need a thick cardboard rectangle to join the two shapes together and form the base of the basket. Double-wall corrugated cardboard is ideal because the basket needs to hold its shape once it's loaded up with eggs. MakeDo tools, cardboard scissors, or a Chompshop Chompsaw all work for cutting.
The trickiest bit is attaching the rectangle base between the two bunny shapes. Hot glue gives the strongest join (adults do this part if you're supporting younger kids), but MakeDo screws work realy well too and let kids do the construction themselves. You'll just need to have extra cardboard rectangles for the joins on the inside of the basket. Tape tends to pull away once there's any weight in the basket, so we avoid it for the structural joins.
Have paint sticks, stickers, collage materials, beads, and ribbon laid out for decorating. We use paint sticks rather than liquid paint for these because cardboard warps when it gets wet, and paint sticks dry instantly so artists can build, decorate, and take it home in one session. A MakeDo hole puncher is brilliant because artists can punch holes around the ears or along the edges and thread ribbon through, or pop in fresh flowers later.
The Making
The building part is so satisfying! Lining up two shapes, figuring out how the rectangle connects them, working out how to make it stand. There's real problem-solving in this. For the very youngest artists, pre-assemble the basket shape and let them focus on decorating.
Every basket ends up wildly different. Stripes, polka dots, rainbow ears, flowers tucked into the holes. We always attach a ribbon handle at the end so they can carry them around, and the look on a kid's face when they realise they just built something they'll actually use on Easter Sunday... just the best. Ours survived a backyard hunt with a very enthusiastic four-year-old, chocolates and all.
Variations
Make them in different sizes! A tiny one for a chocolate egg or two, a big one for the full Easter hunt haul. You could also skip the bunny shape entirely and do chicks, or eggs, or a carrot basket.
Materials
Double-wall corrugated cardboard (thick enough to hold its shape when loaded with chocolate)
Cardboard scissors, MakeDo saw, or Chompsaw
MakeDo hole puncher Mini-tool
Paint sticks
Hot glue gun, low-temp (for adult use on structural joins) or PVA
Ribbon for handles
Collage materials: stickers, beads, sequins, pom poms
Fresh flowers or greenery (optional, for finishing)
Back to Top
Painted Eggs
The prettiest dozen you've ever seen
Bookmark
Painting & Drawing
The Set Up
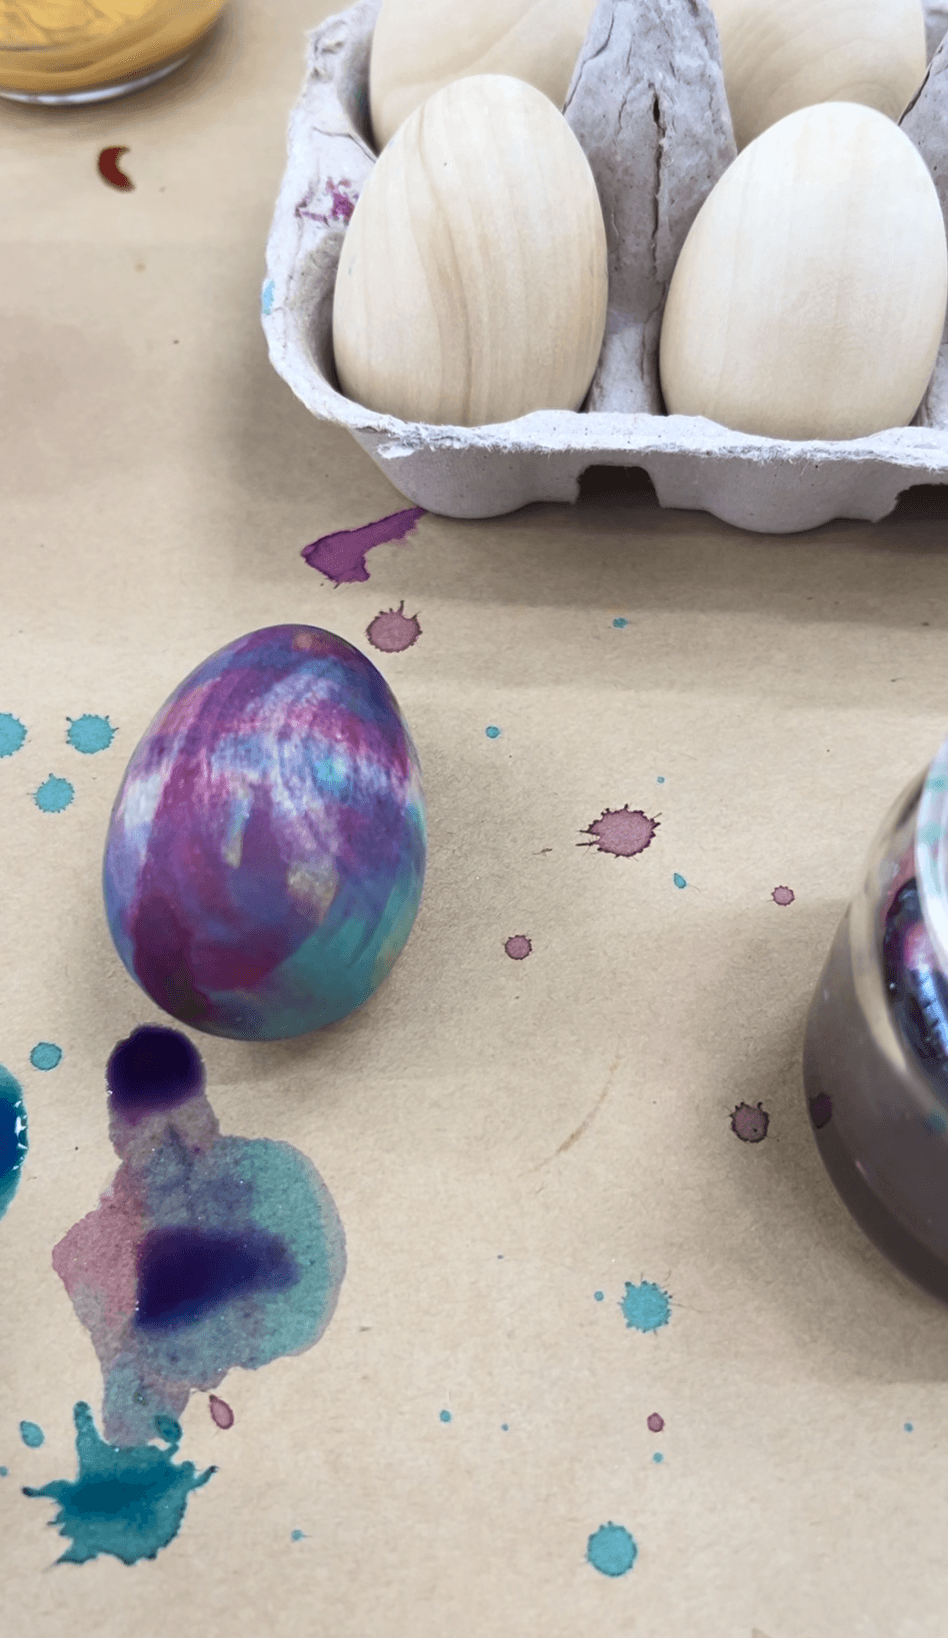
Source wooden eggs from Amazon or a craft supplier. Try to get ones close to the size of real chicken eggs (the tiny ones floating around at the moment are a bit fiddly, especially for smaller hands). You don't need to sand or prime them. Raw wood absorbs the watercolour beautifully and that's such a special part of the process!
Set each egg into an egg carton for painting. The carton keeps them steady and the whole setup looks like the most gorgeous invitation to jump in and create.
Lay out liquid watercolours in jars with pipettes, cotton tips, and fine brushes. If you haven't used liquid watercolours before, they're concentrated pigment, but not the same as food colouring (which I avoid as it stains everything). You can also use watercolour palettes and water.
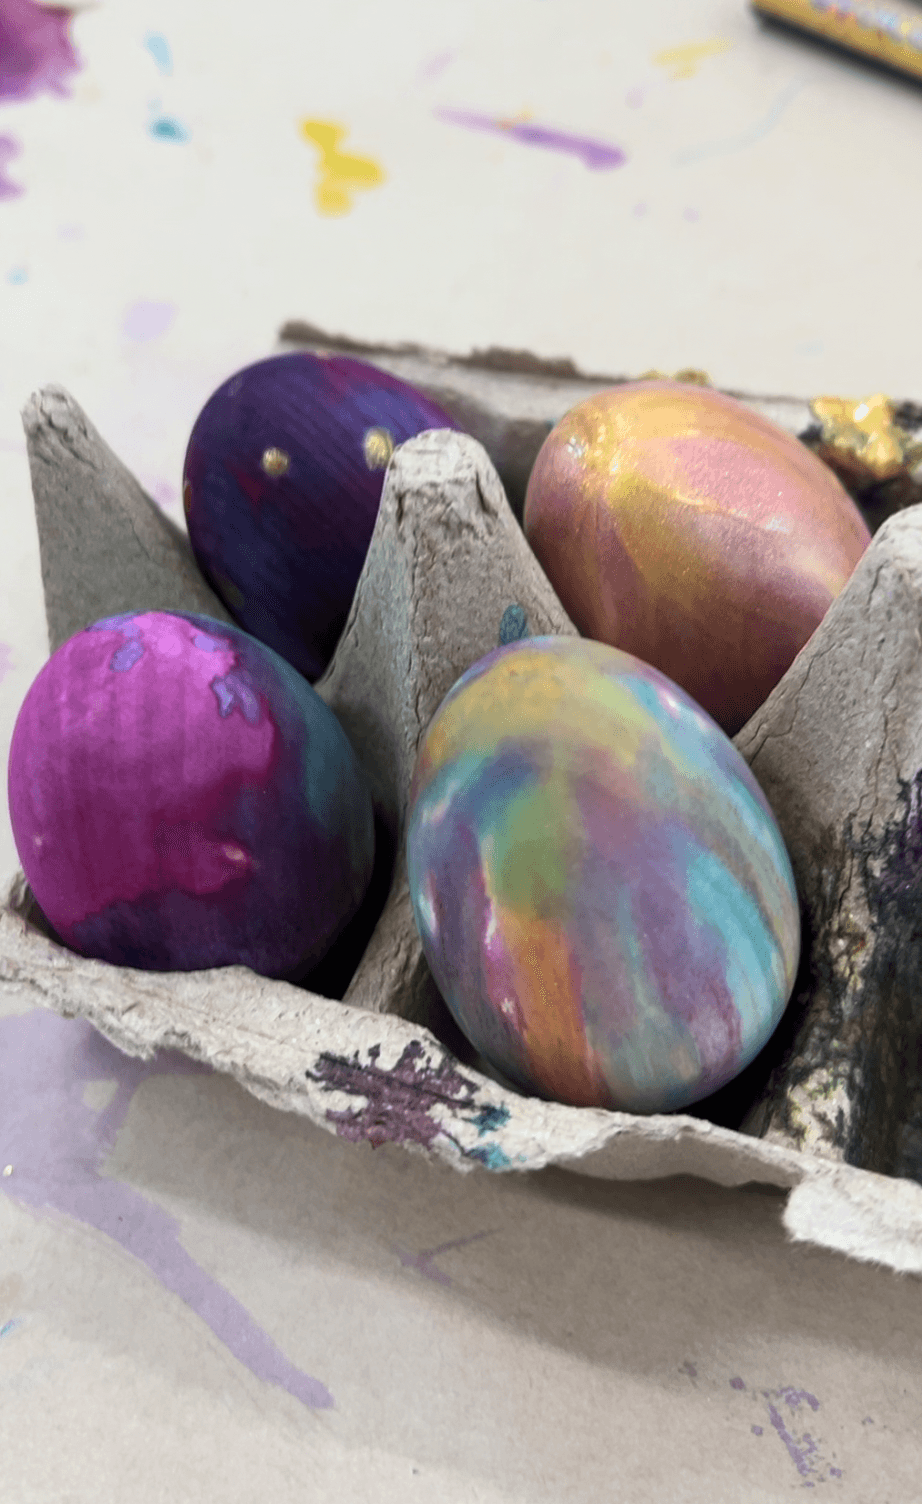
We also offer metallic gold and silver poster paint because the shimmer against the watercolour is stunning. Have a second empty carton ready for drying.


The Making
Liquid watercolour on wood behaves really differently to paper and that's what makes it interesting. The colour pools and bleeds and layers in ways you can't quite predict. It also dries faster than you'd expect, maybe ten minutes, so artists can go back in with a second layer or add metallics on top without a long wait.
Seal with a coat of Mod Podge (or any art sealant) once completely dry if you want them to last.

Variations
Try shaving foam marbling! Spread shaving foam flat on a tray, drop liquid watercolour across the surface, swirl gently with a skewer, then roll the wooden egg through. The marbled effect is gorgeous and completely unique every time. Fair warning: this gets messy quickly. Worth it!
Materials
Wooden eggs, chicken egg sized (no sanding or priming needed)
Egg cartons for holding during painting and drying
Liquid watercolours / watercolour palettes
Pipettes, cotton tips, fine brushes
Metallic gold and silver poster paint
Mod Podge for sealing, matte or gloss (optional)
Shaving foam, flat tray, and skewer (for marbling variation)
Drop cloth (marbling gets messy)
Back to Top
Painted Eggs
The prettiest dozen you've ever seen
Bookmark
Painting & Drawing
The Set Up
Source wooden eggs from Amazon or a craft supplier. Try to get ones close to the size of real chicken eggs (the tiny ones floating around at the moment are a bit fiddly, especially for smaller hands). You don't need to sand or prime them. Raw wood absorbs the watercolour beautifully and that's such a special part of the process!
Set each egg into an egg carton for painting. The carton keeps them steady and the whole setup looks like the most gorgeous invitation to jump in and create.
Lay out liquid watercolours in jars with pipettes, cotton tips, and fine brushes. If you haven't used liquid watercolours before, they're concentrated pigment, but not the same as food colouring (which I avoid as it stains everything). You can also use watercolour palettes and water.
We also offer metallic gold and silver poster paint because the shimmer against the watercolour is stunning. Have a second empty carton ready for drying.
The Making
Liquid watercolour on wood behaves really differently to paper and that's what makes it interesting. The colour pools and bleeds and layers in ways you can't quite predict. It also dries faster than you'd expect, maybe ten minutes, so artists can go back in with a second layer or add metallics on top without a long wait.
Seal with a coat of Mod Podge (or any art sealant) once completely dry if you want them to last.
Variations
Try shaving foam marbling! Spread shaving foam flat on a tray, drop liquid watercolour across the surface, swirl gently with a skewer, then roll the wooden egg through. The marbled effect is gorgeous and completely unique every time. Fair warning: this gets messy quickly. Worth it!
Materials
Wooden eggs, chicken egg sized (no sanding or priming needed)
Egg cartons for holding during painting and drying
Liquid watercolours / watercolour palettes
Pipettes, cotton tips, fine brushes
Metallic gold and silver poster paint
Mod Podge for sealing, matte or gloss (optional)
Shaving foam, flat tray, and skewer (for marbling variation)
Drop cloth (marbling gets messy)
Back to Top
Spin Art Gardland
Spin art on egg-shaped card, strung up and gorgeous
Bookmark
Painting & Drawing

The Set Up
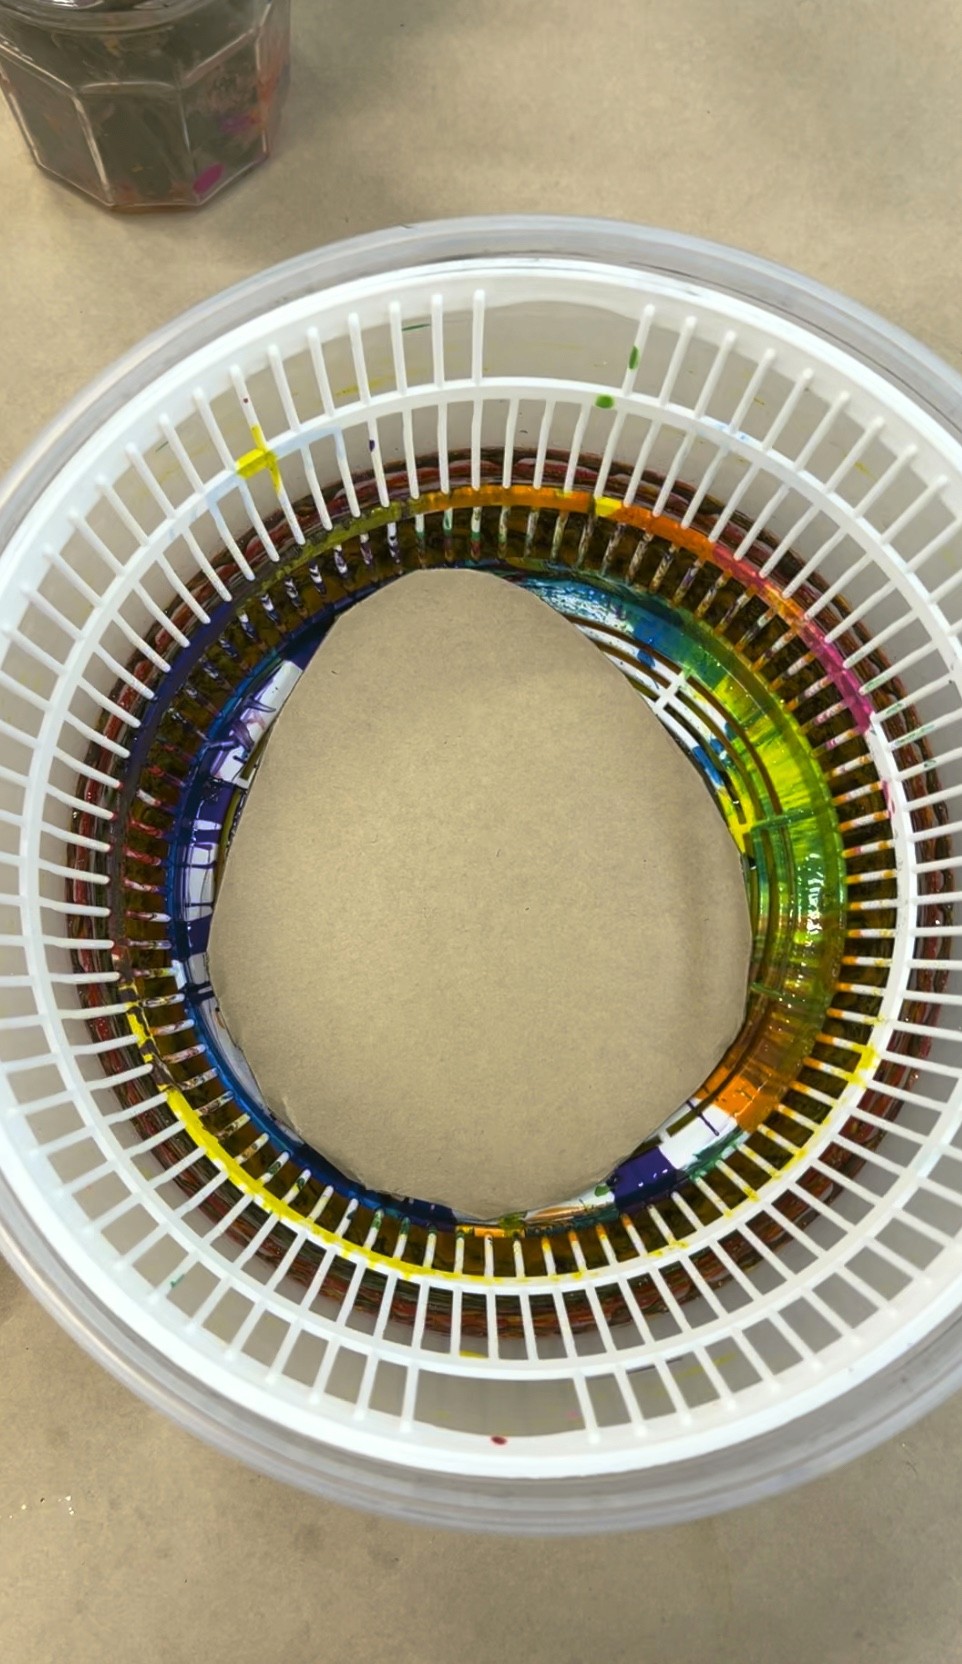
Cut egg shapes from thick card or watercolour paper (180gsm or above so the paint doesn't buckle). About 12 to 15cm tall works well for a garland. My best tip is to cut plenty! We prep about fifty before a session and run out every time.
Check the size of your salad spinner before you cut! The egg shapes need to sit flat inside the bowl. Most spinners fit a 12cm egg perfectly, but if you've got a smaller one, adjust. Also, if you are planning on hanging them up, punching holes before the paint is added is a good idea.
Set up your salad spinner (the best $8 art tool in existence) with poster or tempera paints in squeeze bottles.


The Making
Pop an egg shape into the spinner, squeeze in two or three colours, close the lid, and spin. Lifting the lid is magic! Every single one comes out different, and the patterns look far more sophisticated than the ten seconds of spinning that made them.
Two things that can make a big difference: use paint straight from the bottle, don't water it down, and only squeeze in a small amount. A 5-cent-coin sized blob per colour is plenty.
Kids will find out quickly with experimentation that if they squeeze too much paint then they'll get a muddy puddle instead of defined swirls. But either way is great and it's all learning and play!
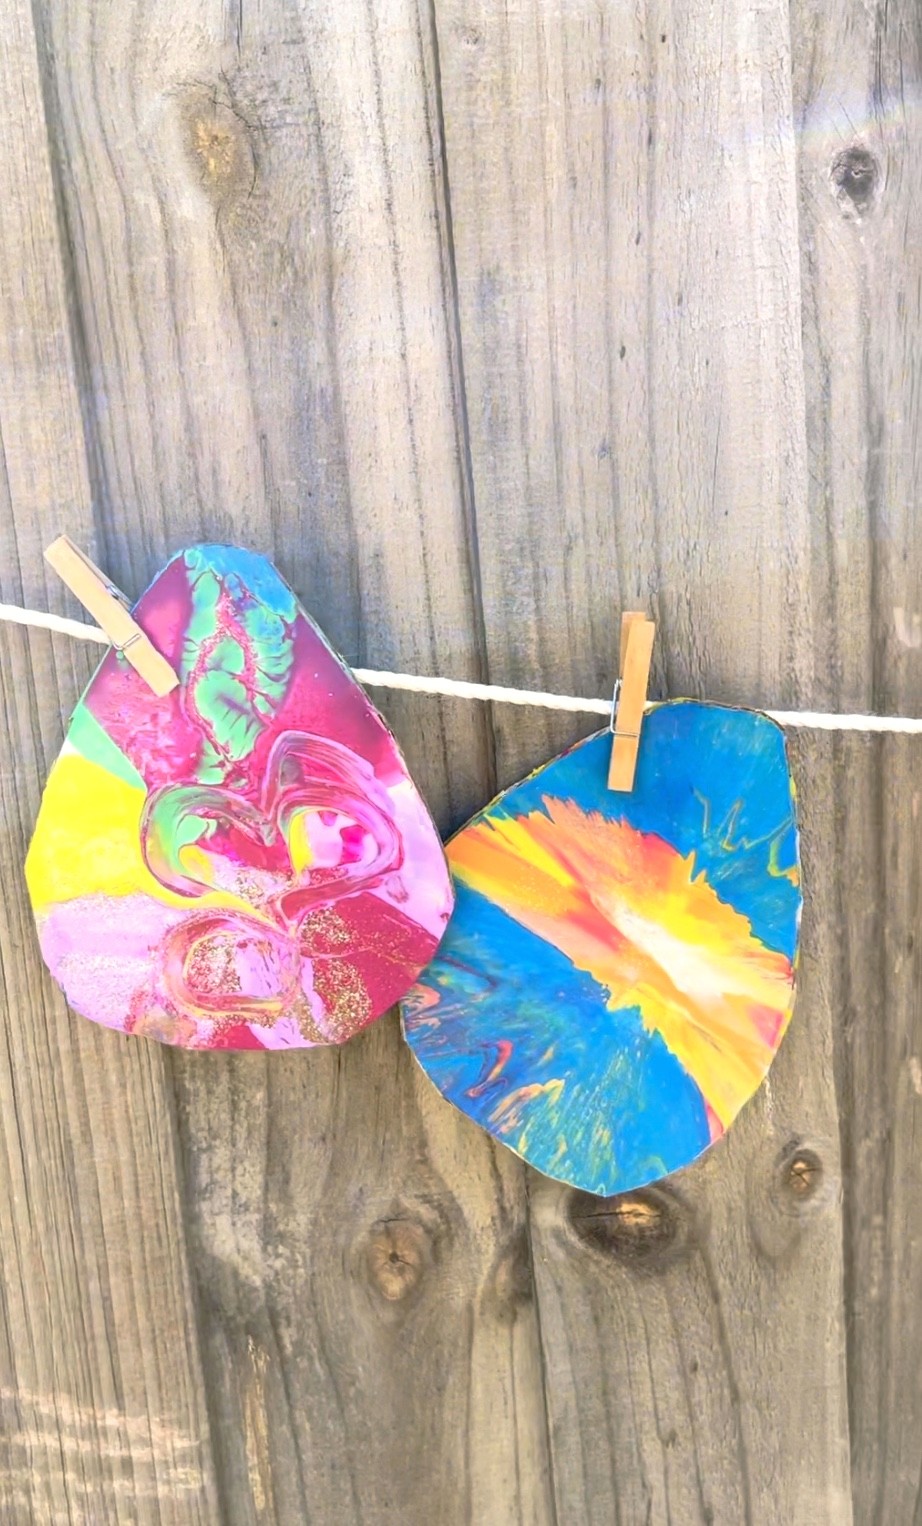
We like to lay them out across the table as they dry. The collection builds quickly and watching the colours multiply as more and more eggs cover the table is so satisfying. Thread onto string or ribbon and hang your garland across the room, along a window, or above the Easter table.


Variations
Add glitter to the paint before spinning for extra sparkle!
Or try cutting bunny or carrot shapes instead of eggs for a mixed garland.


Materials
Thick card or watercolour paper (180gsm+)
Egg shape template (about 12-15cm tall, sized to fit your spinner)
Salad spinner
Poster or tempera paints in squeeze bottles (undiluted)
Hole punch
String, ribbon, or twine for stringing
Scissors
Glitter (optional)
Back to Top
Spin Art Gardland
Spin art on egg-shaped card, strung up and gorgeous
Bookmark
Painting & Drawing
The Set Up
Cut egg shapes from thick card or watercolour paper (180gsm or above so the paint doesn't buckle). About 12 to 15cm tall works well for a garland. My best tip is to cut plenty! We prep about fifty before a session and run out every time.
Check the size of your salad spinner before you cut! The egg shapes need to sit flat inside the bowl. Most spinners fit a 12cm egg perfectly, but if you've got a smaller one, adjust. Also, if you are planning on hanging them up, punching holes before the paint is added is a good idea.
Set up your salad spinner (the best $8 art tool in existence) with poster or tempera paints in squeeze bottles.
The Making
Pop an egg shape into the spinner, squeeze in two or three colours, close the lid, and spin. Lifting the lid is magic! Every single one comes out different, and the patterns look far more sophisticated than the ten seconds of spinning that made them.
Two things that can make a big difference: use paint straight from the bottle, don't water it down, and only squeeze in a small amount. A 5-cent-coin sized blob per colour is plenty.
Kids will find out quickly with experimentation that if they squeeze too much paint then they'll get a muddy puddle instead of defined swirls. But either way is great and it's all learning and play!
We like to lay them out across the table as they dry. The collection builds quickly and watching the colours multiply as more and more eggs cover the table is so satisfying. Thread onto string or ribbon and hang your garland across the room, along a window, or above the Easter table.
Variations
Add glitter to the paint before spinning for extra sparkle!
Or try cutting bunny or carrot shapes instead of eggs for a mixed garland.
Materials
Thick card or watercolour paper (180gsm+)
Egg shape template (about 12-15cm tall, sized to fit your spinner)
Salad spinner
Poster or tempera paints in squeeze bottles (undiluted)
Hole punch
String, ribbon, or twine for stringing
Scissors
Glitter (optional)
Back to Top
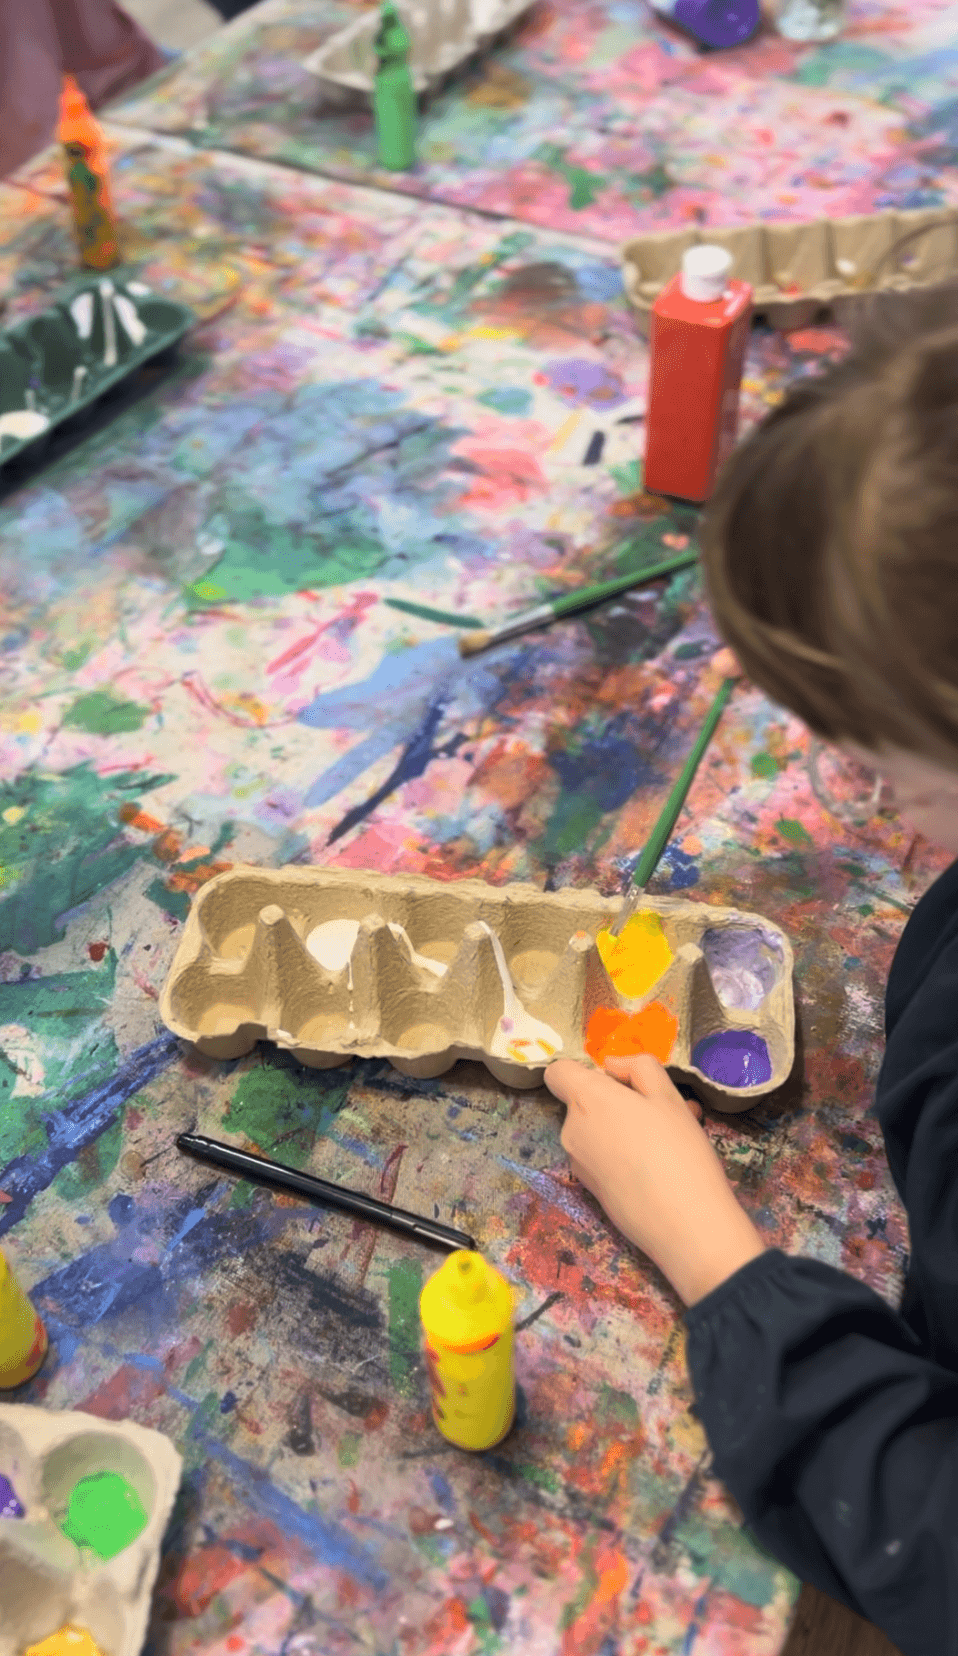
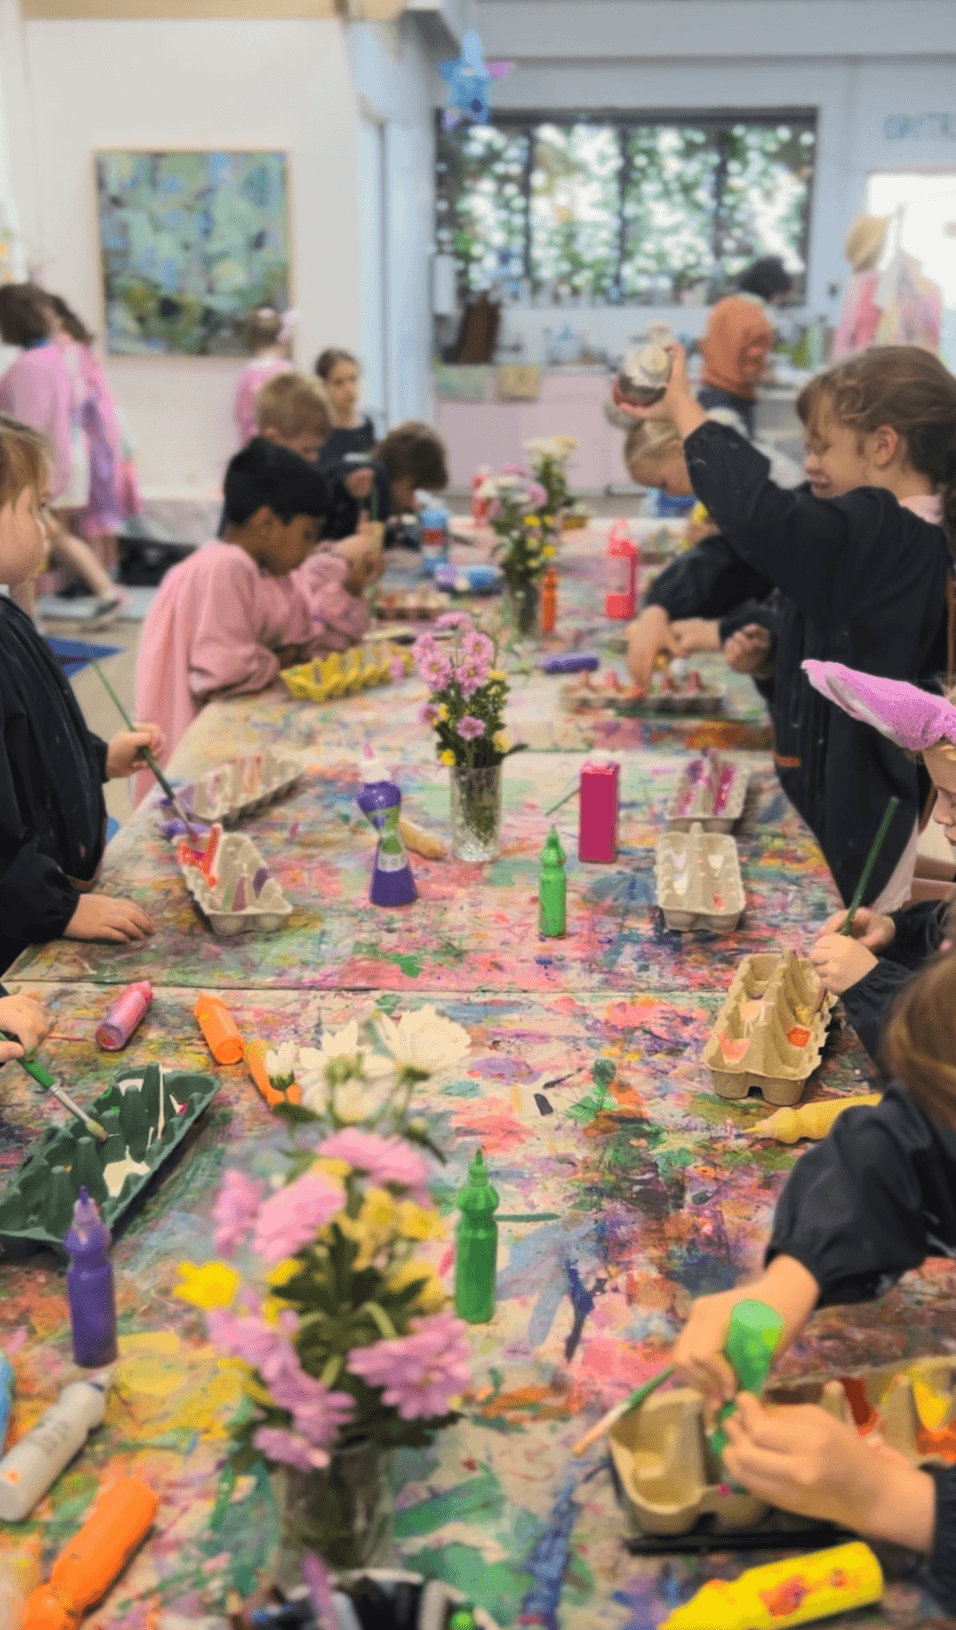
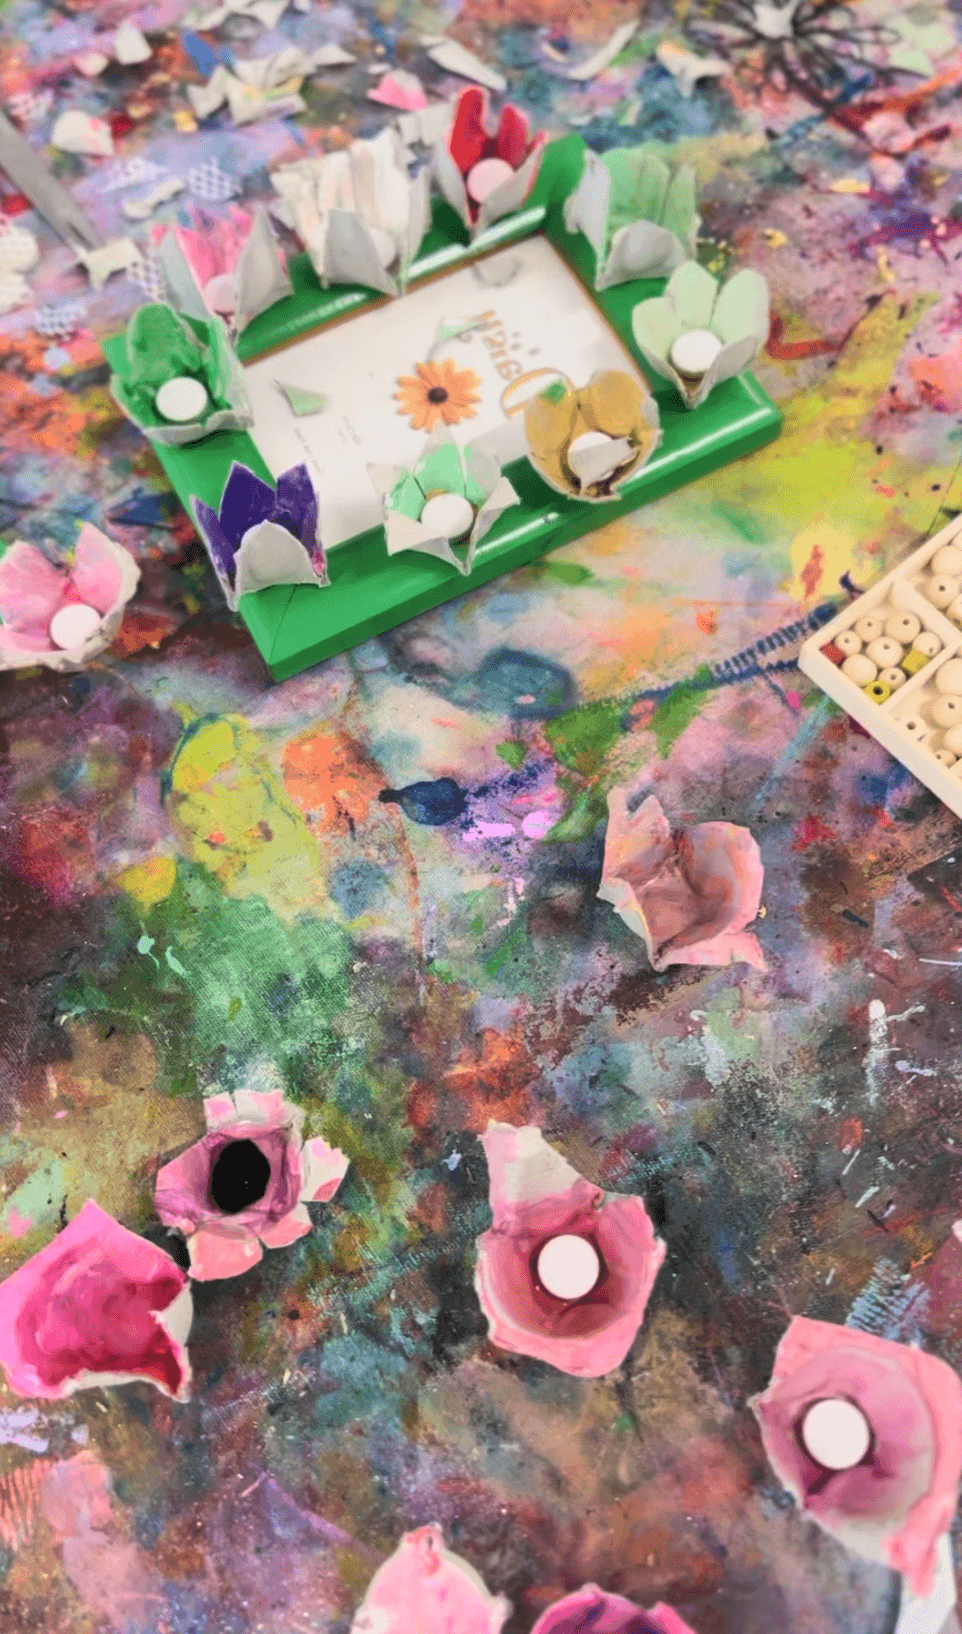
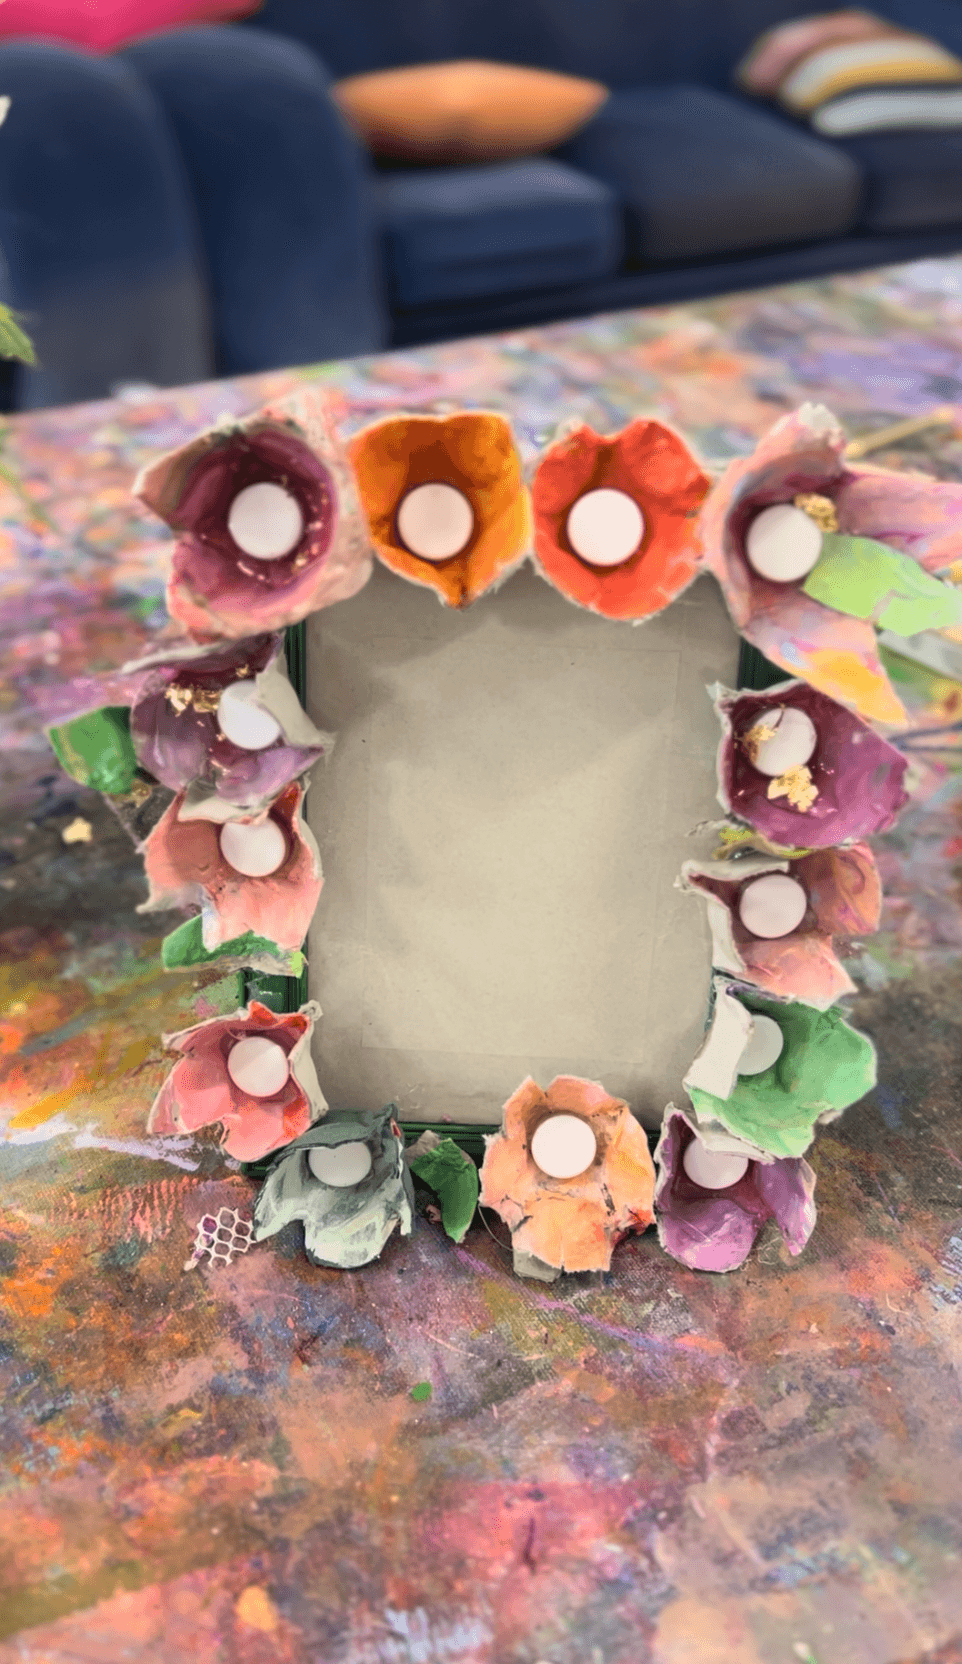
Easter Frames
Egg cartons, opp shop frames, and a whole lot of colour
Bookmark
Collage

The Set Up
You'll need more egg cartons than you think! About two to three per frame. Start saving a couple of weeks in advance, or ask families to bring theirs in.
Collect old frames from opp shops or thrift stores (we raided three on a single Saturday and came home with a carload for about $15). The chunkier the frame the better because there's more surface to glue onto. Spray paint them for a fresh look, or leave them as is, or let the kids paint them a base colour. We love the look of a green with bright painted cups on top, but it's completely up to you.

The Making
Start by using the egg cartons like a paint palette. Mix interesting colours directly into the cups and build up a range. This is the fun bit because every cup ends up slightly different and is a great way to discuss colour theroy.
Once the paint is dry, cut out the individual cups and shape them further if you like... trimming the edges into petal shapes or zigzags or eggs or insects.
Now the arranging. Lay the painted shapes around the frame, move them, swap them, try different combinations. Add pom poms, sequins, mosaic tiles, beads. Build up the composition until it feels full and interesting.
Hot glue for speed if you're working on a tight time frame (use a low-temp gun for safety around little hands). PVA works too if you've got time to leave them overnight. But honestly the hot glue is worth it for the instant satisfaction and it holds the pieces better.
Then the frames are ready for a gorgeous piece of art work or photo!


Variations
Skip the frame and arrange the painted egg carton shapes directly onto a canvas or thick card for a garden collage instead.
Or go three-dimensional and build a wreath shape from a bent wire coat hanger, threading and gluing the cups around it. Hang it on the front door!


Materials
Egg cartons (about 2-3 cartons per frame)
Scissors
Poster or tempera paints for colour mixing
Old frames from opp shops or thrift stores (chunky ones work best)
Spray paint (optional, adults only)
Acrylic paints and brushes
Hot glue gun, low-temp (or PVA if you have overnight drying time)
Pom poms, sequins, mosaic tiles, beads
Palette or paper plates for mixing
Wire coat hanger (for wreath variation)
Back to Top
Easter Frames
Egg cartons, opp shop frames, and a whole lot of colour
Bookmark
Collage
The Set Up
You'll need more egg cartons than you think! About two to three per frame. Start saving a couple of weeks in advance, or ask families to bring theirs in.
Collect old frames from opp shops or thrift stores (we raided three on a single Saturday and came home with a carload for about $15). The chunkier the frame the better because there's more surface to glue onto. Spray paint them for a fresh look, or leave them as is, or let the kids paint them a base colour. We love the look of a green with bright painted cups on top, but it's completely up to you.
The Making
Start by using the egg cartons like a paint palette. Mix interesting colours directly into the cups and build up a range. This is the fun bit because every cup ends up slightly different and is a great way to discuss colour theroy.
Once the paint is dry, cut out the individual cups and shape them further if you like... trimming the edges into petal shapes or zigzags or eggs or insects.
Now the arranging. Lay the painted shapes around the frame, move them, swap them, try different combinations. Add pom poms, sequins, mosaic tiles, beads. Build up the composition until it feels full and interesting.
Hot glue for speed if you're working on a tight time frame (use a low-temp gun for safety around little hands). PVA works too if you've got time to leave them overnight. But honestly the hot glue is worth it for the instant satisfaction and it holds the pieces better.
Then the frames are ready for a gorgeous piece of art work or photo!
Variations
Skip the frame and arrange the painted egg carton shapes directly onto a canvas or thick card for a garden collage instead.
Or go three-dimensional and build a wreath shape from a bent wire coat hanger, threading and gluing the cups around it. Hang it on the front door!
Materials
Egg cartons (about 2-3 cartons per frame)
Scissors
Poster or tempera paints for colour mixing
Old frames from opp shops or thrift stores (chunky ones work best)
Spray paint (optional, adults only)
Acrylic paints and brushes
Hot glue gun, low-temp (or PVA if you have overnight drying time)
Pom poms, sequins, mosaic tiles, beads
Palette or paper plates for mixing
Wire coat hanger (for wreath variation)
Back to Top
The Nest Sensory Play
A tiny Easter world to get lost in
Bookmark
Sensory Play

The Set Up
A low tub or tray works perfectly here. Set it on the floor or a very low table so even the smallest artists can stand at it comfortably, or sit beside it and reach in. Green split peas make the most gorgeous base for this one... they look like little eggs and the colour is perfect for a nest. Pour in enough to cover the bottom of the tray generously.
Scatter in little fluffy chicks (the craft store ones that appear every Easter are adorable and cheap), small nests, mini foam eggs in pastel colours, felt birds, little bunnies, and wooden eggs if you have them. Kmart, Daiso, and the dollar shops are your best friends for stocking a tray like this. We spend maybe $10 to $15 on bits and pieces and it lasts the whole week.
The trick is layering textures: the smooth pour of the split peas, the softness of the felt animals, the weight of the wooden eggs. That mix is what keeps hands coming back. Include scoops, small cups, tongs, and tiny baskets for sorting and collecting. A few real twigs and leaves from the garden tucked around the edges finishes the whole thing off... it makes it feel a bit wild.
Then stand back! Sensory play is the best because it doesn't need direction and it's the kids and the materials that tell the story.

Variations
Add playdough in pastel colours so artists can make their own eggs, nests, and creatures.
For a completely different feel, try shredded paper or raffia instead of the split peas for the base.
Materials
Low tub or tray
Green split peas
Small fluffy chicks
Mini nests (craft store or handmade from twigs)
Mini foam eggs in pastel colours
Felt birds and bunnies
Wooden eggs
Scoops, small cups, tongs, tiny baskets
Real twigs and leaves from the garden
Playdough in pastel colours (optional)
Back to Top
The Nest Sensory Play
A tiny Easter world to get lost in
Bookmark
Sensory Play
The Set Up
A low tub or tray works perfectly here. Set it on the floor or a very low table so even the smallest artists can stand at it comfortably, or sit beside it and reach in. Green split peas make the most gorgeous base for this one... they look like little eggs and the colour is perfect for a nest. Pour in enough to cover the bottom of the tray generously.
Scatter in little fluffy chicks (the craft store ones that appear every Easter are adorable and cheap), small nests, mini foam eggs in pastel colours, felt birds, little bunnies, and wooden eggs if you have them. Kmart, Daiso, and the dollar shops are your best friends for stocking a tray like this. We spend maybe $10 to $15 on bits and pieces and it lasts the whole week.
The trick is layering textures: the smooth pour of the split peas, the softness of the felt animals, the weight of the wooden eggs. That mix is what keeps hands coming back. Include scoops, small cups, tongs, and tiny baskets for sorting and collecting. A few real twigs and leaves from the garden tucked around the edges finishes the whole thing off... it makes it feel a bit wild.
Then stand back! Sensory play is the best because it doesn't need direction and it's the kids and the materials that tell the story.
Variations
Add playdough in pastel colours so artists can make their own eggs, nests, and creatures.
For a completely different feel, try shredded paper or raffia instead of the split peas for the base.
Materials
Low tub or tray
Green split peas
Small fluffy chicks
Mini nests (craft store or handmade from twigs)
Mini foam eggs in pastel colours
Felt birds and bunnies
Wooden eggs
Scoops, small cups, tongs, tiny baskets
Real twigs and leaves from the garden
Playdough in pastel colours (optional)
Back to Top
